


1.安装create-react-app
npm install -g create-react-app2.创建项目
create-react-app multifypages3.进入项目目录
cd multifypages4.
npm start现在react的应用页面已经可以运行起来了
5.然后进入src/App.js 用一下内容替换掉原有内容
import React, { Component } from 'react';
import './App.css';

class App extends Component {
  render() {
    return (
      <div className="App">
        <div className="App-header">
          <h2>Welcome to App1</h2>
        </div>
        <p className="App-intro">
          To get started, edit <code>src/App.js</code> and save to reload.
        </p>
      </div>
    );
  }
}

export default App;
6.将 index.js 中的 内容替换为如下代码(删除registerServiceWorker)
import React from 'react';
import ReactDOM from 'react-dom';
import './index.css';
import App from './App';
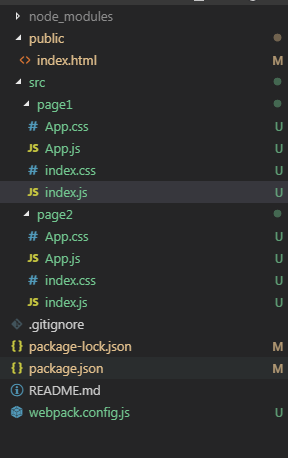
ReactDOM.render(<App />, document.getElementById('root'));7.然后删除src下面的registerServiceWorker.js(该文件用于构建pwa应用用的,暂时我们用不了)和 logo.svg文件(不想处理图片文件)和 App.test.js(用于测试用的)。然后在src下建2个文件夹,将src下的App.css、App.js、index.css、index.js分别粘贴进去 并且在根目录下 新建webpack.config.js文件 目录如下
8.将以下内容 贴到webpack.config.js文件中
const webpack = require('webpack');
const glob = require('glob');
const path = require('path');
const HtmlWebpackPlugin = require('html-webpack-plugin');
const ExtractTextPlugin = require('extract-text-webpack-plugin');
const CleanWebpackPlugin = require('clean-webpack-plugin');

const webpackConfig = {
    entry: {},
    output:{
        path:path.resolve(__dirname, './dist/'),
        filename:'[name]/[name].[chunkhash:6].js'
    },
    //设置开发者工具的端口号,不设置则默认为8080端口
    devServer: {
        inline: true,
        port: 8082
    },
    module:{
        rules:[
            {
                test:/\.js?$/,
                exclude:/node_modules/,
                loader:'babel-loader',
                query:{
                    presets:['es2015','react']
                }
            },
            {
                test: /\.(scss|sass|css)$/,
                loader: ExtractTextPlugin.extract({fallback: "style-loader", use: "css-loader"})
            },

        ]
    },
    plugins: [
        new ExtractTextPlugin("[name]/[name].[chunkhash:6].css"),
        new CleanWebpackPlugin(
            ['dist'],
            {
                root: __dirname,
                verbose:  true,
                dry:      false
            }
        )
    ],
};

// 获取指定路径下的入口文件
function getEntries(globPath) {
    const files = glob.sync(globPath),
      entries = {};
    files.forEach(function(filepath) {
        const split = filepath.split('/');
        const name = split[split.length - 2];
        entries[name] = './' + filepath;
    });
    return entries;
}

const entries = getEntries('src/**/index.js');

Object.keys(entries).forEach(function(name) {
   webpackConfig.entry[name] = entries[name];
   const plugin = new HtmlWebpackPlugin({
       filename: name + '/' + name + '.html',
       template: './public/index.html',
       inject: true,
       chunks: [name]
   });
   webpackConfig.plugins.push(plugin);
})

module.exports = webpackConfig;
9.将package.json文件中的devDependencies部分和scripts部分用下面的文件替代
{
  "name": "recmultify",
  "version": "0.1.0",
  "private": true,
  "dependencies": {
    "react": "^16.8.6",
    "react-dom": "^16.8.6",
    "react-scripts": "2.1.8"
  },
  "devDependencies": {
    "babel-core": "^6.26.0",
    "babel-loader": "^7.1.2",
    "babel-preset-es2015": "^6.24.1",
    "babel-preset-react": "^6.24.1",
    "clean-webpack-plugin": "^0.1.16",
    "css-loader": "^0.28.7",
    "extract-text-webpack-plugin": "^3.0.0",
    "file-loader": "^1.0.0",
    "glob": "^7.1.2",
    "html-webpack-plugin": "^2.30.1",
    "postcss-loader": "^2.0.6",
    "style-loader": "^0.18.2",
    "url-loader": "^0.5.9",
    "webpack": "^3.5.6",
    "webpack-dev-server": "^2.8.1"
  },
  "scripts": {
    "start": "webpack-dev-server --open",
    "build": "webpack"
  },
  "eslintConfig": {
    "extends": "react-app"
  },
  "browserslist": [
    ">0.2%",
    "not dead",
    "not ie <= 11",
    "not op_mini all"
  ]
}
10.进入public文件下,删除favicon.ico和 manifest.json(构建pwa用的),然后将index.html中的内容用如下内容替换
<!DOCTYPE html>
<html lang="en">
  <head>
    <meta charset="utf-8" />
    <meta
      name="viewport"
      content="width=device-width, initial-scale=1, shrink-to-fit=no"
    />
    <meta name="theme-color" content="#000000" />
    <title>React App</title>
  </head>
  <body>
    <noscript>You need to enable JavaScript to run this app.</noscript>
    <div id="root"></div>
  </body>
</html>
11.删除当前目录中的node_modules,重新npm install生成
12.npm run build 生成dist目录以及对应文件夹page1 page2以及内容 想要运行其中的内容 例如 打开page1文件夹 直接点击page1.html就可以访问(要是用的是HBuilder或者webstorm的话) 如果用的是vscode安装view in browser 就用Alt+B打开当前页面

13.如果自己要本地启用,可以 npm run start,然后在http://localhost:8082/page1/page1.html查看页面进行调试
如果要是运行不起来 可以访问我的github地址 克隆下来比对配置 https://github.com/create13/multify/tree/master/recmultify


 2505
2505


 被折叠的 条评论
为什么被折叠?
被折叠的 条评论
为什么被折叠?
 到【灌水乐园】发言


