


上一篇博客当中,我们将模块插入内核以后,在dev目录没有相应的设备文件的生成,我们需要手动的去查看这个驱动程序对应的主设备号,然后用mknod手动的创建设备文件,然后进行相应的读和写,这次,记录下使用相关api来生成这个设备文件的方法。
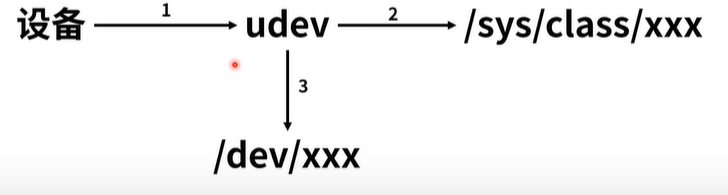
linux当中有一个后台程序udev,当有设备插入时,这个设备的属性会被记录在、/sys/class/xxx目录下,然后系统根据相关的属性信息,在dev目录下生成相关的设备文件。
以下是相关的api
/*
    class_create()      //创建类  会在/sys/class/下创建文件夹
    class_destroy()

    device_create()     //在我们创建的类下创建设备,有了这步就会在/dev生成设备节点
    device_destroy()
*/
我们再来看看是如何使用这些api的。
#include<linux/module.h>
#include<linux/fs.h>
#include<linux/cdev.h>
#include<linux/slab.h>
#include <linux/device.h>

#define HELLO_MAJOR 0
#define HELLO_NR_DEVS 2

int hello_major = HELLO_MAJOR;
int hello_minor = 0;

//高12位是主设备号,低20位是次设备号
dev_t devt;

int hello_nr_devs = HELLO_NR_DEVS;

module_param(hello_major, int, S_IRUGO);
module_param(hello_minor, int, S_IRUGO);
module_param(hello_nr_devs, int, S_IRUGO);

struct hello_char_dev {
    struct cdev cdev;
    char c;
};

struct hello_char_dev *hc_devp;
struct class *hc_cls;

int hc_open(struct inode *inode, struct file *filp) {
    printk(KERN_INFO "open hc_dev%d %d\n",iminor(inode),MINOR(inode->i_cdev->dev));
    return 0;
}

ssize_t hc_read(struct file *filp, char __user *buf, size_t count,loff_t *f_pos) {
    printk(KERN_INFO "read hc_dev\n");
    return 0;
}

ssize_t hc_write(struct file *filp, const char __user *buf, size_t count,loff_t *f_pos) {
    printk(KERN_INFO "write hc_dev\n");
    return count;
}

int hc_release(struct inode *inode, struct file *filp) {
    printk(KERN_INFO "release hc_dev\n");
    return 0;
}

/*字符设备的操作函数*/
struct file_operations hc_fops = {
    .owner =    THIS_MODULE,
    .read =     hc_read,
    .write =    hc_write,
    .open =     hc_open,
    .release =  hc_release,
};


static int __init hello_init(void) {
    int ret,i;
    if(hello_major) {
        devt = MKDEV(hello_major,hello_minor);
        ret = register_chrdev_region(devt,hello_nr_devs,"hello_chr");
    }
    else {
        ret = alloc_chrdev_region(&devt,hello_minor,hello_nr_devs,"hello_chr");
        hello_major = MAJOR(devt);
    }

    if (ret < 0) {
        printk(KERN_WARNING "hello: can't get major %d\n", hello_major);
        goto fail;
    }

    hc_devp = kzalloc(sizeof(struct hello_char_dev)*hello_nr_devs, GFP_KERNEL);
    if(!hc_devp) {
        printk(KERN_WARNING "alloc mem failed");
        ret = -ENOMEM;
        goto failure_kzalloc;
    }
    for(i = 0; i < hello_nr_devs; i++) {
        cdev_init(&hc_devp[i].cdev,&hc_fops);
        hc_devp[i].cdev.owner = THIS_MODULE;
        ret = cdev_add(&hc_devp[i].cdev,MKDEV(hello_major, hello_minor + i), 1);
        if(ret) {
            printk(KERN_WARNING"fail add hc_dev%d",i);
        }
    }

    /*创建设备文件,注意用法*/
    hc_cls = class_create(THIS_MODULE, "hc_dev");
    if(!hc_cls) {
        printk(KERN_WARNING"fail create class");
        ret = PTR_ERR(hc_cls);
        goto failure_class;
    }
    for(i = 0; i < hello_nr_devs; i++) {
        device_create(hc_cls, NULL, MKDEV(hello_major, hello_minor + i), NULL, "hc_de%d",i);
    }

    return 0;

failure_class:
    kfree(hc_devp);
failure_kzalloc:
    unregister_chrdev_region(devt,hello_nr_devs);
fail:
    return ret;
}

static void __exit hello_exit(void) {
    int i;
    for(i=0;i<hello_nr_devs;i++){
        device_destroy(hc_cls,MKDEV(hello_major,hello_minor+i));
    }
    class_destroy(hc_cls);
    for(i=0;i<hello_nr_devs;i++) {
        cdev_del(&hc_devp[i].cdev);
    }
    kfree(hc_devp);
    unregister_chrdev_region(devt,hello_nr_devs);
}

module_init(hello_init);
module_exit(hello_exit);

MODULE_LICENSE("GPL");
MODULE_AUTHOR("XXX");
MODULE_VERSION("V1");
后续通过查看dev目录可以看到相应的设备文件。
当然了,如果要想实现真正的读写还需要特定的api才行。


 1万+
1万+


 被折叠的 条评论
为什么被折叠?
被折叠的 条评论
为什么被折叠?
 到【灌水乐园】发言


