


1 设置背景

 background: url("../../assets/images/login_bg.webp") no-repeat;
  background-size: cover;
  overflow: hidden;
2 下拉框
 <el-form-item prop="schoolId">
                <el-select v-model="loginForm.schoolId" clearable placeholder="请选择学校">
                  <el-option v-for="item in schoolId" :key="item.id" :label="item.schoolName" :value="item.id" />
                </el-select>
              </el-form-item>


  created () {
    this.identifyCode = ""
    schoolList().then(res => {
      this.schoolId = res.data || []
    })
  },
可清空单选
包含清空按钮,可将选择器清空为初始状态
为el-select设置clearable属性,则可将选择器清空。需要注意的是,clearable属性仅适用于单选。
3加载

 <el-form-item style="width: 100%">
                <el-button :loading="loading" size="medium" type="primary" style="width: 100%; margin-top: 20px" @click.native.prevent="handleLogin">
                  <span v-if="!loading">登 录</span>
                  <span v-else>登 录 中...</span>
                </el-button>
              </el-form-item>


   handleLogin () {
      this.$refs.loginForm.validate(valid => {
        if (valid) {
          this.loading = true
          this.$store.dispatch('Login', this.loginForm).then(() => {
            this.loading = false
            this.$router.push({ path: this.redirect || "/" }).catch(() => { })
          }).catch((e) => {
            this.loading = false
          })
        } else {
          return false
        }
      })
    }
4登录成功之后重定向到redirect
这段代码主要是为了登录后,恢复至重定向之前的页面。
watch: {
    $route: {
      handler: function(route) {
        this.redirect = route.query && route.query.redirect
      },
      immediate: true
    }
  },

  //登录成功方法里
   this.$router.push({ path: this.redirect || "/" }).catch(() => { })
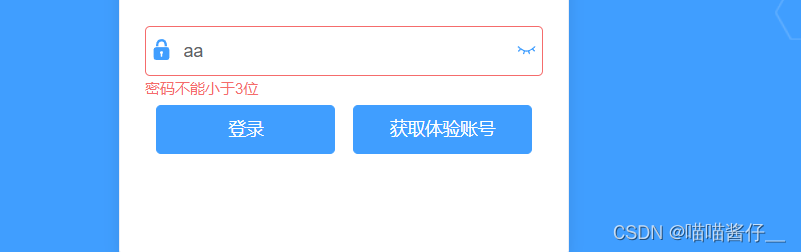
5展示密码
6 验证码
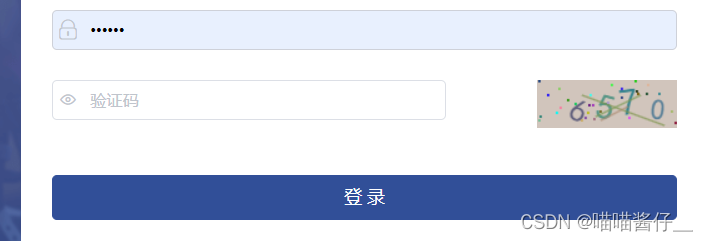
其他类型的验证码:
vue中实现验证码_vue验证码组件_疆~的博客-CSDN博客
7 autocomplete=“off”
 <el-form-item prop="code" v-if="isCode">
          <el-input
            v-model="loginForm.code"
            auto-complete="off"
            placeholder="验证码"
            style="width: 63%"
            @keyup.enter.native="handleLogin"
            maxlength="4"
          >
            <!-- <svg-icon slot="prefix" icon-class="validCode"
                            class="el-input__icon input-icon" /> -->
            <i slot="prefix" class="iconfont iconchakan"></i>
          </el-input>
          <div class="login-code" @click="refreshCode">
            <SIdentify :identifyCode="identifyCode"></SIdentify>
          </div>
        </el-form-item>
需求:前端开发过程中,遇到类似新增账号功能时,表单中的账号和密码就会自动填充,怎么阻止在这种情况呢,需要用到autocomplete属性。
普通文本框使用:autocomplete=“off”,密码框使用:autocomplete="new-password
1<el-input v-model="userForm.userName" placeholder="请输入" maxlength="100" autocomplete="off"/>
2<el-input v-model="userForm.password" placeholder="请输入" show-password autocomplete="new-password"/>
如果是整个表单禁止自动填充,给表单增加autocomplete=“off”


 326
326

 被折叠的 条评论
为什么被折叠?
被折叠的 条评论
为什么被折叠?
 到【灌水乐园】发言


