


要点
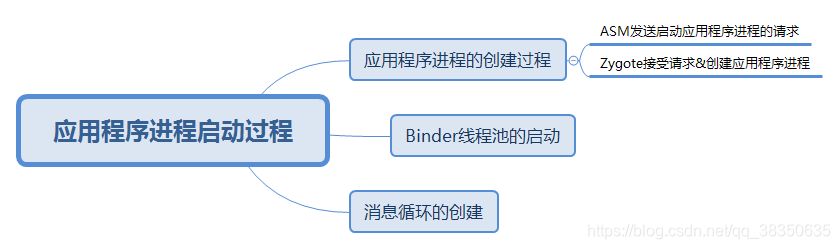
应用程序进程的启动过程
Zygote的Java框架层中会创建一个Server端的Socket,这个Socket用来等待AMS请求Zygote来创建新的应用程序进程。Zygote进程通过fock自身创建应用程序进程,这样应用程序进程就会获得Zygote进程在启动时创建的虚拟机实例。当然,在应用程序进程创建过程中除了获取虚拟机实例外,还创建了Binder线程池和消息循环,这样运行在应用进程中的应用程序就可以方便地使用Binder进行进程间通信以及处理消息了。
启动一个应用程序,要保证这个应用程序所需要的应用程序进程已经启动。AMS在启动应用程序时检查这个应用程序需要的应用程序进程是否存在,不存在就请求Zygote进程启动需要的应用程序进程。应用进程启动过程主要分为两步:
- AMS发送启动应用程序进程请求
- Zygote接收请求并创建应用程序进程
AMS发送启动应用程序进程请求
AMS会通过调用startProcessLocked方法向Zygote进程发送请求。
#时序图
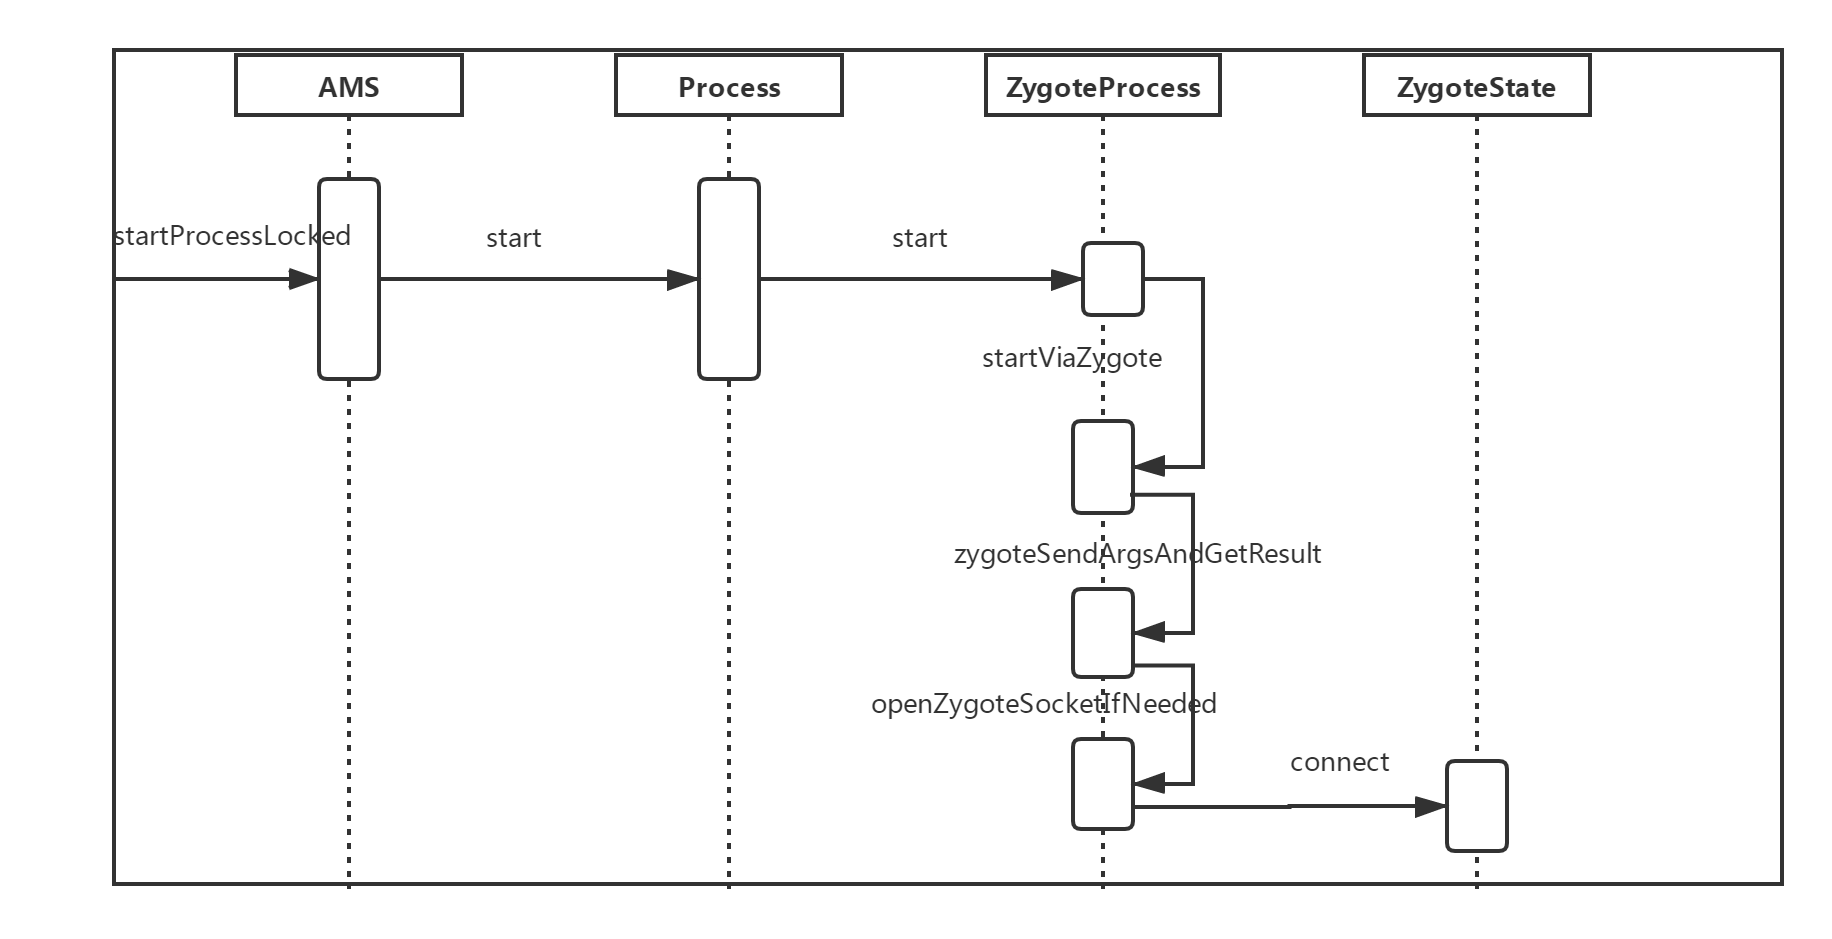
AMS#startProcessLocked
    private final void startProcessLocked(ProcessRecord app, String hostingType,
            String hostingNameStr, String abiOverride, String entryPoint, String[] entryPointArgs) {
···

       try {
            try {

                final int userId = UserHandle.getUserId(app.uid);
                AppGlobals.getPackageManager().checkPackageStartable(app.info.packageName, userId);
            } catch (RemoteException e) {
                throw e.rethrowAsRuntimeException();
            }
            //1、获取要创建应用程序进程的用户id
            int uid = app.uid;
            int[] gids = null;
            ···

            //2、对gid (用户组id)进行创建和赋值
            if (ArrayUtils.isEmpty(permGids)) {
                    gids = new int[3];
                } else {
                    gids = new int[permGids.length + 3];
                    System.arraycopy(permGids, 0, gids, 3, permGids.length);
                }
                gids[0] = UserHandle.getSharedAppGid(UserHandle.getAppId(uid));
                gids[1] = UserHandle.getCacheAppGid(UserHandle.getAppId(uid));
                gids[2] = UserHandle.getUserGid(UserHandle.getUserId(uid));
                ...
                //3、entryPoint 的值就是应用程序主线程的类名
             if (entryPoint == null) entryPoint = "android.app.ActivityThread";
             ...
             // 4、通过Process.start启动应用程序进程
              startResult = Process.start(entryPoint,
                        app.processName, uid, uid, gids, debugFlags, mountExternal,
                        app.info.targetSdkVersion, seInfo, requiredAbi, instructionSet,
                        app.info.dataDir, invokeWith, entryPointArgs);
#ZygoteProcess.java#openZygoteSocketIfNeeded
   @GuardedBy("mLock")
    private ZygoteState openZygoteSocketIfNeeded(String abi) throws ZygoteStartFailedEx {
        Preconditions.checkState(Thread.holdsLock(mLock), "ZygoteProcess lock not held");

        if (primaryZygoteState == null || primaryZygoteState.isClosed()) {
            try {
                //1、与zygote 进程进行socket 连接,并返回信息封装在ZygoteState对象中
                primaryZygoteState = ZygoteState.connect(mSocket);
            } catch (IOException ioe) {
                throw new ZygoteStartFailedEx("Error connecting to primary zygote", ioe);
            }
        }
       //2、zygote 进程返回的ZygoteState 是否与应用进程所需要的abi匹配
        if (primaryZygoteState.matches(abi)) {
            return primaryZygoteState;
        }

        // The primary zygote didn't match. Try the secondary.
        if (secondaryZygoteState == null || secondaryZygoteState.isClosed()) {
            try {
                secondaryZygoteState = ZygoteState.connect(mSecondarySocket);
            } catch (IOException ioe) {
                throw new ZygoteStartFailedEx("Error connecting to secondary zygote", ioe);
            }
        }

        if (secondaryZygoteState.matches(abi)) {
            return secondaryZygoteState;
        }
         // 匹配不成功,返回异常。匹配成功时 Zygote 的socket 就收到ZygoteState 了
        throw new ZygoteStartFailedEx("Unsupported zygote ABI: " + abi);
    }
ZygoteProcess类用于保持与Zygote进程的通信状态,具体是通过ZygoteProcess的静态内部类ZygoteState的connect进行的socket 连接 。
Socket连接成功并匹配ABI后会返回ZygoteState类型对象。zygoteSendArgsAndGetResult 会将应用进程的启动参数argsForZygote写入ZygoteState中,这样Zygote进程就会收到一个创建新的应用程序进程的请求。
Zygote接收请求并创建应用程序进程
通过《Android 系统启动-Zygote进程启动过程》我们知道Zygote进程启动时会在ZygoteInit.java 的main方法中调用ZygoyeSever的runSelectLoop方法来不断轮询处理AMS发送来的消息。接下来便分析下Zygote接收请求并创建应用程序进程的流程。
#时序图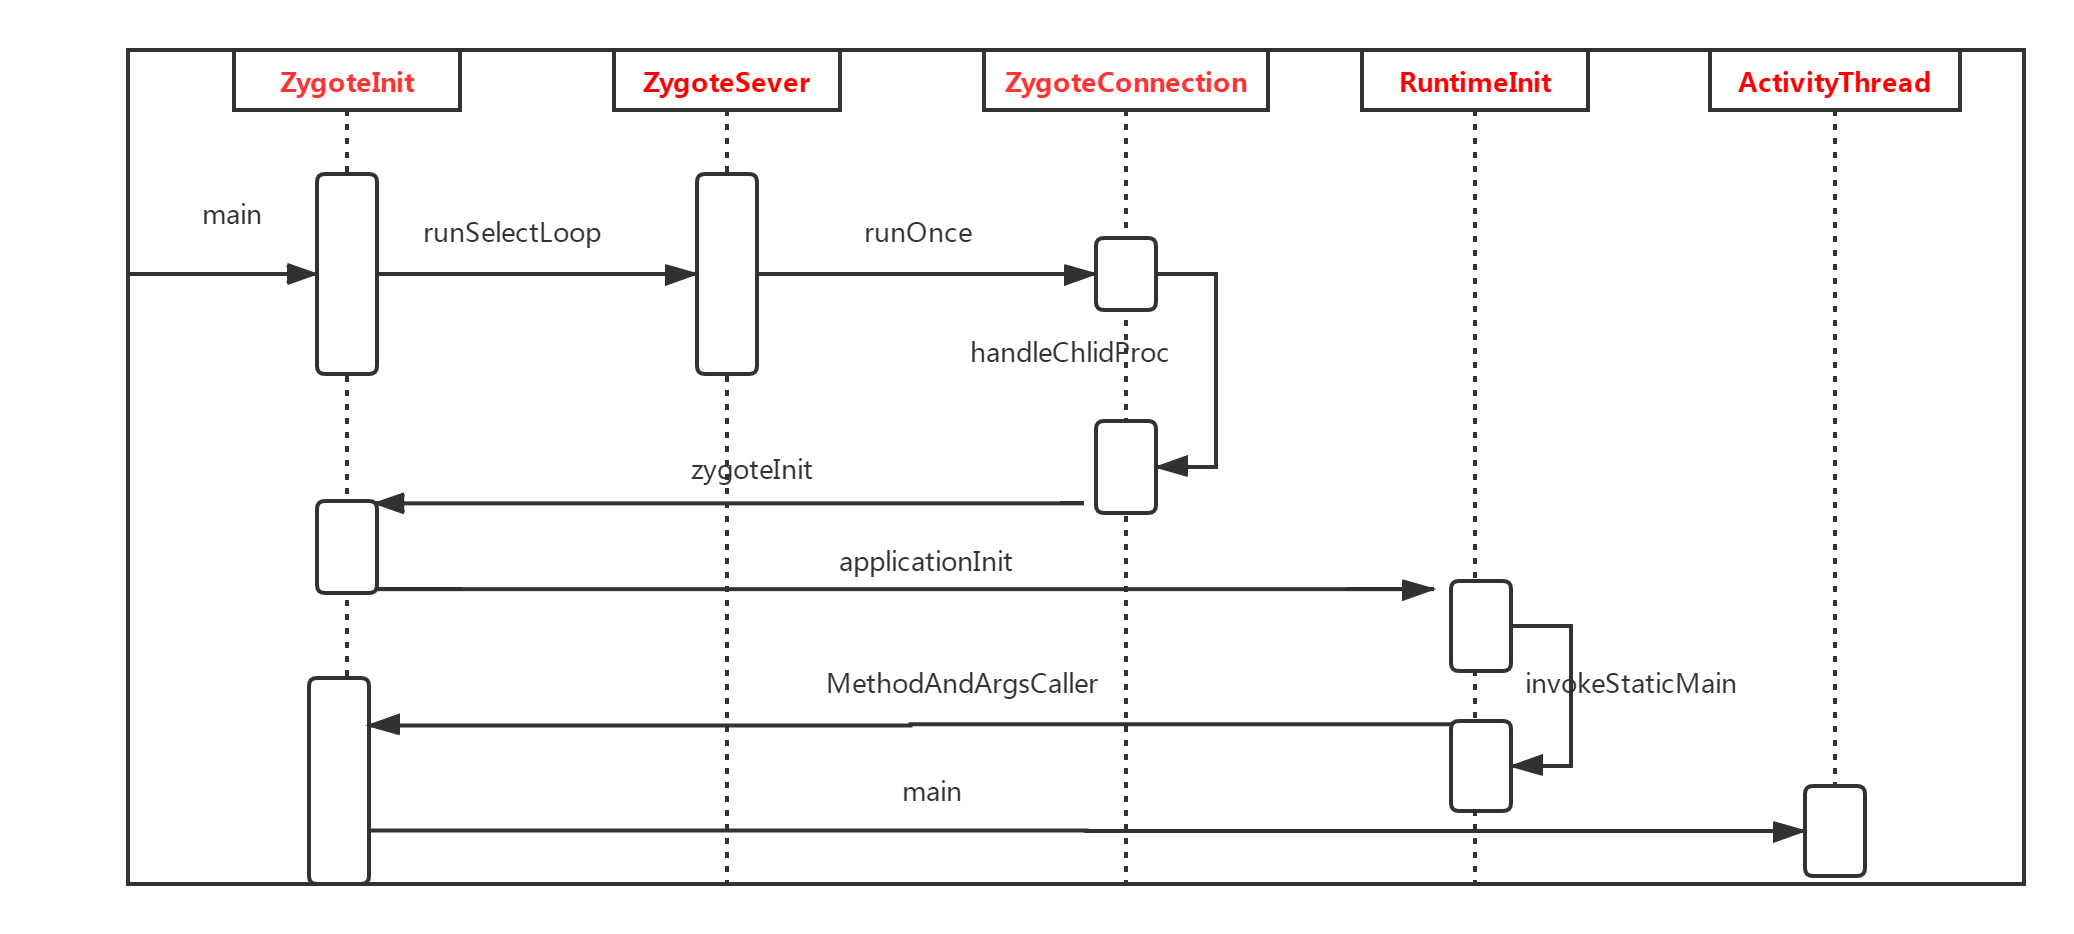
ZygoteConnect#runOnce
两个进程中,原先就存在的那个被称作“父进程”,新出现的那个被称作“子进程”。父子进程的区别除了进程标志符(process ID)不同外,变量pid的值也不相同,pid存放的是fork的返回值。fork调用的一个奇妙之处就是它仅仅被调用一次,却能够返回两次,它可能有三种不同的返回值:
- 在父进程中,fork返回新创建子进程的进程ID;
- 在子进程中,fork返回0;
- 如果出现错误,fork返回一个负值;
  boolean runOnce(ZygoteServer zygoteServer) throws Zygote.MethodAndArgsCaller {
        String args[];
        Arguments parsedArgs = null;
        FileDescriptor[] descriptors;

        try {
           //1、获取应用进程的启动参数
            args = readArgumentList();
            descriptors = mSocket.getAncillaryFileDescriptors();
        } catch (IOException ex) {
            Log.w(TAG, "IOException on command socket " + ex.getMessage());
            closeSocket();
            return true;
        }
  ...
  // 2、将读取到的args字符串数组封装到Arguments对象中
    parsedArgs = new Arguments(args);


  ...
  //3、创建应用进程,返回进程id
  //内部通过fork当前进程来创建一个子进程。
   pid = Zygote.forkAndSpecialize(parsedArgs.uid, parsedArgs.gid, parsedArgs.gids,
                    parsedArgs.debugFlags, rlimits, parsedArgs.mountExternal, parsedArgs.seInfo,
                    parsedArgs.niceName, fdsToClose, fdsToIgnore, parsedArgs.instructionSet,
                    parsedArgs.appDataDir);

  ...
  //4、pid为0,当前代码逻辑运行在新创建的子进程中。这时fork成功,处理子进程。
             if (pid == 0) {
                // in child
                zygoteServer.closeServerSocket();
                IoUtils.closeQuietly(serverPipeFd);
                serverPipeFd = null;
                // 处理应用程序进程
                handleChildProc(parsedArgs, descriptors, childPipeFd, newStderr);

                // should never get here, the child is expected to either
                // throw Zygote.MethodAndArgsCaller or exec().
                return true;
            } else {
                // in parent...pid of < 0 means failure
                IoUtils.closeQuietly(childPipeFd);
                childPipeFd = null;
                return handleParentProc(pid, descriptors, serverPipeFd, parsedArgs);
            }


}
ZygoyeInit#zygote
这里主要做了两件事:
- 通过调用ZygoteInit.nativeZygoteInit开启Binder线程池
- 通过调用Runtime.applicationInit方法进行后续的流程处理。
RuntimeInit#invkeStaticMain
这里主要是通过反射获取ActivityThread的main方法然后抛出Zygote的MethodAndArgsCaller异常
    private static void invokeStaticMain(String className, String[] argv, ClassLoader classLoader)
            throws Zygote.MethodAndArgsCaller {
        Class<?> cl;

        try {
        //1、获得ActivityThread类
            cl = Class.forName(className, true, classLoader);
        } catch (ClassNotFoundException ex) {
            throw new RuntimeException(
                    "Missing class when invoking static main " + className,
                    ex);
        }

        Method m;
        try {
            // 2、获取ActivityThread的main方法
            m = cl.getMethod("main", new Class[] { String[].class });
        } catch (NoSuchMethodException ex) {
            throw new RuntimeException(
                    "Missing static main on " + className, ex);
        } catch (SecurityException ex) {
            throw new RuntimeException(
                    "Problem getting static main on " + className, ex);
        }

        int modifiers = m.getModifiers();
        if (! (Modifier.isStatic(modifiers) && Modifier.isPublic(modifiers))) {
            throw new RuntimeException(
                    "Main method is not public and static on " + className);
        }

        /*
         * This throw gets caught in ZygoteInit.main(), which responds
         * by invoking the exception's run() method. This arrangement
         * clears up all the stack frames that were required in setting
         * up the process.
         */
         // 3、将main方法传入Zygote中的MethodAndArgsCaller类的构造方法中
        throw new Zygote.MethodAndArgsCaller(m, argv);
        //MethodAndArgsCaller异常会被Zygote的main方法捕获,
        //至于这里为何采用了抛出异常而不是直接调用ActivityThread的main方法,
        //原理和Zygote处理SystemServer进程是一样的,
        //这种抛出异常的处理会清除所有的设置过程需要的堆栈帧,
        //并让ActivityThread的main方法看起来像是应用程序进程的入口方法
    }
ZygoteInit#main
run 方法内部通过反射调用ActivityThread的main方法,这样应用进程的创建工作也完成了,ActivityThread就是应用进程主线程的管理类也被开启。
try{
 ...
} catch (Zygote.MethodAndArgsCaller caller) {
//执行MethodAndArgsCaller的run方法
            caller.run();
        } catch (Throwable ex) {
            Log.e(TAG, "System zygote died with exception", ex);
            zygoteServer.closeServerSocket();
            throw ex;
        }
Binder线程池启动过程
ZygoteInit类的zygoteInit方法中会通过调用ZygoteInit.nativeZygoteInit的native方法开启Binder线程池。具体是通过调用ProcessState的spawnPooledThread函数来创建线程池中的第一个线程,也就是线程池的主线程。
#时序图
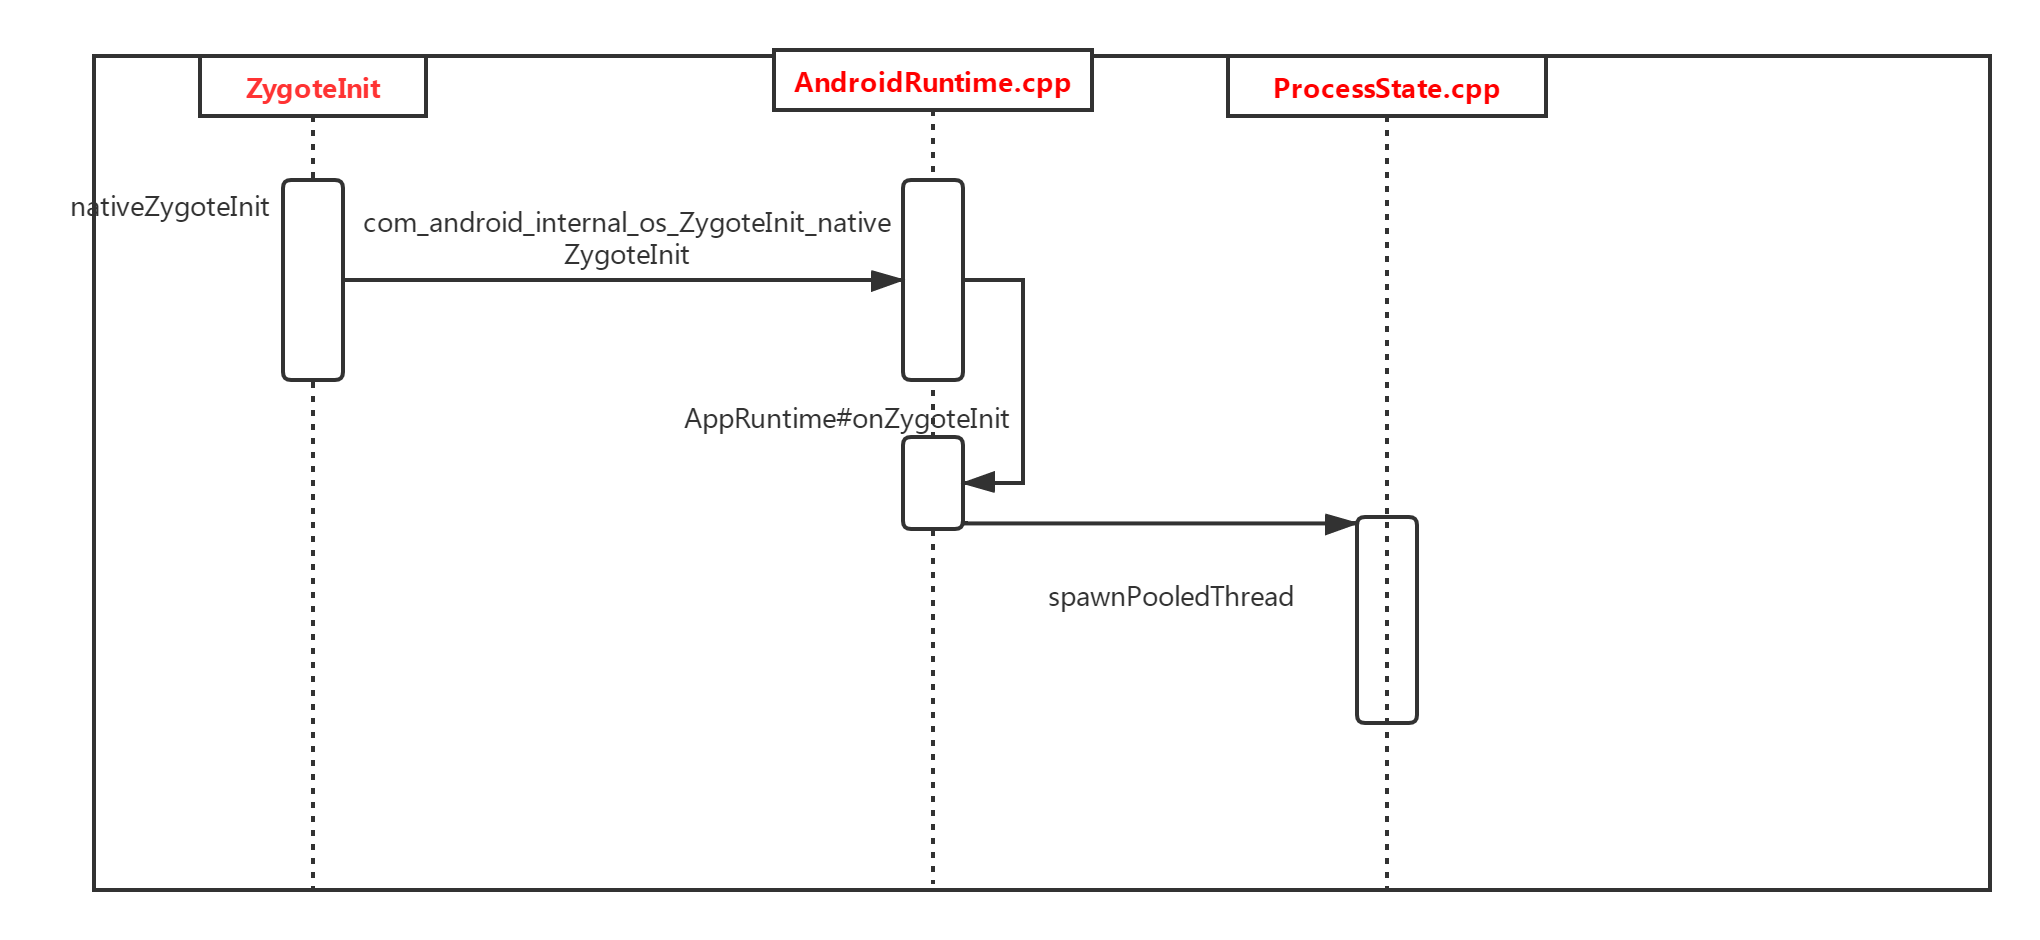
ProcessState#spawnPooledThread
class PoolThread : public Thread
{
public:
    explicit PoolThread(bool isMain)
        : mIsMain(isMain)
    {
    }

    //3、调用IPCThreadState的joinThreadPool函数,将当前线程注册到Binder驱动程序中,
    //这样我们创建的线程就加入了Binder线程池中,新创建的应用程序进程就支持
    //Binder进程间通信了
protected:
    virtual bool threadLoop()
    {
        IPCThreadState::self()->joinThreadPool(mIsMain);
        return false;
    }

    const bool mIsMain;
};
...

void ProcessState::spawnPooledThread(bool isMain)
{
    if (mThreadPoolStarted) {
        String8 name = makeBinderThreadName();
        ALOGV("Spawning new pooled thread, name=%s\n", name.string());
        //1、创建Binder线程。Binder线程是一个PoolThread 类。
        sp<Thread> t = new PoolThread(isMain);
        // 2、启动线程
        t->run(name.string());
    }
}
这里我们只需要创建当前进程的Binder对象,并将它注册到ServiceManager中就可以实现Binder进程间通信,而不必关心进程间是如何通过Binder进行通信的。
消息循环创建过程
在应用进程启动完毕后会通过调用ActivityThread类的main方法来管理当前应用程序的主线程。
ActivityThread#main
    public static void main(String[] args) {
      ...

        // 1、创建主线程的Looper
        Looper.prepareMainLooper();
        //2、创建ActivityThread类
        ActivityThread thread = new ActivityThread();
        thread.attach(false);

        if (sMainThreadHandler == null) {
        // 3、创建主线程的H类,处理主线程消息。(H继承了Handler)
            sMainThreadHandler = thread.getHandler();
        }

        if (false) {
            Looper.myLooper().setMessageLogging(new
                    LogPrinter(Log.DEBUG, "ActivityThread"));
        }

        // End of event ActivityThreadMain.
        Trace.traceEnd(Trace.TRACE_TAG_ACTIVITY_MANAGER);
        //4、开启死循环,不断轮询消息。
        Looper.loop();

        throw new RuntimeException("Main thread loop unexpectedly exited");
    }
系统在应用程序进程启动完成后,就会创建一个消息循环,这样运行在应用程序进程中的应用程序可以方便地使用消息处理机制。
The end
参考:
安卓进阶解密:微信读书版


 159
159


 被折叠的 条评论
为什么被折叠?
被折叠的 条评论
为什么被折叠?
 到【灌水乐园】发言


