


前言:记录一次使用cropper.js+react实现图片裁剪上传的过程、源码、遇到的bug和解决方案。
github地址![]() https://github.com/fengyuanchen/cropperjs
https://github.com/fengyuanchen/cropperjs
官网地址![]() https://fengyuanchen.github.io/cropperjs/
https://fengyuanchen.github.io/cropperjs/
官网示例地址![]() https://fengyuanchen.github.io/photo-editor/
https://fengyuanchen.github.io/photo-editor/
开发过程:
一、cropper.js的引入
import 'cropperjs/dist/cropper.css';
import CropperJs from 'cropperjs';
注:css及js均需引入
二、创建img元素并设置样式
const ref = useRef();

<div className={styles.cropper}>
    <img ref={ref} alt=""/>
</div>

.cropper {
  display: flex;
  align-items: center;
  justify-content: center;
  height: 60%;
  margin-bottom: 20px;
  img {
    max-width: 100%;
    max-height: 100%;
  }
}
注:img将作为用于裁剪的目标图像或画布元素,你可以预设src作为目标图像,或者也可以通过replace(url[, hasSameSize])去替换更新目标图像。
另外,cropper.js将挂载在img的父级元素下。所以你需要将img放置在块级元素下,并设置img的最大宽高。
三、初始化实例并根据文档及需求配置你的options
const [cropper, setCropper] = useState(); // 存储cropper对象
useEffect(() => {
  const myCropper = new CropperJs(ref.current, {
    viewMode: 1,
    dragMode: 'move',
    aspectRatio: LONG / WIDE,
    autoCropArea: 0.9,
    highlight: false,
    cropBoxResizable: false,
    toggleDragModeOnDblclick: false,
  });
  setCropper(myCropper);
}, [])
四、使用Upload用于目标图片的选择
import { UploadOutlined } from '@ant-design/icons';
import { Upload } from 'antd';
import { Button } from 'antd-mobile';

const [image, setImage] = useState(); // 记录图片,没有图片时toBlob会报错

const replaceImg = (img) => {
  setImage(undefined);
  // 通过FileReader读取用户选取的图片
  const reader = new FileReader();
  reader.readAsDataURL(img);
  //加载图片后获取到图片的base64格式
  reader.onload = ({ target: { result } = {} }) => {
    //更新替换为目标图片
    cropper.replace(result);
    setImage(img);
  };
  return false;
};

<Upload fileList={[]} beforeUpload={replaceImg} accept="image/*">
  <Button className={styles.upload} icon={<UploadOutlined />}>
    选择图片
  </Button>
</Upload>
五、裁剪后图片的获取及上传
const [loading, setLoading] = useState(false); // 记录上传的状态

const onSubmit = () => {
  if (image) {
    setLoading(true);
    // 获取HTMLCanvasElement.toBlob获取blob,并通过FormData上传至服务器
    cropper
      .getCroppedCanvas({
        width: LONG,
        maxWidth: LONG, // maxWidth、maxHeight必须设置,原因见:遇到的bug和解决方案
        height: WIDE,
        maxHeight: WIDE, // maxWidth、maxHeight必须设置,原因见:遇到的bug和解决方案
      })
      .toBlob((blob) => {
        setLoading(false);
        if (blob) {
          console.log(blob);
          // const payload = new FormData();
          // payload.append('img', blob, '.png');
          // ...
        }
      }, 'image/png');
  }
};

<Button inline className={styles.button} type="primary" loading={loading} onClick={onSubmit}>
  确定上传
</Button>
源码:
import React, { useEffect, useRef, useState } from 'react';
import styles from './dome.scss';
import 'cropperjs/dist/cropper.css';
import CropperJs from 'cropperjs';
import { UploadOutlined } from '@ant-design/icons';
import { Upload } from 'antd';
import { Button } from 'antd-mobile';
const [LONG, WIDE] = [1512, 1039]; // 5寸照片尺寸
export default () => {
  const ref = useRef();
  const [cropper, setCropper] = useState(); // 存储cropper对象
  const [image, setImage] = useState(); // 记录图片,没有图片时toBlob会报错
  const [loading, setLoading] = useState(false); // 记录上传的状态

  useEffect(() => {
    const myCropper = new CropperJs(ref.current, {
      viewMode: 1,
      dragMode: 'move',
      aspectRatio: LONG / WIDE,
      autoCropArea: 0.9,
      highlight: false,
      cropBoxResizable: false,
      toggleDragModeOnDblclick: false,
    });
    setCropper(myCropper);
  }, []);

  const replaceImg = (img) => {
    setImage(undefined);
    // 通过FileReader读取用户选取的文件
    const reader = new FileReader();
    reader.readAsDataURL(img);
    //加载图片后获取到图片的base64格式
    reader.onload = ({ target: { result } = {} }) => {
      //更新替换为目标图片
      cropper.replace(result);
      setImage(img);
    };
    return false;
  };

  const onSubmit = () => {
    if (image) {
      setLoading(true);
      // 获取HTMLCanvasElement.toBlob获取blob,并通过FormData上传至服务器
      cropper
        .getCroppedCanvas({
          width: LONG,
          maxWidth: LONG, // maxWidth、maxHeight必须设置,原因见:遇到的bug和解决方案
          height: WIDE,
          maxHeight: WIDE, // maxWidth、maxHeight必须设置,原因见:遇到的bug和解决方案
        })
        .toBlob((blob) => {
          setLoading(false);
          if (blob) {
            console.log(blob);
            // const payload = new FormData();
            // payload.append('img', blob, '.png');
            // ...
          }
        }, 'image/png');
    }
  };

  return (
    <div className={styles.container}>
      <div className={styles.title}>{image?.name ?? '请上传图片'}</div>
      <div className={styles.cropper}>
        <img ref={ref} alt="" />
      </div>
      <Upload fileList={[]} beforeUpload={replaceImg} accept="image/*">
        <Button className={styles.upload} icon={<UploadOutlined />}>
          选择图片
        </Button>
      </Upload>
      <Button inline className={styles.button} type="primary" loading={loading} onClick={onSubmit}>
        确定上传
      </Button>
    </div>
  );
};

.container {
  height: 100%;
  padding: 0 24px;
  background-color: #fff;

  .title {
    height: 68px;
    line-height: 68px;
    font-size: 32px;
    font-weight: bold;
    text-align: center;
  }

  .cropper {
    display: flex;
    align-items: center;
    justify-content: center;
    height: 60%;

    img {
      max-width: 100%;
      max-height: 100%;
    }
  }

  .upload {
    width: 240px;
    height: 68px;
    margin: 20px auto 0;
    font-size: 28px;
    border-radius: 8px;
    border: 2px solid #f0f0f0;
  }

  .button {
    display: block;
    width: 240px;
    height: 80px;
    line-height: 76px;
    margin: 80px auto 0;
    font-size: 32px;
    border: 2px solid #f0f0f0;
  }
}
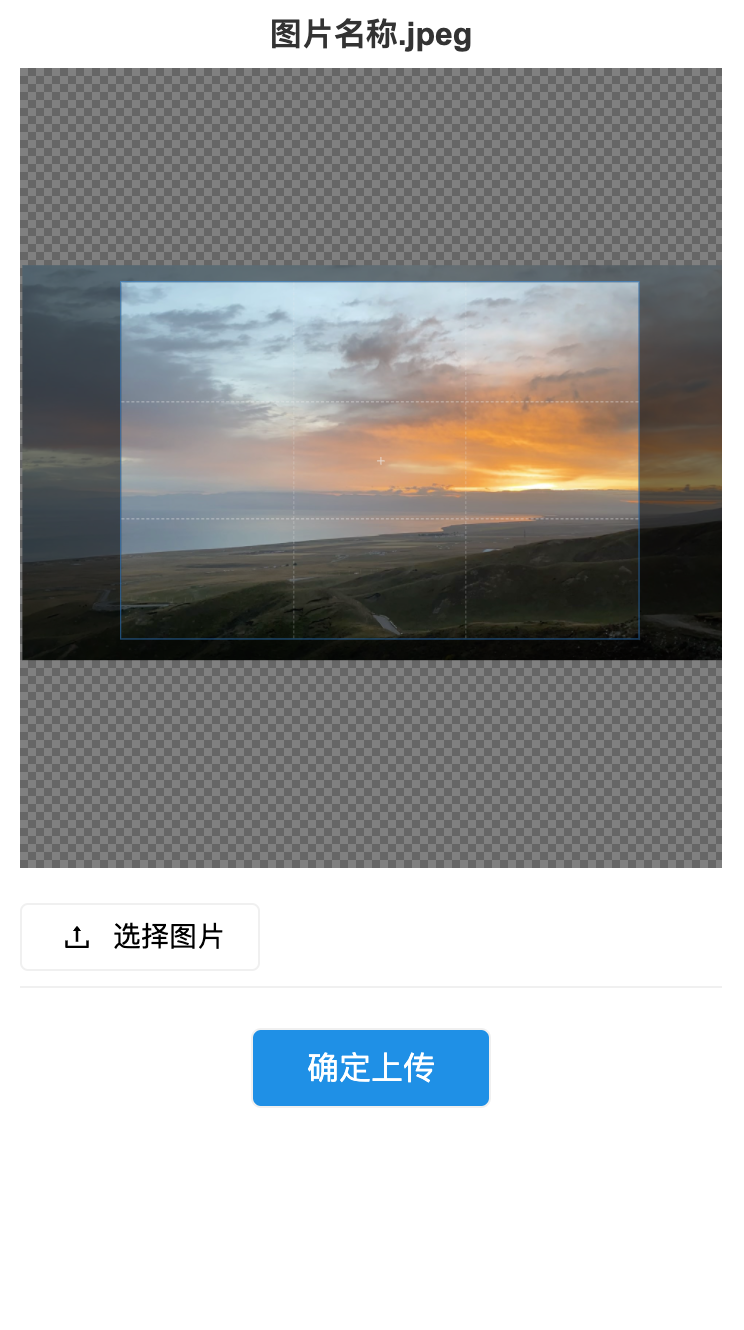
最终效果:
遇到的bug和解决方案:
正式环境下,出现少量用户裁剪后上传的图片为白屏,宽高尺寸正常但大小极低。
由于问题出现的概率很低,导致这个问题排查了很久,但却是一个实实在在存在的bug。
假设用户误操作在空白区域裁剪,我们加上了裁剪区域及拖拽区域限制,确保了用户裁剪区域不会超过图片边缘。
假设用户手机性能较低,我们排查了出现问题用户的订单,发现同一订单下其他图片能正常裁剪上传,且将源图上传到后台后发现部分白屏图片二次裁剪上传是能成功的。
假设用户上传图片较大,我们自己尝试超大图片,发现超大图依然能上传,只是可能图片处理的速度及上传速度较慢。
...
沿着大图处理及上传速度较慢的思路,最终我们翻阅文档后发现这么一句话:
>Avoid get a blank (or black) output image, you might need to set the maxWidth and maxHeight properties to limited numbers, because of the size limits of a canvas element. Also, you should limit the maximum zoom ratio (in the zoom event) for the same reason.
>以及别人在stackoverflow上的解答:https://stackoverflow.com/questions/6081483/maximum-size-of-a-canvas-element
最终,我们才确定了问题的原因:**不同浏览器会对HTML canvas 元素施加不同大小尺寸的限制,且这些限制的大小会随着平台和硬件而进行变化,超过限制后的画布将无法使用。离谱的是,即使你创建使用了超过限制大小的canvas,浏览器并没有提供任何类型的反馈,这就使得你无法知晓并去处理这类问题。**这就是导致HTMLCanvasElement.toBlob获取到空白图片却无任何报错的原因。
回归到问题本身,我们只需要在getCroppedCanvas时设置不超出浏览器限制画布尺寸的maxWidth、maxHeight即可。
若要测试获取不同浏览器对canvas的限制,可考虑使用[canvas-size](https://github.com/jhildenbiddle/canvas-size)。
感谢大家的观看,若有疑问留言,大家可以一起沟通。😊


 16万+
16万+


 被折叠的 条评论
为什么被折叠?
被折叠的 条评论
为什么被折叠?
 到【灌水乐园】发言


