


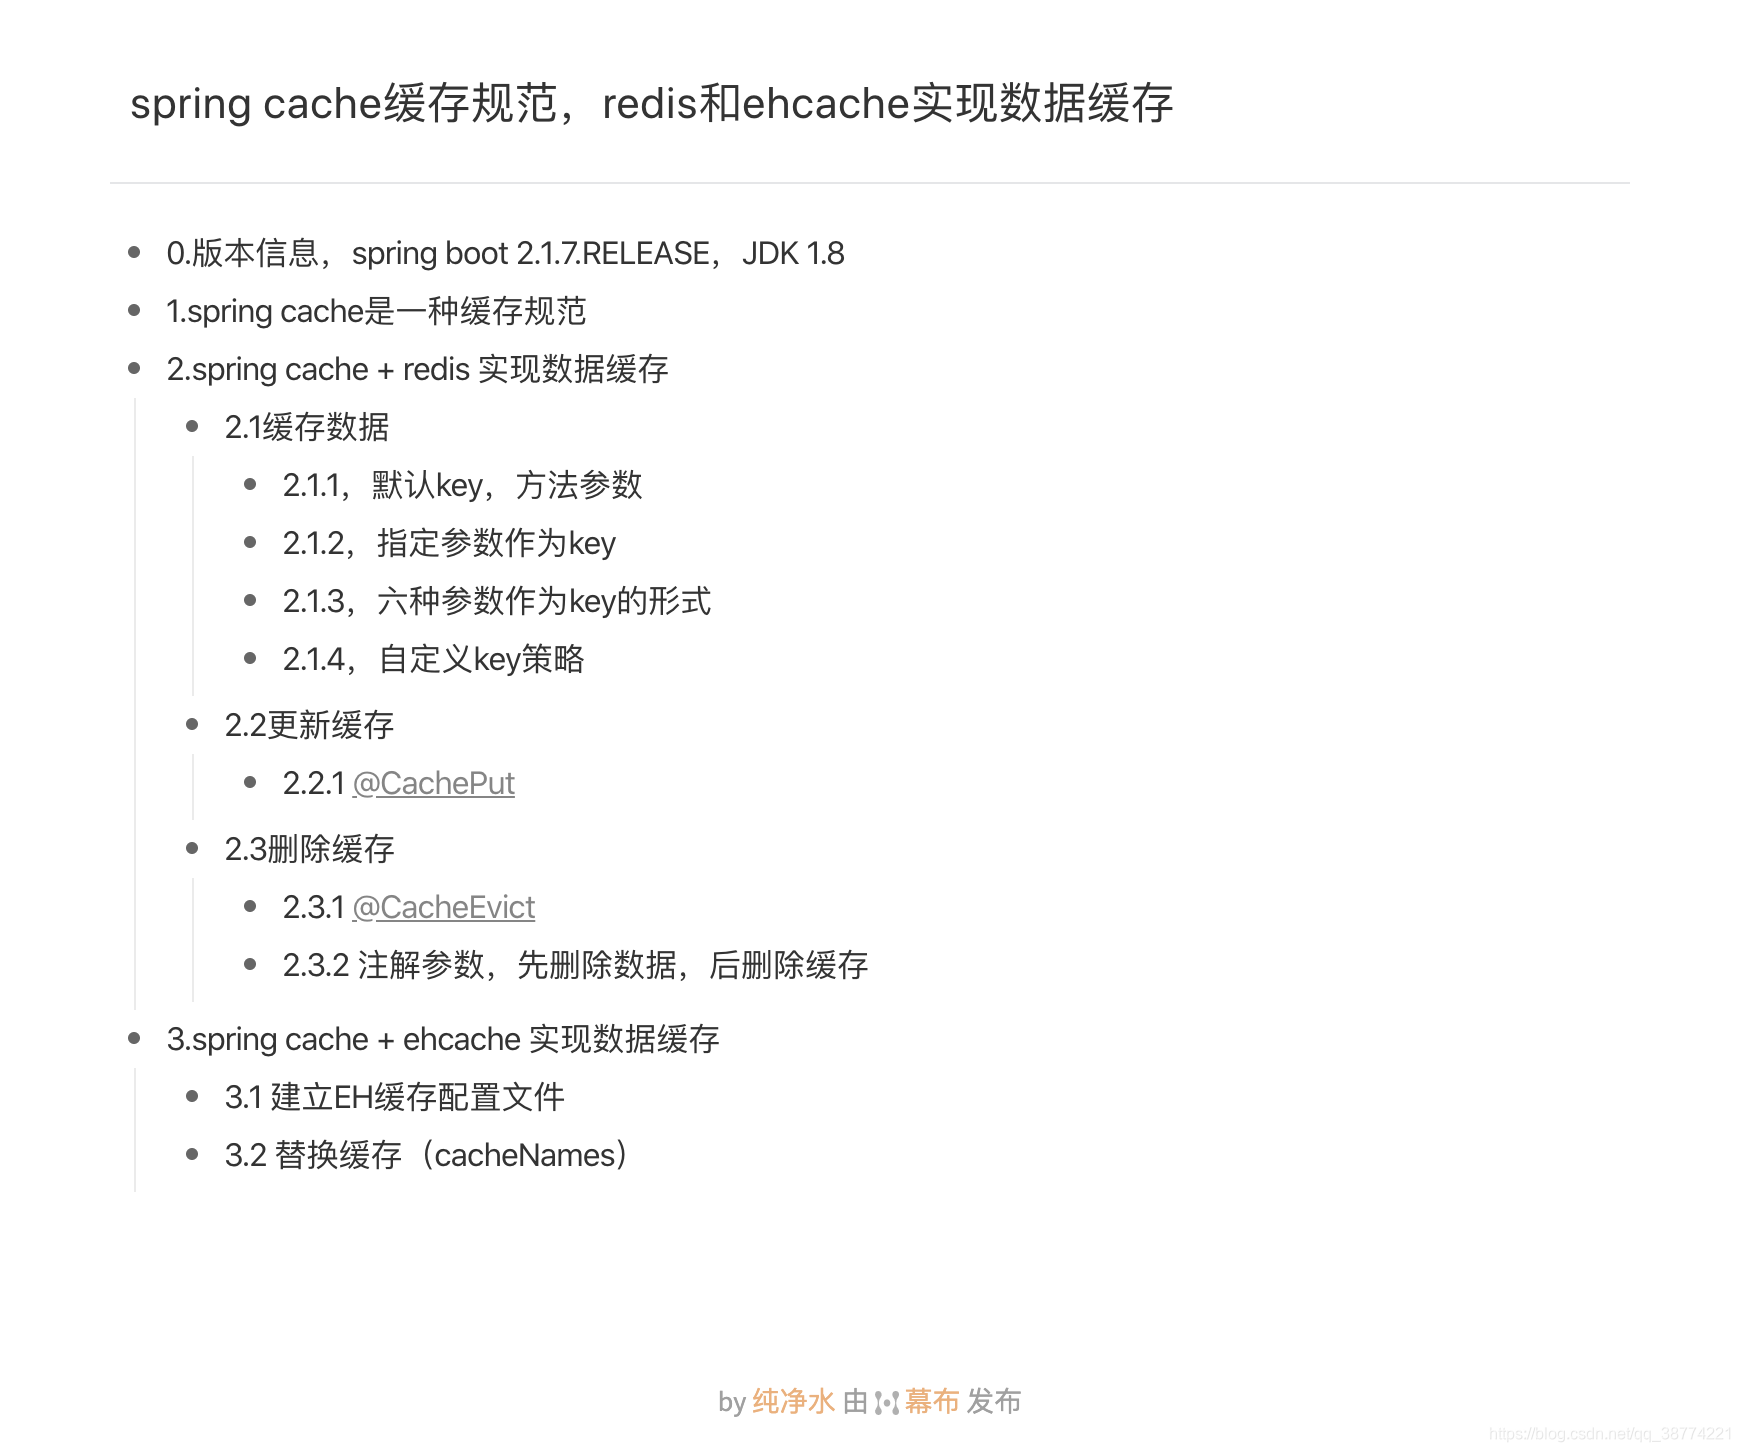
文章大纲
概述
缓存是实际工作中,提高性能比较常见的方法,会在很多场景下使用。
例如:计数缓存、数据库数据缓存、电子商务网站里面的商品。
缓存数据一般是缓存一些不经常修改的数据,如果数据经常变更,那不适合使用缓存。
0.版本信息
spring boot 2.1.7.RELEASE,JDK 1.8
对应依赖
		<dependency>
			<groupId>org.springframework.boot</groupId>
			<artifactId>spring-boot-starter-web</artifactId>
		</dependency>

		<dependency>
			<groupId>org.springframework.boot</groupId>
			<artifactId>spring-boot-starter-test</artifactId>
			<scope>test</scope>
		</dependency>

		<dependency>
			<groupId>org.springframework.boot</groupId>
			<artifactId>spring-boot-starter-data-redis</artifactId>
		</dependency>

		<dependency>
			<groupId>org.springframework.boot</groupId>
			<artifactId>spring-boot-starter-cache</artifactId>
		</dependency>

		<dependency>
			<groupId>org.springframework.boot</groupId>
			<artifactId>spring-boot-starter-security</artifactId>
		</dependency>
1.spring cache是一种缓存规范
spring cache,是一种缓存规范,通过统一的注解规范,不同的底层实现来缓存数据。
可以用redis来实现数据缓存,也可以用ehcache来实现缓存。
就像数据库一样,换了数据库驱动,connect、result、Statement这些都不用变。
2.redis 实现数据缓存
首先添加redis的相关配置。
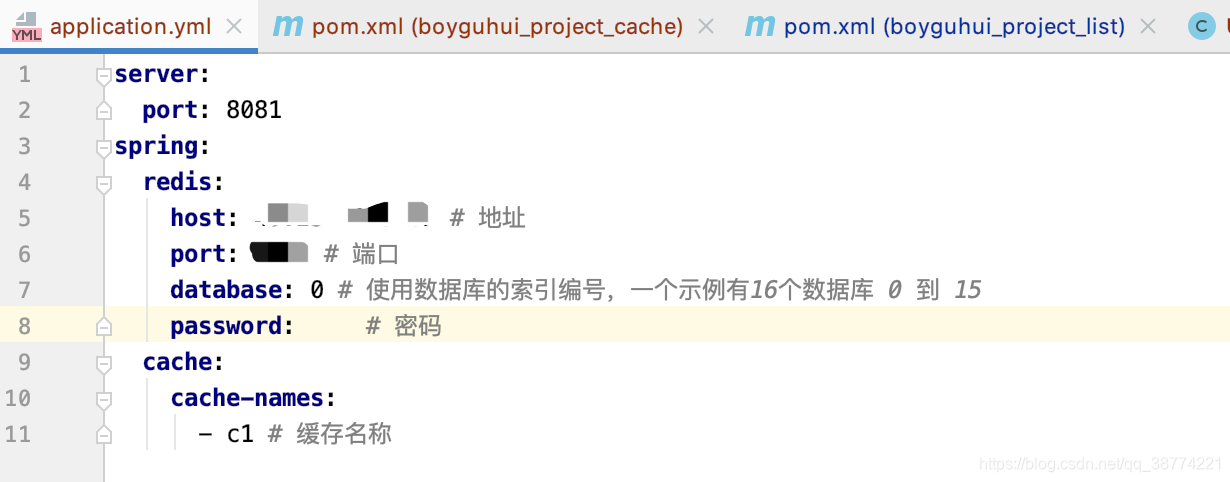
这里我只配置了 Redis 的端口、地址、密码,然后给缓存取了一个名字,这个名字在后文会用到。
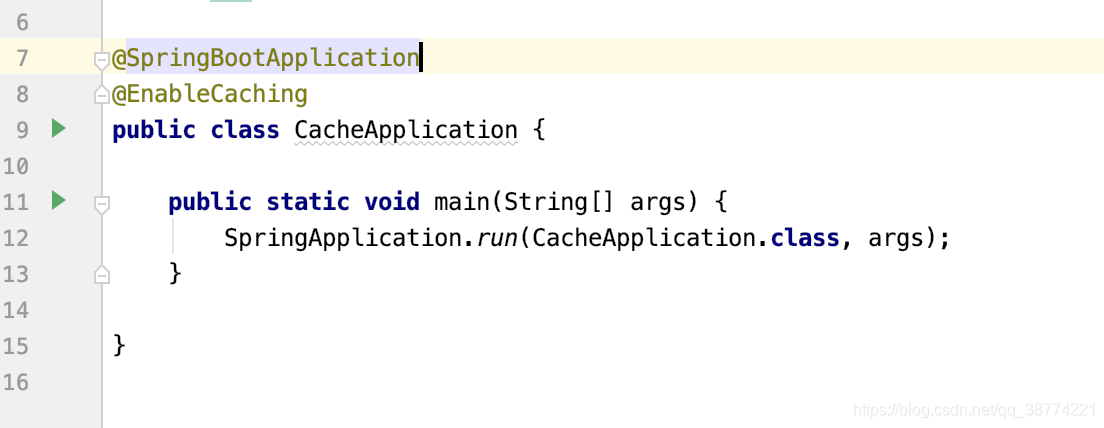
然后我们在启动类上开启缓存配置 @EnableCaching
配置缓存名称 @CacheConfig
这个注解在类上使用,用来描述该类中所有方法使用的缓存名称,示例代码如下:
@Service
@CacheConfig(cacheNames = "c1")
public class UserImpl {
}
如果不加此配置,则在每一个@cacheable注解都需要指定缓存名称,下面我演示的案例都是在方法注解上指定缓存名称。
2.1缓存数据 @Cacheable
2.1.1,默认key,方法参数
@Cacheable这个注解加在方法上,表示将一个方法的返回值缓存起来。
默认情况下,缓存的key就是方法的参数,缓存的value就是返回值,具体看下面的代码。
    @Cacheable(cacheNames = "c1")
    public User getUserById(String id){
        logger.info("getUserById>>:[{}]",id);
        User user = new User();
        user.setId(id);
        return user;
    }
在测试包下,用单元测试下这个方法,看下数据能否缓存到redis中。
	@Test
	public void test1(){
		User u1 = this.userImpl.getUserById("1");
		User u2 = this.userImpl.getUserById("1");
		System.out.println(u1);
		System.out.println(u2);
	}
这里我调用了两次getUserById方法,按照缓存的正常情况,logger.info("getUserById>>:[{}]",id);日志只会打印第一次,因为第一次进来先读取缓存,缓存没有数据,然后走方法中的逻辑,查询数据中的数据。第二次进来,返回缓存有数据,直接读取数据并返回,所以值打印一次日志,我们运行一下代码,看看是不是这样。
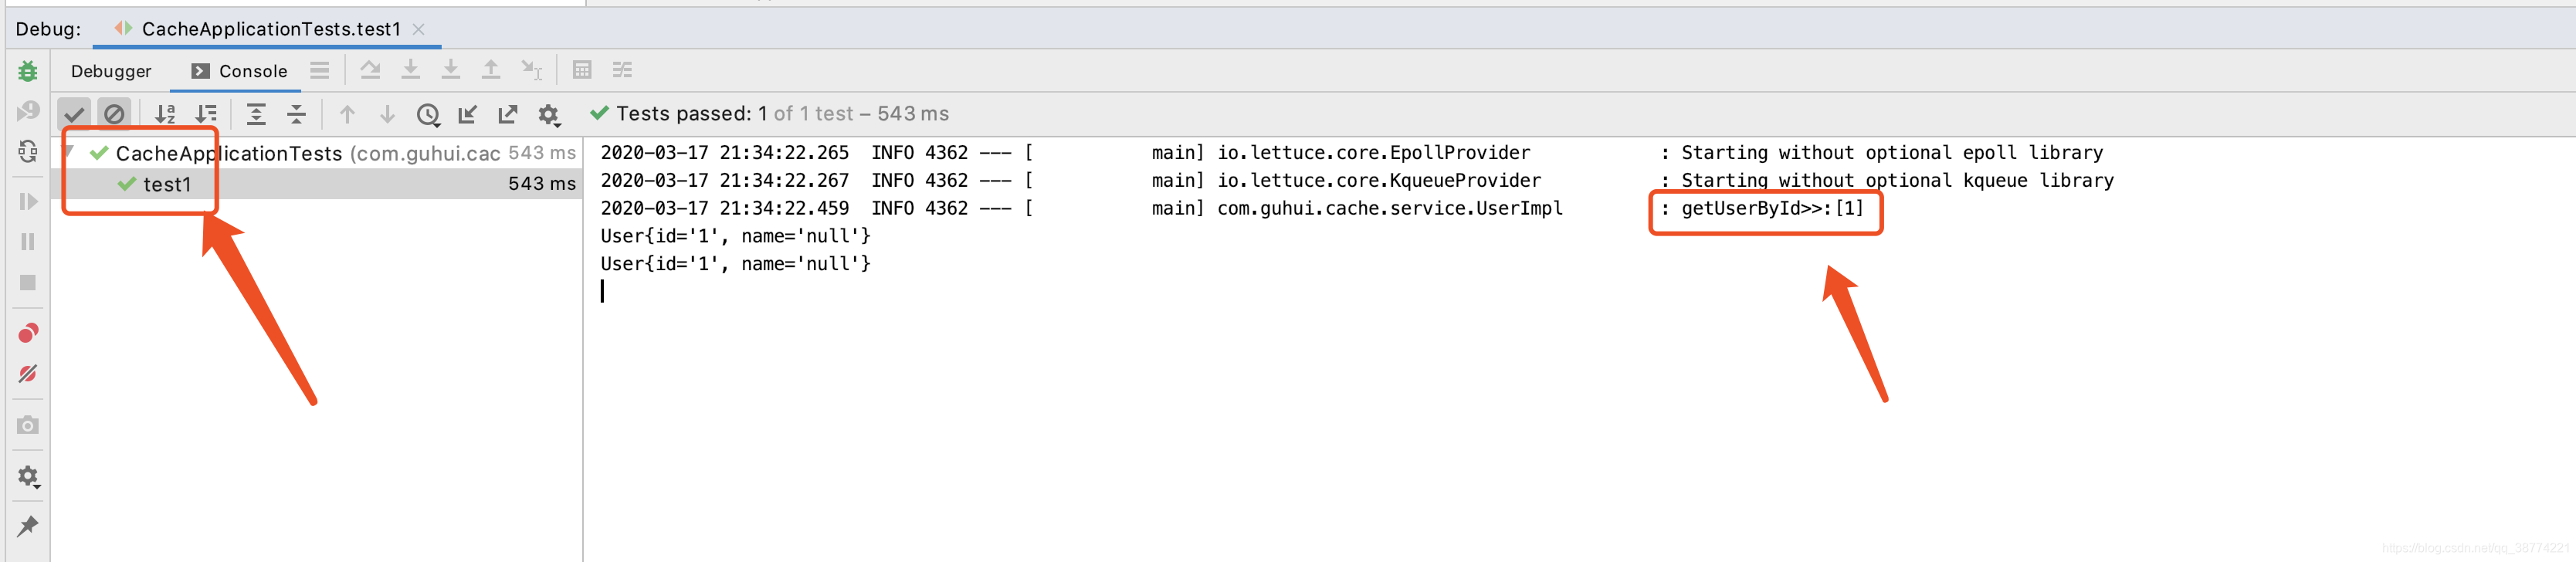
测试方法运行成功,日志只打印一次,证明逻辑没错,看下redis,是不是数据真的缓存进去了。
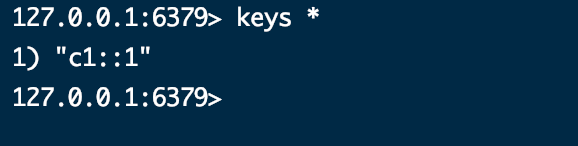
这里可以看到,数据确实缓存进去了。
多个参数作为key
	@Cacheable(cacheNames = "c1")
    public User getUserByIdTwo(String id,String name){
        logger.info("getUserById>> id:[{}],name:[{}]", id,name);
        User user = new User();
        user.setId(id);
        user.setName(name);
        return user;
    }

    @Test
	public void test2(){
		User u1 = this.userImpl.getUserByIdTwo("boy1", "boyguhui");
		User u2 = this.userImpl.getUserByIdTwo("boy2", "javaboyg");
		System.out.println(u1);
		System.out.println(u2);
	}

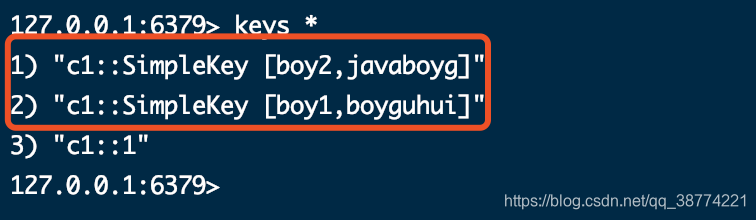
这里日志打印两次,是因为两个参数多作为key,key不一样,两次数据都进行缓存。
2.1.2,指定参数作为key
通过 @Cacheable 的 key 属性指定key值,这里我指定 id 作为key。
@Cacheable(cacheNames = "c1",key = "#id")
public User userKeyId(String id,String name){
logger.info("getUserById>> id:[{}],name:[{}]", id,name);
User user = new User();
user.setId(id);
user.setName(name);
return user;
}
@Test
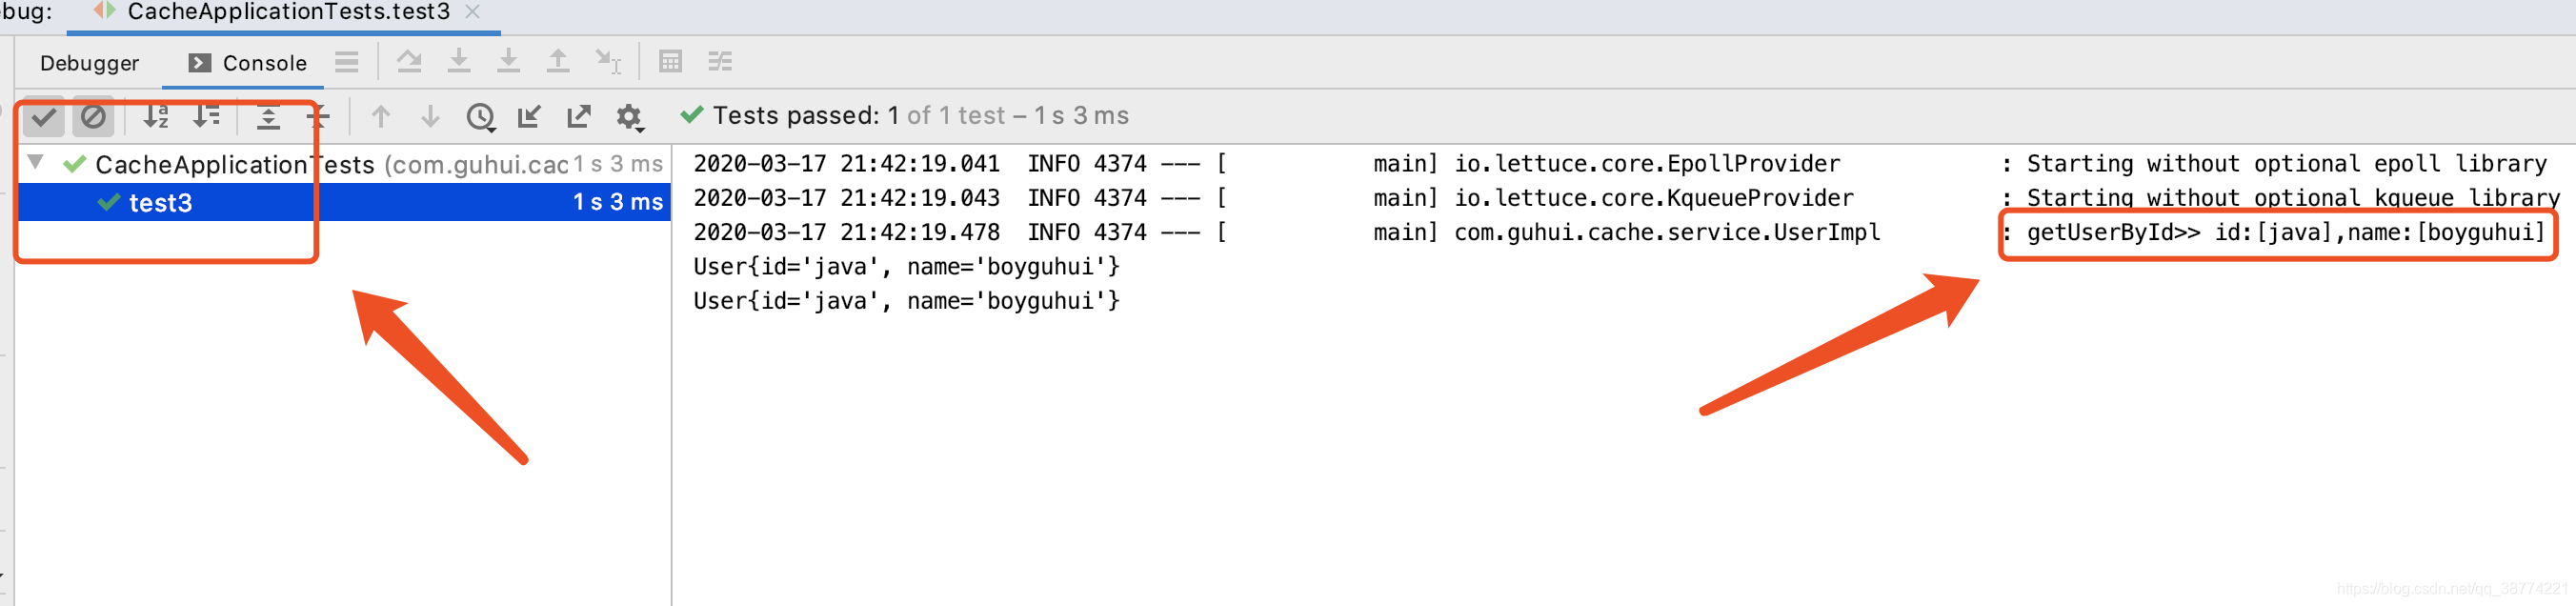
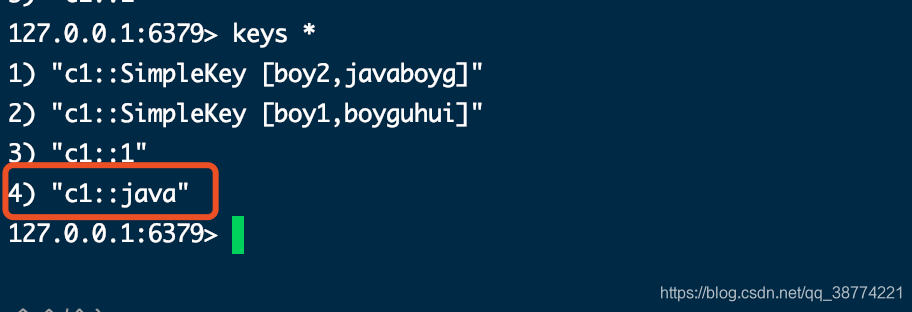
public void test3(){
User u1 = this.userImpl.userKeyId("java", "boyguhui");
User u2 = this.userImpl.userKeyId("java", "javaboyg");
System.out.println(u1);
System.out.println(u2);
}
2.1.3,六种参数作为key的形式
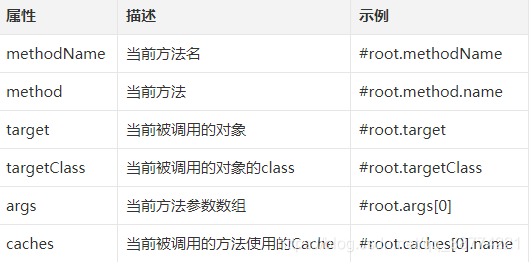
当有多个参数时,默认就使用多个参数来做 key,如果只需要其中某一个参数做 key,则可以在 @Cacheable 注解中,通过 key 属性来指定 key,如上代码就表示只使用 id 作为缓存的 key,如果对 key 有复杂的要求,可以自定义 keyGenerator。当然,Spring Cache 中提供了 root 对象,可以在不定义 keyGenerator(自定义key,看2.1.4小节) 的情况下实现一些复杂的效果:
	@Cacheable(cacheNames = "c1",key = "#root.method.name")
    public User userKeyMethod(String id,String name){
        logger.info("userKeyMethod>> id:[{}],name:[{}]", id,name);
        User user = new User();
        user.setId(id);
        user.setName(name);
        return user;
    }

    @Test
	public void test7(){
		this.userImpl.userKeyMethod("java-method", "java-a1");
		this.userImpl.userKeyMethod("java-root", "java-a2");
	}
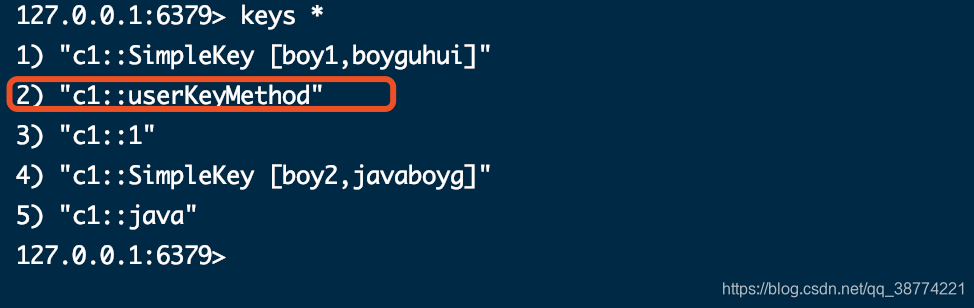
这里注意看测试方法,我传了不一样的参数,结果日志只打印一次,证明我们用方法名缓存是成功的,并且在redis是看到缓存key值的。

2.1.4,自定义key策略
新建一个key类,实现 KeyGenerator 接口,重新 generate 方法。
注意类上加 @Component 注解。
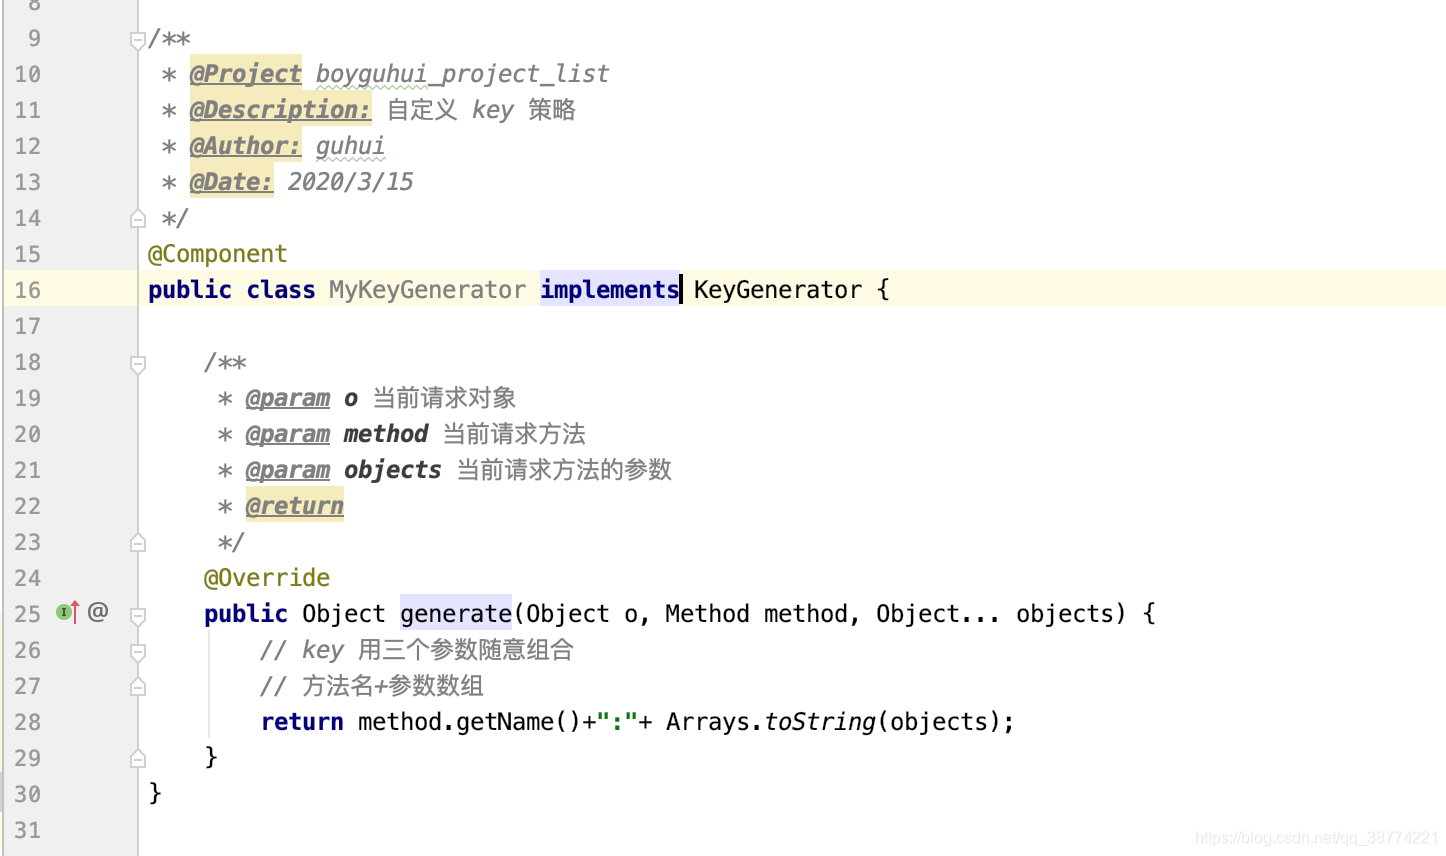
这里我定义的key策略是:方法名+参数数组。
测试方法和实现方法一样,不同的地方,就是@Cacheable注解中key属性替换为keyGenerator属性,指定key策略类
	@Cacheable(cacheNames = "c1",keyGenerator = "myKeyGenerator")
    public User userKeyGenerator(String id,String name){
        logger.info("userKeyGenerator>> id:[{}],name:[{}]", id,name);
        User user = new User();
        user.setId(id);
        user.setName(name);
        return user;
    }

	@Test
	public void test4(){
		User u1 = this.userImpl.userKeyGenerator("spring", "boot");
		User u2 = this.userImpl.userKeyGenerator("spring", "boot");
		System.out.println(u1);
		System.out.println(u2);
	}
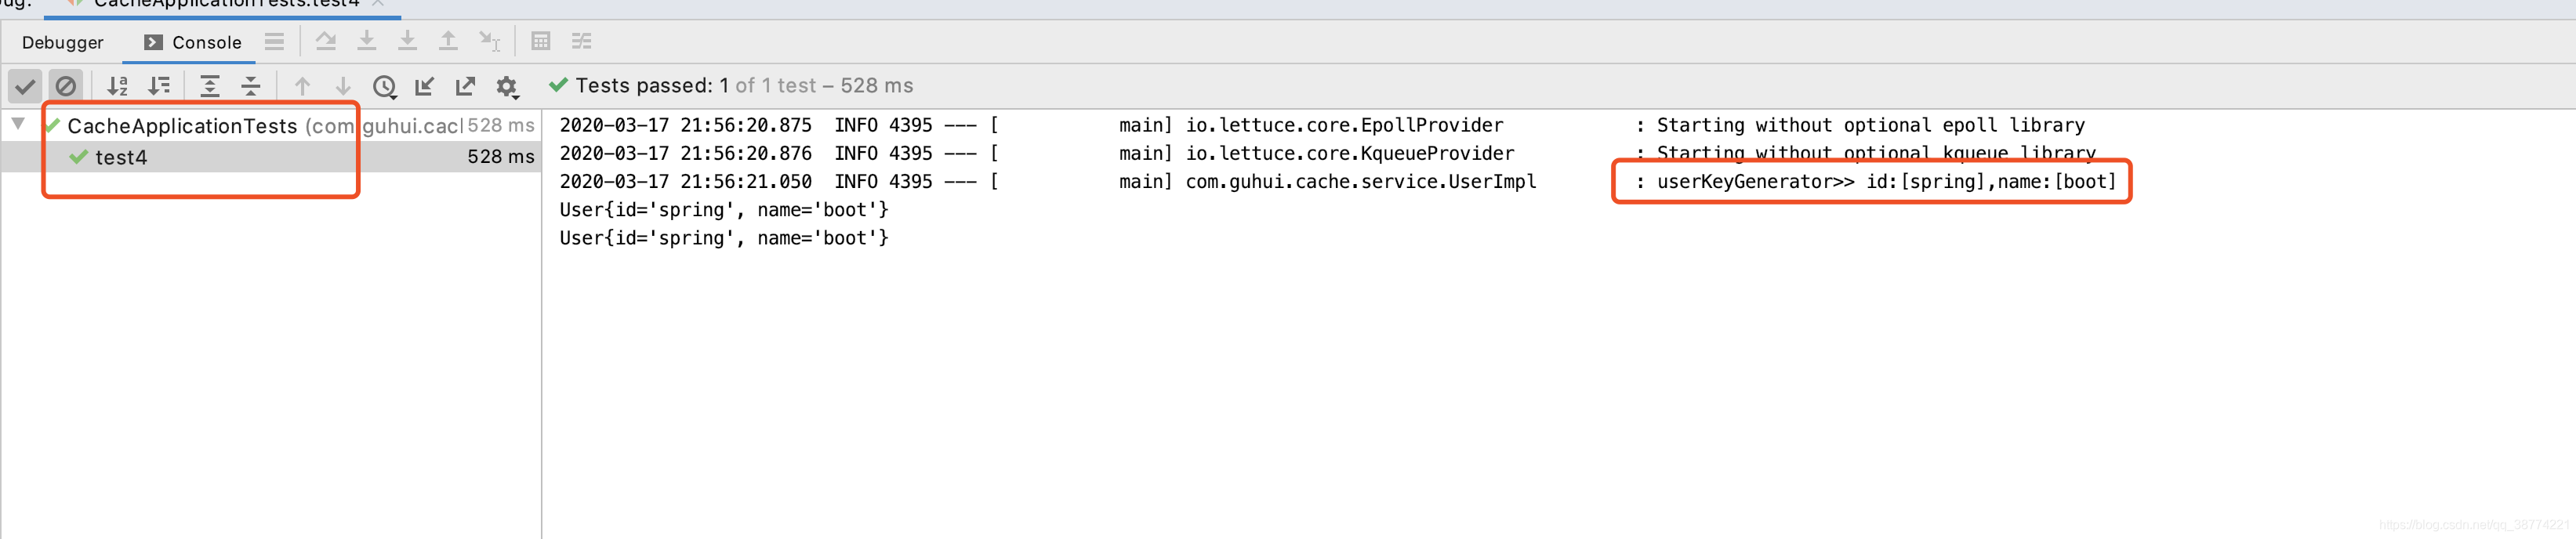
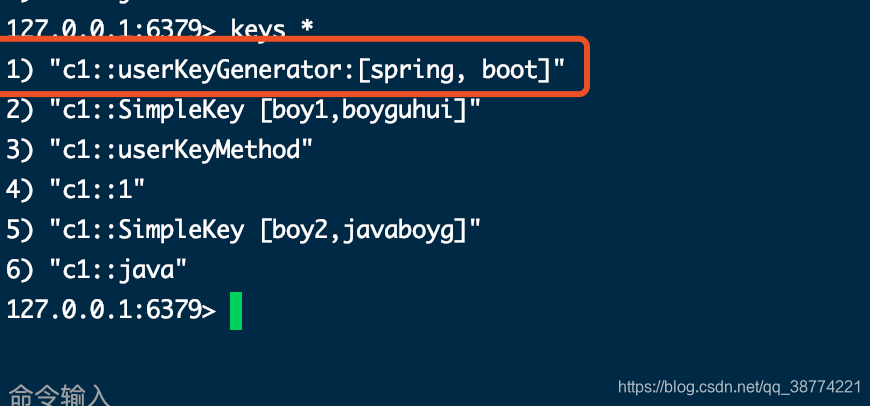
可以看到,定义的key策略,是ok的,key值是:缓存名称+方法名称+参数数组。
2.2更新缓存 @CachePut
@CachePut
这个注解加在更新方法上,当数据库中的数据更新后,缓存中的数据也要跟着更新,使用该注解,可以将方法的返回值自动更新到已经存在的 key 上,示例代码如下:
	@CachePut(cacheNames = "c1",key = "#user.id")
    public User updateUserById(User user){
        logger.info("getUserById>> user:[{}]", user.toString());
        return user;
    }

    @Test
	public void test6(){
		User u1 = this.userImpl.getUserById("1");
		User uu = new User();
		uu.setId("1");
		uu.setName("boyguhui");
		this.userImpl.updateUserById(uu);
		User u2 = this.userImpl.getUserById("1");

		System.out.println(u1.toString());
		System.out.println(u2.toString());
	}
我先去查询了 key 值为 1 的数据,把查的对象,修改name名称,然后去更新,更新之后再调用一次 查询方法,根据key值获取缓存对象,最后打印两个对象,看u2是否是修改之后的数据,缓存修改有没有生效。
u1,修改前,u2,修改后。

可以看到,对象值,修改了。
2.3删除缓存 @CacheEvict
这个注解一般加在删除方法上,当数据库中的数据删除后,相关的缓存数据也要自动清除,该注解在使用的时候也可以配置按照某种条件删除(condition 属性)或者或者配置清除所有缓存(allEntries 属性),示例代码如下:
	@CacheEvict(cacheNames = "c1")
    public void deleteUserById(String id){
        logger.info("deleteUserById>> id:[{}]", id);
    }

    @Test
	public void test5(){
		User u1 = this.userImpl.getUserById("1");
		System.out.println(u1);
		this.userImpl.deleteUserById("1");
	}

先取到key为 1 的数据,然后删除,是否成功我们看下缓存中还有没有就知道了。

可以看到,没有key为:c1::1 的数据了,证明删除缓存成功。
@CacheEvict 凝视有一个属性 beforeInvocation。缺省为 false,即缺省情况下。都是在实际的方法运行完毕后。才对缓存进行清空操作。期间假设运行方法出现异常,则会导致缓存清空不被运行
3.ehcache 实现数据缓存
Ehcache 也是 Java 领域比较优秀的缓存方案之一,Ehcache 这个缓存的名字很有意思,正着念反着念,都是 Ehcache,Spring Boot 中对此也提供了很好的支持,这个支持主要是通过 Spring Cache 来实现的。
和 Spring Cache + Redis 相比,Spring Cache + Ehcache 主要是配置有所差异,具体的用法是一模一样的。我们来看下使用步骤。
首先引入jia包
	<dependency>
        <groupId>org.springframework.boot</groupId>
        <artifactId>spring-boot-starter-cache</artifactId>
    </dependency>
    <dependency>
        <groupId>org.springframework.boot</groupId>
        <artifactId>spring-boot-starter-web</artifactId>
    </dependency>
    <dependency>
        <groupId>net.sf.ehcache</groupId>
        <artifactId>ehcache</artifactId>
        <version>2.10.6</version>
    </dependency>
3.1 建立eh缓存配置文件
添加 Ehcache 配置
在 resources 目录下,添加 ehcache 的配置文件 ehcache.xml ,文件内容如下:
<ehcache>
    <diskStore path="java.io.tmpdir/user-cache"/>
    <defaultCache
            maxElementsInMemory="10000"
            eternal="false"
            timeToIdleSeconds="120"
            timeToLiveSeconds="120"
            overflowToDisk="false"
            diskPersistent="false"
            diskExpiryThreadIntervalSeconds="120"
    />
    <cache name="user"
            maxElementsInMemory="10000"
            eternal="true"
            overflowToDisk="true"
            diskPersistent="true"
            diskExpiryThreadIntervalSeconds="600"/>
</ehcache>
配置含义:
- name:缓存名称。
- maxElementsInMemory:缓存最大个数。
- eternal:对象是否永久有效,一但设置了,timeout将不起作用。
- timeToIdleSeconds:设置对象在失效前的允许闲置时间(单位:秒)。仅当eternal=false对象不是永久有效时使用,可选属性,默认值是0,也就是可闲置时间无穷大。
- timeToLiveSeconds:设置对象在失效前允许存活时间(单位:秒)。最大时间介于创建时间和失效时间之间。仅当eternal=false对象不是永久有效时使用,默认是0.,也就是对象存活时间无穷大。
- overflowToDisk:当内存中对象数量达到maxElementsInMemory时,Ehcache将会对象写到磁盘中。
- diskSpoolBufferSizeMB:这个参数设置DiskStore(磁盘缓存)的缓存区大小。默认是30MB。每个Cache都应该有自己的一个缓冲区。
- maxElementsOnDisk:硬盘最大缓存个数。
- diskPersistent:是否缓存虚拟机重启期数据。
- diskExpiryThreadIntervalSeconds:磁盘失效线程运行时间间隔,默认是120秒。
- memoryStoreEvictionPolicy:当达到maxElementsInMemory限制时,Ehcache将会根据指定的策略去清理内存。默认策略是LRU(最近最少使用)。你可以设置为FIFO(先进先出)或是LFU(较少使用)。
- clearOnFlush:内存数量最大时是否清除。
- diskStore 则表示临时缓存的硬盘目录。
注意
默认情况下,这个文件名是固定的,必须叫 ehcache.xml ,如果一定要换一个名字,那么需要在 application.properties 中明确指定配置文件名,配置方式如下:
spring.cache.ehcache.config=classpath:aaa.xml
3.2替换缓存
前面的配置文件配置好之后,使用和2.0章节的redis一样。
先开启缓存开关 @EnableCaching。
然后service中的不用改,还是
@Cacheable
@CachePut
@CacheEvict
没有任何变化,唯一变化的就是底层缓存实现变了,由redis变为ehcache,如果使用,是一样的。
结尾
怎么样,spring cache的规范是不是很方便,统一使用规范,底层是用什么缓存根据业务来定义,后续变更都不需要改变代码。
在 Spring Boot 中,使用 Redis 缓存,既可以使用 RedisTemplate 自己来实现,也可以使用使用这种方式,这种方式是 Spring Cache 提供的统一接口,实现既可以是 Redis,也可以是 Ehcache 或者其他支持这种规范的缓存框架。从这个角度来说,Spring Cache 和 Redis、Ehcache 的关系就像 JDBC 与各种数据库驱动的关系。


 2737
2737


 被折叠的 条评论
为什么被折叠?
被折叠的 条评论
为什么被折叠?
 到【灌水乐园】发言


