


认证中心单独作为一个微服务工程,对开放平台提供应用id及密钥生成,token生成,认证信息缓存,token验证等一系列功能。开放平台access_token生成业界一般采用Oauth2的客户端模式。将来此认证中心微服务可随时扩展,除Oauth2的剩余三种授权模式授权码模式(应用场景:如第三方授权登录等)、密码模式(应用场景:如企业诸多内部系统登录等)、简化模式(应用场景:如平台与三方服务整合等)之外还可以自定义授权模式来满足各种实际场景,后续如果小伙伴们需要,我会结合企业实际应用案例详细介绍。
1.数据库表创建
create table `oauth_client_details` (
	`client_id` varchar (192),
	`resource_ids` varchar (1024),
	`client_secret` varchar (1024),
	`scope` varchar (1024),
	`authorized_grant_types` varchar (1024),
	`web_server_redirect_uri` varchar (1024),
	`authorities` varchar (1024),
	`access_token_validity` int (11),
	`refresh_token_validity` int (11),
	`additional_information` longtext,
	`autoapprove` varchar (1024)
);
重要参数说明:
1.client_id:应用id(唯一),将来需要提供给三方调用者获取token使用。
2.client_secret:应用密钥(可修改),作用同client_id。
3.authorized_grant_types:支持的授权模式,针对开放平台此值为client_credentials。
4.access_token_validity:token有效期,一般开放接口access_token有效期为7200S。
2.引入pom文件
   <dependencies>
        <!-- springboot支持 -->
        <dependency>
            <groupId>org.springframework.boot</groupId>
            <artifactId>spring-boot-starter</artifactId>
        </dependency>

        <dependency>
            <groupId>org.springframework.boot</groupId>
            <artifactId>spring-boot-starter-web</artifactId>
        </dependency>
        <!-- oauth2支持 -->
        <dependency>
            <groupId>org.springframework.boot</groupId>
            <artifactId>spring-boot-starter-security</artifactId>
        </dependency>

        <dependency>
            <groupId>org.springframework.cloud</groupId>
            <artifactId>spring-cloud-starter-oauth2</artifactId>
            <version>${spring-cloud-starter-oauth2.version}</version>
        </dependency>
        <!-- redis支持 -->
        <dependency>
            <groupId>org.springframework.boot</groupId>
            <artifactId>spring-boot-starter-data-redis</artifactId>
        </dependency>
        <dependency>
            <groupId>org.apache.commons</groupId>
            <artifactId>commons-pool2</artifactId>
            <version>${common-pool.version}</version>
        </dependency>
        <!-- lombok支持 -->
        <dependency>
            <groupId>org.projectlombok</groupId>
            <artifactId>lombok</artifactId>
            <version>${lombok.version}</version>
            <scope>provided</scope>
        </dependency>
        <!-- mp支持 -->
        <dependency>
            <groupId>com.baomidou</groupId>
            <artifactId>mybatis-plus-boot-starter</artifactId>
            <version>${mybatis-plus-boot-starter.version}</version>
        </dependency>

        <dependency>
            <groupId>mysql</groupId>
            <artifactId>mysql-connector-java</artifactId>
            <version>${mysql-connector-java.version}</version>
        </dependency>

        <dependency>
            <groupId>com.alibaba</groupId>
            <artifactId>druid-spring-boot-starter</artifactId>
            <version>${druid.version}</version>
        </dependency>
    </dependencies>
3.创建安全认证器
package com.auth.admin.config;

import org.springframework.context.annotation.Configuration;
import org.springframework.security.config.annotation.authentication.builders.AuthenticationManagerBuilder;
import org.springframework.security.config.annotation.web.builders.HttpSecurity;
import org.springframework.security.config.annotation.web.configuration.WebSecurityConfigurerAdapter;

/**
 * @desc 安全认证器
 * @author mj
 */
@Configuration
public class SecurityConfig extends WebSecurityConfigurerAdapter {

    //配置HTTP安全规则
    @Override
    protected void configure(HttpSecurity http) throws Exception {
        //关闭csrf防护,允许用户访问/oauth开头的请求。
        http.csrf().disable().requestMatchers().antMatchers("/**").and().authorizeRequests()
            .antMatchers("/oauth/**").permitAll().anyRequest().permitAll();
    }


    //配置认证管理器AuthenticationManager
    @Override
    protected void configure(AuthenticationManagerBuilder auth) throws Exception {
        //管理认证实现例如userDetail实现以及密码加密等。(密码模式会用到 客户端模式暂不用关心)
    }
}
4.创建认证配置(令牌端点、oauth2客户端、token配置等)
package com.auth.admin.config;

import java.util.Arrays;
import javax.annotation.Resource;
import javax.sql.DataSource;
import org.springframework.beans.factory.annotation.Autowired;
import org.springframework.context.annotation.Bean;
import org.springframework.context.annotation.Configuration;
import org.springframework.data.redis.connection.RedisConnectionFactory;
import org.springframework.security.authentication.AuthenticationManager;
import org.springframework.security.crypto.bcrypt.BCryptPasswordEncoder;
import org.springframework.security.crypto.password.PasswordEncoder;
import org.springframework.security.oauth2.config.annotation.configurers.ClientDetailsServiceConfigurer;
import org.springframework.security.oauth2.config.annotation.web.configuration.AuthorizationServerConfigurerAdapter;
import org.springframework.security.oauth2.config.annotation.web.configuration.EnableAuthorizationServer;
import org.springframework.security.oauth2.config.annotation.web.configurers.AuthorizationServerEndpointsConfigurer;
import org.springframework.security.oauth2.config.annotation.web.configurers.AuthorizationServerSecurityConfigurer;
import org.springframework.security.oauth2.provider.ClientDetailsService;
import org.springframework.security.oauth2.provider.client.JdbcClientDetailsService;
import org.springframework.security.oauth2.provider.token.AuthorizationServerTokenServices;
import org.springframework.security.oauth2.provider.token.DefaultTokenServices;
import org.springframework.security.oauth2.provider.token.TokenEnhancer;
import org.springframework.security.oauth2.provider.token.TokenEnhancerChain;
import org.springframework.security.oauth2.provider.token.TokenStore;
import org.springframework.security.oauth2.provider.token.store.JwtAccessTokenConverter;
import org.springframework.security.oauth2.provider.token.store.redis.RedisTokenStore;

/**
 * @desc 认证配置
 * @author mj
 */
@Configuration
@EnableAuthorizationServer
public class AuthServerConfig extends AuthorizationServerConfigurerAdapter {

    @Resource
    private ClientDetailsService clientDetailsService;

    @Resource
    private TokenEnhancer tokenEnhancer;

    @Resource
    private DataSource dataSource;

    @Resource
    private RedisConnectionFactory redisConnectionFactory;

    // 对称秘钥,资源服务器使用该秘钥来验证
    private static final String SIGN_KEY = "ABCDEF";

    //redis中认证信息存储前缀
    private static final String OAUTH_PREFIX = "CREATE_TOKEN:";


    //1 配置令牌端点 其实就是令牌相关的服务
    @Override
    public void configure(AuthorizationServerSecurityConfigurer security) throws Exception {
        //初始化配置
        //配置对token key端点的访问控制
        security.checkTokenAccess("permitAll()")
            //配置对/oauth/check_token端点的访问控制 此端点通常是用来验证令牌token有效性
            .tokenKeyAccess("permitAll()")
            // 允许以应用/密码的方式访问/oauth/token端点。
            .allowFormAuthenticationForClients();
    }

    //2 配置oauth2客户端
    @Override
    public void configure(ClientDetailsServiceConfigurer clients) throws Exception {
        // 客户端存储到数据库中
        clients.withClientDetails(createJdbcDetailsService());
    }

    //数据库加载客户端
    @Bean
    public JdbcClientDetailsService createJdbcDetailsService() {
        JdbcClientDetailsService jdbcClientDetailsService = new JdbcClientDetailsService(dataSource);
        return jdbcClientDetailsService;
    }


    //3 配置授权及令牌服务(例如认证管理器、token存储等)
    @Override
    public void configure(AuthorizationServerEndpointsConfigurer endpoints) throws Exception {
        endpoints
            //重要:自定义令牌实现。
            .tokenServices(tokenServiceImpl());
    }
    //自定义实现令牌生成 存储 刷新等操作
    @Bean
    public AuthorizationServerTokenServices tokenServiceImpl() {
        //AuthorizationServerTokenServices 默认实现 此处也可以自定义实现token的一系列管理
        //例如你想自定义token过期后的策略等等 都可以在这里实现。
        DefaultTokenServices defaultTokenServices = new DefaultTokenServices();
        //token配置客户端信息存储 例如token的有效期 授权模式等等 均在数据库中进行管理。
        defaultTokenServices.setClientDetailsService(clientDetailsService);
        //支持刷新token。
        defaultTokenServices.setSupportRefreshToken(true);
        // 配置token的存储方法(业界一般用redis存储)。
        defaultTokenServices.setTokenStore(tokenStore());
        //token增强器 例如你想在token信息里边加一些附加信息 就可以在这里添加TokenEnhancer的实现。
        TokenEnhancerChain tokenEnhancerChain = new TokenEnhancerChain();
        tokenEnhancerChain.setTokenEnhancers(Arrays.asList(tokenEnhancer,jwtAccessTokenConverter()));
        defaultTokenServices.setTokenEnhancer(tokenEnhancerChain);
        return defaultTokenServices;
    }
    //token存储配置
    @Bean
    public TokenStore tokenStore() {
        RedisTokenStore tokenStore = new RedisTokenStore(redisConnectionFactory);
        //token存储前缀
        tokenStore.setPrefix(OAUTH_PREFIX);
        return tokenStore;
    }
    @Bean
    public JwtAccessTokenConverter jwtAccessTokenConverter() {
        JwtAccessTokenConverter jwtAccessTokenConverter = new JwtAccessTokenConverter();
        jwtAccessTokenConverter.setSigningKey(SIGN_KEY);
        return jwtAccessTokenConverter;
    }
    @Bean
    public PasswordEncoder passwordEncoder() {
        return new BCryptPasswordEncoder();
    }

}
5.客户端操作controller
package com.auth.admin.controller;

import com.auth.admin.service.IOauthClientDetailService;
import com.auth.admin.vo.ClientDetailReqVo;
import com.auth.admin.vo.ClientDetailVo;
import javax.annotation.Resource;
import org.slf4j.Logger;
import org.slf4j.LoggerFactory;
import org.springframework.web.bind.annotation.PostMapping;
import org.springframework.web.bind.annotation.RequestBody;
import org.springframework.web.bind.annotation.RestController;

/**
 * @desc 客户端配置(用户给三方申请应用client_id及client_secret密钥)
 * @author mj
 */
@RestController
public class ClientDetailController {

    private static final Logger log = LoggerFactory.getLogger(ClientDetailController.class);

    @Resource
    private IOauthClientDetailService oauthClientDetailService;

    // 添加客户端配置信息
    @PostMapping("/client/detail/post")
    public Boolean addClientDetails(@RequestBody ClientDetailVo clientDetailVo){
        return oauthClientDetailService.addClientDetail(clientDetailVo);
    }

    // 查询客户端配置
    @PostMapping("/client/detail/get")
    public ClientDetailVo findClientDetails(@RequestBody ClientDetailReqVo clientDetailReqVo){
        return oauthClientDetailService.findClientDetails(clientDetailReqVo);
    }

}
6.客户端操作实现
package com.auth.admin.service.impl;

import com.auth.admin.mapper.OauthClientDetailMapper;
import com.auth.admin.model.OauthClientDetail;
import com.auth.admin.service.IOauthClientDetailService;
import com.auth.admin.vo.ClientDetailReqVo;
import com.auth.admin.vo.ClientDetailVo;
import com.baomidou.mybatisplus.extension.conditions.query.LambdaQueryChainWrapper;
import com.baomidou.mybatisplus.extension.service.impl.ServiceImpl;
import org.springframework.beans.BeanUtils;
import org.springframework.stereotype.Service;
import org.springframework.transaction.annotation.Transactional;
import org.springframework.util.ObjectUtils;
import org.springframework.util.StringUtils;

/**
 * @desc 客户端接口实现
 * @author mj
 */
@Service
public class OauthClientDetailServiceImpl extends ServiceImpl<OauthClientDetailMapper, OauthClientDetail> implements
    IOauthClientDetailService {

    @Override
    @Transactional
    public Boolean addClientDetail(ClientDetailVo clientDetailVo) {
        if(ObjectUtils.isEmpty(clientDetailVo)){
            return Boolean.TRUE;
        }
        OauthClientDetail oauthClientDetail=new OauthClientDetail();
        BeanUtils.copyProperties(clientDetailVo,oauthClientDetail);
        this.baseMapper.insert(oauthClientDetail);
        return Boolean.TRUE;
    }

    @Override
    public ClientDetailVo findClientDetails(ClientDetailReqVo clientDetailReqVo) {
        ClientDetailVo clientDetailVo=new ClientDetailVo();
        if(StringUtils.isEmpty(clientDetailReqVo.getClientId())){
            throw new IllegalArgumentException("clientId is not null");
        }
        OauthClientDetail clientDetail = new LambdaQueryChainWrapper<>(baseMapper).eq(OauthClientDetail::getClientId,
            clientDetailReqVo.getClientId()).one();
        if(ObjectUtils.isEmpty(clientDetail)){
            return clientDetailVo;
        }
        BeanUtils.copyProperties(clientDetail,clientDetailVo);
        return clientDetailVo;
    }
}
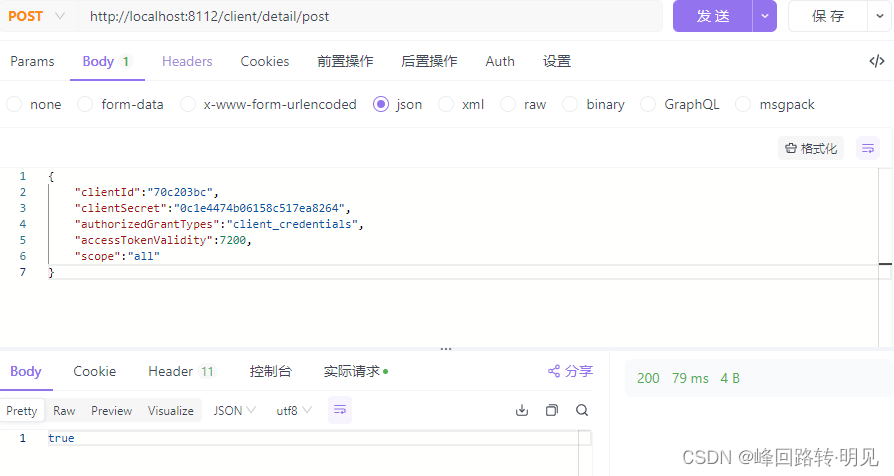
7.测试-(为三方分配应用)
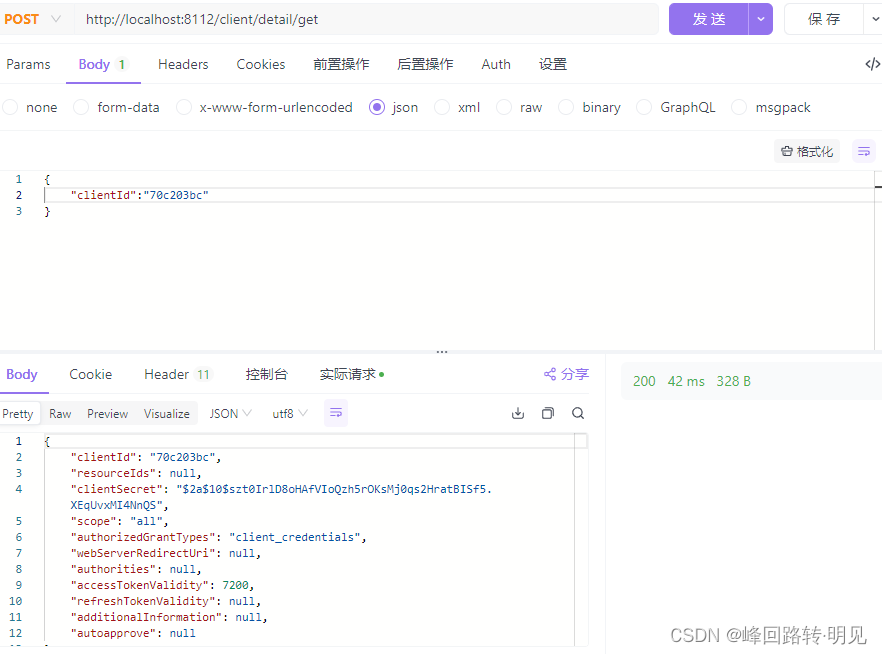
8.测试-(查询客户端配置)
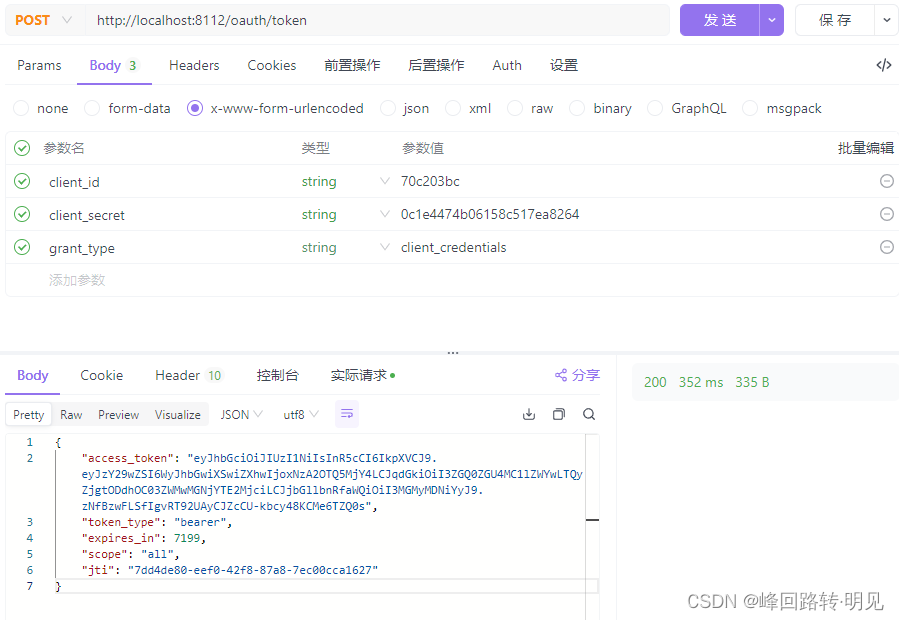
9.测试-(为三方生成access_token)


 617
617


 被折叠的 条评论
为什么被折叠?
被折叠的 条评论
为什么被折叠?
 到【灌水乐园】发言


