


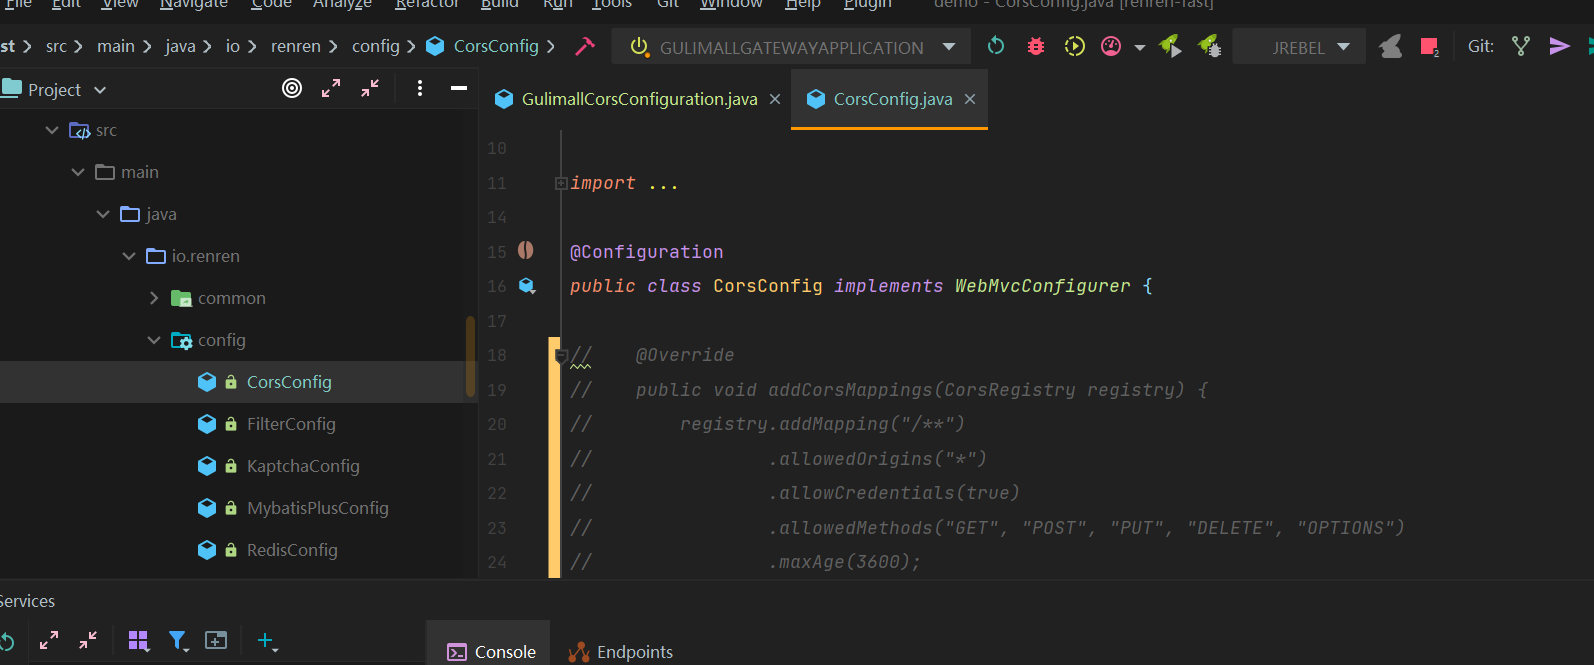
统一解决跨域
跨域:是指的浏览器不能执行其他网站的脚本,它是由浏览器的同源策略造成的,是浏览器对javascript施加的安全限制
同源策略:是指协议,域名,端口都要相同,其中有一个不同都会产生跨域
package com.zhouzhou.gulimall.gateway.config;

import org.springframework.context.annotation.Bean;
import org.springframework.context.annotation.Configuration;
import org.springframework.web.cors.CorsConfiguration;
import org.springframework.web.cors.reactive.CorsWebFilter;
import org.springframework.web.cors.reactive.UrlBasedCorsConfigurationSource;

@Configuration
public class GulimallCorsConfiguration {

    @Bean
    public CorsWebFilter corsWebFilter(){
        UrlBasedCorsConfigurationSource source = new UrlBasedCorsConfigurationSource();

        CorsConfiguration corsConfiguration = new CorsConfiguration();

        //1.配置跨域
        corsConfiguration.addAllowedHeader("*");
        corsConfiguration.addAllowedMethod("*");
        corsConfiguration.addAllowedOrigin("*");
        corsConfiguration.setAllowCredentials(true);

        source.registerCorsConfiguration("/**", corsConfiguration);
        return new CorsWebFilter(source);
    }

}
在 renren-fast 中把对应的 cors 注释掉
这样就可以登录进入到首页了
查询
分类维护的 url
http://localhost:88/api/product/category/list/tree 目前是 404
配置网关
- id: product_route
  uri: lb://gulimall-product
  predicates:
    - Path=/api/product/**
  filters:
    - RewritePath=/api/(?<segment>/?.*), /$\{segment}
把 product 模块 注册进 nacos
nacos 里面创建一个 namespace
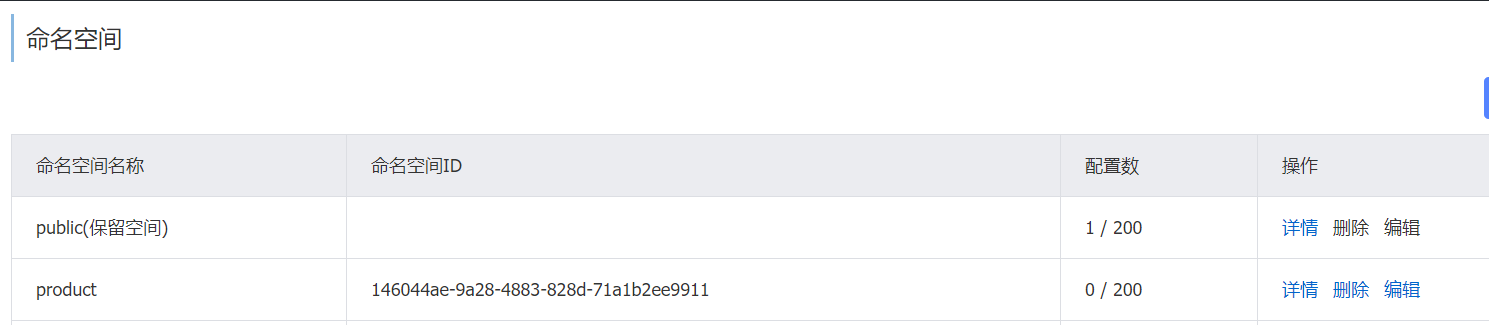
spring.application.name=gulimall-product

spring.cloud.nacos.config.server-addr=127.0.0.1:8848

spring.cloud.nacos.config.namespace=146044ae-9a28-4883-828d-71a1b2ee9911
bootstrap.properties
服务注册发现
主启动类加上注解
yml 加上 注册中心地址
调整 路由 ip 设置: 把精确路由放在前面
<template>
  <div>
    <el-tree
      :data="menus"
      :props="defaultProps"
      @node-click="handleNodeClick"
    ></el-tree>
  </div>
</template>

<script>
export default {
  data() {
    return {
      menus: [],
      defaultProps: {
        children: "children",
        label: "name",
      },
    };
  },
  methods: {
    handleNodeClick(data) {
      console.log(data);
    },
    getMenus() {
      this.$http({
        url: this.$http.adornUrl("/product/category/list/tree"),
        method: "get",
      }).then(({data})  => {
        console.log("成功获取到菜单数据...", data.data);
        this.menus = data.data
      });
    },
  },
  created() {
    this.getMenus();
  },
};
</script>

<style></style>

删除
页面效果

<template>
  <div>
    <el-tree  show-checkbox :data="menus" :props="defaultProps" :expand-on-click-node="false" node-key="catId">
      <span class="custom-tree-node" slot-scope="{ node, data }">
        <span>{{ node.label }}</span>
        <span>
          <!-- 只有一级和二级分类显示 append -->
          <el-button v-if="node.level <= 2" type="text" size="mini" @click="() => append(data)">
            Append
          </el-button>
          <!-- 只有没有子节点才显示 -->
          <el-button v-if="node.childNodes.length == 0"  type="text" size="mini" @click="() => remove(node, data)">
            Delete
          </el-button>
        </span>
      </span>
    </el-tree>
  </div>
</template>

<script>
export default {
  data() {
    return {
      menus: [],
      defaultProps: {
        children: "children",
        label: "name",
      },
    };
  },
  methods: {
    append(data) {
      console.log("append");
    },

    remove(node, data) {
      console.log("remove", node, data);
    },
    getMenus() {
      this.$http({
        url: this.$http.adornUrl("/product/category/list/tree"),
        method: "get",
      }).then(({ data }) => {
        console.log("成功获取到菜单数据...", data.data);
        this.menus = data.data;
      });
    },
  },
  created() {
    this.getMenus();
  },
};
</script>

<style></style>
后端接口
使用逻辑删除
1.配置全局的逻辑删除规则
application.yml
logic-delete-value: 1
logic-not-delete-value: 0
2.加上逻辑删除注解
@TableLogic(value = "1", delval = "0")
private Integer showStatus;
/**
     * 删除
     * @RequestBody 获取请求体,必须发送POST请求
     * SpringMVC会自动将请求体的数据转变成 对应的对象
     */
    @RequestMapping("/delete")
//    @RequiresPermissions("product:category:delete")
    public R delete(@RequestBody Long[] catIds) {

        //1. 检查当前删除的菜单,是否被别的菜单使用
//        categoryService.removeByIds(Arrays.asList(catIds));

        categoryService.removeMenuByIds(Arrays.asList(catIds));
        return R.ok();
    }
@Override
public void removeMenuByIds(List<Long> asList) {
    // TODO: 1. 检查当前删除的菜单,是否被别的菜单使用

    // 逻辑删除
    baseMapper.deleteBatchIds(asList);
}
这里留下一个 TODO

# 日志配置
logging:
  level:
    com.zhouzhou.gulimall.product: debug
测试

这里有一个小问题,注意 navicate 一页显示的记录数目


打开日志之后可以看到,这里的逻辑删除实际是执行的 update
前后端联调
把基础的 get, post 请求 抽取成代码片段

{
  // Place your 全局 snippets here. Each snippet is defined under a snippet name and has a scope, prefix, body and
  // description. Add comma separated ids of the languages where the snippet is applicable in the scope field. If scope
  // is left empty or omitted, the snippet gets applied to all languages. The prefix is what is
  // used to trigger the snippet and the body will be expanded and inserted. Possible variables are:
  // $1, $2 for tab stops, $0 for the final cursor position, and ${1:label}, ${2:another} for placeholders.
  // Placeholders with the same ids are connected.
  // Example:
  "http-get请求": {
    "prefix": "httpget",
    "body": [
      "this.\\$http({",
      "url: this.\\$http.adornUrl(''),",
      "method: 'get',",
      "data: this.\\$http.adornData({})",
      "}).then(({data}) => {",
      "})"
    ],
    "description": "httpGET请求"
  },
  "http-post请求": {
    "prefix": "httppost",
    "body": [
      "this.\\$http({",
      "url: this.\\$http.adornUrl(''),",
      "method: 'post',",
      "data: this.\\$http.adornData(data, false)",
      "}).then(({data}) => {",
      "})"
    ],
    "description": "httpPOST请求"
  }
}
<template>
  <div>
    <el-tree
      show-checkbox
      :data="menus"
      :props="defaultProps"
      :expand-on-click-node="false"
      node-key="catId"
      :default-expanded-keys="expandedKey"
    >
      <span class="custom-tree-node" slot-scope="{ node, data }">
        <span>{{ node.label }}</span>
        <span>
          <!-- 只有一级和二级分类显示 append -->
          <el-button
            v-if="node.level <= 2"
            type="text"
            size="mini"
            @click="() => append(data)"
          >
            Append
          </el-button>
          <!-- 只有没有子节点才显示 -->
          <el-button
            v-if="node.childNodes.length == 0"
            type="text"
            size="mini"
            @click="() => remove(node, data)"
          >
            Delete
          </el-button>
        </span>
      </span>
    </el-tree>
  </div>
</template>

<script>
export default {
  data() {
    return {
      // 默认展开
      expandedKey: [],
      menus: [],
      defaultProps: {
        children: "children",
        label: "name"
      }
    };
  },
  methods: {
    append(data) {
      console.log("append");
    },

    remove(node, data) {
      var ids = [data.catId];
      // 弹出框
      this.$confirm(`是否删除【${data.name}】菜单?`, "提示", {
        confirmButtonText: "确定",
        cancelButtonText: "取消",
        type: "warning"
      }).then(() => {
        this.$http({
          url: this.$http.adornUrl("/product/category/delete"),
          method: "post",
          data: this.$http.adornData(ids, false)
        })
          .then(({ data }) => {
            // 消息提示
            this.$message({
              message: "菜单删除成功",
              type: "success"
            });
            // 刷新出新的菜单
            this.getMenus();
            // 设置需要默认展开的菜单
            this.expandedKey = [node.parent.data.catId]
          })
          .catch(() => {});
      });
    },
    getMenus() {
      this.$http({
        url: this.$http.adornUrl("/product/category/list/tree"),
        method: "get"
      }).then(({ data }) => {
        console.log("成功获取到菜单数据...", data.data);
        this.menus = data.data;
      });
    }
  },
  created() {
    this.getMenus();
  }
};
</script>

<style></style>
新增
使用对话框
<template>
  <div>
    <el-tree
      show-checkbox
      :data="menus"
      :props="defaultProps"
      :expand-on-click-node="false"
      node-key="catId"
      :default-expanded-keys="expandedKey"
    >
      <span class="custom-tree-node" slot-scope="{ node, data }">
        <span>{{ node.label }}</span>
        <span>
          <!-- 只有一级和二级分类显示 append -->
          <el-button
            v-if="node.level <= 2"
            type="text"
            size="mini"
            @click="() => append(data)"
          >
            Append
          </el-button>
          <!-- 只有没有子节点才显示 -->
          <el-button
            v-if="node.childNodes.length == 0"
            type="text"
            size="mini"
            @click="() => remove(node, data)"
          >
            Delete
          </el-button>
        </span>
      </span>
    </el-tree>
    <el-dialog title="提示" :visible.sync="dialogVisible" width="30%">
      <el-form :model="category">
        <el-form-item label="分类名称">
          <el-input v-model="category.name" autocomplete="off"></el-input>
        </el-form-item>
      </el-form>
      <span slot="footer" class="dialog-footer">
        <el-button @click="dialogVisible = false">取 消</el-button>
        <el-button type="primary" @click="addCategory">确 定</el-button>
      </span>
    </el-dialog>
  </div>
</template>

<script>
export default {
  data() {
    return {
      // 表单
      category: {
        name: "",
        parentCid: 0,
        catLevel: 0,
        showStatus: 1,
        sort: 0
      },
      // 对话框是否打开
      dialogVisible: false,
      // 默认展开
      expandedKey: [],
      menus: [],
      defaultProps: {
        children: "children",
        label: "name"
      }
    };
  },
  methods: {
    append(data) {
      console.log("append");
      // 打开对话框
      this.dialogVisible = true;
      // 赋值 在哪个分类上点击了 append
      this.category.parentCid = data.catId;
      this.category.catLevel = data.catLevel * 1 + 1;
    },
    // 添加三级分类
    addCategory() {
      console.log("提交的三级分类数据", this.category);
      this.$http({
        url: this.$http.adornUrl("/product/category/save"),
        method: "post",
        data: this.$http.adornData(this.category, false)
      }).then(({ data }) => {
        // 消息提示
        this.$message({
          message: "菜单保存成功",
          type: "success"
        });
        // 关闭对话框
        this.dialogVisible = false;
        // 刷新出新的菜单
        this.getMenus();
        //设置需要默认展开的菜单
        this.expandedKey = [this.category.parentCid];
      });
    },

    remove(node, data) {
      var ids = [data.catId];
      // 弹出框
      this.$confirm(`是否删除【${data.name}】菜单?`, "提示", {
        confirmButtonText: "确定",
        cancelButtonText: "取消",
        type: "warning"
      }).then(() => {
        this.$http({
          url: this.$http.adornUrl("/product/category/delete"),
          method: "post",
          data: this.$http.adornData(ids, false)
        })
          .then(({ data }) => {
            // 消息提示
            this.$message({
              message: "菜单删除成功",
              type: "success"
            });
            // 刷新出新的菜单
            this.getMenus();
            // 设置需要默认展开的菜单
            this.expandedKey = [node.parent.data.catId];
          })
          .catch(() => {});
      });
    },
    getMenus() {
      this.$http({
        url: this.$http.adornUrl("/product/category/list/tree"),
        method: "get"
      }).then(({ data }) => {
        console.log("成功获取到菜单数据...", data.data);
        this.menus = data.data;
      });
    }
  },
  created() {
    this.getMenus();
  }
};
</script>

<style></style>
对应的接口
 /**
     * 保存
     */
    @RequestMapping("/save")
//     @RequiresPermissions("product:category:save")
    public R save(@RequestBody CategoryEntity category) {
        categoryService.save(category);

        return R.ok();
    }
无需修改


 1万+
1万+


 被折叠的 条评论
为什么被折叠?
被折叠的 条评论
为什么被折叠?
 到【灌水乐园】发言


