


//本文章参看BliBli学习总结,感谢提供视频的北京动力节点,本文章仅分享供大家参考学习,没有商业用途,谢谢!
为什么要使用事务管理?
事务是一组sql语句的集合,在开发项目时,sql语句的执行往往有多条同时执行,这是就要保证所有语句都执行正确,才能完成某个功能,即执行的语句都能成功或都失败,否则就会出现数据库数据异常,此时就需要对事务进行管理,如果sql语句集合有报错语句,执行回滚操作。
第一步:实现基本的业务功能
1、创建数据库表
数据库名:ssm
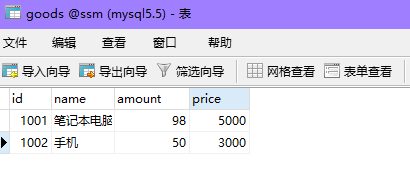
表goods

表sale

2、新建一个项目:spring-trans


3、修改pom.xml文件
<?xml version="1.0" encoding="UTF-8"?>

<project xmlns="http://maven.apache.org/POM/4.0.0" xmlns:xsi="http://www.w3.org/2001/XMLSchema-instance"
  xsi:schemaLocation="http://maven.apache.org/POM/4.0.0 http://maven.apache.org/xsd/maven-4.0.0.xsd">
  <modelVersion>4.0.0</modelVersion>

  <groupId>com.bjpowernode</groupId>
  <artifactId>spring-trans</artifactId>
  <version>1.0-SNAPSHOT</version>

  <name>spring-trans</name>
  <!-- FIXME change it to the project's website -->
  <url>http://www.example.com</url>

  <properties>
    <project.build.sourceEncoding>UTF-8</project.build.sourceEncoding>
    <maven.compiler.source>1.8</maven.compiler.source>
    <maven.compiler.target>1.8</maven.compiler.target>
  </properties>

  <dependencies>
    <!--单元测试-->
    <dependency>
      <groupId>junit</groupId>
      <artifactId>junit</artifactId>
      <version>4.11</version>
      <scope>test</scope>
    </dependency>
    <!--spring核心ioc-->
    <dependency>
      <groupId>org.springframework</groupId>
      <artifactId>spring-context</artifactId>
      <version>5.2.5.RELEASE</version>
    </dependency>
    <!--做spring事务用到的-->
    <dependency>
      <groupId>org.springframework</groupId>
      <artifactId>spring-tx</artifactId>
      <version>5.2.5.RELEASE</version>
    </dependency>
    <dependency>
      <groupId>org.springframework</groupId>
      <artifactId>spring-jdbc</artifactId>
      <version>5.2.5.RELEASE</version>
    </dependency>
    <!--mybatis依赖-->
    <dependency>
      <groupId>org.mybatis</groupId>
      <artifactId>mybatis</artifactId>
      <version>3.5.1</version>
    </dependency>
    <!--mybatis和spring集成的依赖-->
    <dependency>
      <groupId>org.mybatis</groupId>
      <artifactId>mybatis-spring</artifactId>
      <version>1.3.1</version>
    </dependency>
    <!--mysql驱动-->
    <dependency>
      <groupId>mysql</groupId>
      <artifactId>mysql-connector-java</artifactId>
      <version>5.1.9</version>
    </dependency>
    <!--阿里公司的数据库连接池-->
    <dependency>
      <groupId>com.alibaba</groupId>
      <artifactId>druid</artifactId>
      <version>1.1.12</version>
    </dependency>
  </dependencies>

  <build>
    <!--目的是把src/main/java目录中的xml文件包含到输出结果中。输出到classes目录中-->
    <resources>
      <resource>
        <directory>src/main/java</directory><!--所在的目录-->
        <includes><!--包括目录下的.properties,.xml 文件都会扫描到-->
          <include>**/*.properties</include>
          <include>**/*.xml</include>
        </includes>
        <filtering>false</filtering>
      </resource>
    </resources>
    <!--指定jdk的版本-->
    <plugins>
      <plugin>
        <artifactId>maven-compiler-plugin</artifactId>
        <version>3.1</version>
        <configuration>
          <source>1.8</source>
          <target>1.8</target>
        </configuration>
      </plugin>
    </plugins>
  </build>
</project>
4、java/com.bjpowernode.domain包,创建实体类
Goods.java
package com.bjpowernode.domain;

public class Goods {
    private Integer id;
    private String name;
    private Integer amount;
    private float price;

    public Integer getId() {
        return id;
    }

    public void setId(Integer id) {
        this.id = id;
    }

    public String getName() {
        return name;
    }

    public void setName(String name) {
        this.name = name;
    }

    public Integer getAmount() {
        return amount;
    }

    public void setAmount(Integer amount) {
        this.amount = amount;
    }

    public float getPrice() {
        return price;
    }

    public void setPrice(float price) {
        this.price = price;
    }
}
Sale.java
package com.bjpowernode.domain;

public class Sale {
    private Integer id;
    private Integer gid;
    private Integer nums;

    public Integer getId() {
        return id;
    }

    public void setId(Integer id) {
        this.id = id;
    }

    public Integer getGid() {
        return gid;
    }

    public void setGid(Integer gid) {
        this.gid = gid;
    }

    public Integer getNums() {
        return nums;
    }

    public void setNums(Integer nums) {
        this.nums = nums;
    }
}
5、java/com.bjpowernode.dao包中,定义接口
GoodsDao.java
package com.bjpowernode.dao;

import com.bjpowernode.domain.Goods;

public interface GoodsDao {
    int updateGoods(Goods goods);
    Goods selectGoods(Integer goodsId);
}
SaleDao.java
package com.bjpowernode.dao;


import com.bjpowernode.domain.Sale;

public interface SaleDao {
  int insertSale(Sale sale);
}
6、java/com.bjpowernode.dao包中,定义dao接口对象的sql映射文件
GoodsDao.xml
<?xml version="1.0" encoding="UTF-8" ?>
<!DOCTYPE mapper
        PUBLIC "-//mybatis.org//DTD Mapper 3.0//EN"
        "http://mybatis.org/dtd/mybatis-3-mapper.dtd">
<mapper namespace="com.bjpowernode.dao.GoodsDao">
    <update id="updateGoods">
        update goods set amount=amount-#{amount} where id=#{id}
    </update>
    <select id="selectGoods" resultType="Goods">
       select id,name,price,amount from goods where id=#{goodsId}
    </select>
</mapper>
SaleDao.xml
<?xml version="1.0" encoding="UTF-8" ?>
<!DOCTYPE mapper
        PUBLIC "-//mybatis.org//DTD Mapper 3.0//EN"
        "http://mybatis.org/dtd/mybatis-3-mapper.dtd">
<mapper namespace="com.bjpowernode.dao.SaleDao">
    <insert id="insertSale">
        insert into sale(gid,nums) values(#{gid},#{nums})
    </insert>
</mapper>
7、java/com.bjpowernode.excep包中,定义异常类
NotEnoughException.java
package com.bjpowernode.excep;

public class NotEnoughException extends RuntimeException{
    public NotEnoughException(){
        super();
    }
    public NotEnoughException(String msg){
        super(msg);
    }
}
8、java/com.bjpowernode.service包中,定义service接口
BuyGoodsService.java
package com.bjpowernode.service;

public interface BuyGoodsService {
    public void buy(Integer goodsId,Integer amount);
}
9、java/com.bjpowernode.service.impl包中,定义service接口实现类
BuyGoodsServiceImpl.java
package com.bjpowernode.service.impl;

import com.bjpowernode.dao.GoodsDao;
import com.bjpowernode.dao.SaleDao;
import com.bjpowernode.domain.Goods;
import com.bjpowernode.domain.Sale;
import com.bjpowernode.excep.NotEnoughException;
import com.bjpowernode.service.BuyGoodsService;
//类定义
public class BuyGoodsServiceImpl implements BuyGoodsService {
    //Dao属性
    private GoodsDao goodsDao;
    private SaleDao saleDao;
    //buy方法
    @Override
    public void buy(Integer goodsId, Integer amount) {
        Sale sale = new Sale();
        sale.setGid(goodsId);
        sale.setNums(amount);
        saleDao.insertSale(sale);

        Goods goods = goodsDao.selectGoods(goodsId);
        if(goods==null){
            throw new NullPointerException("编号是:"+goodsId+",商品不存在");
        }
        if(goods.getAmount()<amount){
            throw new NotEnoughException("编号是:"+goodsId+",商品库存不足");
        }

        goods = new Goods();
        goods.setAmount(amount);
        goods.setId(goodsId);
        goodsDao.updateGoods(goods);
        System.out.println("=====buy方法的完成====");
    }
    public void setGoodsDao(GoodsDao goodsDao) {
        this.goodsDao = goodsDao;
    }
    public void setSaleDao(SaleDao saleDao) {
        this.saleDao = saleDao;
    }
}
10、main下新建resources目录,标记目录为resources根,并创建以下文件
applicationContext.xml
<?xml version="1.0" encoding="UTF-8"?>
<beans xmlns="http://www.springframework.org/schema/beans"
       xmlns:xsi="http://www.w3.org/2001/XMLSchema-instance"
       xmlns:context="http://www.springframework.org/schema/context"
       xsi:schemaLocation="http://www.springframework.org/schema/beans http://www.springframework.org/schema/beans/spring-beans.xsd http://www.springframework.org/schema/context https://www.springframework.org/schema/context/spring-context.xsd">

    <!--
       把数据库的配置信息,写在一个独立的文件,编译修改数据库的配置内容
       spring知道jdbc.properties文件的位置
    -->
    <context:property-placeholder location="classpath:jdbc.properties" />

    <!--声明数据源DataSource, 作用是连接数据库的-->
    <bean id="myDataSource" class="com.alibaba.druid.pool.DruidDataSource"
          init-method="init" destroy-method="close">
        <!--set注入给DruidDataSource提供连接数据库信息 -->
        <!--    使用属性配置文件中的数据,语法 ${key} -->
        <property name="url" value="${jdbc.url}" /><!--setUrl()-->
        <property name="username" value="${jdbc.username}"/>
        <property name="password" value="${jdbc.passwd}" />
        <property name="maxActive" value="${jdbc.max}" />
    </bean>

    <!--声明的是mybatis中提供的SqlSessionFactoryBean类,这个类内部创建SqlSessionFactory的
        SqlSessionFactory  sqlSessionFactory = new ..
    -->
    <bean id="sqlSessionFactory" class="org.mybatis.spring.SqlSessionFactoryBean">
        <!--set注入,把数据库连接池付给了dataSource属性-->
        <property name="dataSource" ref="myDataSource" />
        <!--mybatis主配置文件的位置
           configLocation属性是Resource类型,读取配置文件
           它的赋值,使用value,指定文件的路径,使用classpath:表示文件的位置
        -->
        <property name="configLocation" value="classpath:mybatis.xml" />
    </bean>

    <!--声明MyBatis的扫描对象,创建dao对象,使用SqlSession的getMapper(StudentDao.class)
        MapperScannerConfigurer:在内部调用getMapper()生成每个dao接口的代理对象。

    -->
    <bean class="org.mybatis.spring.mapper.MapperScannerConfigurer">
        <!--指定SqlSessionFactory对象的id-->
        <property name="sqlSessionFactoryBeanName" value="sqlSessionFactory" />
        <!--指定包名, 包名是dao接口所在的包名。
            MapperScannerConfigurer会扫描这个包中的所有接口,把每个接口都执行
            一次getMapper()方法,得到每个接口的dao对象。
            创建好的dao对象放入到spring的容器中的。 dao对象的默认名称是 接口名首字母小写
        -->
        <property name="basePackage" value="com.bjpowernode.dao"/>
    </bean>

    <!--声明service业务层对象-->
    <bean id="buyService" class="com.bjpowernode.service.impl.BuyGoodsServiceImpl">
        <property name="goodsDao" ref="goodsDao" />
        <property name="saleDao" ref="saleDao" />
    </bean>

</beans>
jdbc.properties
jdbc.url=jdbc:mysql://localhost:3306/ssm
jdbc.username=root
jdbc.passwd=root
jdbc.max=30
mybatis.xml
<?xml version="1.0" encoding="UTF-8" ?>
<!DOCTYPE configuration
        PUBLIC "-//mybatis.org//DTD Config 3.0//EN"
        "http://mybatis.org/dtd/mybatis-3-config.dtd">
<configuration>

    <!--设置别名-->
    <typeAliases>
        <!--name:实体类所在的包名
            表示com.bjpowernode.domain包中的列名就是别名
            你可以使用Student表示com.bjpowenrode.domain.Student
        -->
        <package name="com.bjpowernode.domain"/>
    </typeAliases>

    <!-- sql mapper(sql映射文件)的位置-->
    <mappers>
        <!--
          name:是包名, 这个包中的所有mapper.xml一次都能加载
        -->
        <package name="com.bjpowernode.dao"/>
    </mappers>
</configuration>
11、test/java/com.bjpowernode包中定义测试类
MyTest.java
package com.bjpowernode;

import com.bjpowernode.service.BuyGoodsService;
import org.junit.Test;
import org.springframework.context.ApplicationContext;
import org.springframework.context.support.ClassPathXmlApplicationContext;

public class MyTest {
    @Test
    public void testBuy(){
        String configLocation ="applicationContext.xml";
        ApplicationContext ctx= new ClassPathXmlApplicationContext(configLocation);
        BuyGoodsService service = (BuyGoodsService) ctx.getBean("buyService");
        service.buy(1001,2);
    }
}
第二步:实现事务管理
第一种方法:使用spring的事务注解管理事务
1、在applicationContext.xml文件beans标签里,声明事务管理器
 <!--使用spring的事务处理-->
    <!--1. 声明事务管理器-->
    <bean id="transactionManager" class="org.springframework.jdbc.datasource.DataSourceTransactionManager">
        <!--连接的数据库, 指定数据源-->
        <property name="dataSource" ref="myDataSource" />
    </bean>
2、在1后边接着声明事务注解驱动
 <!--2. 开启事务注解驱动,告诉spring使用注解管理事务,创建代理对象
           transaction-manager:事务管理器对象的id
           导入类的包为:http://www.springframework.org/schema/tx
    -->
    <tx:annotation-driven transaction-manager="transactionManager" />
applicationContext.xml完整代码
<?xml version="1.0" encoding="UTF-8"?>
<beans xmlns="http://www.springframework.org/schema/beans"
       xmlns:xsi="http://www.w3.org/2001/XMLSchema-instance"
       xmlns:context="http://www.springframework.org/schema/context"
       xmlns:tx="http://www.springframework.org/schema/tx"
       xsi:schemaLocation="http://www.springframework.org/schema/beans
       http://www.springframework.org/schema/beans/spring-beans.xsd
       http://www.springframework.org/schema/context
       https://www.springframework.org/schema/context/spring-context.xsd
       http://www.springframework.org/schema/tx
       http://www.springframework.org/schema/tx/spring-tx.xsd">

    <!--
       把数据库的配置信息,写在一个独立的文件,编译修改数据库的配置内容
       spring知道jdbc.properties文件的位置
    -->
    <context:property-placeholder location="classpath:jdbc.properties" />

    <!--声明数据源DataSource, 作用是连接数据库的-->
    <bean id="myDataSource" class="com.alibaba.druid.pool.DruidDataSource"
          init-method="init" destroy-method="close">
        <!--set注入给DruidDataSource提供连接数据库信息 -->
        <!--    使用属性配置文件中的数据,语法 ${key} -->
        <property name="url" value="${jdbc.url}" /><!--setUrl()-->
        <property name="username" value="${jdbc.username}"/>
        <property name="password" value="${jdbc.passwd}" />
        <property name="maxActive" value="${jdbc.max}" />
    </bean>

    <!--声明的是mybatis中提供的SqlSessionFactoryBean类,这个类内部创建SqlSessionFactory的
        SqlSessionFactory  sqlSessionFactory = new ..
    -->
    <bean id="sqlSessionFactory" class="org.mybatis.spring.SqlSessionFactoryBean">
        <!--set注入,把数据库连接池付给了dataSource属性-->
        <property name="dataSource" ref="myDataSource" />
        <!--mybatis主配置文件的位置
           configLocation属性是Resource类型,读取配置文件
           它的赋值,使用value,指定文件的路径,使用classpath:表示文件的位置
        -->
        <property name="configLocation" value="classpath:mybatis.xml" />
    </bean>

    <!--声明MyBatis的扫描对象,创建dao对象,使用SqlSession的getMapper(StudentDao.class)
        MapperScannerConfigurer:在内部调用getMapper()生成每个dao接口的代理对象。

    -->
    <bean class="org.mybatis.spring.mapper.MapperScannerConfigurer">
        <!--指定SqlSessionFactory对象的id-->
        <property name="sqlSessionFactoryBeanName" value="sqlSessionFactory" />
        <!--指定包名, 包名是dao接口所在的包名。
            MapperScannerConfigurer会扫描这个包中的所有接口,把每个接口都执行
            一次getMapper()方法,得到每个接口的dao对象。
            创建好的dao对象放入到spring的容器中的。 dao对象的默认名称是 接口名首字母小写
        -->
        <property name="basePackage" value="com.bjpowernode.dao"/>
    </bean>

    <!--声明service业务层对象-->
    <bean id="buyService" class="com.bjpowernode.service.impl.BuyGoodsServiceImpl">
        <property name="goodsDao" ref="goodsDao" />
        <property name="saleDao" ref="saleDao" />
    </bean>
    <!--使用spring的事务处理-->
    <!--1. 声明事务管理器-->
    <bean id="transactionManager" class="org.springframework.jdbc.datasource.DataSourceTransactionManager">
        <!--连接的数据库, 指定数据源-->
        <property name="dataSource" ref="myDataSource" />
    </bean>

    <!--2. 开启事务注解驱动,告诉spring使用注解管理事务,创建代理对象
           transaction-manager:事务管理器对象的id
           导入类的包为:http://www.springframework.org/schema/tx
    -->
    <tx:annotation-driven transaction-manager="transactionManager" />

</beans>
3、在service业务实现类中,public方法上,加入事务属性@Transactional
注意:Transactional若用在方法上,只能用于public方法上。对于其他非public方法,如果加上了注解@Transactional,虽然spring不会报错,但不会将指定事务织入到该方法中。因为spring会忽略掉所有非public方法上的@Transaction注解。
	如果@Transaction注解在类上,表示该类上的所有方法均将在执行是织入事务。
@Transactional的所有可选属性有:
	propagation;isolation;readOnly;timeout;rollbackFor;rollbackForClassName;noRollbackFor;noRollbackForClassName;
@Transactional的常用属性:
	rollbackFor:指定需要回滚的异常类。类型为Class[],默认值为空数组。
		rollbackFor的处理逻辑:spring框架会首先检查方法抛出的异常是不是在rollbackFor属性值中:
			1、如果抛出的异常在rollbackFor列表中,不管什么类型的异常,一定回滚
			2、如果抛出的异常不在rollbackFor列表中,spring会判断异常是不是RuntimeException(运行时异常),如果是!就一定回滚。也就是说,rollbackFor没有值或不写时,默认抛出RuntimeException异常。
@Transactional使用举例:
	1、不带任何属性:所有属性为默认值
	2、带属性举例:
		@Transactional(propagation = Propagation.REQUIRED,rollbackFor = {NotEnoughException.class,NullPointerException.class})
注意:Exception分为两类:
	运行时异常:RuntimeException及其子类,即只有在运行时才出现的异常。例如:NULLPointerException,ArrayIndexOutOfBoundsException;
	受查异常:也叫编译时异常,RuntimeException及其子类以外的其他异常,即在代码编写时要求必须捕获或抛出的异常,若不处理,则无法通过编译。例如:SQLException,ClassNotFoundException,IOException;
service/impl/BuyGoodsServiceImpl.java
package com.bjpowernode.service.impl;

import com.bjpowernode.dao.GoodsDao;
import com.bjpowernode.dao.SaleDao;
import com.bjpowernode.domain.Goods;
import com.bjpowernode.domain.Sale;
import com.bjpowernode.excep.NotEnoughException;
import com.bjpowernode.service.BuyGoodsService;
import org.springframework.transaction.annotation.Transactional;

import java.beans.Transient;

//类定义
public class BuyGoodsServiceImpl implements BuyGoodsService {
    //Dao属性
    private GoodsDao goodsDao;
    private SaleDao saleDao;
    //buy方法
    @Transactional
    @Override
    public void buy(Integer goodsId, Integer amount) {
        Sale sale = new Sale();
        sale.setGid(goodsId);
        sale.setNums(amount);
        saleDao.insertSale(sale);

        Goods goods = goodsDao.selectGoods(goodsId);
        if(goods==null){
            throw new NullPointerException("编号是:"+goodsId+",商品不存在");
        }
        if(goods.getAmount()<amount){
            throw new NotEnoughException("编号是:"+goodsId+",商品库存不足");
        }

        goods = new Goods();
        goods.setAmount(amount);
        goods.setId(goodsId);
        goodsDao.updateGoods(goods);
        System.out.println("=====buy方法的完成====");
    }
    public void setGoodsDao(GoodsDao goodsDao) {
        this.goodsDao = goodsDao;
    }
    public void setSaleDao(SaleDao saleDao) {
        this.saleDao = saleDao;
    }
}
4、测试方法
MyTest.java
package com.bjpowernode;

import com.bjpowernode.service.BuyGoodsService;
import org.junit.Test;
import org.springframework.context.ApplicationContext;
import org.springframework.context.support.ClassPathXmlApplicationContext;

public class MyTest {
	//实现业务基本功能测试
    @Test
    public void testBuy(){
        String configLocation ="applicationContext.xml";
        ApplicationContext ctx= new ClassPathXmlApplicationContext(configLocation);
        BuyGoodsService service = (BuyGoodsService) ctx.getBean("buyService");
        service.buy(1001,2);
    }
    //spring事务注解管理事务测试
    @Test
    public void test01(){
        String config="applicationContext.xml";
        ApplicationContext ctx = new ClassPathXmlApplicationContext(config);
        //从容器获取service
        BuyGoodsService service = (BuyGoodsService) ctx.getBean("buyService");
        //com.sun.proxy.$Proxy16 :jdk动态代理对象
        System.out.println("service是代理:"+service.getClass().getName());
        service.buy(1001,20);
    }

}
第二种方法:使用AspectJ的AOP配置管理事务
删除,或者注释掉第一种方法添加的所有代码
1、pom.xml文件中加入aspectJ的依赖
<!--aspectj依赖-->
    <dependency>
      <groupId>org.springframework</groupId>
      <artifactId>spring-aspects</artifactId>
      <version>5.2.5.RELEASE</version>
    </dependency>
完整的pom.xml文件
<?xml version="1.0" encoding="UTF-8"?>

<project xmlns="http://maven.apache.org/POM/4.0.0" xmlns:xsi="http://www.w3.org/2001/XMLSchema-instance"
  xsi:schemaLocation="http://maven.apache.org/POM/4.0.0 http://maven.apache.org/xsd/maven-4.0.0.xsd">
  <modelVersion>4.0.0</modelVersion>

  <groupId>com.bjpowernode</groupId>
  <artifactId>spring-trans</artifactId>
  <version>1.0-SNAPSHOT</version>

  <name>spring-trans</name>
  <!-- FIXME change it to the project's website -->
  <url>http://www.example.com</url>

  <properties>
    <project.build.sourceEncoding>UTF-8</project.build.sourceEncoding>
    <maven.compiler.source>1.8</maven.compiler.source>
    <maven.compiler.target>1.8</maven.compiler.target>
  </properties>

  <dependencies>
    <!--单元测试-->
    <dependency>
      <groupId>junit</groupId>
      <artifactId>junit</artifactId>
      <version>4.11</version>
      <scope>test</scope>
    </dependency>
    <!--spring核心ioc-->
    <dependency>
      <groupId>org.springframework</groupId>
      <artifactId>spring-context</artifactId>
      <version>5.2.5.RELEASE</version>
    </dependency>
    <!--做spring事务用到的-->
    <dependency>
      <groupId>org.springframework</groupId>
      <artifactId>spring-tx</artifactId>
      <version>5.2.5.RELEASE</version>
    </dependency>
    <dependency>
      <groupId>org.springframework</groupId>
      <artifactId>spring-jdbc</artifactId>
      <version>5.2.5.RELEASE</version>
    </dependency>
    <!--mybatis依赖-->
    <dependency>
      <groupId>org.mybatis</groupId>
      <artifactId>mybatis</artifactId>
      <version>3.5.1</version>
    </dependency>
    <!--mybatis和spring集成的依赖-->
    <dependency>
      <groupId>org.mybatis</groupId>
      <artifactId>mybatis-spring</artifactId>
      <version>1.3.1</version>
    </dependency>
    <!--mysql驱动-->
    <dependency>
      <groupId>mysql</groupId>
      <artifactId>mysql-connector-java</artifactId>
      <version>5.1.9</version>
    </dependency>
    <!--阿里公司的数据库连接池-->
    <dependency>
      <groupId>com.alibaba</groupId>
      <artifactId>druid</artifactId>
      <version>1.1.12</version>
    </dependency>
    <!--aspectj依赖-->
    <dependency>
      <groupId>org.springframework</groupId>
      <artifactId>spring-aspects</artifactId>
      <version>5.2.5.RELEASE</version>
    </dependency>
  </dependencies>

  <build>
    <!--目的是把src/main/java目录中的xml文件包含到输出结果中。输出到classes目录中-->
    <resources>
      <resource>
        <directory>src/main/java</directory><!--所在的目录-->
        <includes><!--包括目录下的.properties,.xml 文件都会扫描到-->
          <include>**/*.properties</include>
          <include>**/*.xml</include>
        </includes>
        <filtering>false</filtering>
      </resource>
    </resources>
    <!--指定jdk的版本-->
    <plugins>
      <plugin>
        <artifactId>maven-compiler-plugin</artifactId>
        <version>3.1</version>
        <configuration>
          <source>1.8</source>
          <target>1.8</target>
        </configuration>
      </plugin>
    </plugins>
  </build>
</project>
2、applicationContext.xml文件中,声明事务管理器
  <!--声明式事务处理:和源代码完全分离的-->
    <!--1.声明事务管理器对象-->
    <bean id="transactionManager" class="org.springframework.jdbc.datasource.DataSourceTransactionManager">
        <property name="dataSource" ref="myDataSource" />
    </bean>
3、applicationContext.xml文件中,配置事务通知
 <!--2.声明业务方法它的事务属性(隔离级别,传播行为,超时时间)
          id:自定义名称,表示 <tx:advice> 和 </tx:advice>之间的配置内容的
          transaction-manager:事务管理器对象的id
    -->
    <tx:advice id="myAdvice" transaction-manager="transactionManager">
        <!--tx:attributes:配置事务属性-->
        <tx:attributes>
            <!--tx:method:给具体的方法配置事务属性,method可以有多个,分别给不同的方法设置事务属性
                name:方法名称,1)完整的方法名称,不带有包和类。
                              2)方法可以使用通配符,* 表示任意字符
                propagation:传播行为,枚举值
                isolation:隔离级别
                rollback-for:你指定的异常类名,全限定类名。 发生异常一定回滚
            -->
            <tx:method name="buy" propagation="REQUIRED" isolation="DEFAULT"
                       rollback-for="java.lang.NullPointerException,com.bjpowernode.excep.NotEnoughException"/>

            <!--使用通配符,指定很多的方法-->
            <tx:method name="add*" propagation="REQUIRES_NEW" />
            <!--指定修改方法-->
            <tx:method name="modify*" />
            <!--删除方法-->
            <tx:method name="remove*" />
            <!--查询方法,query,search,find-->
            <tx:method name="*" propagation="SUPPORTS" read-only="true" />
        </tx:attributes>
    </tx:advice>
4、applicationContext.xml文件中配置aop
 <!--配置aop-->
    <aop:config>
        <!--配置切入点表达式:指定哪些包中类,要使用事务
            id:切入点表达式的名称,唯一值
            expression:切入点表达式,指定哪些类要使用事务,aspectj会创建代理对象
            com.bjpowernode.service
            com.crm.service
            com.service
        -->
        <aop:pointcut id="servicePt" expression="execution(* *..service..*.*(..))"/>
        <!--配置增强器:关联adivce和pointcut
           advice-ref:通知,上面tx:advice哪里的配置的id
           pointcut-ref:切入点表达式的id
        -->
        <aop:advisor advice-ref="myAdvice" pointcut-ref="servicePt" />
    </aop:config>
完整的applicationContext.xml文件
<?xml version="1.0" encoding="UTF-8"?>
<beans xmlns="http://www.springframework.org/schema/beans"
       xmlns:xsi="http://www.w3.org/2001/XMLSchema-instance"
       xmlns:context="http://www.springframework.org/schema/context"
       xmlns:tx="http://www.springframework.org/schema/tx" xmlns:aop="http://www.springframework.org/schema/aop"
       xsi:schemaLocation="http://www.springframework.org/schema/beans
       http://www.springframework.org/schema/beans/spring-beans.xsd
       http://www.springframework.org/schema/context
       https://www.springframework.org/schema/context/spring-context.xsd
       http://www.springframework.org/schema/tx
       http://www.springframework.org/schema/tx/spring-tx.xsd http://www.springframework.org/schema/aop https://www.springframework.org/schema/aop/spring-aop.xsd">

    <!--
       把数据库的配置信息,写在一个独立的文件,编译修改数据库的配置内容
       spring知道jdbc.properties文件的位置
    -->
    <context:property-placeholder location="classpath:jdbc.properties" />

    <!--声明数据源DataSource, 作用是连接数据库的-->
    <bean id="myDataSource" class="com.alibaba.druid.pool.DruidDataSource"
          init-method="init" destroy-method="close">
        <!--set注入给DruidDataSource提供连接数据库信息 -->
        <!--    使用属性配置文件中的数据,语法 ${key} -->
        <property name="url" value="${jdbc.url}" /><!--setUrl()-->
        <property name="username" value="${jdbc.username}"/>
        <property name="password" value="${jdbc.passwd}" />
        <property name="maxActive" value="${jdbc.max}" />
    </bean>

    <!--声明的是mybatis中提供的SqlSessionFactoryBean类,这个类内部创建SqlSessionFactory的
        SqlSessionFactory  sqlSessionFactory = new ..
    -->
    <bean id="sqlSessionFactory" class="org.mybatis.spring.SqlSessionFactoryBean">
        <!--set注入,把数据库连接池付给了dataSource属性-->
        <property name="dataSource" ref="myDataSource" />
        <!--mybatis主配置文件的位置
           configLocation属性是Resource类型,读取配置文件
           它的赋值,使用value,指定文件的路径,使用classpath:表示文件的位置
        -->
        <property name="configLocation" value="classpath:mybatis.xml" />
    </bean>

    <!--声明MyBatis的扫描对象,创建dao对象,使用SqlSession的getMapper(StudentDao.class)
        MapperScannerConfigurer:在内部调用getMapper()生成每个dao接口的代理对象。

    -->
    <bean class="org.mybatis.spring.mapper.MapperScannerConfigurer">
        <!--指定SqlSessionFactory对象的id-->
        <property name="sqlSessionFactoryBeanName" value="sqlSessionFactory" />
        <!--指定包名, 包名是dao接口所在的包名。
            MapperScannerConfigurer会扫描这个包中的所有接口,把每个接口都执行
            一次getMapper()方法,得到每个接口的dao对象。
            创建好的dao对象放入到spring的容器中的。 dao对象的默认名称是 接口名首字母小写
        -->
        <property name="basePackage" value="com.bjpowernode.dao"/>
    </bean>

    <!--声明service业务层对象-->
    <bean id="buyService" class="com.bjpowernode.service.impl.BuyGoodsServiceImpl">
        <property name="goodsDao" ref="goodsDao" />
        <property name="saleDao" ref="saleDao" />
    </bean>
    <!--使用spring的事务处理-->
    <!--1. 声明事务管理器-->

    <!--<bean id="transactionManager" class="org.springframework.jdbc.datasource.DataSourceTransactionManager"> -->
        <!--连接的数据库, 指定数据源-->
    <!--    <property name="dataSource" ref="myDataSource" />-->
    <!--</bean>-->
    <!--2. 开启事务注解驱动,告诉spring使用注解管理事务,创建代理对象
           transaction-manager:事务管理器对象的id
           导入类的包为:http://www.springframework.org/schema/tx
    -->
    <!--
    <tx:annotation-driven transaction-manager="transactionManager" />
    -->

    <!--使用AspectJ的AOP配置管理事务-->
    <!--声明式事务处理:和源代码完全分离的-->
    <!--1.声明事务管理器对象-->
    <bean id="transactionManager" class="org.springframework.jdbc.datasource.DataSourceTransactionManager">
        <property name="dataSource" ref="myDataSource" />
    </bean>

    <!--2.声明业务方法它的事务属性(隔离级别,传播行为,超时时间)
          id:自定义名称,表示 <tx:advice> 和 </tx:advice>之间的配置内容的
          transaction-manager:事务管理器对象的id
    -->
    <tx:advice id="myAdvice" transaction-manager="transactionManager">
        <!--tx:attributes:配置事务属性-->
        <tx:attributes>
            <!--tx:method:给具体的方法配置事务属性,method可以有多个,分别给不同的方法设置事务属性
                name:方法名称,1)完整的方法名称,不带有包和类。
                              2)方法可以使用通配符,* 表示任意字符
                propagation:传播行为,枚举值
                isolation:隔离级别
                rollback-for:你指定的异常类名,全限定类名。 发生异常一定回滚
            -->
            <tx:method name="buy" propagation="REQUIRED" isolation="DEFAULT"
                       rollback-for="java.lang.NullPointerException,com.bjpowernode.excep.NotEnoughException"/>

            <!--使用通配符,指定很多的方法-->
            <tx:method name="add*" propagation="REQUIRES_NEW" />
            <!--指定修改方法-->
            <tx:method name="modify*" />
            <!--删除方法-->
            <tx:method name="remove*" />
            <!--查询方法,query,search,find-->
            <tx:method name="*" propagation="SUPPORTS" read-only="true" />
        </tx:attributes>
    </tx:advice>

    <!--配置aop-->
    <aop:config>
        <!--配置切入点表达式:指定哪些包中类,要使用事务
            id:切入点表达式的名称,唯一值
            expression:切入点表达式,指定哪些类要使用事务,aspectj会创建代理对象
            com.bjpowernode.service
            com.crm.service
            com.service
        -->
        <aop:pointcut id="servicePt" expression="execution(* *..service..*.*(..))"/>
        <!--配置增强器:关联adivce和pointcut
           advice-ref:通知,上面tx:advice哪里的配置
           pointcut-ref:切入点表达式的id
        -->
        <aop:advisor advice-ref="myAdvice" pointcut-ref="servicePt" />
    </aop:config>
</beans>
5、测试方法
MyTest.java
package com.bjpowernode;

import com.bjpowernode.service.BuyGoodsService;
import org.junit.Test;
import org.springframework.context.ApplicationContext;
import org.springframework.context.support.ClassPathXmlApplicationContext;

public class MyTest {
    //实现业务基本功能测试
    @Test
    public void testBuy(){
        String configLocation ="applicationContext.xml";
        ApplicationContext ctx= new ClassPathXmlApplicationContext(configLocation);
        BuyGoodsService service = (BuyGoodsService) ctx.getBean("buyService");
        service.buy(1001,2);
    }
    //spring事务注解管理事务测试
    @Test
    public void test01(){
        String config="applicationContext.xml";
        ApplicationContext ctx = new ClassPathXmlApplicationContext(config);
        //从容器获取service
        BuyGoodsService service = (BuyGoodsService) ctx.getBean("buyService");
        //com.sun.proxy.$Proxy16 :jdk动态代理对象
        System.out.println("service是代理:"+service.getClass().getName());
        service.buy(1001,20);
    }
    //使用AspectJ的AOP配置管理事务测试
    @Test
    public void test02(){
        String config="applicationContext.xml";
        ApplicationContext ctx = new ClassPathXmlApplicationContext(config);
        //从容器种获取service
        BuyGoodsService service =(BuyGoodsService) ctx.getBean("buyService");
        //com.sun.proxy.$Proxy12
        System.out.println("service是代理:"+service.getClass().getName());
        //调用方法
        service.buy(1001,100);
    }

}


 194
194


 被折叠的 条评论
为什么被折叠?
被折叠的 条评论
为什么被折叠?
 到【灌水乐园】发言


