


导言
上接博文:springboot学习三:Spring Boot 配置文件语法、静态工具类读取配置文件
二、Spring Boot Profile 多环境配置
1. 介绍
我们在开发项目时,通常同一套程序会被发布到几个不同的环境,比如:开发、测试、生产等。其中每个环境的数据库地址、redis地 址、服务器端口等等配置都会不同,如果在为不同环境打包时都要频繁修改配置文件的话,那必将是个非常繁琐且容易发生错误的事。
对于多环境的配置,各种项目构建工具或是框架的基本思路是一致的,通过配置多份不同环境的配置文件,再通过打包命令指定需要 打包的内容之后进行区分打包,而Spring Boot 就更简单了,打好包后,只需在不同的环境下启动时候指定读取的配置文件就可以了。
在Spring Boot中多环境配置文件名需要满足application-{profile}.properties的格式,其中{profile}对应你的环境标识,比如:
- application-dev.properties:开发环境
- application-test.properties:测试环境
- application-prod.properties:生产环境
至于哪个具体的配置文件会被加载,需要在application.properties文件中通过spring.profiles.active属性来设置,其值对应{profile} 值。
如:spring.profiles.active=test就会加载application-test.properties配置文件内容
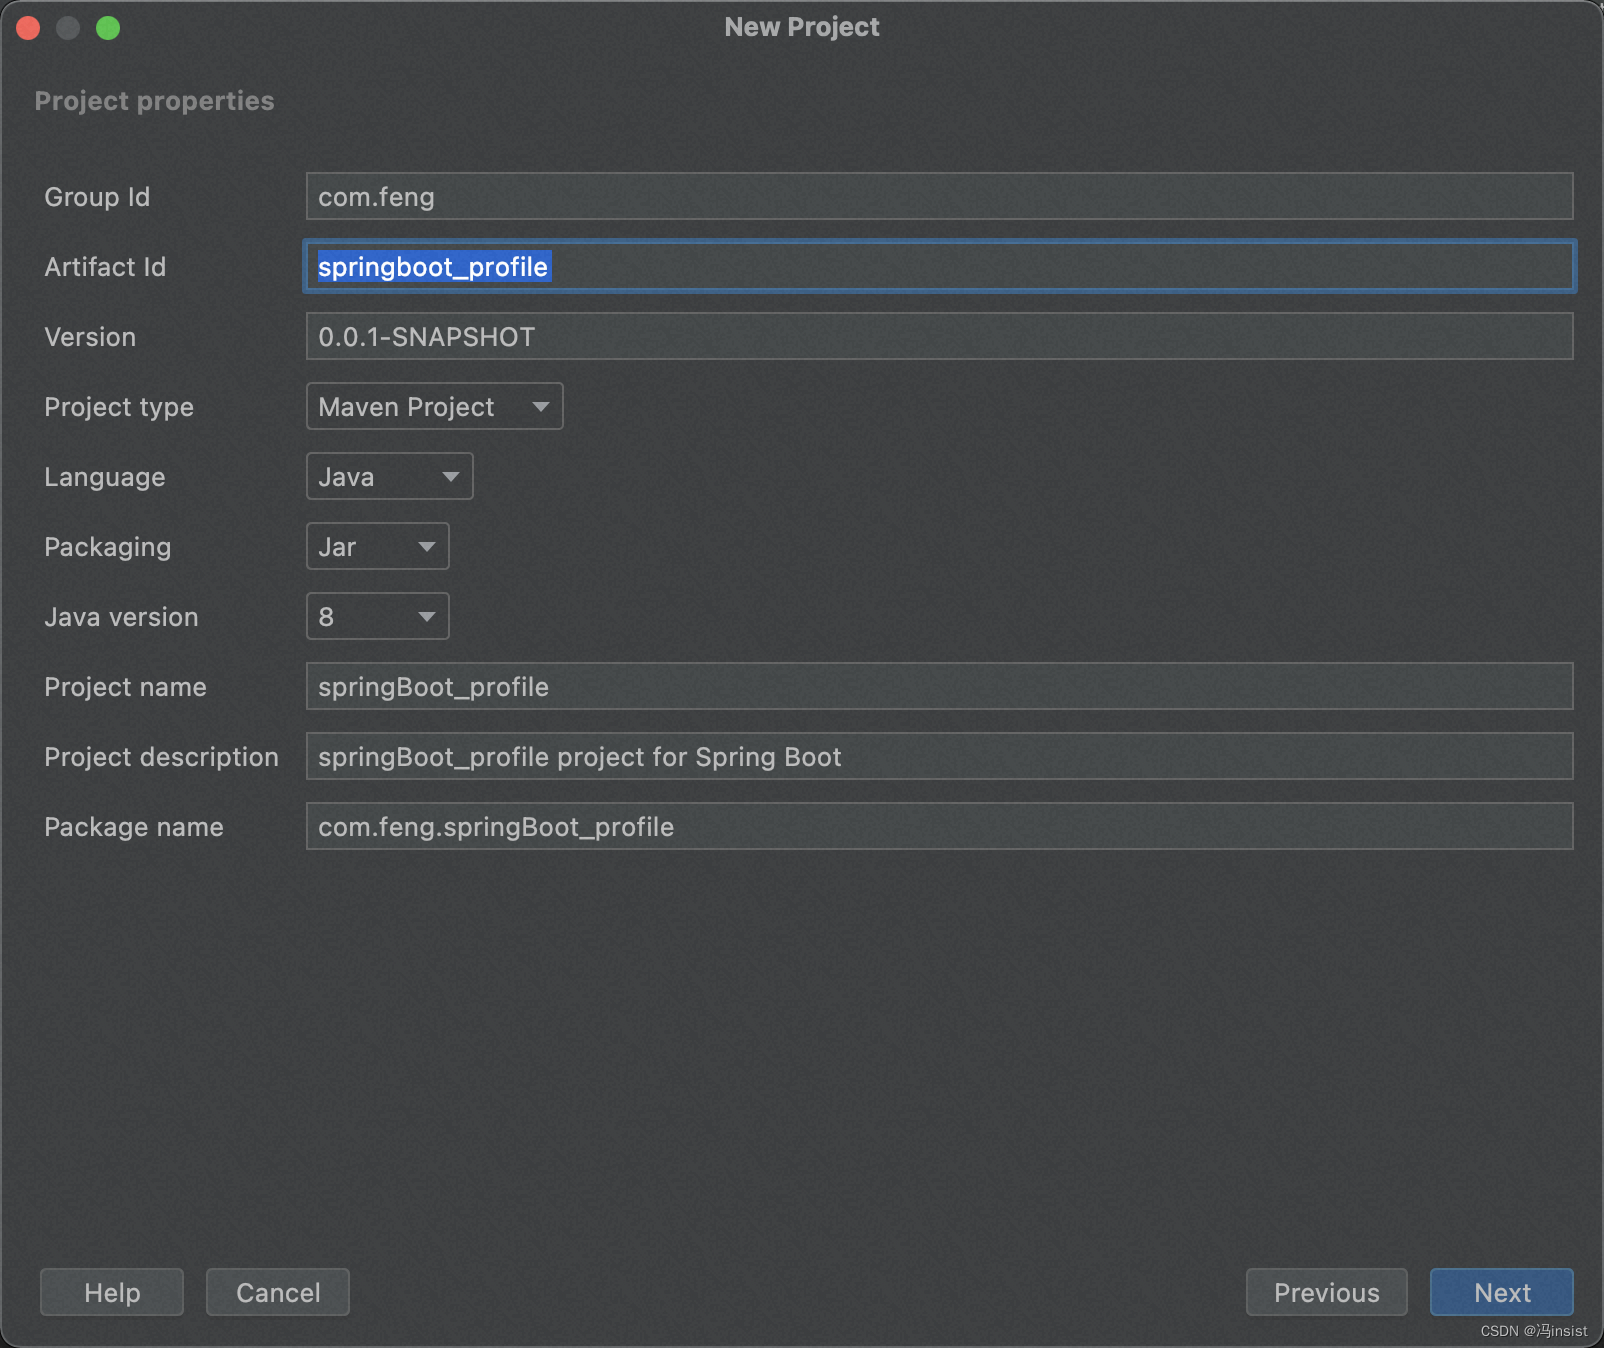
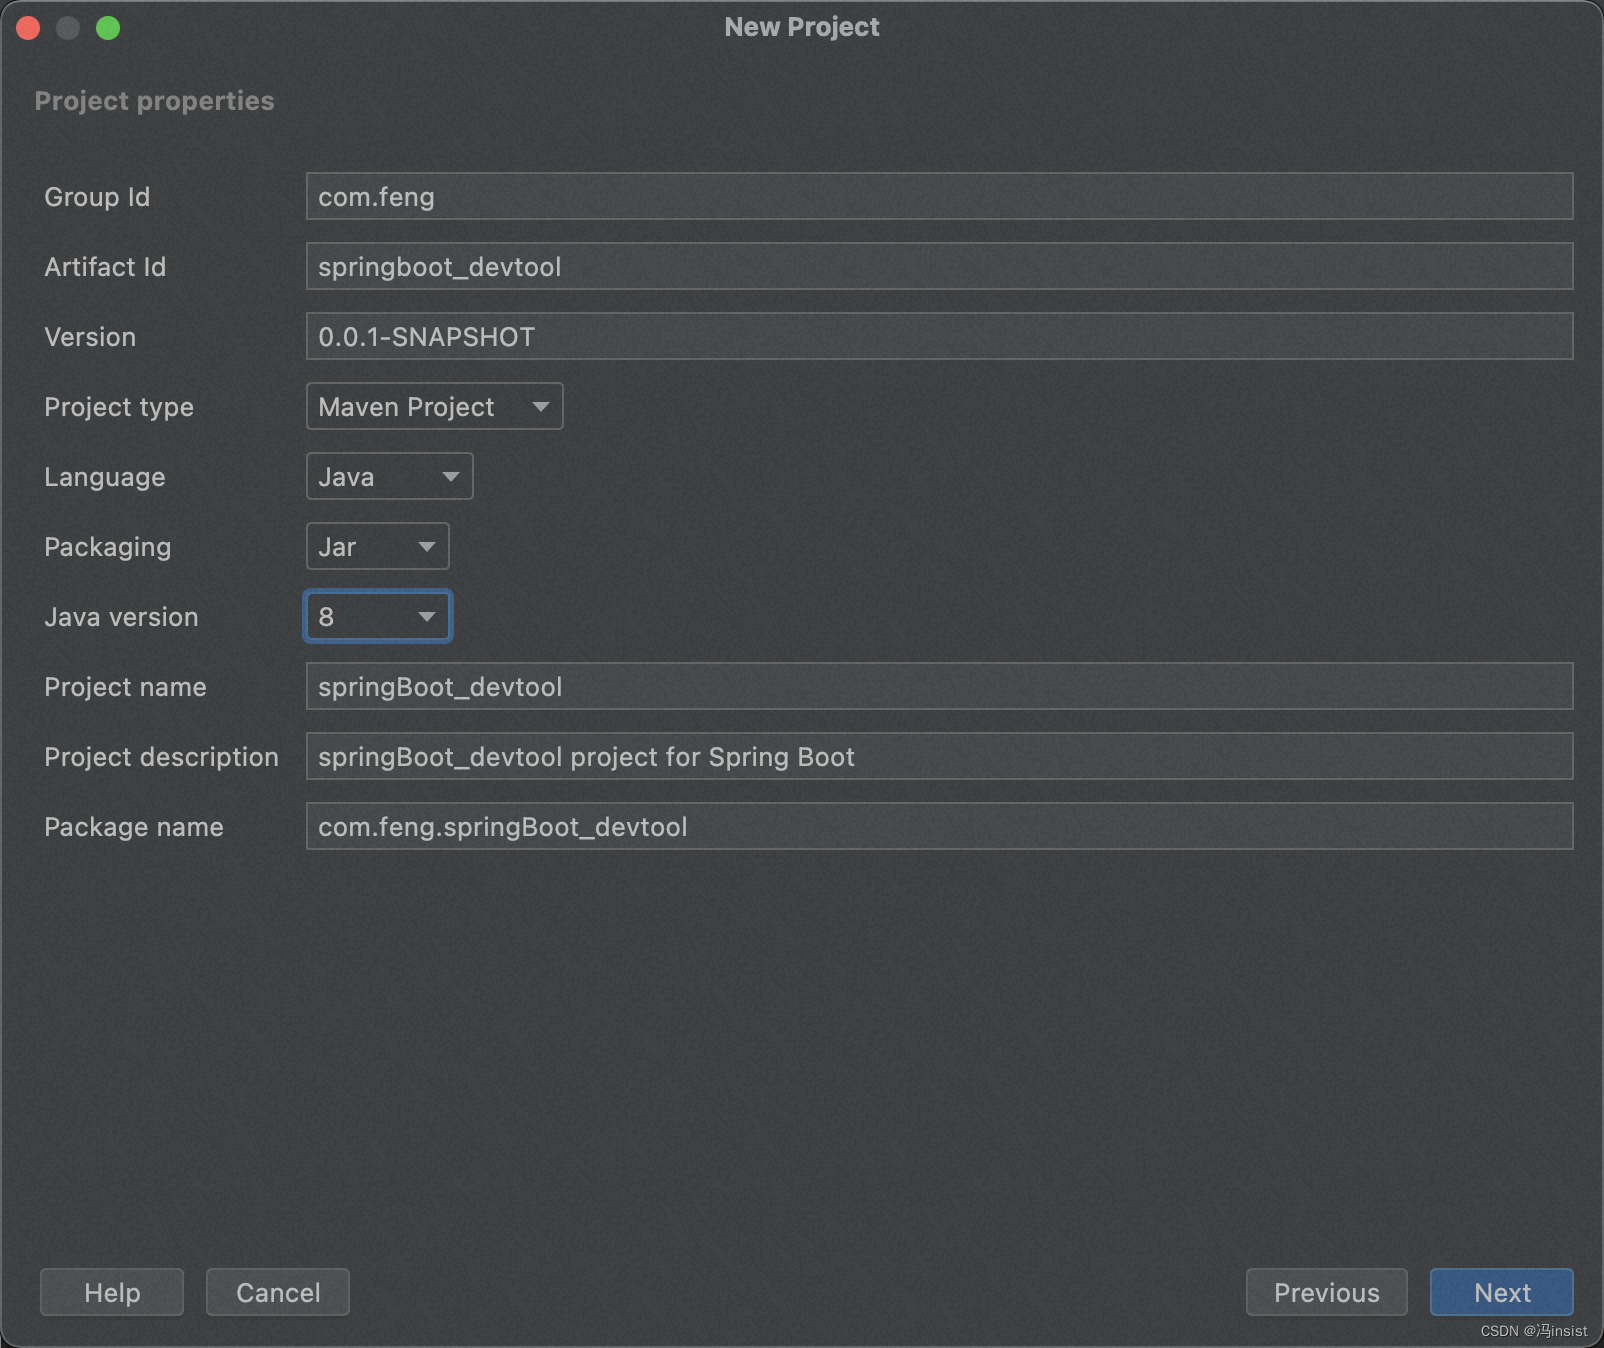
2. 创建项目
- 项目细节
- 项目插件(这里的版本,创建完项目后,我手动改成了2.7.2)

- 修改配置文件为:
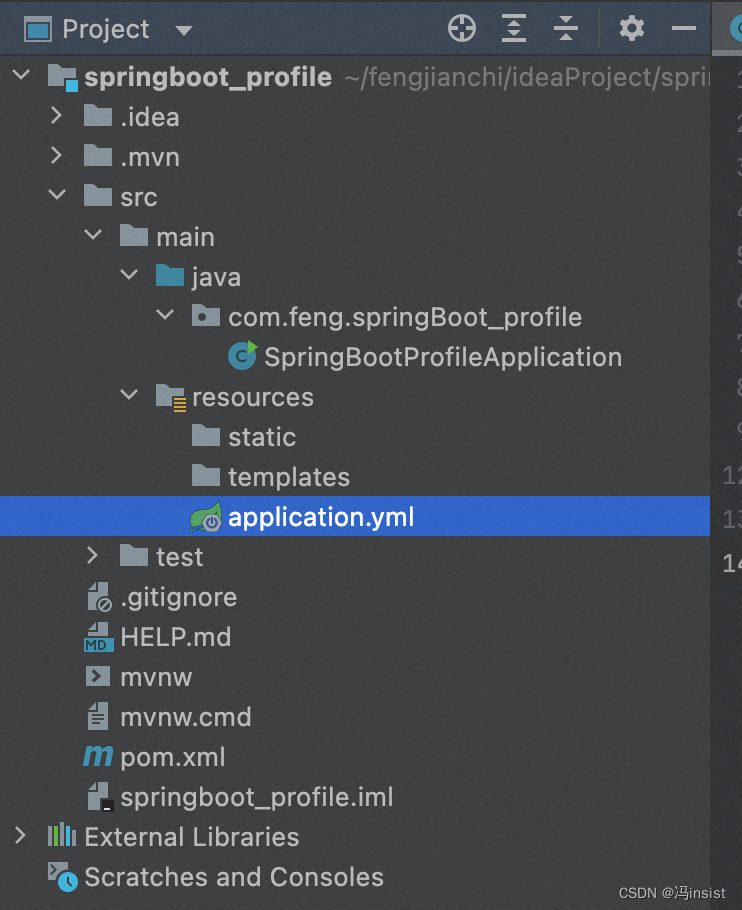
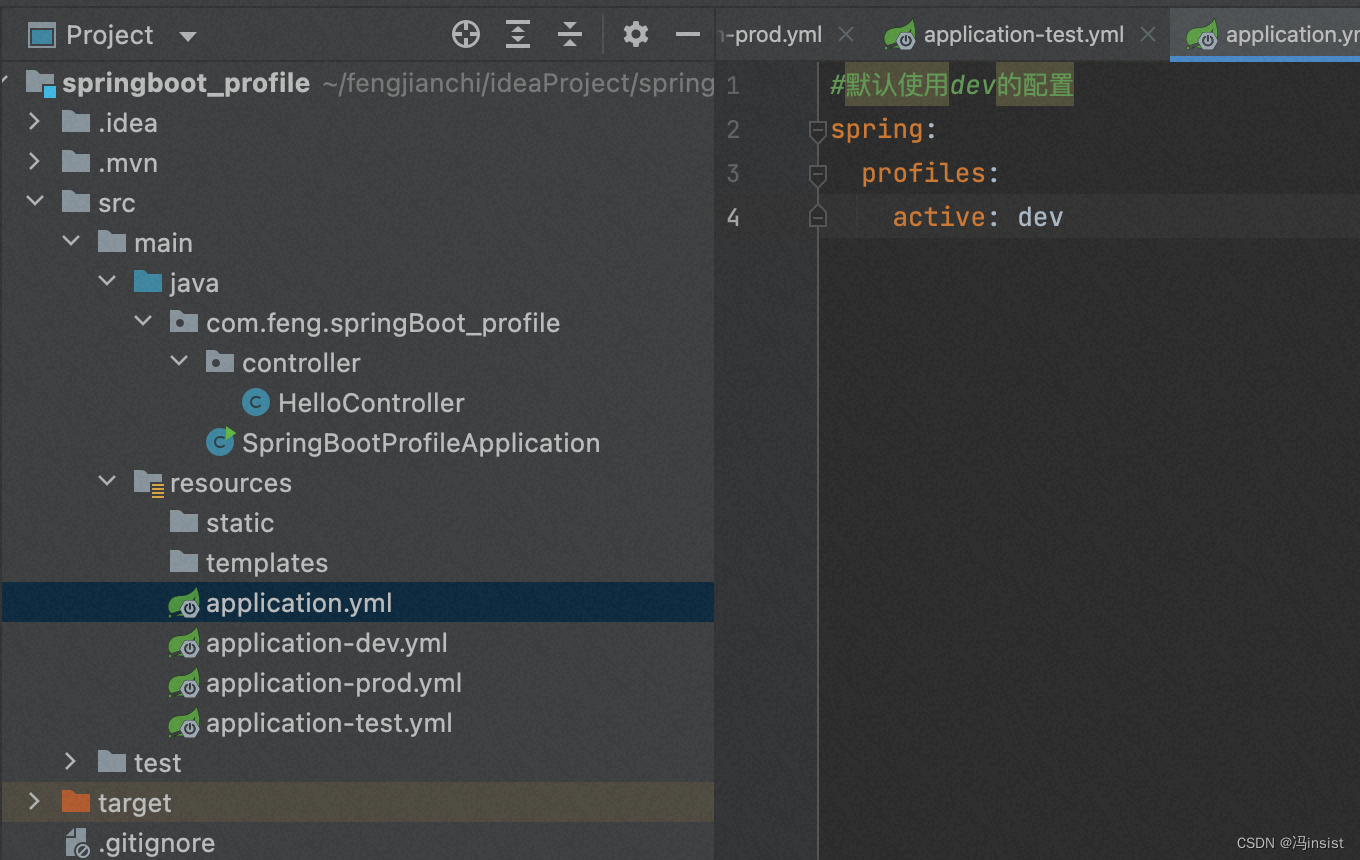
application.yml - 项目结构
3. 创建多个 配置文件

4. 每个环境 设置branch分支的值
- application.yml 默认dev
#默认使用dev的配置
spring:
  profiles:
    active: dev
- application-dev.yml 端口8080
- application-prod.yml 端口8081
- application-test.yml 端口8082
server:
  port: 8082

branch: test
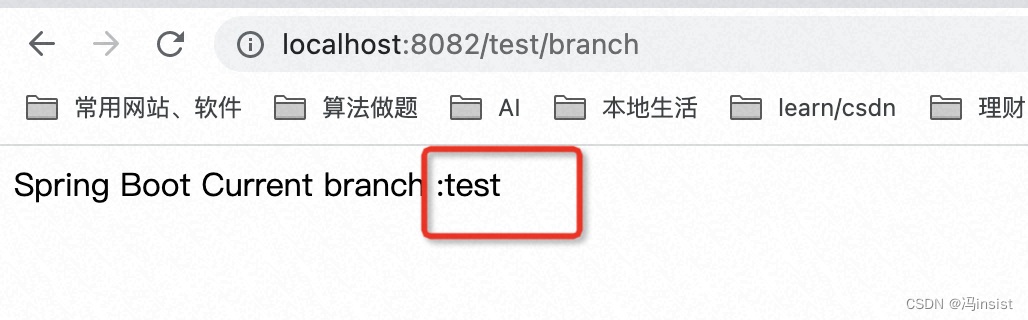
5. 测试类 controller
package com.feng.springBoot_profile.controller;
import org.springframework.beans.factory.annotation.Value;
import org.springframework.web.bind.annotation.GetMapping;
import org.springframework.web.bind.annotation.RequestMapping;
import org.springframework.web.bind.annotation.RestController;
@RestController
@RequestMapping("/test")
public class HelloController {
@Value("${branch}")
private String branch;
@GetMapping("/branch")
public String test(){
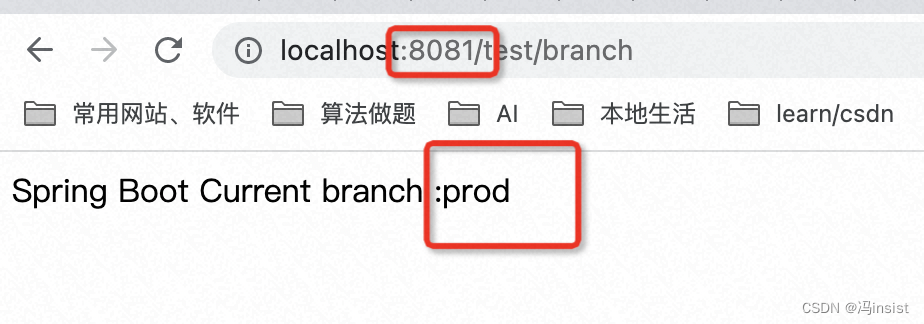
return "Spring Boot Current branch :" + branch;
}
}
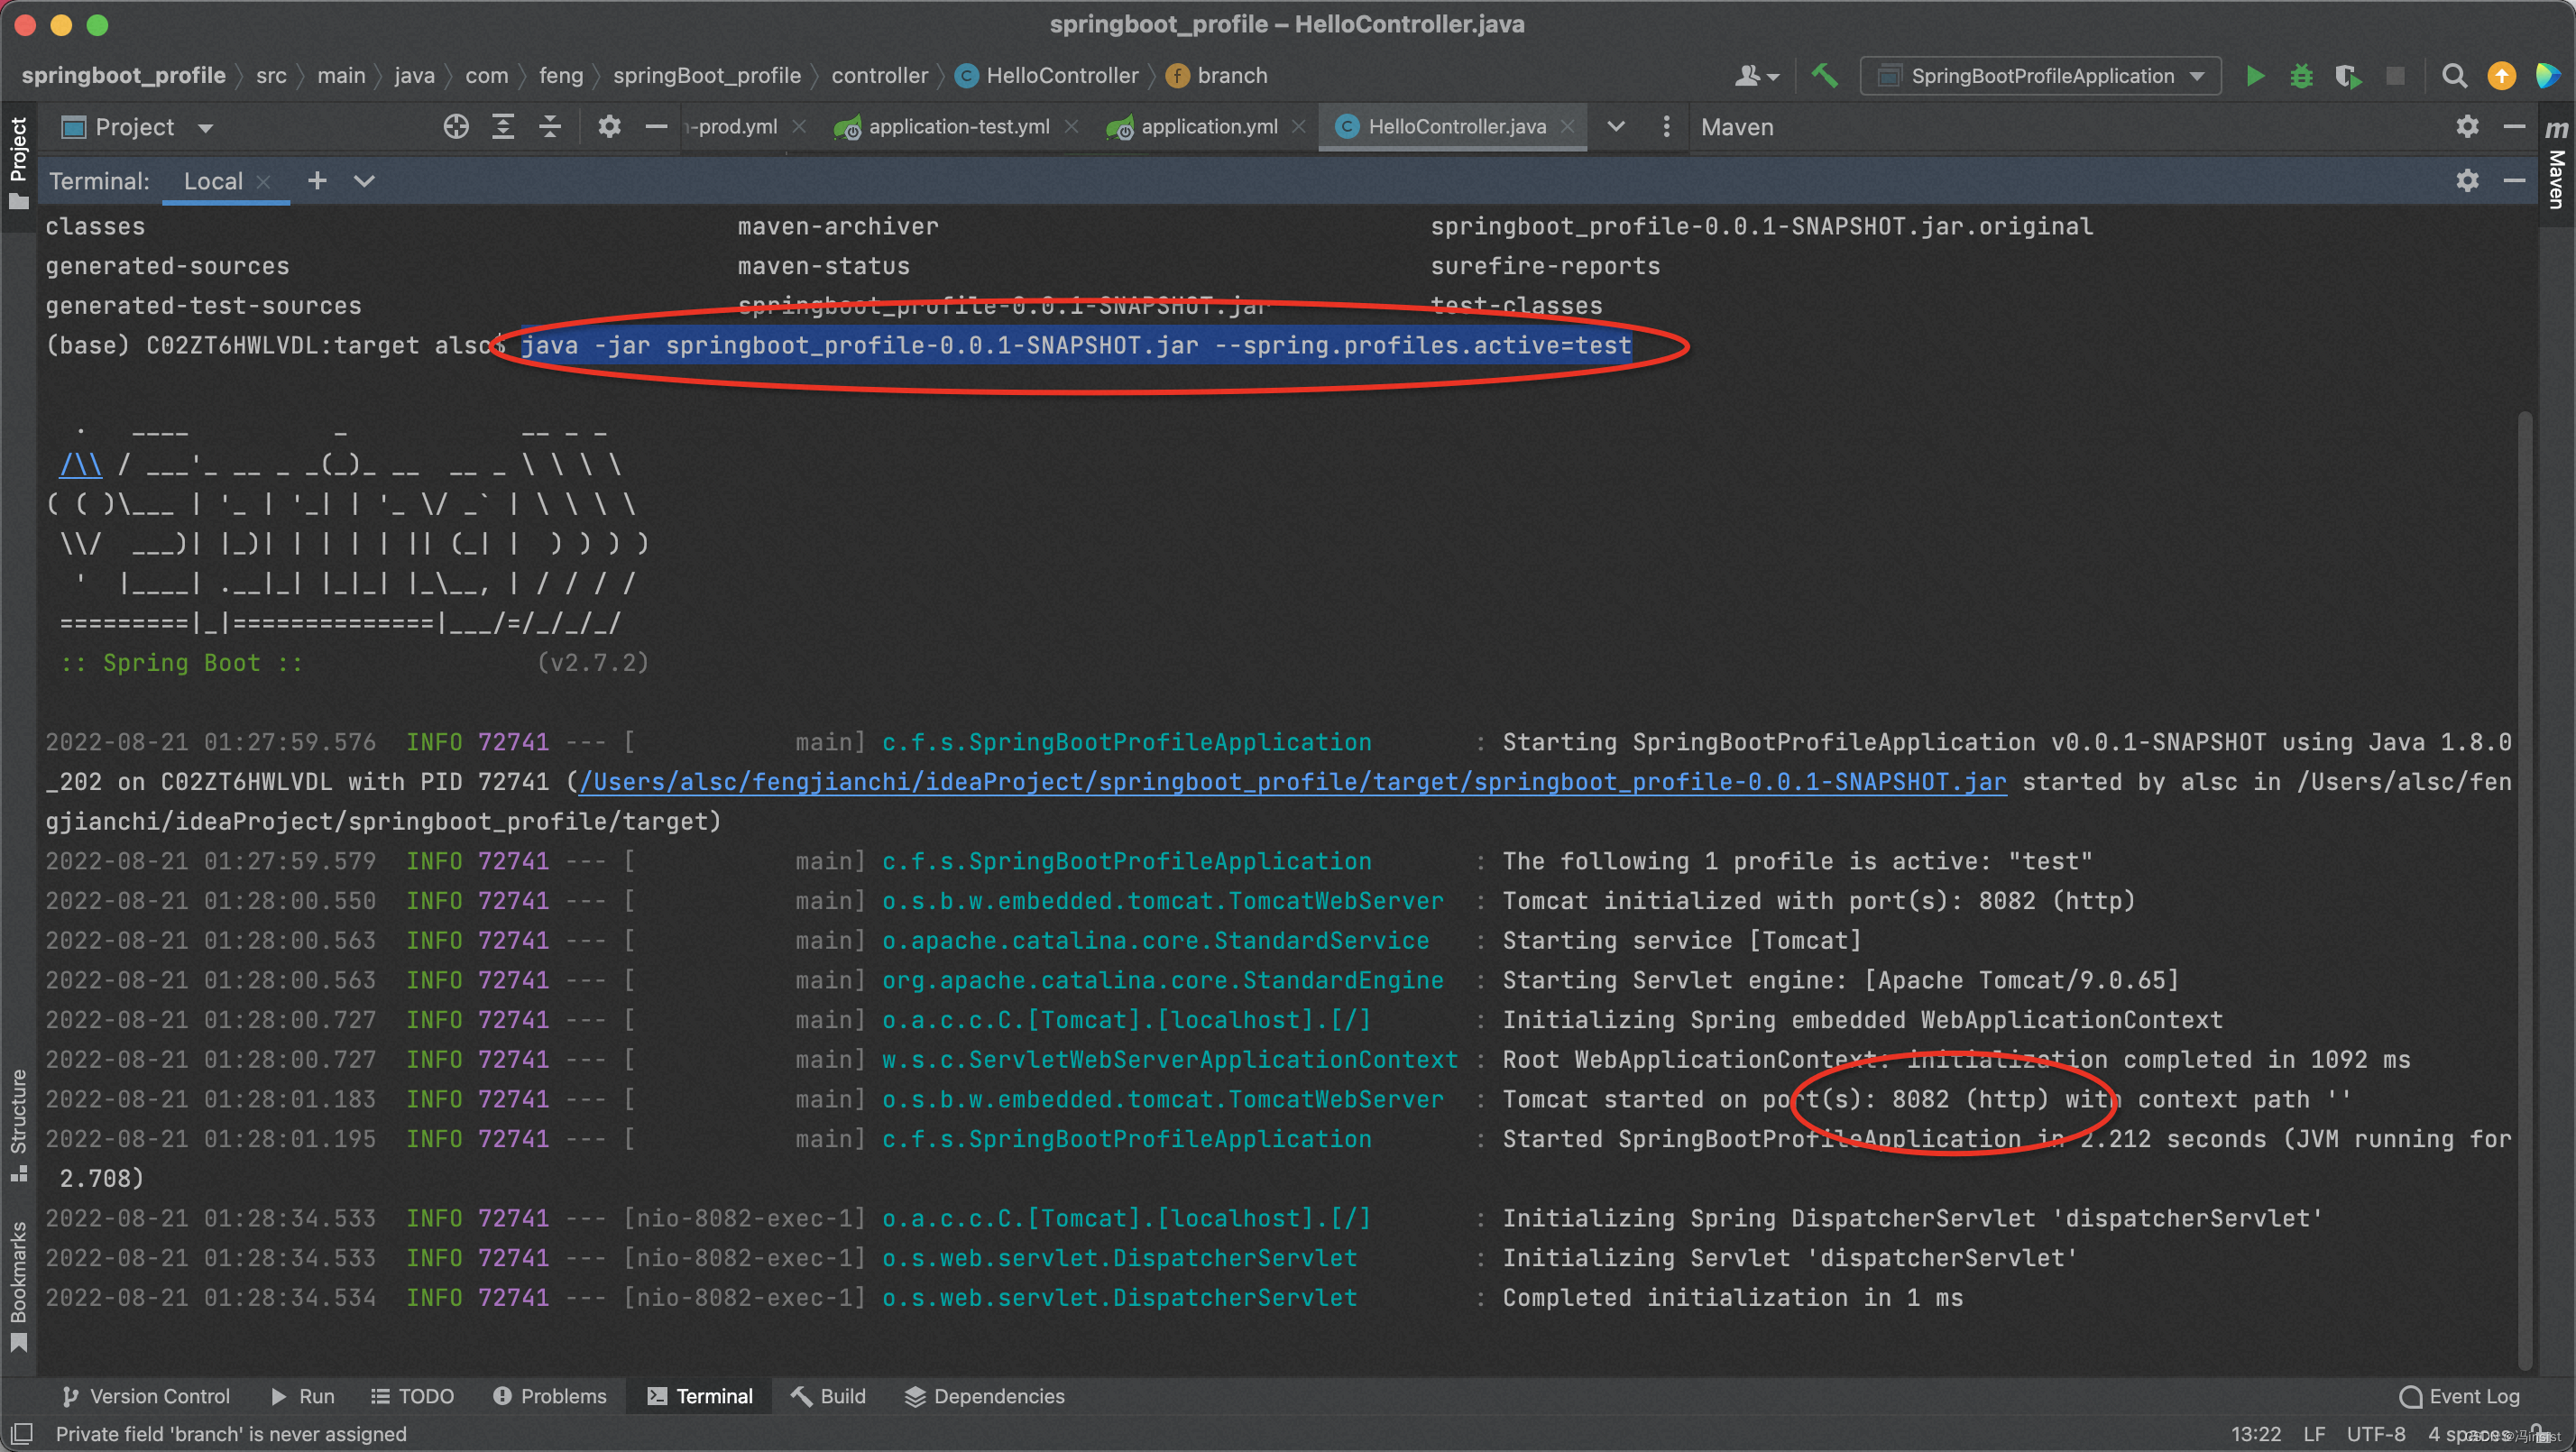
6. 测试
a、测试:测试环境
- cd target

- 进入到 jar同级执行
java -jar springboot_profile-0.0.1-SNAPSHOT.jar --spring.profiles.active=test - 运行成功
b、测试:生产环境
- 在项目终端:
ctrl+c,终止当前进程 - 然后执行命令:
java -jar springboot_profile-0.0.1-SNAPSHOT.jar --spring.profiles.active=prod - 运行成功
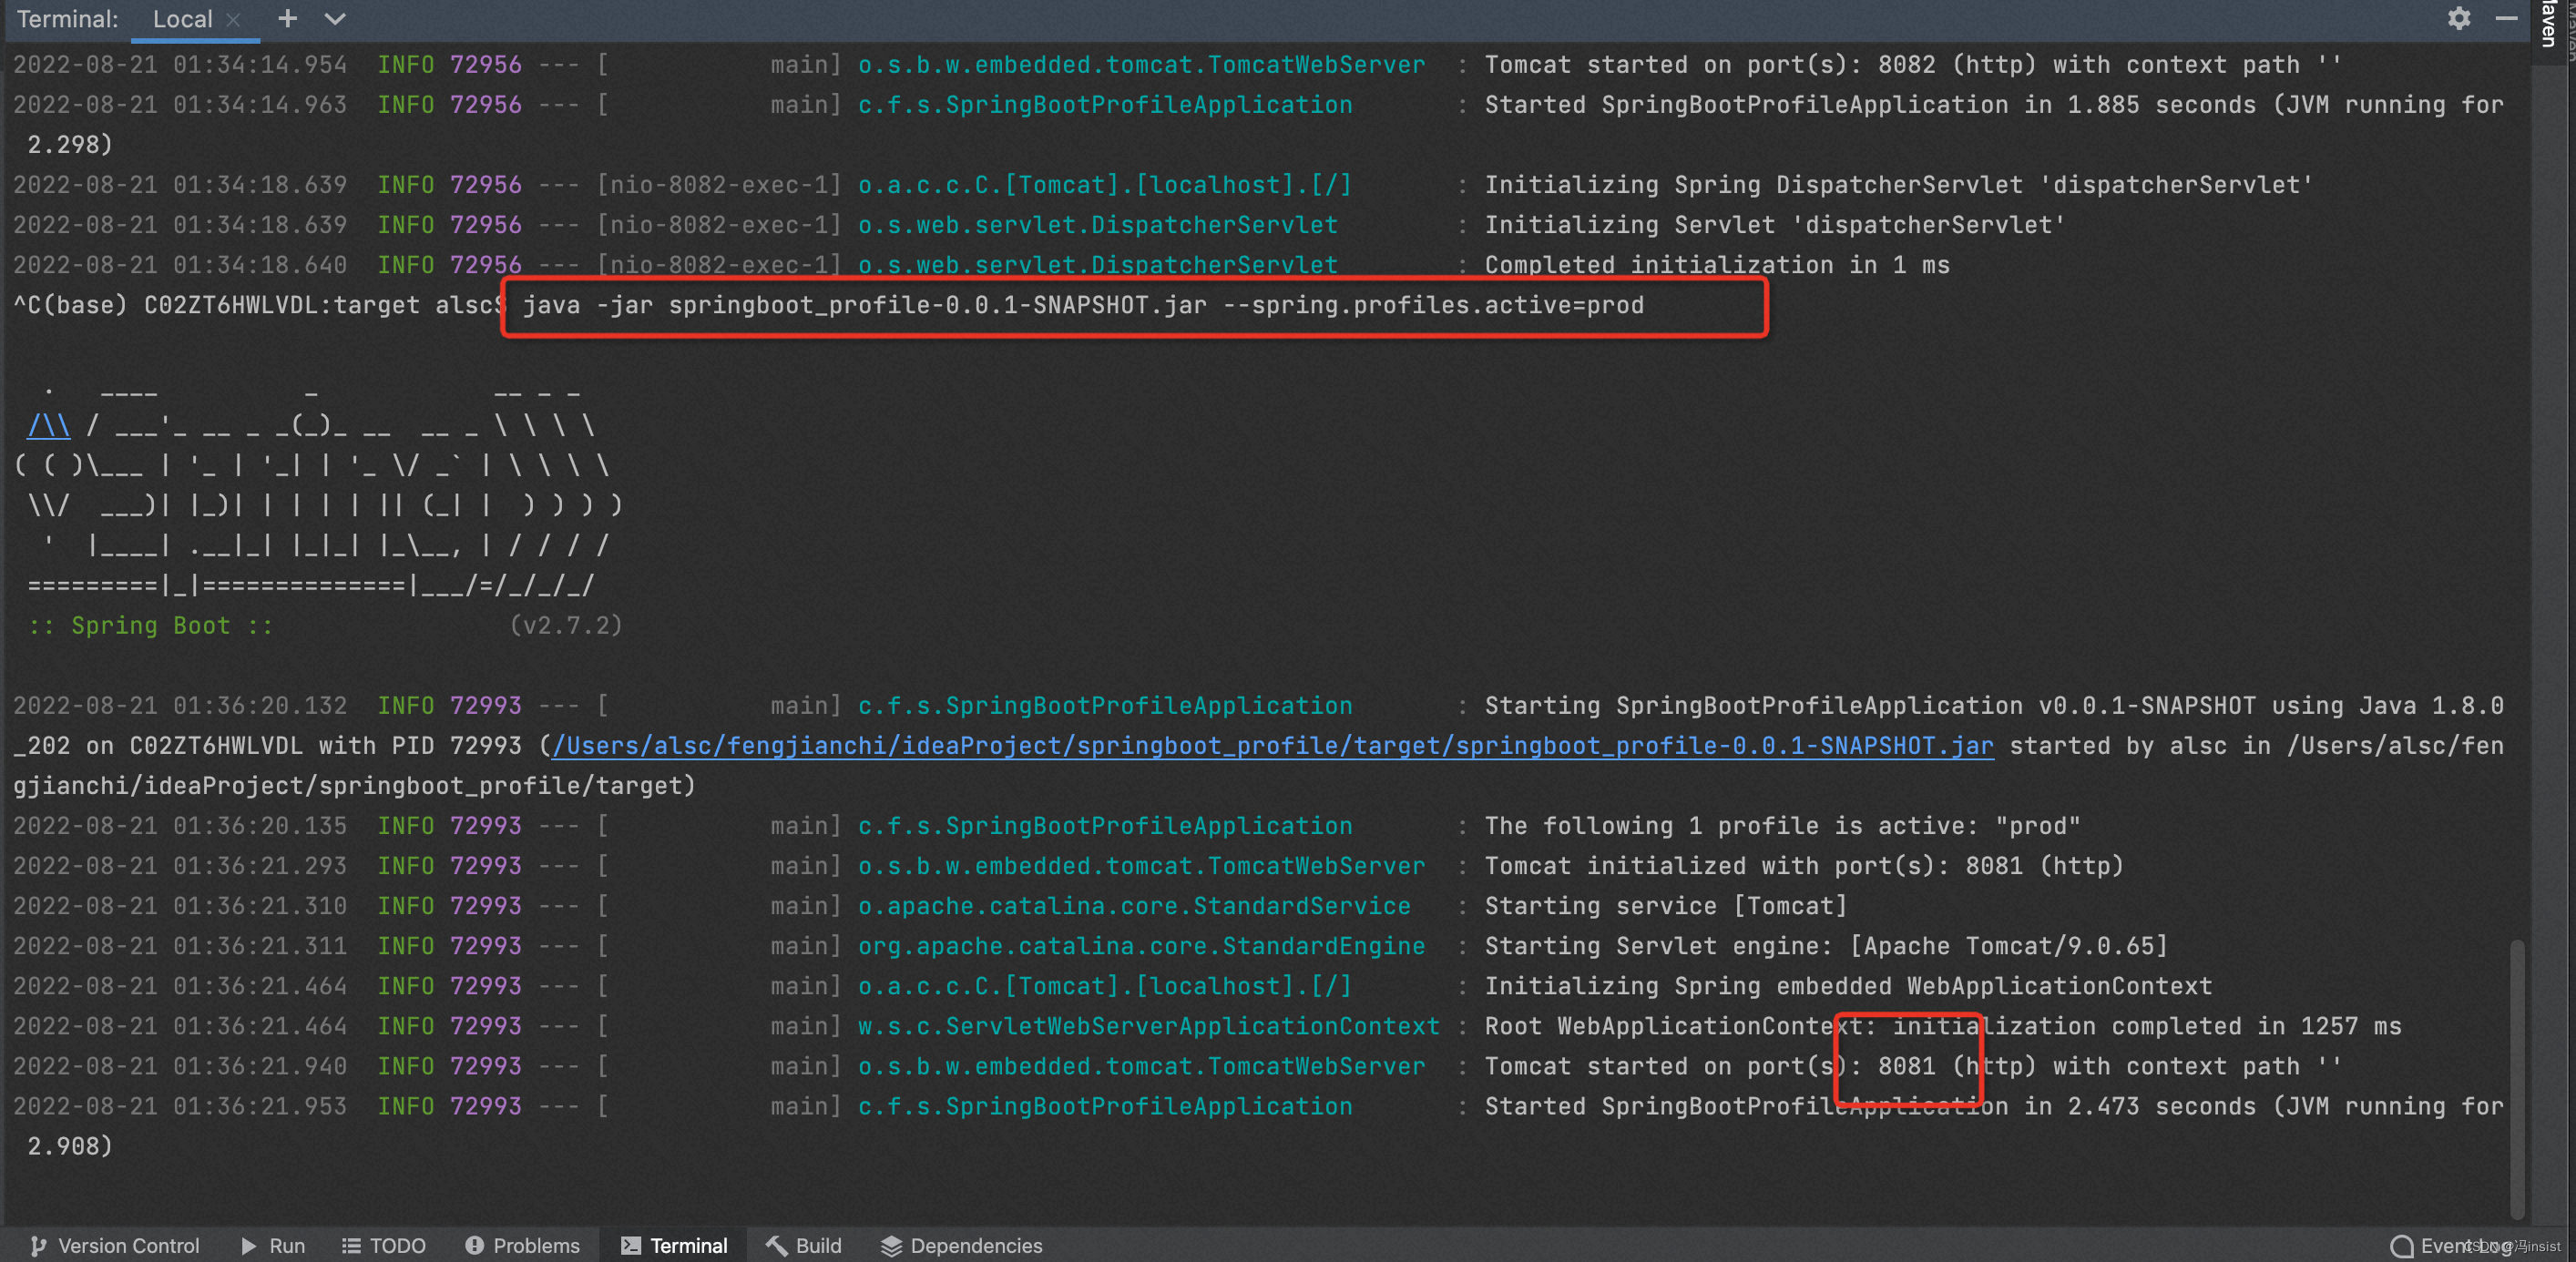
- 测试成功
7. 项目结构
五、Spring Boot 整合 devtools热部署
csdn 其他人的文档,挺好的,值得一看:https://blog.csdn.net/u014163312/article/details/120565270
1. 介绍
-
是什么?
spring为开发者提供了一个名为spring-boot-devtools的模块来使Spring Boot应用支持热部署,提高开发者的开发效率,无需手动重启Spring Boot应用。 -
devtools的原理
底层原理是使用了两个ClassLoader,一个Classloader加载那些不会改变的类(第三方Jar包),另一个ClassLoader加载会更改的类,称为restart ClassLoader,这样在有代码更改的时候,原来的restart ClassLoader 被丢弃,重新创建一个restart ClassLoader,由于需要加载的类相比较少,所以实现了较快的重启时间。
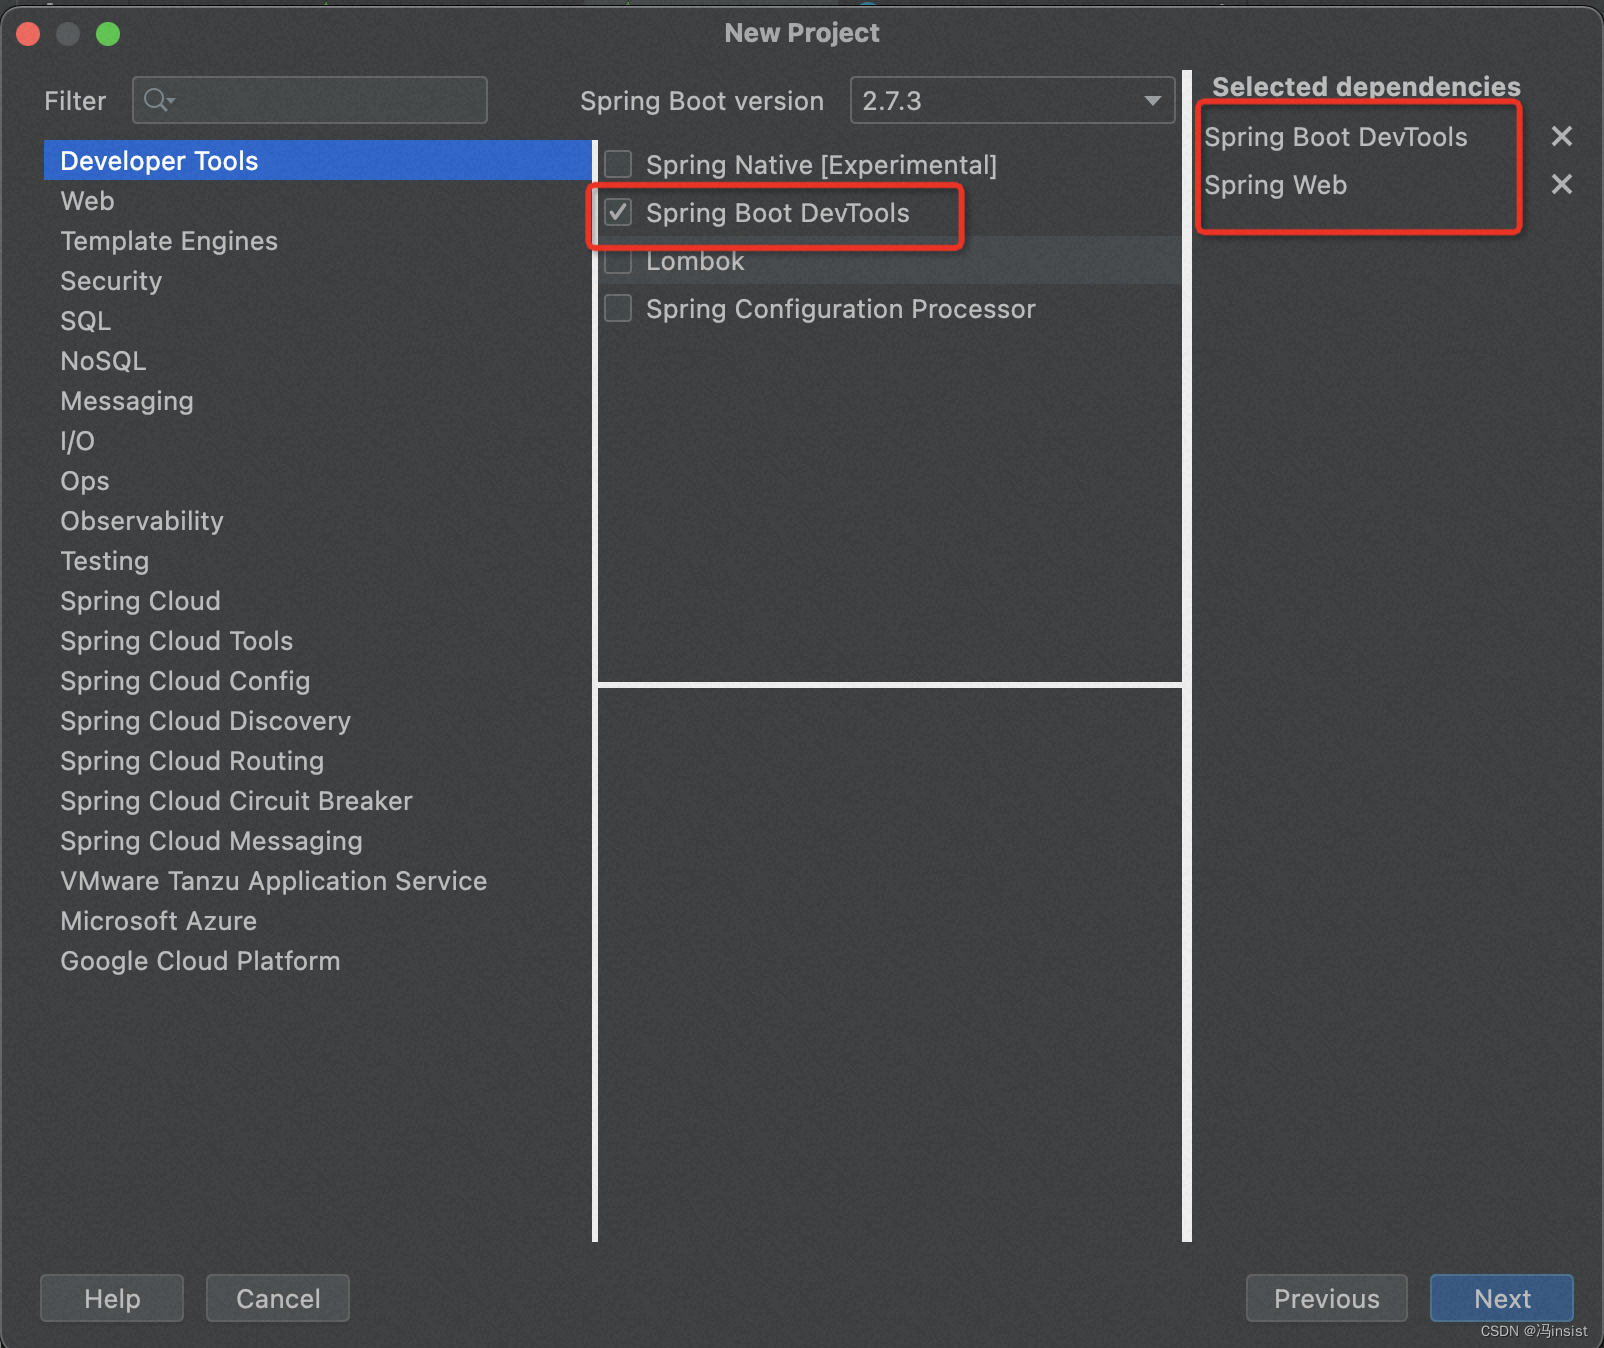
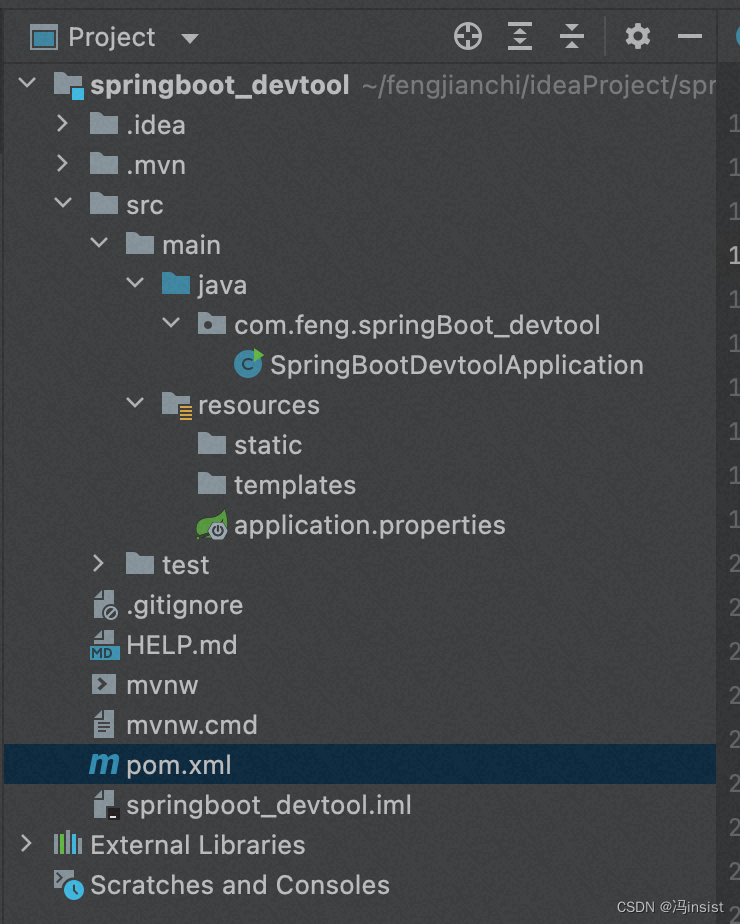
2. 创建工程(重要的依赖)
- 项目细节
- 引入依赖
web和DevTools(这里的版本,创建完项目后,我手动改成了2.7.2)
- 修改配置名称为:
application.yml - 项目结构
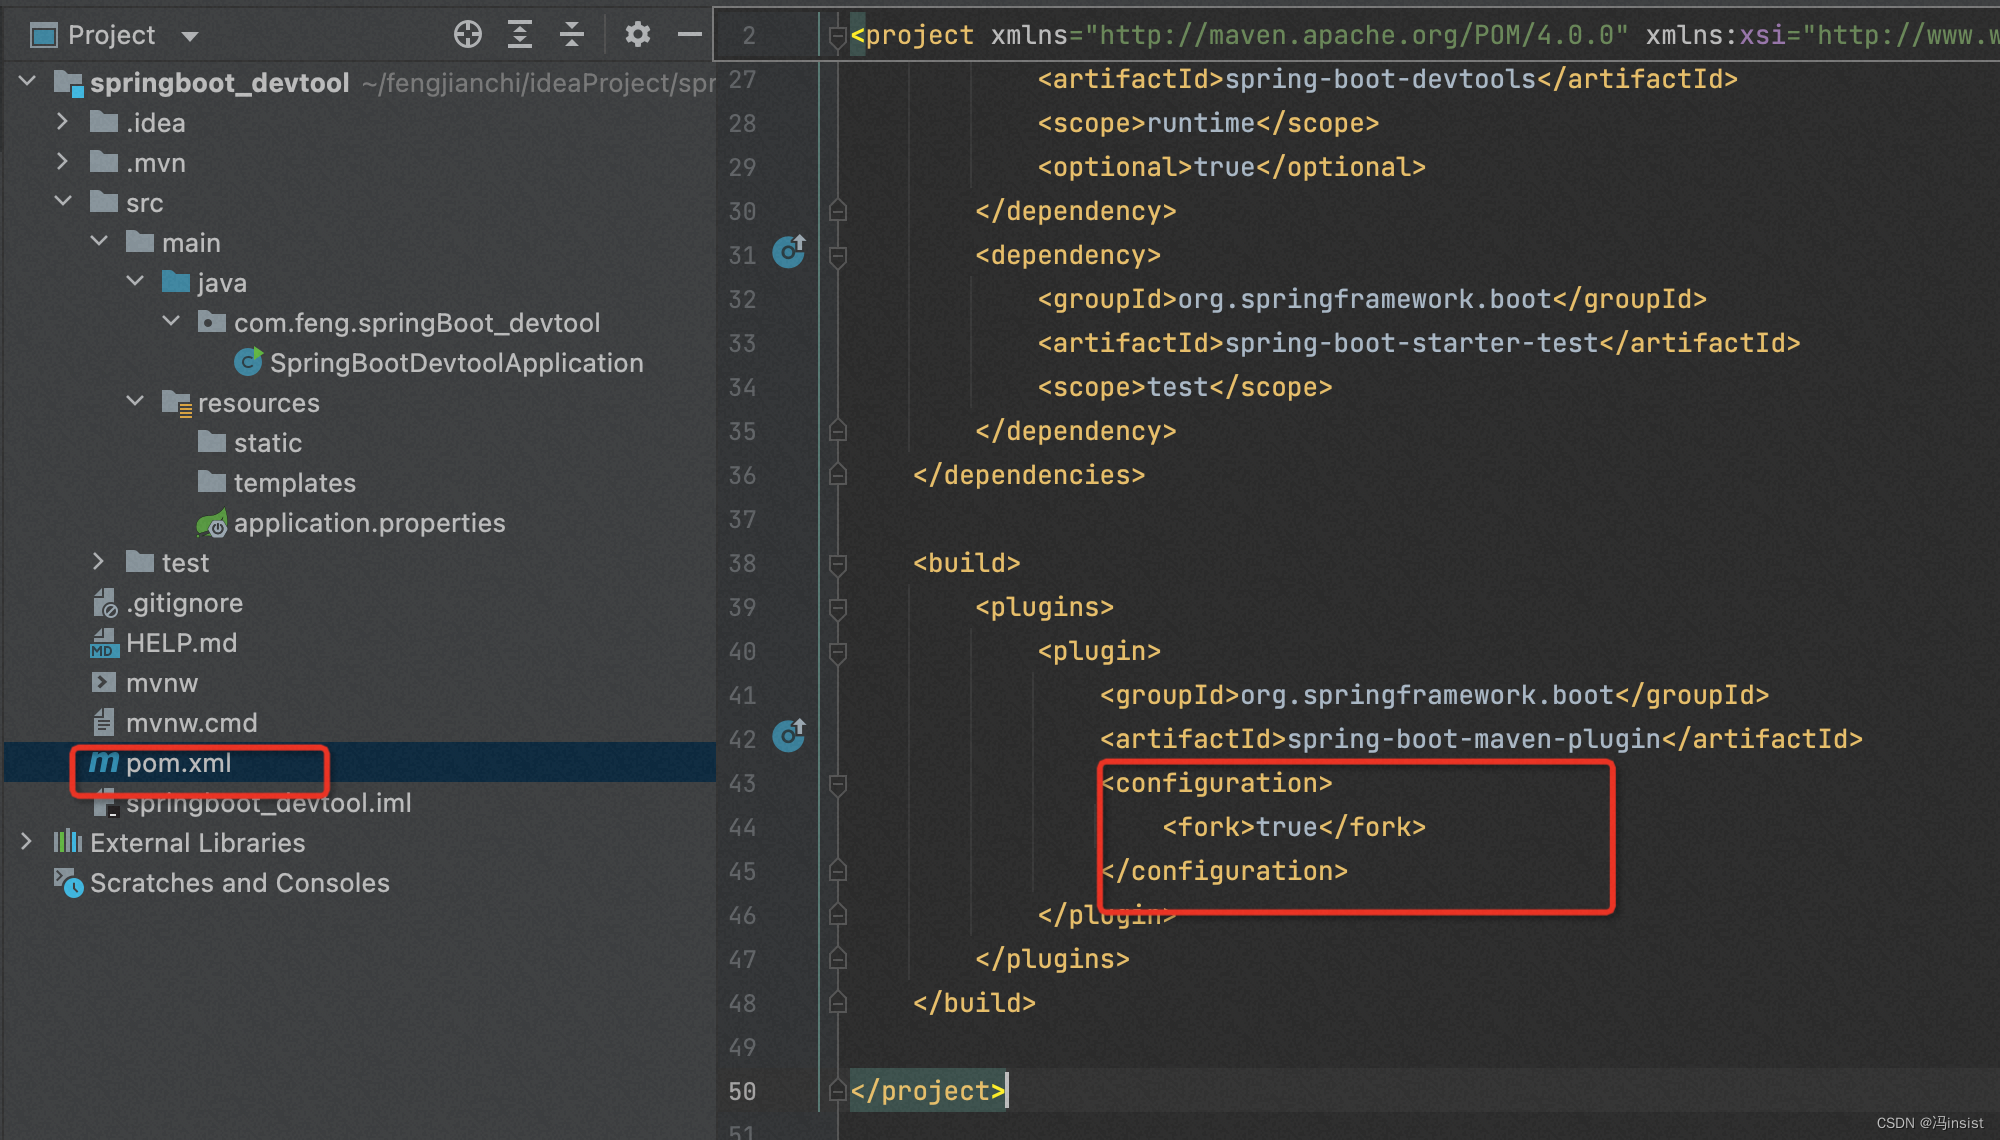
3. 引入 依赖(创建项目时已经引入)
		<dependency>
			<groupId>org.springframework.boot</groupId>
			<artifactId>spring-boot-devtools</artifactId>
			<scope>runtime</scope>
			<optional>true</optional>
		</dependency>
4. 配置 plugin
加入 pligin 且配置一个属性 fork 为 true
<build>
	<plugins>
		<plugin>
			<groupId>org.springframework.boot</groupId>
			<artifactId>spring-boot-maven-plugin</artifactId>
               <configuration>
                   <fork>true</fork> <!-- 如果没有该配置,devtools不会生效 -->
               </configuration>
		</plugin>
	</plugins>
</build>
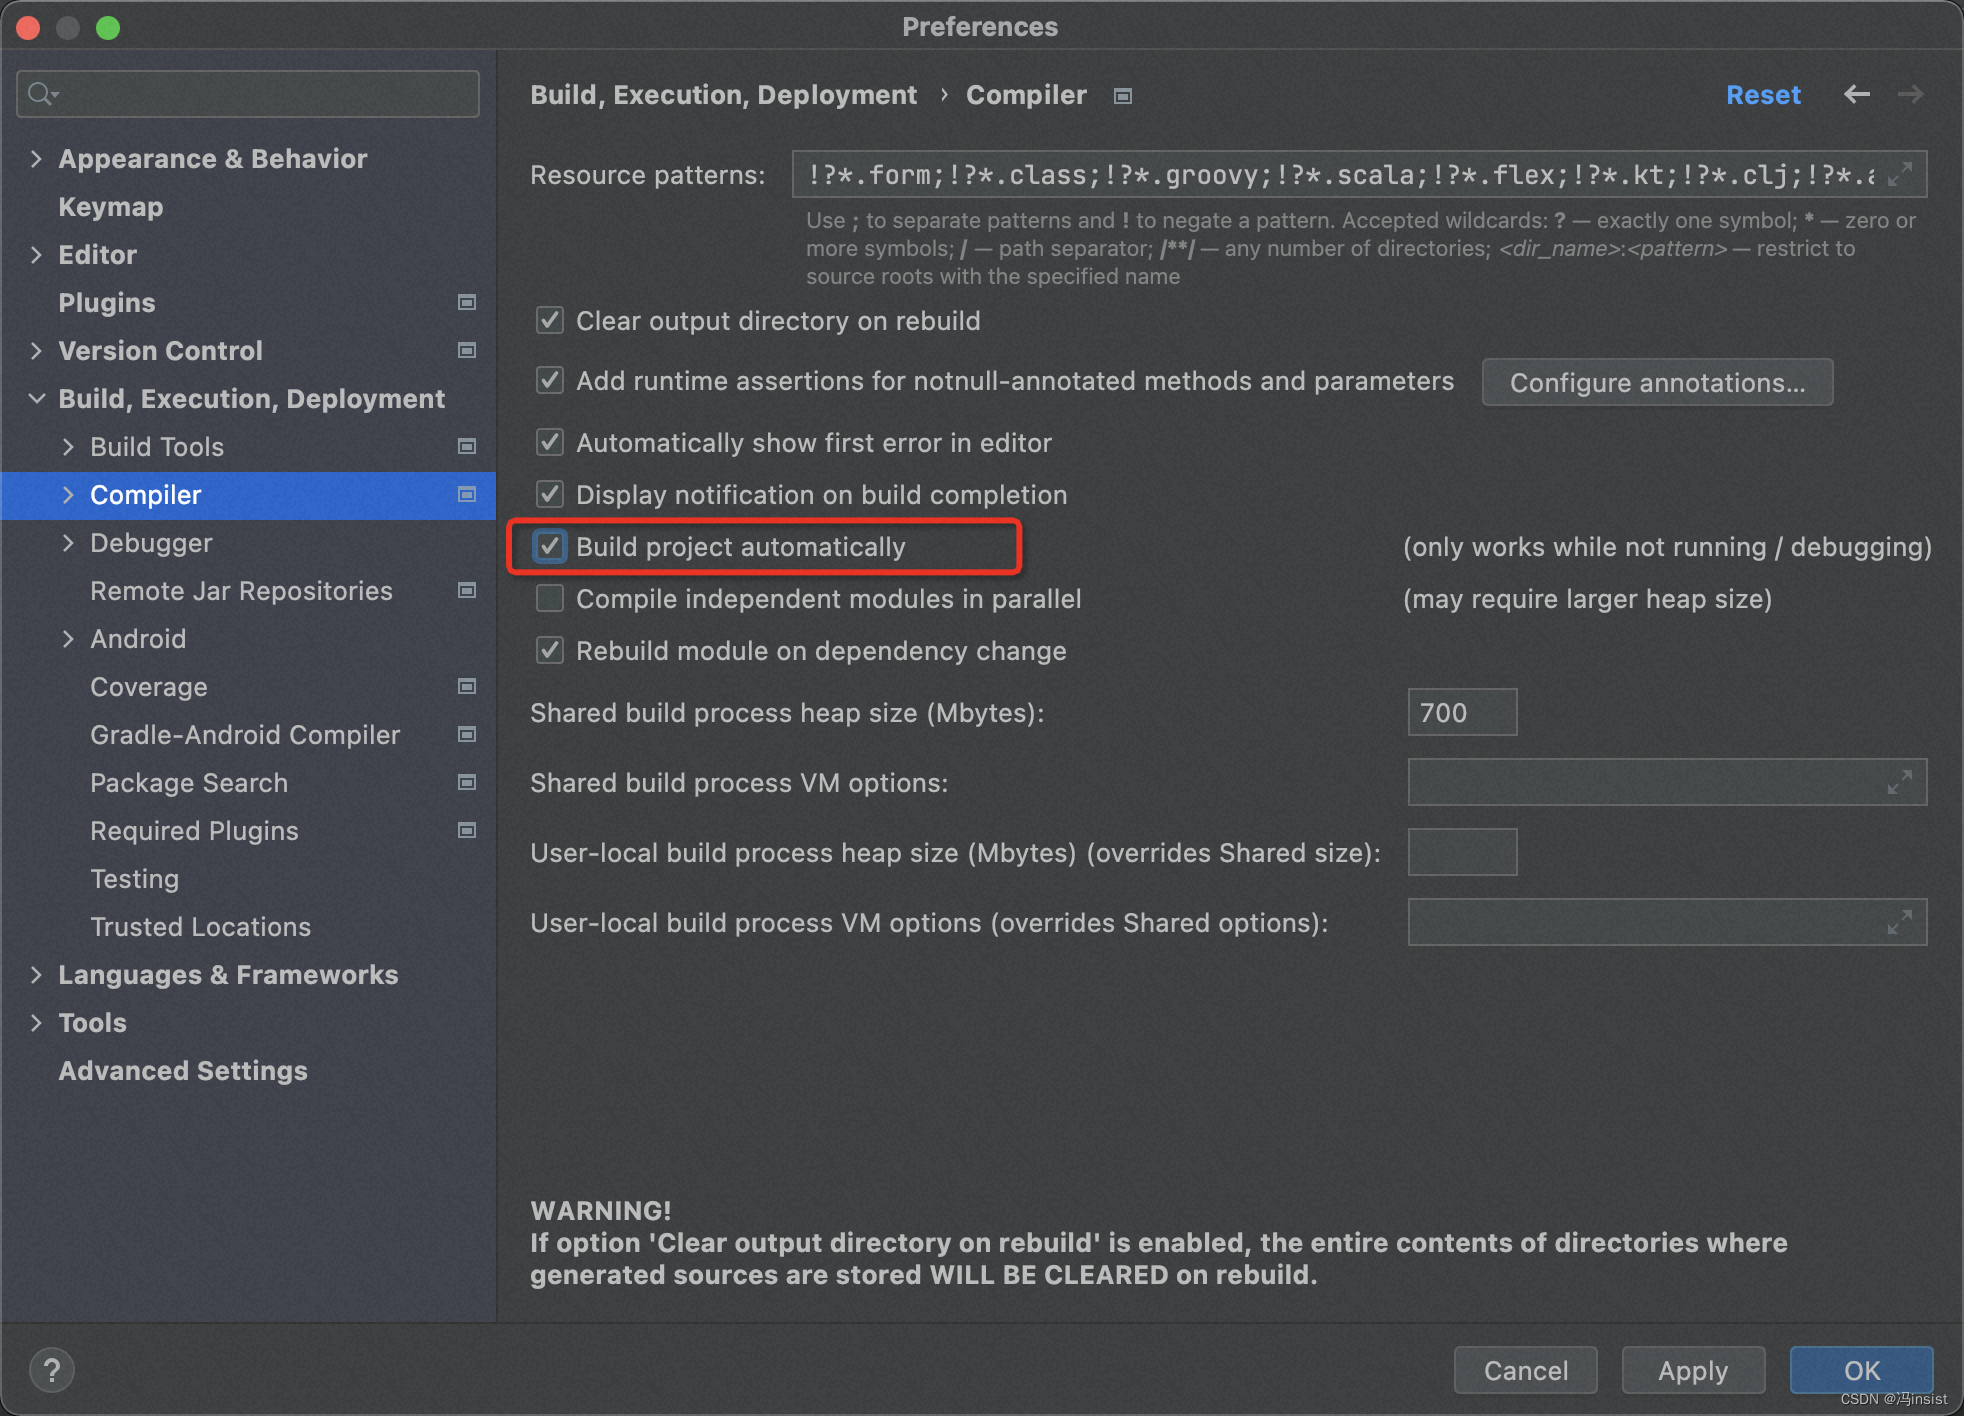
5. 开启自动编译
-
当我们修改了Java类后,IDEA默认是不自动编译的,而spring-boot-devtools又是监测classpath下的文件发生变化才会重启应用,所以需要设置IDEA的自动编译:
-
系统设置
- Windows: Ctrl+Alt+S
- MacOS:command +
-
选择
File | Settings | Compiler命令,然后勾选Build project automatically复选框,低版本的 IDEA 请勾选make projectautomatically复选框。
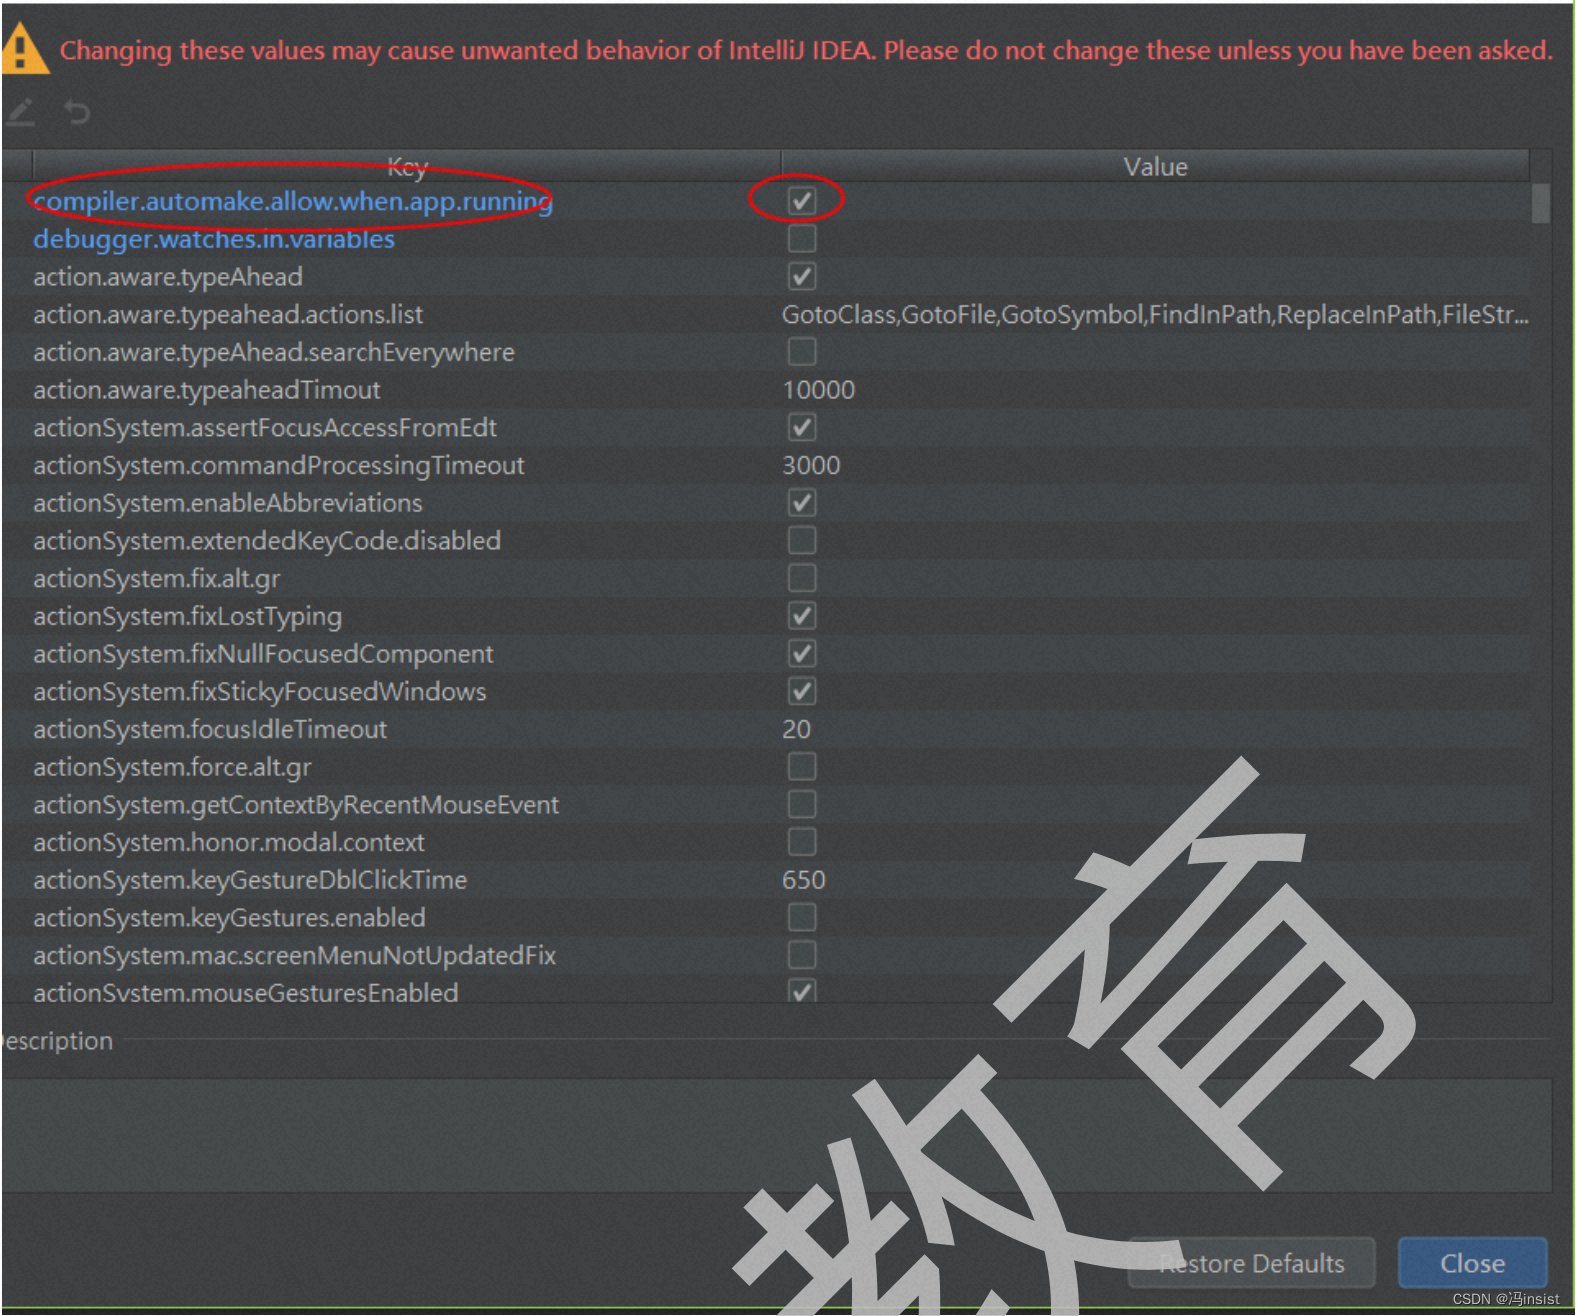
6. 配置auto-make
IDEA 设置运行程中,设置允许自动编译
a、旧版本:2021之前
- Windows快捷键:Ctrl + Shift + Alt + /
- MacOS快捷键:双击shift,打开查找页面,输入reg
- 操作:
勾选勾上 Compiler autoMake allow when app running
意思是:
Allow auto-make to start even if developed application is currently running. Note that automatically started make may eventually delete some classes that are required by the application.
b、新版本:2021之后
2021之后的版本被迁移到了这里

c、重启 IDEA
7. devtools的配置
a、properties文件
在 application.properties 中配置 spring.devtools.restart.enabled=false ,此时restart类加载器还会初始化,但不会监视文件更新。
#热部署生效
spring.devtools.restart.enabled: true
#设置重启的目录
#spring.devtools.restart.additional-paths: src/main/java
#classpath目录下的WEB-INF文件夹内容修改不重启
spring.devtools.restart.exclude: WEB-INF/**
在SprintApplication.run之前调用System.setProperty(“spring.devtools.restart.enabled”, “false”);可以完全关闭重启支持,配置内容
public static void main(String[] args) {
    System.setProperty("spring.devtools.restart.enabled", "false");
    SpringApplication.run(MyApp.class, args);
}
b、yml文件
spring:
  devtools:
    restart:
      enabled: true # 热部署开关
    freemarker:
      cache: false # 页面不加载缓存,修改即时生效
8. 测试
- 修改类–>保存:应用会重启
- 修改配置文件–>保存:应用会重启
9. 扩展
以下信息,来自于spring boot官方:
Developer tools are automatically disabled when running a fully packaged application.
If your application is launched from java -jar or if it is started from a special classloader, then it is considered a “production application”.
You can control this behavior by using the spring.devtools.restart.enabled system property.
To enable devtools, irrespective of the classloader used to launch your application, set the -Dspring.devtools.restart.enabled=true system property.
This must not be done in a production environment where running devtools is a security risk.
To disable devtools, exclude the dependency or set the -Dspring.devtools.restart.enabled=false system property.


 4876
4876


 被折叠的 条评论
为什么被折叠?
被折叠的 条评论
为什么被折叠?
 到【灌水乐园】发言


