


微服务搭建流程,无任何技术含量,记作个人学习笔记。
1.首先下载consul
Install | Consul | HashiCorp Developer
解压下载consul得压缩包,解压,到consul得根目录,在consul得根目录运行cmd,执行consul agent -dev 启动consul
打开consul得ui localhost:8500
2.创建项目,创建一个.net core web api项目和一个web mvc项目
首先Api端服务实例启动时需到Consul中进行服务注册,Web Client直接与Consul进行连接,从Consul中拿到服务实例并配置策略及发送http请求等。

Consul每隔一段时间就会调用一次注册的服务实例进行健康检查。
在Api项目中新建一个IConfiguration的扩展方法:
 public static void ConsulExtend(this IConfiguration configuration)
    {
        ConsulClient client = new ConsulClient(m =>
        {
            m.Address = new Uri("http://localhost:8500/");
            m.Datacenter = "dc1";
        });
        //启动的时候在consul中注册实例服务
        //在consul中注册的ip,port
        string ip = configuration["ip"];
        int port = int.Parse(configuration["port"]);
        int weight = string.IsNullOrWhiteSpace(configuration["weight"]) ? 1 : int.Parse(configuration["weight"]);
        client.Agent.ServiceRegister(new AgentServiceRegistration()
        {
            ID = "service" + Guid.NewGuid(),//唯一的
            Name = "MicroserviceAttempt",//组(服务)名称
            Address = ip,
            Port = port,//不同的端口=>不同的实例
            Tags = new string[] { weight.ToString() },//标签
            Check = new AgentServiceCheck()//服务健康检查
            {
                Interval = TimeSpan.FromSeconds(12),//间隔12s一次 检查
                HTTP = $"http://{ip}:{port}/Api/Health/Index",
                Timeout = TimeSpan.FromSeconds(5),//检测等待时间
                DeregisterCriticalServiceAfter = TimeSpan.FromSeconds(20)//失败后多久移除
            }
        });
        Console.WriteLine($"{ip}:{port}--weight:{weight}");
    }
心跳接口
[ApiController]
[Route("api/[controller]/[action]")]
public class HealthController : Controller
{
    readonly IConfiguration _configuration;
    public HealthController(IConfiguration configuration)
    {
        _configuration = configuration;
    }
    [HttpGet]
    public IActionResult Index()
    {
        //心跳,consul会每隔几秒调一次
        Console.WriteLine($"{ _configuration["port"]} Invoke");
        return Ok();
    }
}
调用方法
builder.Services.AddControllers();注册服务
dotnet Service1.dll --urls="http://*:5726" --ip="127.0.0.1" --port=5726
dotnet Service1.dll --urls="http://*:5727" --ip="127.0.0.1" --port=5727
dotnet Service1.dll --urls="http://*:5728" --ip="127.0.0.1" --port=5728

客户端调用
 public class UserController : Controller
    {
        HttpSender _httpSender;
        public UserController()
        {

        }
        //暂不考虑线程安全
        private static int index = 0;
        public async Task<IActionResult> Index()
        {
            #region nginx版 只知道nginx地址就行了
            //var str = await _httpSender.InvokeApi("http://localhost:8088/api/User/GetCustomerUser");
            #endregion

            #region consul
            //new一个consul实例
            ConsulClient client = new ConsulClient(m =>
            {
                new Uri("http://localhost:8500/");
                m.Datacenter = "dc1";
            });
            //与consul进行通信(连接),得到consul中所有的服务实例
            var response = client.Agent.Services().Result.Response;
            string url = "http://MicroserviceAttempt/Api/Health/Index";
            Uri uri = new Uri(url);
            string groupName = uri.Host;
            AgentService agentService = null;//服务实例
            var serviceDictionary = response.Where(m => m.Value.Service.Equals(groupName, StringComparison.OrdinalIgnoreCase)).ToArray();//找到的全部服务实例
                                                                                                                                         //{
                                                                                                                                         //    agentService = serviceDictionary[0].Value;
                                                                                                                                         //}
            {
                //轮询策略=>达到负载均衡的目的
                agentService = serviceDictionary[index++ % 3].Value;
            }
            {
                //平均策略(随机获取索引--相对平均)=>达到负载均衡的目的
                agentService = serviceDictionary[new Random(index++).Next(0, serviceDictionary.Length)].Value;
            }
            {
                //权重策略,给不同的实例分配不同的压力,注册时提供权重
                List<KeyValuePair<string, AgentService>> keyValuePairs = new List<KeyValuePair<string, AgentService>>();
                foreach (var item in keyValuePairs)
                {
                    int count = int.Parse(item.Value.Tags?[0]);//在服务注册的时候给定权重数量
                    for (int i = 0; i < count; i++)
                    {
                        keyValuePairs.Add(item);
                    }
                }
                //agentService = keyValuePairs.ToArray()[0].Value;
            }
            url = $"{uri.Scheme}://{agentService.Address}:{agentService.Port}{uri.PathAndQuery}";
            _httpSender = new HttpSender();
            string content = await _httpSender.InvokeApi(url);
            #endregion
            return Ok(content);
        }
    }
public async Task<string> InvokeApi(string url)
{
using (HttpClient client = new HttpClient())
{
HttpRequestMessage message = new HttpRequestMessage();
message.Method = HttpMethod.Get;
message.RequestUri = new Uri(url);
var result = client.SendAsync(message).Result;
string content = result.Content.ReadAsStringAsync().Result;
return content;
}
}启动这个web项目,访问User /Index 就可以读取服务得结果了
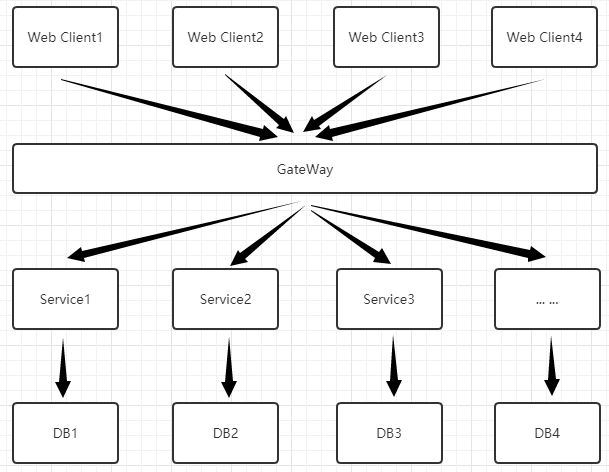
但是这样做不好,客户端都需要和Consul进行连接,拿到所有的服务实例,直接和服务实例进行交互,服务实例就暴露了--所以需要网关。
网关将服务实例与客户端进行隔离,是所有Api请求的入口。因此可以统一鉴权。当然微服务网关的作用有很多,大家可自行百度了解。
新建一个网关的项目,请求先到达网关,再由网关分发请求到不同的实例。如图:
创建一个网关服务OceletDemo引用NuGet包:Ocelot、Ocelot.Provider.Consul
  private static void Main(string[] args)
    {
        var builder = WebApplication.CreateBuilder(args);
        builder.Host.ConfigureAppConfiguration(conf =>
        {
            conf.AddJsonFile("appsettings.json", optional: false,
                reloadOnChange: true);
        });
        // Add services to the container.

       // builder.Services.AddControllers();
        builder.Services.AddOcelot().AddConsul();
        // Learn more about configuring Swagger/OpenAPI at https://aka.ms/aspnetcore/swashbuckle
       // builder.Services.AddEndpointsApiExplorer();
       // builder.Services.AddSwaggerGen();
        var app = builder.Build();
        app.UseOcelot();
        app.Run();
        // Configure the HTTP request pipeline.
        // if (app.Environment.IsDevelopment())
        //{
        //  app.UseSwagger();
        /// app.UseSwaggerUI();
        //  }

        //  app.UseAuthorization();

        //  app.MapControllers();

    }
{
  "Logging": {
    "LogLevel": {
      "Default": "Information",
      "Microsoft.AspNetCore": "Warning"
    }
  },


    "Routes": [
      {
        //GeteWay转发=>Downstream
        "DownstreamPathTemplate": "/api/{url}", //服务地址--url变量
        "DownstreamScheme": "http",
        //http://localhost:6299/T5/User/GetCustomerUser
        "UpstreamPathTemplate": "/T5/{url}", //网关地址--url变量 冲突的还可以加权重Priority
        "UpstreamHttpMethod": [ "Get", "Post" ],
        "UseServiceDiscovery": true, //使用服务发现
        "ServiceName": "MicroserviceAttempt", //Consul服务名称
        "LoadBalancerOptions": {
          "Type": "RoundRobin" //轮询  //"LeastConnection":最少连接数服务器   "NoloadBalance":不负载均衡     "CookieStickySession":会话粘滞
        }
      }
    ],
    "GlobalConfiguration": {
      "BaseUrl": "http://127.0.0.1:6299",
      "ServiceDiscoveryProvider": {
        "Host": "127.0.0.1",
        "Port": 8500,
        "Type": "Consul" //由Consul提供服务发现,每次请求去Consul
      }

    },

    "AllowedHosts": "*"
}
运行网关服务
dotnet OceletDemo.dll --urls="http://*:6299" --ip="127.0.0.1" --port=6299
调用:127.0.0.1:6299/T5/Health/Index
到此微服务就算搭建好了,至于服务治理什么的,个人感觉这些东西需要实践,仅靠demo成不了事的


 1099
1099


 被折叠的 条评论
为什么被折叠?
被折叠的 条评论
为什么被折叠?
 到【灌水乐园】发言


