


TP的结构
TP驱动芯片厂商主要有:focaltech(敦泰科技),synaptics(新思),atmel(爱特梅尔),iliteck(奕立)
手机显示屏LCD&TP的不同贴合工艺
主要结构上主要分为in-cell on-cell ogs,主要是面板模组厂商和触摸屏模组厂商的不同倾向的选择所产生的。
OGS(ONE GLASSS SOLUTION)技术,现在主要由触控屏厂商主导并发展,显示面板厂商倾向推动On-Cell或In-Cell的技术是因为其本身就是生产显示屏的,因此倾向于将触摸层制作在显示屏;而触控模组厂商或上游材料厂商则倾向于OGS,即将触控层制作在保护玻璃上,主要原因是该技术具备较强的制作工艺能力和技术。
In-cell是指将TP触摸面板功能嵌入到LCD液晶像素中的方法,因此原本3层的保护玻璃+TP+LCD变成了两层的保护玻璃+带触控功能的LCD,这样能使屏幕变得更加轻薄,留给手机的空间就更大,可扩充电池,同时若出现触摸出现问题,需要同屏幕一起换掉。
On-cell是指将触摸屏嵌入到显示屏的彩色滤光片基板和偏光片之间的方法,即在液晶面板上配触摸传感器,相比in-cell技术难度降低不少。三星、日立、LG等厂商在on-cell结构触摸屏上进展较快,目前,on-cell多应用于三星Amoled面板产品上,技术上尚未能克服薄型化、触控时产生的颜色不均等问题。
目前InCell&Oncell是一个阵营,OSG是一个阵营。低端一般用OSG。
TP的硬件接口
硬件原理图可以结合Android Qcom Display学习博客中的部分,硬件接口主要是
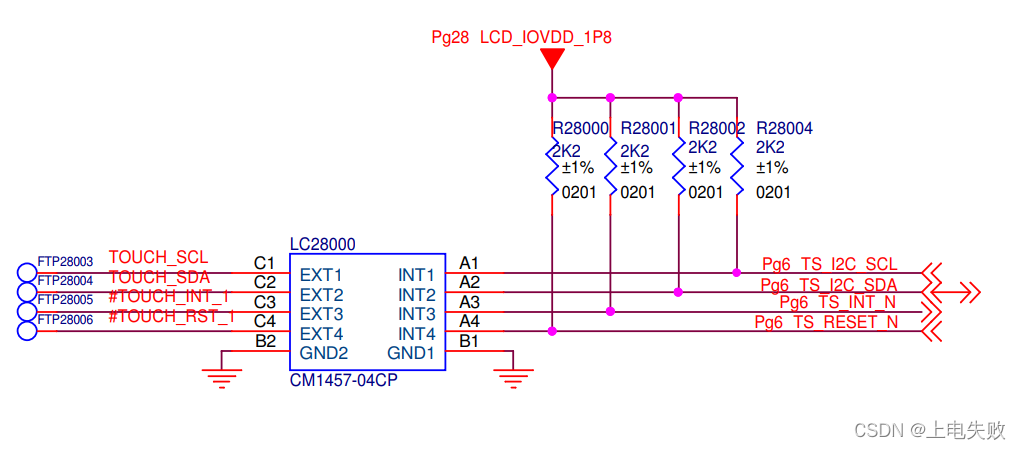
中断引脚:TS_INT_N GPIO80
复位引脚:TS_RESET_N GPIO71
总线通信:TOUCH_SCL TS_I2C_SCL/SDA GPIO7 GPIO6
供电相关:LCD_IOVDD_1P8 VREG_L9A_1P8 1.65V to 3.3V
TP使能引脚:TOUCH_3V3_EN_GPIO90 GPIO45
部分dtsi
&qupv3_se2_i2c { /* BLSP1 QUP4 (Touch) */
    status = "okay";
    atmel_maxtouch_ts@4a {
        compatible = "atmel,maxtouch-ts";
        reg = <0x4a>;

        vdd-supply = <&L9A>; //vddio, 1.8v
        atmel,vdd-voltage = <1800000>;
        atmel,tp-enable-gpio = <&tlmm 45 0x00>;//3.3v enable
        atmel,reset-gpio = <&tlmm 71 0x00>;
        interrupt-parent = <&tlmm>;
        interrupts = <80 0x2008>;//irq gpio + irq flags(interrupt.h)
        atmel,irq-gpio = <&tlmm 80 0x2008>;
        pinctrl-names = "pmx_ts_active", "pmx_ts_suspend";
        pinctrl-0 = <&ts_int_active    &ts_reset_active  &ts_en_active>;
        pinctrl-1 = <&ts_reset_suspend &ts_int_suspend  &ts_en_suspend>;

        atmel,display-coords = <0  0 1080 1920>;
        atmel,panel-coords = <0  0 1080 1920>;
        atmel,cfg-name = "mxt640u.raw";
        /delete-property/ atmel,fw-name;
        atmel,middle-keycode = <256>;
        panel  = <&dsi_hx8399_1080_video>;
};

&tlmm{
	pmx_ts_reset_active {
		ts_reset_active: ts_reset_active {
			mux {
				pins = "gpio71";
				function = "gpio";
			};

			config {
				pins = "gpio71";
				drive-strength = <8>;
				bias-pull-up;
			};
		};
	};
	pmx_ts_reset_suspend {
		ts_reset_suspend: ts_reset_suspend {
			mux {
				pins = "gpio71";
				function = "gpio";
			};

			config {
				pins = "gpio71";
				drive-strength = <2>;
				bias-pull-down;
			};
		};
	};

	pmx_ts_int_active {
		ts_int_active: ts_int_active {
			mux {
				pins = "gpio80";
				function = "gpio";
			};

			config {
				pins = "gpio80";
				drive-strength = <8>;
				bias-pull-up;
			};
		};
	};

	pmx_ts_int_suspend {
		ts_int_suspend: ts_int_suspend {
			mux {
				pins = "gpio80";
				function = "gpio";
			};

			config {
				pins = "gpio80";
				drive-strength = <2>;
				bias-pull-down;
			};
		};
	};

	pmx_ts_en_active {
		ts_en_active: ts_en_active {
			mux {
				pins = "gpio45";
				function = "gpio";
			};

			config {
				pins = "gpio45";
				drive-strength = <8>;
				bias-pull-up;
			};
		};
	};

	pmx_ts_en_suspend {
		ts_en_suspend: ts_en_suspend {
			mux {
				pins = "gpio45";
				function = "gpio";
			};

			config {
				pins = "gpio45";
				drive-strength = <2>;
				bias-pull-down;
			};
		};
	};
};
TP驱动代码解析
[Linux] 内核通知链 notifier
Linux firmware子系统的实现机制学习笔记
TouchPanel–Qcom DRM休眠唤醒通知链的注册及回调流程
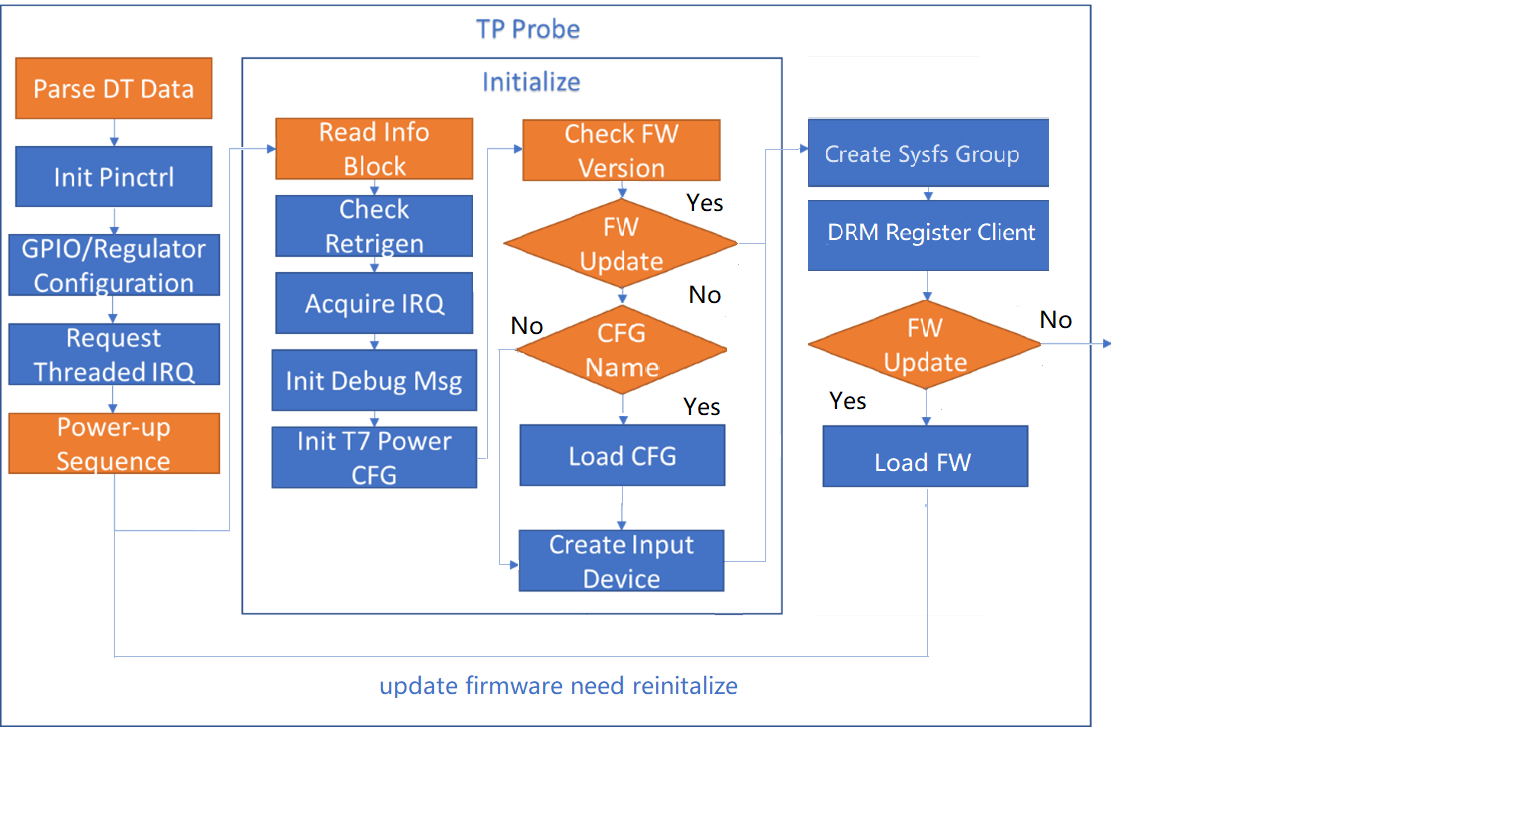
mxt_probe
	mxt_parse_dt(&client->dev, pdata);
		mxt_get_dt_coords(dev, "atmel,panel-coords", pdata);
		mxt_get_dt_coords(dev, "atmel,display-coords", pdata);
	atmel_check_dt_panel(client->dev.of_node) /* data->active_panel */
		node = of_parse_phandle(np, "panel", i);
		panel = of_drm_find_panel(node); /* panel的注册列表中找到匹配的 */
	gpio_to_irq(data->pdata->gpio_irq);
	request_threaded_irq(data->irq, NULL, mxt_interrupt,data->pdata->irqflags
						| IRQF_ONESHOT,client->name, data);
	mxt_regulator_enable(data); /* 使能 设置上下电时序 */
		gpio_set_value(data->pdata->gpio_reset, 0);
		regulator_enable(data->reg_vdd);
		gpio_set_value(data->pdata->tp_en_gpio, 1);
		mdelay(MXT_640U_REGULATOR_DELAY);
		gpio_set_value(data->pdata->gpio_reset, 1);
		mdelay(MXT_640U_POWERON_DELAY);
	disable_irq(data->irq);
	mxt_initialize(data);
		mxt_read_info_block(data);
			mxt_update_cfg_version(data); /* 读取cfg_version 后续mxt_load_cfg */
			mxt_update_mode(data); /* __mxt_read_reg 读取寄存器的值存入mxt_data-> cfg_mode*/
			mxt_choose_mode(data); /* configure mode enum 根据cfgmode去更新mxt_data->cfg_name */
		mxt_check_fw_version(data); /* 判断fw是否需要更新*/
		request_firmware_nowait(THIS_MODULE, true, data->cfg_name,&data->client->dev, GFP_KERNEL,
								data,mxt_config_cb);
			fw_get_filesystem_firmware(device, fw->priv); // fw_path = {fw_path_para, "vendor/firmware"};
		mxt_load_cfg(ctx, cfg, false);/* download configuration to chip */
		mxt_configure_objects(data); /* 创建了input device*/
			mxt_create_input_dev(data);
				input_allocate_device();
				input_dev->open = mxt_input_open;
				input_set_capability(input_dev, EV_KEY, BTN_TOUCH);
				input_set_abs_params(input_dev, ABS_X,data->pdata->disp_minx, data->pdata->disp_maxx,0, 0);
				input_set_abs_params(input_dev, ABS_Y,data->pdata->disp_miny, data->pdata->disp_maxy,0, 0);
				input_register_device(input_dev);
	sysfs_create_group(&client->dev.kobj, &mxt_attr_group); /* 注册文件 */
		/sys/devices/platform/soc/4a88000.i2c/i2c-1/1-004a/fw_version
	sysfs_bin_attr_init(&data->mem_access_attr); /* lockdep死锁检测需要分配动态 attr.name = mem_access */
	ata->fb_notif.notifier_call = fb_notifier_callback;
	drm_panel_notifier_register(data->active_panel,&data->fb_notif); /* 休眠唤醒通知链 */
	request_firmware_nowait(THIS_MODULE, true, data->fw_name,&data->client->dev, GFP_KERNEL, data,mxt_fw_cb);
部分log:
atmel_maxtouch_ts 1-004a: enter mxt_parse_dt
atmel_maxtouch_ts 1-004a: success to update touch cords.
atmel_maxtouch_ts 1-004a: success to update display cords.
atmel_maxtouch_ts 1-004a: touch cords: 0 0 1079 1919 , diplay cords: 0 0 1079 1919
atmel_maxtouch_ts 1-004a: mxt_parse_dt: atmel,reset-gpio is 1238
atmel_maxtouch_ts 1-004a: mxt_parse_dt: atmel,irq-gpio is 1247
atmel_maxtouch_ts 1-004a: read atmel middle scan key success.
atmel_maxtouch_ts 1-004a: Success to get active_panel
atmel_maxtouch_ts 1-004a: tp_en_gpio : 1212
atmel_maxtouch_ts 1-004a: Linked as a consumer to regulator.30
atmel_maxtouch_ts 1-004a: mxt_regulator_enable 3124 set tp_en_gpio high ...
atmel_maxtouch_ts 1-004a: Family: 166 Variant: 1 Firmware V1.1.AA Objects: 41 cfg version: 0.7.0.5
						  ( driver function:mxt_read_info_block )
atmel_maxtouch_ts 1-004a: path: mxt640u.raw ( mxt_choose_mode )
atmel_maxtouch_ts 1-004a: Initialised power cfg: ACTV 16, IDLE 32 ( mxt_init_t7_power_cfg )
atmel_maxtouch_ts 1-004a: Falling back to syfs fallback for: mxt640u.raw
input: atmel_mxt_ts as /devices/platform/soc/4a88000.i2c/i2c-1/1-004a/input/input5 ( input_register_device )
counters_connect atmel_mxt_ts
atmel_maxtouch_ts 1-004a: Register drm_fb_notifier success
atmel_maxtouch_ts 1-004a: mxt_config_cb >>>>>>
atmel_maxtouch_ts 1-004a: controller version:0.7.0.5 file version:0.7.0.5
atmel_maxtouch_ts 1-004a: configuration is up-to-date
atmel_maxtouch_ts 1-004a: Unable to load_cfg
如果request_firmware_nowait没有找到cfg文件则会打印
atmel_maxtouch_ts 1-004a: Failure to request config file mxt640u.raw
Linux 固件子系统
linux firmware 实现原理
Linux固件子系统的实现机制简介
linux内核下载固件函数request_firmware流程分析
int request_firmware(const struct firmware **fw,
				const char *name, struct device *device);
int request_firmware_nowait(struct module *module, /*= THIS_MODULE*/
			    int uevent, const char *name, struct device *device,
   				gfp_t gfp,void *context,/*不由固件子系统使用的私有数据指针*/
   				void (*cont)(const struct firmware *fw, void *context));
	INIT_WORK(&fw_work->work, request_firmware_work_func);
	chedule_work(&fw_work->work);
request_firmware 会请求用户空间,所以返回前将保持休眠,若probe函数调用会一直等待文件系统的挂载
request_firmware_nowait 是通过异步的工作队列去获取固件,使得请求固件不会进入休眠,可以不阻塞probe函数,会通过任务队列调用request_firmware_work_func,request_firmware相关的底层都会调用到_request_firmware函数
从源码driver/base/firmware_loader/main.c fallback.c中得知查找固件有三种方式:
第一种:builtin段,判断是否被编译到kernel中,Hacker_Albert博客有分享一种
fw_get_builtin_firmware(firmware, name, dbuf, size)

CONFIG_FIRMWARE_IN_KERNEL=y
CONFIG_EXTRA_FIRMWARE_DIR="firmware"  // this means $(source_dir)/firmware
CONFIG_EXTRA_FIRMWARE="fw_sst_0f28.bin"
第二种:cache,寻找之前是否有保存了以前load过的fw的信息,比如name, data, size等
alloc_lookup_fw_priv(name, &fw_cache, &fw_priv, dbuf, size, opt_flags);
第三种:fw_path,比较直观的可以知道从列表支持的file system路径中去寻找是否有存在对应的固件
fw_get_filesystem_firmware(device, fw->priv);

static const char * const fw_path[] = {
        fw_path_para,
        "/mnt/vendor/persist/tpp",
        "/lib/firmware/updates/" UTS_RELEASE,
        "/lib/firmware/updates",
        "/lib/firmware/" UTS_RELEASE,
        "/lib/firmware"
};
module_param_string(path, fw_path_para, sizeof(fw_path_para), 0644);
firmware_class.path=$CUSTOMIZED_PATH'
firmware_class.path=/system/etc/firmware
第四中:usespace,通过通过/sys/class/firmware/ 内核向用户空间发送uevent,udevd接收到事件后去寻找
firmware_fallback_sysfs(fw, name, device, opt_flags, ret);
	fw_load_from_user_helper(fw, name, device, opt_flags);

system/core/rootdir/ueventd.rc
	firmware_directories /etc/firmware/ /odm/firmware/ /vendor/firmware/ /firmware/image/
Linux 中断子系统
linux驱动request_threaded_irq()
linux中断申请之request_threaded_irq
中断要尽可能耗时比较短,尽快恢复系统正常调试,所以把中断触发、中断执行分开,也就是所说的“上半部分(中断触发)、底半部(中断执行)”,也就是所说的中断上下文。上半部分处理紧急、不耗时的硬件操作,下半部分一般处理不紧急的耗时操作采用tasklet、workqueue实现
int request_irq(unsigned int irq, irq_handler_t handler,
                unsigned long flags,const char* name, void *dev)
int request_threaded_irq(unsigned int irq, irq_handler_t handler,
             	irq_handler_t thread_fn,
             	unsigned long flags, const char *name, void *dev);
IRQF_SHARED : allow sharing the irq among several devices
IRQF_SHARED 共享中断时,dev_id不能为空,因为释放irq时要区分哪个共享中断
IRQF_ONESHOT:Interrupt is not reenabled after the hardirq handler finished.Used by threaded interrupts
			 which need to keep the irq line disabled until the threaded handler has been run
IRQF_ONESHOT 例如:设备是低电平产生中断,而硬中断函数为NULL,如果不使用IRQF_ONESHOT,
			 就会一直产生中断执行NULL函数,中断线程得不到执行,声明IRQF_ONESHOT后,会执行完线程才使能该中断
request_threaded_irq 是在将上半部的硬件中断处理缩短为所需设备的硬体中断,唤醒kernel thread 执行任务。没必要再使用request_irq加tasklet/workqueue或者内核线程的方式;如果中断处理简单时也不要执着使用request_threaded_irq
Android 输入系统架构
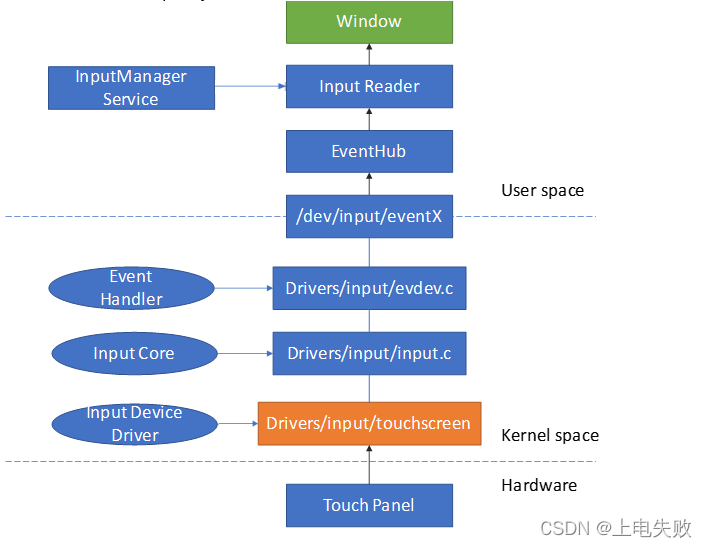
以上是Android input系统的整体架构,可以查看十分钟了解Android触摸事件原理(InputManagerService)
个人学习总结,Android input gpio driver手动对焦 + Android input epoll/inotify机制
MT协议上报点位
linux下多点电容触摸屏实验
Type A:适用于触摸点不能被区分或者追踪,此类型的设备上报原始数据(此类型在实际使用中非常少!
Type B:适用于有硬件追踪并能区分触摸点的触摸设备,此类型设备通过 slot 更新某一个触摸点的信息,并且可以可以减少上报到用户空间的数据量,当只在X轴上移动时,只会上报ABS_MT_POSITION_Y。
1.设置能力,不然上报的过程中会被拦截
__set_bit(EV_ABS, input_dev->evbit);
input_set_capability(input_dev, EV_KEY, BTN_TOUCH);
input_set_abs_params(input_dev, ABS_X,
        data->pdata->disp_minx, data->pdata->disp_maxx, 0, 0);
input_set_abs_params(input_dev, ABS_Y,
        data->pdata->disp_miny, data->pdata->disp_maxy, 0, 0);

input_mt_init_slots(input_dev, num_mt_slots, mt_flags); //多点触摸的个数

2.根据MT协议上报点位
input_mt_slot(input_dev, id);			              //slot
input_mt_report_slot_state(input_dev, MT_TOOL_FINGER, 1);     //tracking id
input_report_abs(input_dev, ABS_MT_POSITION_X, x);            //MT_X
input_report_abs(input_dev, ABS_MT_POSITION_Y, y);            //MT_Y

//以下几个点由于没有set_bit所以在上报过程中会被过滤掉
input_report_abs(input_dev, ABS_MT_TOUCH_MAJOR, major);       //触摸点区域大小
input_report_abs(input_dev, ABS_MT_PRESSURE, pressure);       //触摸点压力
input_report_abs(input_dev, ABS_MT_DISTANCE, distance);       //触摸点与触摸面的距离
input_report_abs(input_dev, ABS_MT_ORIENTATION, orientation); //触底的方向

//单点+Sync同步
input_mt_report_pointer_emulation(input_dev, false);//input_event + BTN_TOUCH+ABS_X+ABS_Y
input_sync(input_dev);

Event Types
#define EV_SYN			0x00
#define EV_KEY			0x01
#define EV_ABS			0x03
Code
#define ABS_MT_SLOT		0x2f	/* MT slot being modified */
#define ABS_MT_TRACKING_ID	0x39	/* Unique ID of initiated contact */
#define ABS_MT_POSITION_X	0x35	/* Center X touch position */
#define ABS_MT_POSITION_Y	0x36	/* Center Y touch position */

#define BTN_TOUCH		0x14a   /* pressure on/off */
#define ABS_X			0x00
#define ABS_Y			0x01
根据getevent来查看具体的上报事件, type code value
TypeB  slot
单点                                         单点slot可能会被忽略
/dev/input/event4: 0003 0039 00000066        type=0x3代表为EV_ABS事件,上报Tracking id
/dev/input/event4: 0003 0035 00000004        上报触摸点的X轴坐标(触摸点靠近左上角)
/dev/input/event4: 0003 0036 0000000d        上报触摸点的Y轴坐标(x = 04 y = 0d)
/dev/input/event4: 0001 014a 00000001        BTN_TOUCH type为KEY的事件代表触摸点摁下
/dev/input/event4: 0003 0000 00000004        用于单点触摸的时候上报的X轴坐标,同MT_X
/dev/input/event4: 0003 0001 0000000d        同上,ABS_Y = ABS_POSITION_Y
/dev/input/event4: 0000 0000 00000000        input_sync的EV_SYN事件同步上报操作
/frameworks/native/services/inputflinger/reader/mapper/SingleTouchInputMapper.cpp

多点
/dev/input/event4: 0003 002f 00000000         0x2f代表slot,用于区分点value=0第一个点
/dev/input/event4: 0003 0039 0000007c         ABS_MT_TRACKING_ID
/dev/input/event4: 0003 0035 0000025c         ABS_MT_POSITION_X
/dev/input/event4: 0003 0036 00000318         ABS_MT_POSITION_Y
/dev/input/event4: 0003 002f 00000001         slot1,表示当前有两个点在触摸
/dev/input/event4: 0003 0039 0000007d         ABS_MT_TRACKING_ID
/dev/input/event4: 0003 0035 000001d5         ABS_MT_POSITION_X
/dev/input/event4: 0003 0036 00000260         ABS_MT_POSITION_Y
/dev/input/event4: 0001 014a 00000001         BTN_TOUCH
/dev/input/event4: 0003 0000 0000025c         ABS_X
/dev/input/event4: 0003 0001 00000318         ABS_Y
/dev/input/event4: 0000 0000 00000000         EV_SYN
/frameworks/native/services/inputflinger/reader/mapper/MultiTouchInputMapper.cpp

抬手
/dev/input/event4: 0003 0039 ffffffff         0xffffffff代表触摸点离开屏幕
/dev/input/event4: 0001 014a 00000000         BTN_TOUCH = 0 手指离开屏幕
/dev/input/event4: 0000 0000 00000000
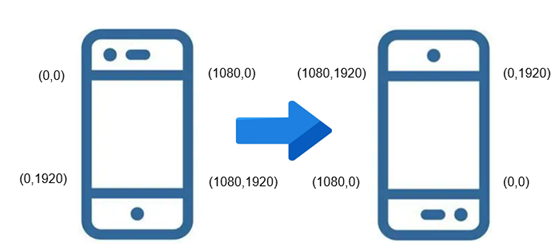
有可能会遇到模组厂于实际安装位置出现翻转的现象,其实也是很容易就能解决的,当然如果厂商能修改寄存器或者类型atmel的cfg更新,以下可以当作临时修改,还得防止出现负值的情况
x = (int)data->pdata->panel_maxx -x;
y = (int)data->pdata->panel_maxy -y;


 634
634

 被折叠的 条评论
为什么被折叠?
被折叠的 条评论
为什么被折叠?
 到【灌水乐园】发言


