


vscode 基础编程环境搭建
一、配置C/C++环境
1、下载minGW
官网:可以把下载链接贴到迅雷中,下载更快~
配置环境变量,并重启电脑(很重要!)
2、下载vscode
打开一个新建文件夹,新建一个test.c文件,随便写点东西
点击F5运行,在弹出的窗口中点击第一个,会自动生成tasks.json、launch.json文件。如果不自动生成,参照下面的:
注意:相关路径填写自己的,如下面的gcc.exe和gdb.exe的路径
// tasks.json
{
    "tasks": [
        {
            "type": "shell",
            "label": "task g++",
            "command": "D:\\code\\develop\\mingw64\\bin\\gcc.exe", // 改成自己电脑minGW配置的gcc路径
            "args": [
                "-g",
                "${file}",
                "-o",
                "${fileDirname}\\${fileBasenameNoExtension}.exe"
            ],
            "options": {
                "cwd": "${workspaceFolder}"
            },
            "problemMatcher": [
                "$gcc"
            ],
            "group": {
                "kind": "build",
                "isDefault": true
            }
        }
    ],
    "version": "2.0.0"
}
// launch.json
{
    // Use IntelliSense to learn about possible attributes.
    // Hover to view descriptions of existing attributes.
    // For more information, visit: https://go.microsoft.com/fwlink/?linkid=830387
    "version": "0.2.0",
    "configurations": [
        {
            "name": "gcc.exe - 生成和调试活动文件",
            "type": "cppdbg",
            "request": "launch",
            "program": "${fileDirname}\\${fileBasenameNoExtension}.exe",
            "args": [],
            "stopAtEntry": false,
            "cwd": "${workspaceFolder}",
            "environment": [],
            "externalConsole": false,
            "MIMode": "gdb",
            "miDebuggerPath": "D:\\code\\develop\\mingw64\\bin\\gdb.exe", // 改成自己电脑minGW配置的gdb路径
            "setupCommands": [
                {
                    "description": "为 gdb 启用整齐打印",
                    "text": "-enable-pretty-printing",
                    "ignoreFailures": true
                }
            ],
            "preLaunchTask": "task g++" // 这个就是tasks.json文件中的label
        }
    ]
}
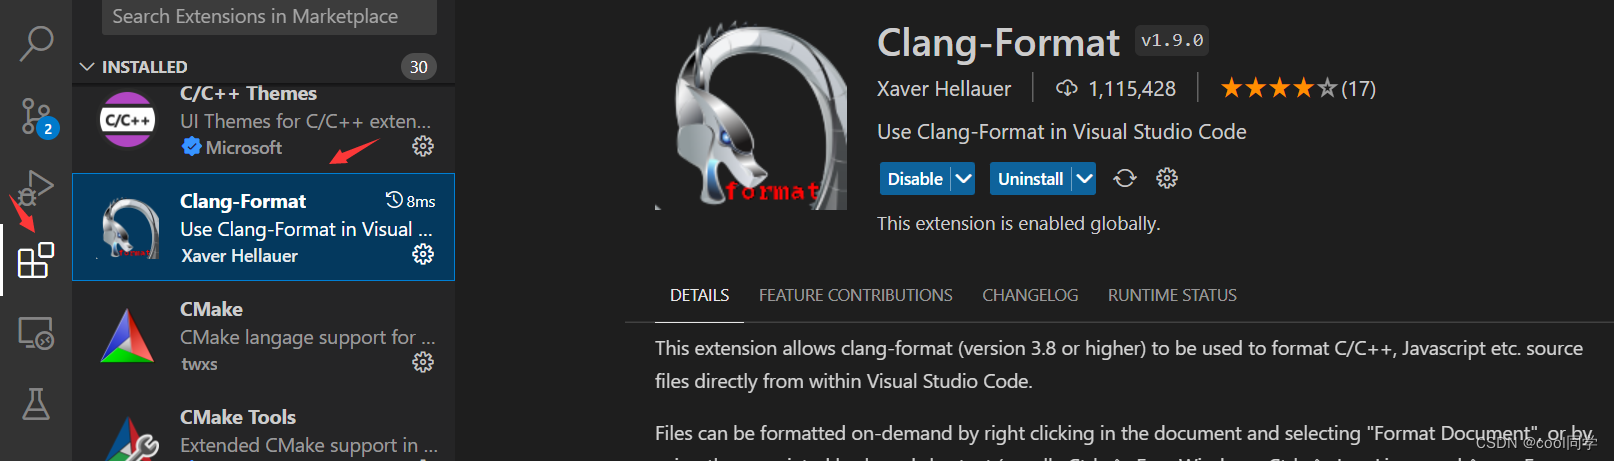
3、配置clang-format
默认配置
安装clang-format拓展
打开setting.json文件,填入以下内容:
注意:clang-format.executable的路径也是填写自己的
{
    // "editor.formatOnSave": true,
    "clang-format.executable": "C:\\Users\\19447\\.vscode\\extensions\\ms-vscode.cpptools-1.9.8-win32-x64\\LLVM\\bin\\clang-format",
    "[cpp]": {
        "editor.defaultFormatter": "xaver.clang-format"
    },
    /* 让 Tab 键缩进 4 个空格 */
    "editor.detectIndentation": false,
    "editor.tabSize": 4,

    "files.insertFinalNewline": true // 文件末尾添加空行
}
自定义配置
以上格式化后是按照 Clang-format 默认的格式,默认的缩进只有两个空格,看上去十分不清晰,可以修改部分格式。
进入cmd或vscode下的终端,输入如下命令进入到指定目录(用户名和版本号改成你自己的):
cd C:\Users\你的用户名\.vscode\extensions\ms-vscode.cpptools-版本号\LLVM\bin
然后输入:
clang-format -style=Google -dump-config > .clang-format
目录下会生成.clang-format文件,将其拷贝到你的工作区根目录下,打开编辑该文件,修改缩进宽度为 4:
IndentWidth: 4
更多配置可参考clang官方文档
注意
1、 .clang-format文件中不能带有汉字!注释的汉字也不行!!!
2、.clang-format文件的编码格式一定要是UTF-8
3、上面安装了clang-format扩展之后,环境中就会有两个formatter了,右键-Format Document With,选中Clang-Format就行。
我的 .clang-format 配置
---
BasedOnStyle: Google
---
Language: Cpp
AccessModifierOffset: -4
# AlignAfterOpenBracket: Align
# AlignConsecutiveMacros: false
# AlignConsecutiveAssignments: false
# AlignConsecutiveDeclarations: false
# AlignEscapedNewlines: Left
# AlignOperands: true
# AlignTrailingComments: true
# AllowAllArgumentsOnNextLine: true
AllowAllConstructorInitializersOnNextLine: false
# AllowAllParametersOfDeclarationOnNextLine: true
# AllowShortBlocksOnASingleLine: Never
AllowShortCaseLabelsOnASingleLine: true
# AllowShortFunctionsOnASingleLine: All
# AllowShortLambdasOnASingleLine: All
# AllowShortIfStatementsOnASingleLine: WithoutElse
# AllowShortLoopsOnASingleLine: true
# AlwaysBreakAfterDefinitionReturnType: None
# AlwaysBreakAfterReturnType: None
AlwaysBreakBeforeMultilineStrings: false
# AlwaysBreakTemplateDeclarations: Yes
# BinPackArguments: true
# BinPackParameters: true
BraceWrapping:
  # AfterCaseLabel: false
  AfterClass: true
  AfterControlStatement: Always
  AfterEnum: true
  AfterFunction: true
  # AfterNamespace: false
  # AfterObjCDeclaration: false
  AfterStruct: true
  AfterUnion: true
  AfterExternBlock: true
  BeforeCatch: true
  BeforeElse: true
  # IndentBraces: false
  # SplitEmptyFunction: true
  # SplitEmptyRecord: true
  # SplitEmptyNamespace: true
# BreakBeforeBinaryOperators: None
BreakBeforeBraces: WebKit
# BreakBeforeInheritanceComma: false
# BreakInheritanceList: BeforeColon
# BreakBeforeTernaryOperators: true
# BreakConstructorInitializersBeforeComma: false
# BreakConstructorInitializers: BeforeColon
# BreakAfterJavaFieldAnnotations: false
# BreakStringLiterals: true
# ColumnLimit: 80
CommentPragmas: "^ NOLINT:"
# CompactNamespaces: false
# ConstructorInitializerAllOnOneLineOrOnePerLine: true
# ConstructorInitializerIndentWidth: 4
# ContinuationIndentWidth: 4
# Cpp11BracedListStyle: true
# DeriveLineEnding: true
# DerivePointerAlignment: true
# DisableFormat: false
# ExperimentalAutoDetectBinPacking: false
# FixNamespaceComments: true
# ForEachMacros:
#   - foreach
#   - Q_FOREACH
#   - BOOST_FOREACH
# IncludeBlocks: Regroup
# IncludeCategories:
#   - Regex: '^<ext/.*\.h>'
#     Priority: 2
#     SortPriority: 0
#   - Regex: '^<.*\.h>'
#     Priority: 1
#     SortPriority: 0
#   - Regex: "^<.*"
#     Priority: 2
#     SortPriority: 0
#   - Regex: ".*"
#     Priority: 3
#     SortPriority: 0
# IncludeIsMainRegex: "([-_](test|unittest))?$"
# IncludeIsMainSourceRegex: ""
# IndentCaseLabels: true
# IndentGotoLabels: true
# IndentPPDirectives: None
IndentWidth: 4
# IndentWrappedFunctionNames: false
# JavaScriptQuotes: Leave
# JavaScriptWrapImports: true
# KeepEmptyLinesAtTheStartOfBlocks: false
# MacroBlockBegin: ""
# MacroBlockEnd: ""
# MaxEmptyLinesToKeep: 1
# NamespaceIndentation: None
# ObjCBinPackProtocolList: Never
# ObjCBlockIndentWidth: 2
# ObjCSpaceAfterProperty: false
# ObjCSpaceBeforeProtocolList: true
# PenaltyBreakAssignment: 2
# PenaltyBreakBeforeFirstCallParameter: 1
# PenaltyBreakComment: 300
# PenaltyBreakFirstLessLess: 120
# PenaltyBreakString: 1000
# PenaltyBreakTemplateDeclaration: 10
# PenaltyExcessCharacter: 1000000
# PenaltyReturnTypeOnItsOwnLine: 200
PointerAlignment: Right
# RawStringFormats:
#   - Language: Cpp
#     Delimiters:
#       - cc
#       - CC
#       - cpp
#       - Cpp
#       - CPP
#       - "c++"
#       - "C++"
#     CanonicalDelimiter: ""
#     BasedOnStyle: google
#   - Language: TextProto
#     Delimiters:
#       - pb
#       - PB
#       - proto
#       - PROTO
#     EnclosingFunctions:
#       - EqualsProto
#       - EquivToProto
#       - PARSE_PARTIAL_TEXT_PROTO
#       - PARSE_TEST_PROTO
#       - PARSE_TEXT_PROTO
#       - ParseTextOrDie
#       - ParseTextProtoOrDie
#     CanonicalDelimiter: ""
#     BasedOnStyle: google
# ReflowComments: true
SortIncludes: false
SortUsingDeclarations: false
# SpaceAfterCStyleCast: false
# SpaceAfterLogicalNot: false
# SpaceAfterTemplateKeyword: true
# SpaceBeforeAssignmentOperators: true
# SpaceBeforeCpp11BracedList: false
# SpaceBeforeCtorInitializerColon: true
# SpaceBeforeInheritanceColon: true
# SpaceBeforeParens: ControlStatements
# SpaceBeforeRangeBasedForLoopColon: true
# SpaceInEmptyBlock: false
# SpaceInEmptyParentheses: false
SpacesBeforeTrailingComments: 1
# SpacesInAngles: false
# SpacesInConditionalStatement: false
SpacesInContainerLiterals: false
# SpacesInCStyleCastParentheses: false
# SpacesInParentheses: false
# SpacesInSquareBrackets: false
# SpaceBeforeSquareBrackets: false
Standard: Cpp11
# StatementMacros:
#   - Q_UNUSED
#   - QT_REQUIRE_VERSION
TabWidth: 4
# UseCRLF: false
UseTab: Always
参考
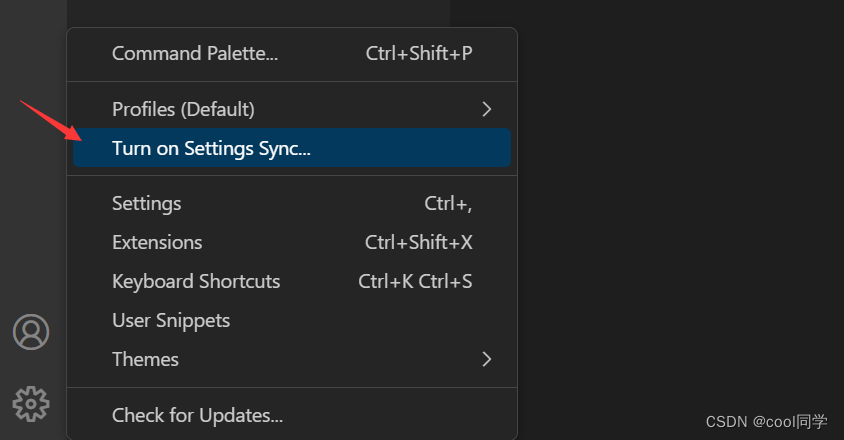
二、同步配置
直接使用vscode自带的sync功能,如果没有,需要将vscode升级到较新版本
无论是上传还是下载配置,都是如下操作:
1、点击界面左下方齿轮 Manage - Turn on Settings Sync…
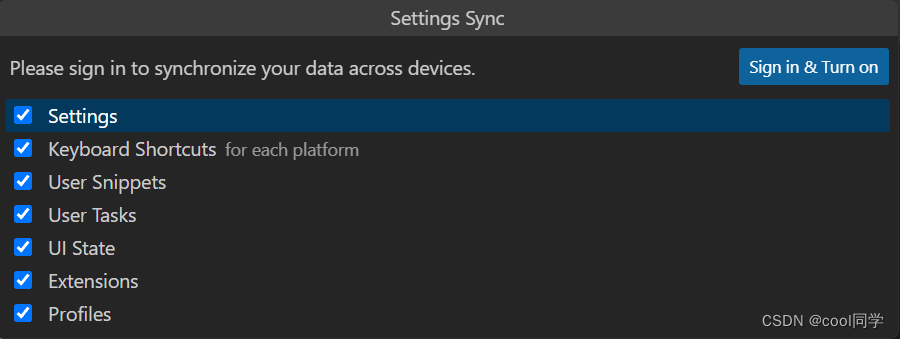
2、勾选需要同步的内容,随后点击右上角的 Sign in & Turn on
3、这里有两种登录方式:Github 和 Microsoft。以Github为例,点击第一个

4、如果是第一次登录,则会自动跳转到Github的登录界面,登录即可。由于我之前登录过,所以上图点击后会自动登录。
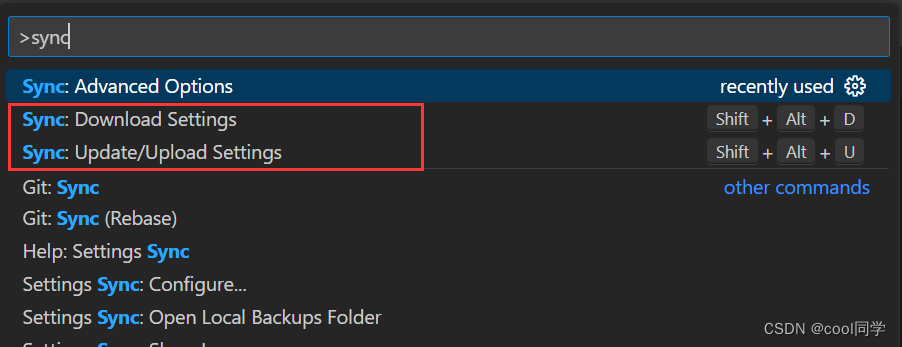
5、开始同步丝滑之旅~
- 上传:
Shift+Alt+U - 下载:
Shift+Alt+D
如果快捷键失效,直接 Shift + Ctrl + P 进入命令面板,搜索sync即可


 181
181


 被折叠的 条评论
为什么被折叠?
被折叠的 条评论
为什么被折叠?
 到【灌水乐园】发言


