


AutoConfig加载- 自己写代码加载
xml加载
使用这三种方式都需要:
1.添加依赖
2.写配置信息
spring.redis.database=0
spring.redis.host=localhost
spring.redis.port=6379
# 连接超时时间 单位 ms(毫秒)
spring.redis.timeout=3000

# 连接池中的最大空闲连接,默认值也是8。
spring.redis.pool.max-idle=8
#连接池中的最小空闲连接,默认值也是0。
spring.redis.pool.min-idle=0
# 如果赋值为-1,则表示不限制;如果pool已经分配了maxActive个jedis实例,则此时pool的状态为exhausted(耗尽)。
spring.redis.pool.max-active=8
# 等待可用连接的最大时间,单位毫秒,默认值为-1,表示永不超时。如果超过等待时间,则直接抛出JedisConnectionException
spring.redis.pool.max-wait=-1
方式一:使用Autoconfiguration自动加载。
因为上面引入了spring-boot-start-data-redis,所以可以使用RedisAutoConfiguration类加载properties文件的配置。
**
 * Standard Redis configuration.
 */
@Configuration
protected static class RedisConfiguration {

    @Bean
    @ConditionalOnMissingBean(name = "redisTemplate")
    public RedisTemplate<Object, Object> redisTemplate(
            RedisConnectionFactory redisConnectionFactory)
                    throws UnknownHostException {
        RedisTemplate<Object, Object> template = new RedisTemplate<Object, Object>();
        template.setConnectionFactory(redisConnectionFactory);
        return template;
    }

    @Bean
    @ConditionalOnMissingBean(StringRedisTemplate.class)
    public StringRedisTemplate stringRedisTemplate(
            RedisConnectionFactory redisConnectionFactory)
                    throws UnknownHostException {
        StringRedisTemplate template = new StringRedisTemplate();
        template.setConnectionFactory(redisConnectionFactory);
        return template;
    }
}
此种方式会默认加载applicaiton中的redis配置,提供了以下两种bean
RedisTemplate<Object,Object> 可以对Redis中key和value都为object类型的数据进行操作,默认会将对象使用JdkSerializationRedisSerializer进行序列化
StringRedisTemplate可以对Redis中key和value都是String类型的数据进行操作。
方式二:自己写代码加载。
@Configuration
public class RedisConfig{

  private Logger logger = LoggerFactory.getLogger(this.getClass());

  @Value("${spring.redis.host}")
  private String host;

  @Value("${spring.redis.port}")
  private int port;

  @Value("${spring.redis.timeout}")
  private int timeout;

  @Value("${spring.redis.password}")
  private String password;

  @Value("${spring.redis.database}")
  private int database;

  @Value("${spring.redis.pool.max-idle}")
  private int maxIdle;

  @Value("${spring.redis.pool.min-idle}")
  private int minIdle;

  /**
   * redis模板,存储关键字是字符串,值是Jdk序列化
   * @Description:
   * @param factory
   * @return
   */
  @Bean
  public RedisTemplate<String,Object> redisTemplate(RedisConnectionFactory factory) {
      RedisTemplate<String,Object> redisTemplate = new RedisTemplate<>();
      redisTemplate.setConnectionFactory(factory);
      RedisSerializer<String> redisSerializer = new StringRedisSerializer();
      redisTemplate.setKeySerializer(redisSerializer);
      redisTemplate.setHashKeySerializer(redisSerializer);
      //JdkSerializationRedisSerializer序列化方式;
      JdkSerializationRedisSerializer jdkRedisSerializer=new JdkSerializationRedisSerializer();
      redisTemplate.setValueSerializer(jdkRedisSerializer);
      redisTemplate.setHashValueSerializer(jdkRedisSerializer);
      redisTemplate.afterPropertiesSet();
      return redisTemplate;
  }
}
方式三:使用xml加载。
在程序入口添加:
@ImportResource(locations={"classpath:spring-redis.xml"})
在
resource文件夹下新建文件
spring-redis.xml
<beans xmlns="http://www.springframework.org/schema/beans"
    xmlns:xsi="http://www.w3.org/2001/XMLSchema-instance" xmlns:cache="http://www.springframework.org/schema/cache"
    xmlns:context="http://www.springframework.org/schema/context"
    xsi:schemaLocation="http://www.springframework.org/schema/beans
    http://www.springframework.org/schema/beans/spring-beans-4.0.xsd
     http://www.springframework.org/schema/cache
     http://www.springframework.org/schema/cache/spring-cache.xsd


        http://www.springframework.org/schema/context
    http://www.springframework.org/schema/context/spring-context-4.0.xsd">

    <bean id="jedisPoolConfig" class="redis.clients.jedis.JedisPoolConfig">
        <property name="minIdle" value="${redis.pool.minIdle}" />
        <property name="maxIdle" value="${redis.pool.maxIdle}" />
        <property name="maxWaitMillis" value="${redis.pool.maxWaitMillis}" />
    </bean>

    <bean id="jedisConnectionFactory"
        class="org.springframework.data.redis.connection.jedis.JedisConnectionFactory">
        <property name="usePool" value="true"></property>
        <property name="hostName" value="${redis.ip}" />
        <property name="port" value="${redis.port}" />
        <property name="password" value="${redis.password}" />
        <property name="timeout" value="${redis.timeout}" />
        <property name="database" value="${redis.default.db}"></property>
        <constructor-arg ref="jedisPoolConfig" />
    </bean>

    <bean id="redisTemplate" class="org.springframework.data.redis.core.RedisTemplate">
        <property name="connectionFactory" ref="jedisConnectionFactory" />
        <property name="KeySerializer">
            <bean
                class="org.springframework.data.redis.serializer.StringRedisSerializer"></bean>
        </property>
        <property name="ValueSerializer">
            <bean
                class="org.springframework.data.redis.serializer.JdkSerializationRedisSerializer"></bean>
        </property>
        <property name="HashKeySerializer">
            <bean
                class="org.springframework.data.redis.serializer.StringRedisSerializer"></bean>
        </property>
        <property name="HashValueSerializer">
            <bean
                class="org.springframework.data.redis.serializer.JdkSerializationRedisSerializer"></bean>
        </property>
    </bean>
</beans>
使用:
用注解注入Template,直接调用就好了。
@Repository
public class RedisService {

    @Autowired
    StringRedisTemplate stringRedisTemplate;

    public void add(String key, User user, Long time) {
        Gson gson = new Gson();
        stringRedisTemplate.opsForValue().set(key, gson.toJson(user), time, TimeUnit.MINUTES);
    }

    public void add(String key, List<User> users, Long time) {
        Gson gson = new Gson();
        String src = gson.toJson(users);
        stringRedisTemplate.opsForValue().set(key, src, time, TimeUnit.MINUTES);
    }

    public User get(String key) {
        String source = stringRedisTemplate.opsForValue().get(key);
        if (!StringUtils.isEmpty(source)) {
            return new Gson().fromJson(source, User.class);
        }
        return null;
    }

    public List<User> getUserList(String key) {
        String source = stringRedisTemplate.opsForValue().get(key);
        if (!StringUtils.isEmpty(source)) {
            return new Gson().fromJson(source, new TypeToken<List<User>>() {
            }.getType());
        }
        return null;
    }

    public void delete(String key) {
        stringRedisTemplate.opsForValue().getOperations().delete(key);
    }
}
如果是测试的话:
@RunWith(SpringJUnit4ClassRunner.class)
@SpringBootTest
public class RedisTest {

    @Autowired
    RedisService redisService;

    @Before
    public void setUp() {

    }

    @Test
    public void get() {
        User user = new User();
        user.setName("wangjianfeng");
        user.setAge(22);
        redisService.add("userByName:" + user.getName(), user, 10L);
        List<User> list = new ArrayList<>();
        list.add(user);
        redisService.add("list", list, 10L);
        User user1 = redisService.get("userByName:wangjianfeng");
        Assert.notNull(user1, "user is null");
        List<User> list2 = redisService.getUserList("list");
        Assert.notNull(list2, "list is null");
    }
}
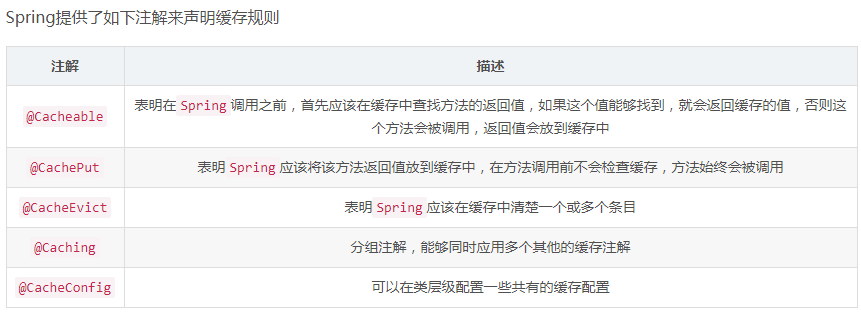
SpringBoot使用Redis缓存:
Springboot提供了很多缓存管理器,比如:
SimpleCacheManagerEhCacheManagerCaffeineCacheManagerGuavaCacheManagerCompositeCacheManager
SpringData提供了缓存管理器:RedisCacheManager
在SpringBoot中,在程序入口,加上@EnableCaching注解自动化配置合适的管理器。
然后我们使用自己写代码配置的方式,修改
RedisConfig添加
@EnableCaching注解,并继承
CachingCongigurerSupport
@Configuration
@EnableCaching
public class RedisConfig extends CachingConfigurerSupport{
    ...
}


 390
390


 被折叠的 条评论
为什么被折叠?
被折叠的 条评论
为什么被折叠?
 到【灌水乐园】发言


