


文章目录
前言
后端开发,提供 Restful 接口给前端,Swagger3 提供 Restful 的接口文档自动生成和在线接口调试。Knife4j 是对 Swagger 进一步封装,优化了 API 文档的 UI 界面。
一、Pom 导入 Knife4j 依赖
<dependency>
     <groupId>com.github.xiaoymin</groupId>
     <artifactId>knife4j-spring-boot-starter</artifactId>
     <version>3.0.3</version>
</dependency>
二、修改 application.yaml 配置文件
# knife4j配置
knife4j:
  # 启用
  enable: true
  # 增强配置
  setting:
    enableSwaggerModels: true
    enableDocumentManage: true
    enableHost: false
    enableHostText: http://localhost
    enableRequestCache: true
    enableFilterMultipartApis: false
    enableFilterMultipartApiMethodType: POST
    language: zh-CN
  # 开启屏蔽文档资源
  production: true
三、创建一个 Knife4jConfig 类
@Configuration
@EnableKnife4j
public class Knife4jConfig {

    @Bean
    public Docket docket1() {
        return new Docket(DocumentationType.SWAGGER_2).groupName("A");
    }

    @Bean
    public Docket docket2() {
        return new Docket(DocumentationType.SWAGGER_2).groupName("B");
    }

    @Bean
    public Docket docket3() {
        return new Docket(DocumentationType.SWAGGER_2).groupName("C");
    }


    @Bean
    public Docket docket(Environment environment) {
        // 设置要显示swagger环境
        Profiles profiles = Profiles.of("dev", "test");
        // 判断是否处在在自己设定的环境当中
        boolean flag = environment.acceptsProfiles(profiles);

        return new Docket(DocumentationType.SWAGGER_2)
                .apiInfo(apiInfo())
                // 是否启动swagger
                .enable(flag)
                // 分组名称
                .groupName("雪山")
                // 设置哪些接口暴露给Swagger展示
                .select()

                /**
                 * 配置要扫描的接口的方式 RequestHandlerSelectors
                 * basePackage:指定要扫描的包
                 * any(): 扫描全部
                 * none():不扫描
                 * withClassAnnotation(RestController.class): 扫描类上有RestController.class的注解
                 * withMethodAnnotation(GetMapping.class):    扫描方法上的注解
                 */

                // 扫描所有有注解的api,用这种方式更灵活
                .apis(RequestHandlerSelectors.withMethodAnnotation(ApiOperation.class))
                // 指定Controller扫描包路径
                // .apis(RequestHandlerSelectors.basePackage("com.xb.controller"))
                // 过滤请求路径
                .paths(PathSelectors.ant("/xb/**"))
                .build();
    }

    private ApiInfo apiInfo() {
        // 作者信息
        Contact contact = new Contact("哈哈哈", "https://blog.csdn.net/xx", "xx@qq.com");

        return new ApiInfo(
                "SwaggerAPI文档",
                "远航",
                "v1.0",
                "https://github.com/xx",
                contact,
                "Apache 2.0",
                "http://www.apache.org/licenses/LICENSE-2.0",
                new ArrayList<>()
        );
    }
}
四、Api 注解的使用
1、控制类
@Api(value = "用户controller", tags = {"用户操作接口"})
@RestController
public class UserController {
    @ApiOperation(value = "获取用户信息")
    @GetMapping("/xb/getUserInfo")
    public User getUserInfo(@ApiParam(name = "id", value = "用户id", required = true) Long id, @ApiParam(name = "username", value = "用户名") String username) {
        return new User();
    }

    @ApiOperation("更改用户信息")
    @PostMapping("/xb/updateUserInfo")
    public int updateUserInfo(@RequestBody @ApiParam(name = "用户对象", value = "传入json格式", required = true) User user) {
        return 999;
    }
}
2、实体类
@Data
@AllArgsConstructor
@NoArgsConstructor
@ApiModel(value = "", description = "用户对象user")
public class User implements Serializable {
    private static final long serialVersionUID = 1L;

    @ApiModelProperty(value = "用户名", example = "xx")
    private String username;

    @ApiModelProperty(value = "状态", required = true)
    private Integer state;

    private String password;

    private String nickName;

    private Integer isDeleted;

    @ApiModelProperty(value = "id数组", hidden = true)
    private String[] ids;

    private List<String> idList;
}
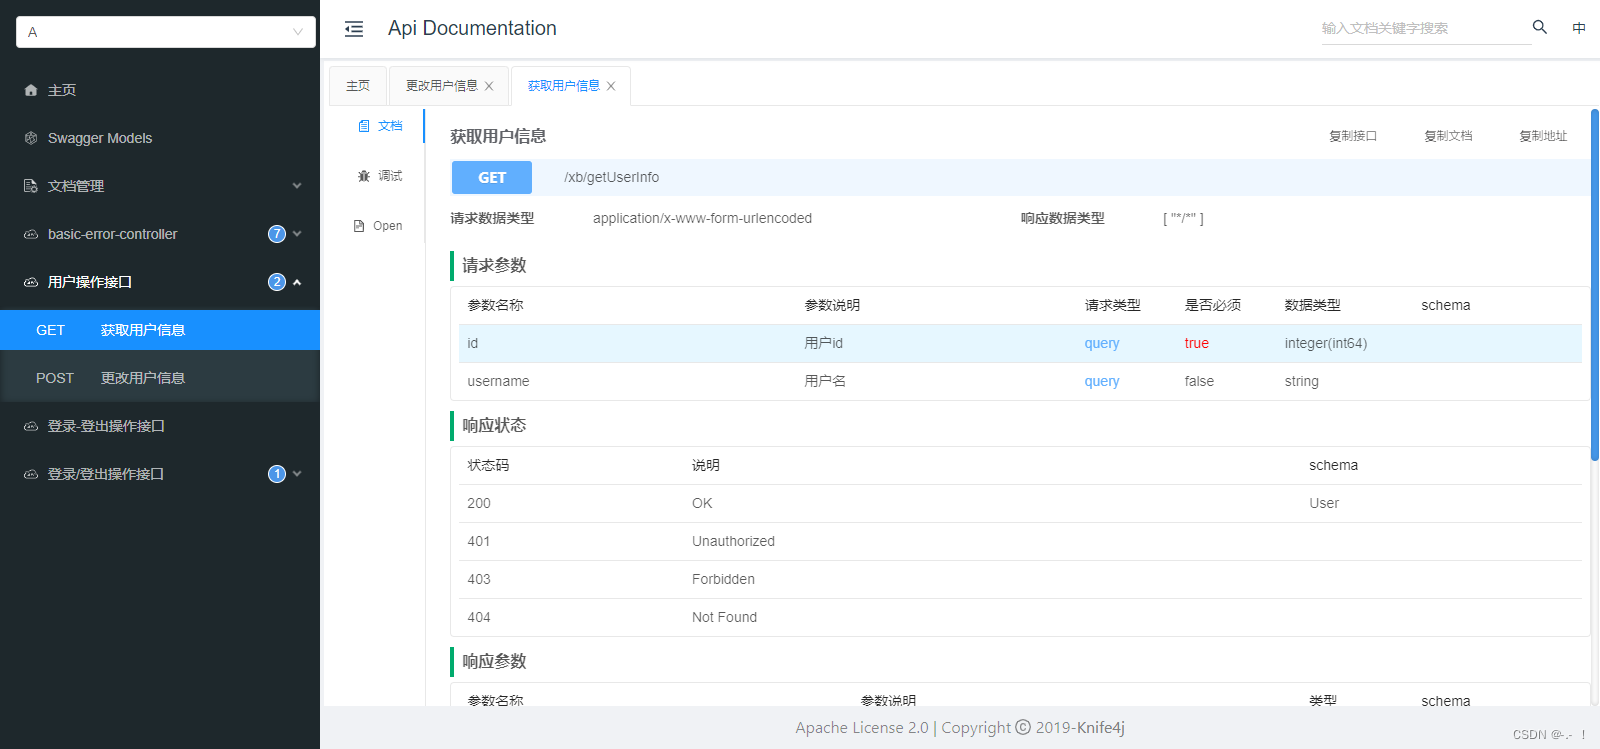
五、启动测试访问
启动项目,在浏览器输入 http://localhost:8080/doc.html 就可以看到接口的信息。


 4090
4090


 被折叠的 条评论
为什么被折叠?
被折叠的 条评论
为什么被折叠?
 到【灌水乐园】发言


