


Scrapy介绍
Scrapy一个开源和协作的框架,其最初是为了页面抓取(更确切来说,网络抓取)所设计的,使用它可以快速、简单、可扩展
的方式从网站中提取所需的数据。但目前Scrapy的用途十分广泛,可用于如挖掘、监测和自动化测试等领域,也可以应用在API
所返回的数据(例如Amazon Associates Web Services)或者通用的网络爬虫。Scrapy是基于twisted框架开发而来,twisted是一个流行的事件驱动的python网络框架。因此Scrapy使用了一种非阻塞(又名异步)的代码来实现并发。整体架构大致如下: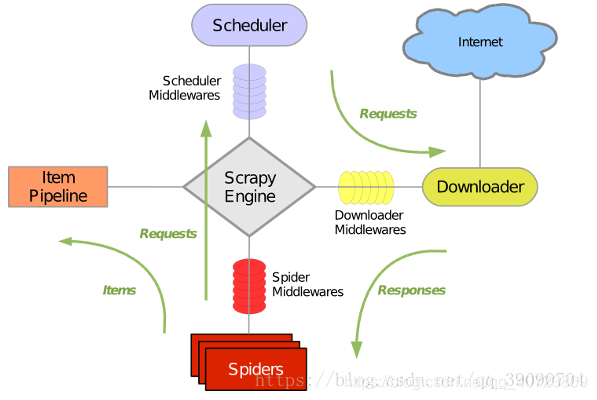
Scrapy数据流是由执行的核心引擎(engine)控制,流程是这样的:
1.引擎打开一个网站(open adomain),找到处理该网站的Spider并向该spider请求第一个要抓取的URL(s)。
2.引擎从Spider中获取到第一个要抓取的URL并在调度器(Scheduler)以Request调度。
3.引擎向调度器请求下一个要爬取的URL。
4.调度器返回下一个要抓取的URL给引擎,引擎将URL通过下载中间件(请求(request)方向)转发给下载器(Downloader).
5.一旦页面下载完毕,下载器生成一个该页面的Response,并将其通过下载中间件(返回(response)方向)发送给引擎。
6.引擎从下载器中接收到Response并通过Spider中间件(输入方向)发送给Spider处理。
7.Spider处理Response并返回爬取到的Item给Item Pipeline,将(Spider返回的)Request给调度器。
8.引擎将(Spider返回的)爬取的Item给Item Pipeline,将(Spider返回的)Request给调度器。
9.(从第二步)重复直到调度器中没有更多地request,引擎关闭该网站。
Scrapy主要包括了一下组件:
1.爬虫引擎(engine):爬虫引擎负责控制各个组件之间的数据流,当某些操作触发事件后都是通过engine来处理
2.调度器:调度接收来engine的请求并将请求请求放入队列中,并通过事件返回给engine
3.下载器:通过engine请求下载网络数据并将结果响应给engine
4.spider:Spider发出请求,并处理engine返回给它下载器响应数据,以items和规则内的数据请求(urls)返回给engine
5.管道数目(item pipeline):负责处理engine返回spider解析后的数据,并且将数据持久化,例如将数据存入数据库或者文件6.下载中间件:下载中间件是engine和下载器交互组件,以钩子(插件)的形式存在,可以代替接收请求、处理数据的下载以及将结果响应给engine
7.spider中间件:spider中间件是engine和spider之间的交互组件,以钩子(插件)的形式存在,可以代替处理response以及返回给engine items及新的请求集.
爬取的步骤
- 确定url地址;
- 获取页面信息;(urllib, requests);
- 解析页面提取需要的数据; (正则表达式, bs4, xpath)
- 保存到本地(csv, json, pymysql, redis);
- 清洗数据(删除不必要的内容 -----正则表达式);
- 分析数据(词云wordcloud + jieba)
有没有用到多线程? -----
获取页面信息每个爬虫都会使用, 重复去写----
设置头部信息 ---- user-agent, proxy…
流程分析:
- 确定url地址:http://www.imooc.com/course/list;(spider)
- 获取页面信息;(urllib, requests); —(scrapy中我们不要处理)—(Downloader)
- 解析页面提取需要的数据; (正则表达式, bs4, xpath)—: (spider)
课程链接, 课程的图片url, 课程的名称, 学习人数, 课程描述
- 保存到本地(csv, json, pymysql, redis); ----(pipeline)
环境
- Scrapy 1.6.0
实现步骤:
1. 工程创建
scrapy startproject mySpider
cd mySpider
tree
├── mySpider
│ ├── init.py
│ ├── items.py # 提取的数据信息
│ ├── middlewares.py # 中间键
│ ├── pipelines.py # 管道, 如何存储数据
│ ├── pycache
│ ├── settings.py # 设置信息
│ └── spiders # 爬虫(解析页面的信息)
│ ├── init.py
│ └── pycache
└── scrapy.cfg
创建一个爬虫
scrapy genspider mooc “www.imooc.com”
cd mySpider/spiders/
vim mooc.py
start_url
定义爬取的items内容
class CourseItem(scrapy.Item):
# 课程标题
title = scrapy.Field()
# 课程的url地址
url = scrapy.Field()
# 课程图片url地址
image_url = scrapy.Field()
# 课程的描述
introduction = scrapy.Field()
# 学习人数
student = scrapy.Field()
编写spider代码, 解析
运作流程:
代码写好,程序开始运行…
1 引擎:Hi!Spider, 你要处理哪一个网站?
2 Spider:老大要我处理 xxxx.com。
3 引擎:你把第一个需要处理的URL给我吧。
4 Spider:给你,第一个URL是 xxxxxxx.com。
5 引擎:Hi!调度器,我这有request请求你帮我排序入队一下。
6 调度器:好的,正在处理你等一下。
7 引擎:Hi!调度器,把你处理好的request请求给我。
8 调度器:给你,这是我处理好的request。
9 引擎:Hi!下载器,你按照老大的下载中间件的设置帮我下载一下这个request请求。
10 下载器:好的!给你,这是下载好的东西。(如果失败:sorry,这个request下载失败了。然后引擎告诉调度器,这个request下载失败了,你记录一下,我们待会儿再下载)
11 引擎:Hi!Spider,这是下载好的东西,并且已经按照老大的下载中间件处理过了,你自己处理一下(注意!这儿responses默认是交给def parse()这个函数处理的)
12 Spider:(处理完毕数据之后对于需要跟进的URL),Hi!引擎,我这里有两个结果,这个是我需要跟进的URL,还有这个是我获取到的Item数据。
13 引擎:Hi !管道 我这儿有个item你帮我处理一下!调度器!这是需要跟进URL你帮我处理下。然后从第四步开始循环,直到获取完老大需要全部信息。
14 管道调度器:好的,现在就做!
新建项目
制作爬虫 (spiders/ mooc.py)
制作爬虫开始爬取网页 ----> 编写spider代码,解析网页
import scrapy

from mySpider.items import CourseItem


class MoocSpider(scrapy.Spider):
    # name: 用于区别爬虫, 必须是唯一的;
    name = 'mooc'
    # 允许爬取的域名;其他网站的页面直接跳过;
    allowed_domains = ['www.imooc.com', 'img3.mukewang.com']
    # 爬虫开启时第一个放入调度器的url地址;
    start_urls = ['http://www.imooc.com/course/list']

    # 被调用时, 每个出世url完成下载后, 返回一个响应对象,
    # 负责将响应的数据分析, 提取需要的数据items以及生成下一步需要处理的url地址请求;
    def parse(self, response):

        # # 用来检测代码是否达到指定位置, 并用来调试并解析页面信息;
        # from scrapy.shell import  inspect_response
        # inspect_response(response, self)

        # 1). 实例化对象, CourseItem
        course = CourseItem()
        # 分析响应的内容
        # scrapy分析页面使用的是xpath语法
        # 2). 获取每个课程的信息: <div class="course-card-container">
        courseDetails = response.xpath('//div[@class="course-card-container"]')
        for courseDetail in courseDetails:
            # 课程的名称:
            # "htmlxxxx"


            # 爬取新的网站, Scrapy里面进行调试(parse命令logging)
            course['title'] = courseDetail.xpath('.//h3[@class="course-card-name"]/text()').extract()[0]
            # 学习人数
            course['student'] = courseDetail.xpath('.//span/text()').extract()[1]
            # 课程描述:
            course['introduction'] = courseDetail.xpath(".//p[@class='course-card-desc']/text()").extract()[0]
            # 课程链接, h获取/learn/9 ====》 http://www.imooc.com/learn/9
            course['url'] = "http://www.imooc.com" + courseDetail.xpath('.//a/@href').extract()[0]
            # 课程的图片url:
            course['image_url'] = 'http:' + courseDetail.xpath('.//img/@src').extract()[0]

            yield  course


            # url跟进, 获取下一页是否有链接;href
            url  = response.xpath('.//a[contains(text(), "下一页")]/@href')[0].extract()
            if url:
                # 构建新的url
                page = "http://www.imooc.com" + url
                yield scrapy.Request(page, callback=self.parse)
存储内容 (pipelines.py)
设计管道存储爬取内容
import json

from mySpider.settings import MOOCFilename
from  scrapy.pipelines.images import ImagesPipeline

class MyspiderPipeline(object):
    """将爬取的信息保存为Json格式"""
    def __init__(self):
        self.f = open(MOOCFilename, 'w')

    def process_item(self, item, spider):
        # 默认传过来的item是json格式
        import json
        # 读取item中的数据, 并转成json格式;
        line = json.dumps(dict(item), ensure_ascii=False, indent=4)
        self.f.write(line + '\n')
        # 一定要加, 返回给调度为器;
        return item
    def open_spider(self, spider):
        """开启爬虫时执行的函数"""
        pass

    def close_spider(self, spider):
        """当爬虫全部爬取结束的时候执行的函数"""
        self.f.close()


class CsvPipeline(object):
    """将爬取的信息保存为csv格式"""

    def __init__(self):
        self.f = open('mooc.csv', 'w')

    def process_item(self, item, spider):
        # xxxx:xxxxx:xxxx
        item = dict(item)
        self.f.write("{0}:{1}:{1}\n".format(item['title'], item['student'], item['url']))
        # 一定要加, 返回给调度为器;
        return item

    def open_spider(self, spider):
        """开启爬虫时执行的函数"""
        pass

    def close_spider(self, spider):
        """当爬虫全部爬取结束的时候执行的函数"""
        self.f.close()


import pymysql


class MysqlPipeline(object):
    """
    将爬取的信息保存到数据库中
    1. 创建mooc数据库
    """
    def __init__(self):
        super(MysqlPipeline, self).__init__()
        self.conn = pymysql.connect(
            host='localhost',
            user='root',
            password='redhat',
            db='Mooc',
            charset='utf8',
        )

        self.cursor = self.conn.cursor()

    def process_item(self, item, spider):
        # xxxx:xxxxx:xxxx
        # item时一个对象,
        item = dict(item)
        info = (item['title'], item['url'], item['image_url'], item['introduction'], item['student'])
        insert_sqli = "insert into moocinfo values('%s', '%s', '%s', '%s', '%s'); " %(info)
        # open('mooc.log', 'w').write(insert_sqli)
        # # 用来检测代码是否达到指定位置, 并用来调试并解析页面信息;
        self.cursor.execute(insert_sqli)
        self.conn.commit()
        return item

    def open_spider(self, spider):
        """开启爬虫时执行的函数"""
        create_sqli = "create table if not exists  moocinfo (title varchar(50), url varchar(200), image_url varchar(200), introduction varchar(500), student int)"
        self.cursor.execute(create_sqli)

    def close_spider(self, spider):
        """当爬虫全部爬取结束的时候执行的函数"""
        self.cursor.close()
        self.conn.close()

import  scrapy

# scrapy框架里面,
class ImagePipeline(ImagesPipeline):
    def get_media_requests(self, item, info):
        # 返回一个request请求, 包含图片的url地址
        yield  scrapy.Request(item['image_url'])

    # 当下载请求完成后执行的函数/方法
    def item_completed(self, results, item, info):

        # open('mooc.log', 'w').write(results)
        #  获取下载的地址
        image_path = [x['path'] for ok,x in results if ok]
        if not image_path:
            raise  Exception("不包含图片")
        else:
            return  item
配置文件(settings.py)
最后,一定不要忘记设置scrapy的配置文件
# Scrapy settings for mySpider project
#
# For simplicity, this file contains only settings considered important or
# commonly used. You can find more settings consulting the documentation:
#
#     https://doc.scrapy.org/en/latest/topics/settings.html
#     https://doc.scrapy.org/en/latest/topics/downloader-middleware.html
#     https://doc.scrapy.org/en/latest/topics/spider-middleware.html

BOT_NAME = 'mySpider'

SPIDER_MODULES = ['mySpider.spiders']
NEWSPIDER_MODULE = 'mySpider.spiders'


# Crawl responsibly by identifying yourself (and your website) on the user-agent
#USER_AGENT = 'mySpider (+http://www.yourdomain.com)'

# Obey robots.txt rules
# ROBOTSTXT_OBEY = True
ROBOTSTXT_OBEY = False

# Configure maximum concurrent requests performed by Scrapy (default: 16)
#CONCURRENT_REQUESTS = 32

# Configure a delay for requests for the same website (default: 0)
# See https://doc.scrapy.org/en/latest/topics/settings.html#download-delay
# See also autothrottle settings and docs
#DOWNLOAD_DELAY = 3
# The download delay setting will honor only one of:
#CONCURRENT_REQUESTS_PER_DOMAIN = 16
#CONCURRENT_REQUESTS_PER_IP = 16

# Disable cookies (enabled by default)
#COOKIES_ENABLED = False

# Disable Telnet Console (enabled by default)
#TELNETCONSOLE_ENABLED = False

# Override the default request headers:
#DEFAULT_REQUEST_HEADERS = {
#   'Accept': 'text/html,application/xhtml+xml,application/xml;q=0.9,*/*;q=0.8',
#   'Accept-Language': 'en',
#}

# Enable or disable spider middlewares
# See https://doc.scrapy.org/en/latest/topics/spider-middleware.html
#SPIDER_MIDDLEWARES = {
#    'mySpider.middlewares.MyspiderSpiderMiddleware': 543,
#}

# Enable or disable downloader middlewares
# See https://doc.scrapy.org/en/latest/topics/downloader-middleware.html
#DOWNLOADER_MIDDLEWARES = {
#    'mySpider.middlewares.MyspiderDownloaderMiddleware': 543,
#}

# Enable or disable extensions
# See https://doc.scrapy.org/en/latest/topics/extensions.html
#EXTENSIONS = {
#    'scrapy.extensions.telnet.TelnetConsole': None,
#}

# Configure item pipelines
# See https://doc.scrapy.org/en/latest/topics/item-pipeline.html

MOOCFilename =  "mooc.txt"
ITEM_PIPELINES = {
    # 管道的位置: 优先级, 0~1000, 数字越小, 优先级越高;
   'mySpider.pipelines.MyspiderPipeline': 300,
   'mySpider.pipelines.CsvPipeline': 400,
   'mySpider.pipelines.MysqlPipeline': 500,
   'mySpider.pipelines.ImagePipeline': 200,

}


IMAGES_STORE =  '/root/PycharmProjects/day29/mySpider/img'
# Enable and configure the AutoThrottle extension (disabled by default)
# See https://doc.scrapy.org/en/latest/topics/autothrottle.html
#AUTOTHROTTLE_ENABLED = True
# The initial download delay
#AUTOTHROTTLE_START_DELAY = 5
# The maximum download delay to be set in case of high latencies
#AUTOTHROTTLE_MAX_DELAY = 60
# The average number of requests Scrapy should be sending in parallel to
# each remote server
#AUTOTHROTTLE_TARGET_CONCURRENCY = 1.0
# Enable showing throttling stats for every response received:
#AUTOTHROTTLE_DEBUG = False

# Enable and configure HTTP caching (disabled by default)
# See https://doc.scrapy.org/en/latest/topics/downloader-middleware.html#httpcache-middleware-settings
#HTTPCACHE_ENABLED = True
#HTTPCACHE_EXPIRATION_SECS = 0
#HTTPCACHE_DIR = 'httpcache'
#HTTPCACHE_IGNORE_HTTP_CODES = []
#HTTPCACHE_STORAGE = 'scrapy.extensions.httpcache.FilesystemCacheStorage'
运行爬虫命令
scrapy crawl mooc
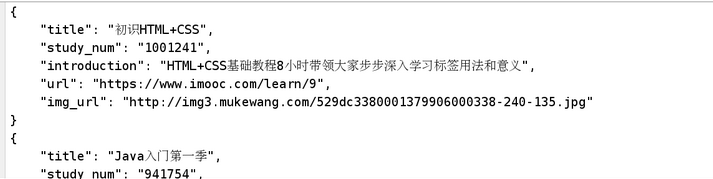
爬取的信息以json格式保存到 mooc.txt:
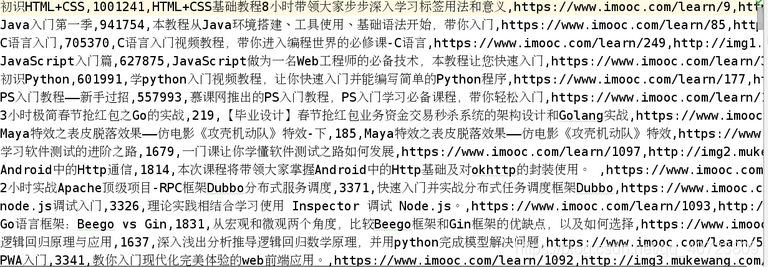
 爬取的信息以csv格式保存到 mooc.csv:
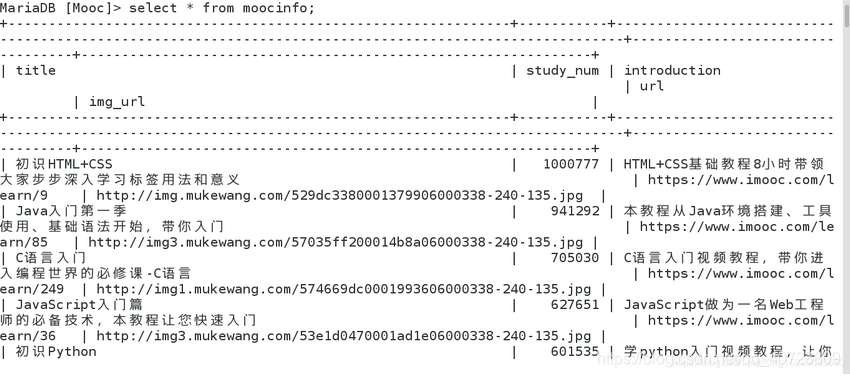
 爬取的信息保存到数据库:
 根据爬取的课程图片url将图片下载本地;


 6127
6127


 被折叠的 条评论
为什么被折叠?
被折叠的 条评论
为什么被折叠?
 到【灌水乐园】发言


