


SpringMVC学习记录文章目录:
1、程序的耦合和解耦思路
2、使用springIOC解决程序耦合的前期准备
3、BeanFactory和ApplicationContext的区别及ApplicationContext接口的实现类
4、bean标签及其实例化的3种方式
5、bean的作用范围和生命周期
6、Spring的依赖注入
7、基于注解的IOC环境搭建
8、基于注解的IOC-常用注解(Spring2.5规范)
9、Spring常用注解-新(Spring2.5规范以上)
10、Spring整合Junit单元测试
11、AOP的相关概念
12、Spring中AOP的术语
13、SpringAOP常用标签解释说明
14、SpringAOP中切入点表达式说明
15、SpringAOP类型说明及环绕通知的特殊说明
16、基于xml的SpringAOP配置
17、SpringAOP常用注解
18、基于注解的SpringAOP配置
19、Spring中的JdbcTemplate
20、Spring中的事务控制
1.环境搭建
1.1 第一步:准备客户的业务层和接口并用注解配置(需要增强的类)
/**
 * 客户的业务层接口
*/
public interface ICustomerService {

	/**
	 * 保存客户
	 */
	void saveCustomer();

	/**
	 * 修改客户
	 * @param i
	 */
	void updateCustomer(int i);
}
/**
 * 客户的业务层实现类
 */
public class CustomerServiceImpl implements ICustomerService {

	@Override
	public void saveCustomer() {
		System.out.println("调用持久层,执行保存客户");
	}

	@Override
	public void updateCustomer(int i) {
		System.out.println("调用持久层,执行修改客户");
	}
}
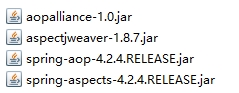
1.2 第二步:拷贝必备的jar包到工程的lib目录
1.3 第三步:创建spring的配置文件并导入约束
<?xml version="1.0" encoding="UTF-8"?>
<beans xmlns="http://www.springframework.org/schema/beans"
        xmlns:xsi="http://www.w3.org/2001/XMLSchema-instance"
        xmlns:aop="http://www.springframework.org/schema/aop"
        xmlns:context="http://www.springframework.org/schema/context"
        xsi:schemaLocation="http://www.springframework.org/schema/beans
        		http://www.springframework.org/schema/beans/spring-beans.xsd
        		http://www.springframework.org/schema/aop
        		http://www.springframework.org/schema/aop/spring-aop.xsd
        		http://www.springframework.org/schema/context
        		http://www.springframework.org/schema/context/spring-context.xsd">

</beans>
1.4 第四步:把资源使用注解让spring来管理
/**
 * 客户的业务层实现类
 */
@Service("customerService")
public class CustomerServiceImpl implements ICustomerService {

	@Override
	public void saveCustomer() {
		System.out.println("调用持久层,执行保存客户");
	}
	@Override
	public void updateCustomer(int i) {
		System.out.println("调用持久层,执行修改客户");
	}
}
1.5 第五步:在配置文件中指定spring要扫描的包
<!-- 告知spring,在创建容器时要扫描的包 -->
<context:component-scan base-package="com"></context:component-scan>
2.配置步骤
2.1 第一步:把通知类也使用注解配置
/**
 * 一个记录日志的工具类
 */
@Component("logger")
public class Logger {
	/**
	 * 期望:此方法在业务核心方法执行之前,就记录日志
	 * 前置通知
	 */
	public void beforePrintLog(){
		System.out.println("前置通知:Logger类中的printLog方法开始记录日志了");
	}
}
2.2 第二步:在通知类上使用@Aspect注解声明为切面
/**
 * 一个记录日志的工具类
 */
@Component("logger")
@Aspect//表明当前类是一个切面类
public class Logger {
	/**
	 * 期望:此方法在业务核心方法执行之前,就记录日志
	 * 前置通知
	 */
	public void beforePrintLog(){
		System.out.println("前置通知:Logger类中的printLog方法开始记录日志了");
	}
}
2.3 第三步:在增强的方法上使用@Before注解配置前置通知
/**
	 * 期望:此方法在业务核心方法执行之前,就记录日志
	 * 前置通知
	 */
	@Before("execution(* com.service.impl.*.*(..))")//表示前置通知
	public void beforePrintLog(){
		System.out.println("前置通知:Logger类中的printLog方法开始记录日志了");
	}
2.4 第四步:在spring配置文件中开启spring对注解AOP的支持
<!-- 开启spring对注解AOP的支持 -->
<aop:aspectj-autoproxy/>
3.不使用XML的配置方式
@Configuration
@ComponentScan(basePackages="com")
@EnableAspectJAutoProxy
public class SpringConfiguration {
}


 2万+
2万+


 被折叠的 条评论
为什么被折叠?
被折叠的 条评论
为什么被折叠?
 到【灌水乐园】发言


