


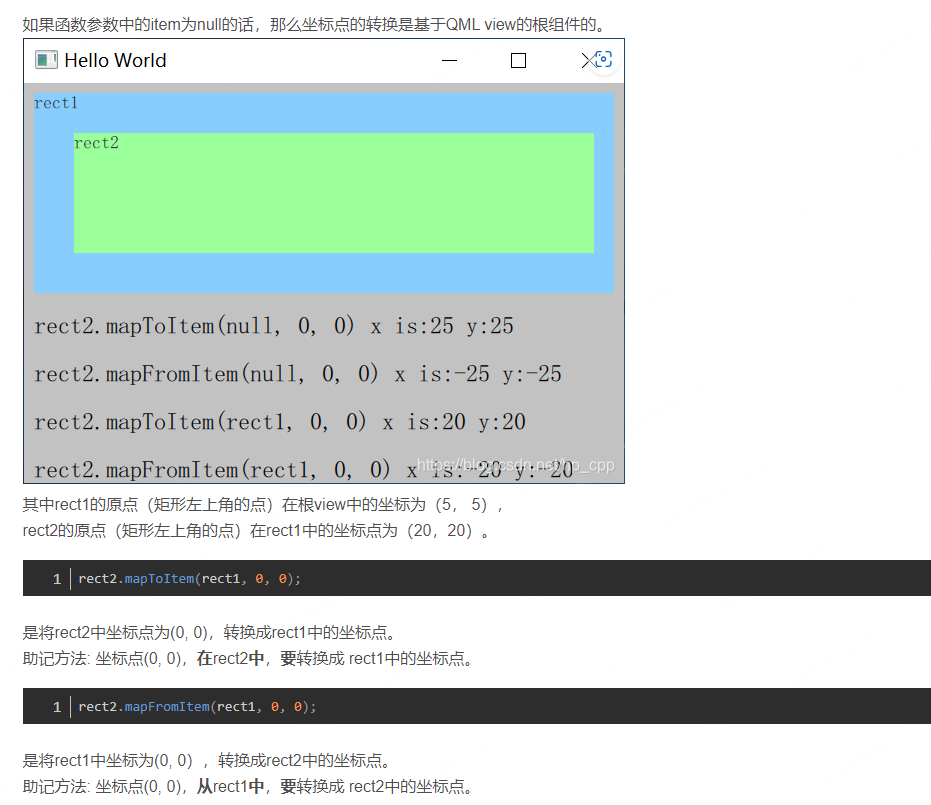
坐标变换
代码
import QtQuick 2.6
import QtQuick.Window 2.2

Window {
    visible: true
    width: 1024
    height: 480
    title: qsTr("Drag Icon")

    property ListModel dataModel: ListModel {
        ListElement { title: qsTr("电话") }
        ListElement { title: qsTr("相册") }
        ListElement { title: qsTr("短信") }
        ListElement { title: qsTr("网络") }
        ListElement { title: qsTr("微信") }
        ListElement { title: qsTr("设置") }
        ListElement { title: qsTr("日历") }
        ListElement { title: qsTr("天气") }
        ListElement { title: qsTr("百度") }
        ListElement { title: qsTr("时间") }
        ListElement { title: qsTr("生活") }
    }

    QtObject {
        id: d

        readonly property int cellWidth: 128
        readonly property int cellHeight: 128
        readonly property int iconWidth: 96
        readonly property int iconHeight: 96

        property int dragIndex: -1
        property bool dragBehavior: false
    }

    GridView {
        id: gridView
        anchors.fill: parent
        cellWidth: d.cellWidth
        cellHeight: d.cellHeight
        move: Transition {
            NumberAnimation { properties: "x"; duration: 100; easing.type: Easing.OutCubic }
            NumberAnimation { properties: "y"; duration: 100; easing.type: Easing.OutCubic }
        }
        moveDisplaced: Transition {
            NumberAnimation { properties: "x"; duration: 300; easing.type: Easing.OutCubic}
            NumberAnimation { properties: "y"; duration: 100;  easing.type: Easing.OutCubic }
        }
        model: dataModel
        delegate: Item {
            width: d.cellWidth
            height: d.cellHeight
            z: mouseArea.pressed ? 1000 : 1
            Rectangle {
                id: btnIconArea
                anchors.centerIn: parent
                width: d.cellWidth
                height: d.cellWidth
                radius: 8
                border.width: 2
                border.color: "black"
                color:"blue"
                // color: "transparent"
                // border.color: "gray"
                Rectangle {
                    id: btnIcon
                    width: d.iconWidth
                    height: d.iconWidth
                    radius: 8
                    color: "grey"
                    border.color: "black"
                    Behavior on x { enabled: d.dragBehavior; NumberAnimation { duration: 200 } }
                    Behavior on y { enabled: d.dragBehavior; NumberAnimation { duration: 200 } }
                    Text {
                        anchors.centerIn: parent
                        color: "white"
                        text: model.title
                    }
                    MouseArea {
                        id: mouseArea
                        anchors.fill: parent
                        drag.target: parent
                        onPressed: {
                            d.dragBehavior = false;
                            var pos = gridView.mapFromItem(btnIcon, 0, 0);
                            console.log("onPressed pos : " + pos);
                            console.log("btnIcon.x: " + btnIcon.x+"btnIcon.y: "+btnIcon.y);
                            d.dragIndex = model.index;
                            btnIcon.parent = gridView;
                            btnIcon.x = pos.x
                            btnIcon.y = pos.y
                        }
                        onReleased: {
                            d.dragIndex = -1;
                            console.log("onReleased btnIcon.x : " + btnIcon.x + "btnIcon.y "+ btnIcon.y);
                            var pos = gridView.mapToItem(btnIconArea, btnIcon.x, btnIcon.y);
                            console.log("onReleased pos : " + pos);
                            console.log("btnIconArea.x: " + btnIconArea.x+"btnIconArea.y: "+btnIconArea.y);
                            // 这里一定要设置parent
                            btnIcon.parent = btnIconArea;
                            // 这几行代码是用来保证动画效果的
                            btnIcon.x = pos.x;
                            btnIcon.y = pos.y;
                            d.dragBehavior = true;
                            btnIcon.x = 0;
                            btnIcon.y = 0;
                        }

                        onPositionChanged: {
                            var pos = gridView.mapFromItem(btnIcon, 0, 0);
                            console.log("onPositionChanged pos :"+pos)
                            var idx = gridView.indexAt(pos.x, pos.y);
                            if (idx > -1 && idx < gridView.count) {
                                dataModel.move(d.dragIndex, idx, 1)
                                d.dragIndex = idx;
                            }

                        }
                    }
                }
            }
        }
    }


    Component.onCompleted: {
        console.log("gridView.spacing = " + gridView.spacing);
    }
}
用上面这个例子举例说明一下,拖动是怎么实现交换的。
我们应该是把A拖到B的时候,A拖到B需要我们自己实现,但是B回到A,或者回到其他地方,GridView会自动帮我们实现?move和moveDisplaced这两个动画需要我们实现。
当pressed的时候,会记录当前对象btnIcon的索引dragIndex,同时将这个对象的parent设置为gridview。
移动的时候,会不断触发onPositionChanged,将btnIcon对象的左上角坐标,转换成gridview下的坐标,根据这个坐标计算是在gridview中的哪一格,以此来判断是否需要交换。如果需要交换,就将之前记录的那个索引dragIndex对应的元素,移动到新的idx对应的元素那里。也就是说,这个时候,gridview中的元素已经完成了交换。我们拖动的是那个元素里面的一个子元素!
当onReleased的时候,首先计算var pos = gridView.mapToItem(btnIconArea, btnIcon.x, btnIcon.y);这是btnIcon在btnIconArea中的相对位置,然后将btnIcon的parent换成btnIconArea,这一步很重要!!!
d.dragBehavior = true;用来保证动画时间
btnIcon.x = pos.x;
btnIcon.y = pos.y;来保证松开的时候,btnIcon坐标不会偏,然后再设置动画enable,再改变btnIcon坐标,展开一段动画效果。
// 这里一定要设置parent
btnIcon.parent = btnIconArea;
// 这几行代码是用来保证动画效果的
btnIcon.x = pos.x;
btnIcon.y = pos.y;
d.dragBehavior = true;
btnIcon.x = 0;
btnIcon.y = 0;
这里不理解的话,可以自己调试一下,就懂了。


 402
402


 被折叠的 条评论
为什么被折叠?
被折叠的 条评论
为什么被折叠?
 到【灌水乐园】发言


