


1、建立springboot的web项目,并导入相对应依赖
<?xml version="1.0" encoding="UTF-8"?>
<project xmlns="http://maven.apache.org/POM/4.0.0" xmlns:xsi="http://www.w3.org/2001/XMLSchema-instance"
xsi:schemaLocation="http://maven.apache.org/POM/4.0.0 https://maven.apache.org/xsd/maven-4.0.0.xsd">
<modelVersion>4.0.0</modelVersion>
<parent>
<groupId>org.springframework.boot</groupId>
<artifactId>spring-boot-starter-parent</artifactId>
<version>2.6.2</version>
<relativePath/> <!-- lookup parent from repository -->
</parent>
<groupId>com.example</groupId>
<artifactId>demo</artifactId>
<version>0.0.1-SNAPSHOT</version>
<name>demo</name>
<description>Demo project for Spring Boot</description>
<properties>
<java.version>1.8</java.version>
</properties>
<dependencies>
<dependency>
<groupId>org.springframework.boot</groupId>
<artifactId>spring-boot-starter-jdbc</artifactId>
</dependency>
<dependency>
<groupId>org.springframework.boot</groupId>
<artifactId>spring-boot-starter-web</artifactId>
</dependency>
<dependency>
<groupId>org.springframework.boot</groupId>
<artifactId>spring-boot-starter-thymeleaf</artifactId>
</dependency>
<dependency>
<groupId>org.thymeleaf</groupId>
<artifactId>thymeleaf-spring5</artifactId>
</dependency>
<dependency>
<groupId>mysql</groupId>
<artifactId>mysql-connector-java</artifactId>
<version>5.1.4</version>
<scope>runtime</scope>
</dependency>
<dependency>
<groupId>org.springframework.boot</groupId>
<artifactId>spring-boot-starter-test</artifactId>
<scope>test</scope>
</dependency>
<!--druid-->
<!-- https://mvnrepository.com/artifact/com.alibaba/druid-spring-boot-starter -->
<dependency>
<groupId>com.alibaba</groupId>
<artifactId>druid-spring-boot-starter</artifactId>
<version>1.2.1</version>
</dependency>
<dependency>
<groupId>log4j</groupId>
<artifactId>log4j</artifactId>
<version>1.2.17</version>
</dependency>
<!-- https://mvnrepository.com/artifact/org.mybatis.spring.boot/mybatis-spring-boot-starter -->
<dependency>
<groupId>org.mybatis.spring.boot</groupId>
<artifactId>mybatis-spring-boot-starter</artifactId>
<version>2.2.1</version>
</dependency>
<!--<!– https://mvnrepository.com/artifact/io.springfox/springfox-swagger2 –>-->
<!--<dependency>-->
<!--<groupId>io.springfox</groupId>-->
<!--<artifactId>springfox-swagger2</artifactId>-->
<!--<version>2.6.1</version>-->
<!--</dependency>-->
<!--<!– https://mvnrepository.com/artifact/io.springfox/springfox-swagger-ui –>-->
<!--<dependency>-->
<!--<groupId>io.springfox</groupId>-->
<!--<artifactId>springfox-swagger-ui</artifactId>-->
<!--<version>2.6.1</version>-->
<!--</dependency>-->
<dependency>
<groupId>io.springfox</groupId>
<artifactId>springfox-boot-starter</artifactId>
<version>3.0.0</version>
</dependency>
<dependency>
<groupId>org.springframework.boot</groupId>
<artifactId>spring-boot-starter-data-redis</artifactId>
</dependency>
</dependencies>
<build>
<plugins>
<plugin>
<groupId>org.springframework.boot</groupId>
<artifactId>spring-boot-maven-plugin</artifactId>
</plugin>
</plugins>
</build>
</project>
2、连接mysql并配置mybatis配置文件
上一篇文章讲过:连接mysql及mybatis配置
3、配置redis
1、编写redis配置类
package com.example.demo.config;

import com.fasterxml.jackson.annotation.JsonAutoDetect;
import com.fasterxml.jackson.annotation.PropertyAccessor;
import com.fasterxml.jackson.databind.ObjectMapper;
import org.springframework.context.annotation.Bean;
import org.springframework.context.annotation.Configuration;
import org.springframework.data.redis.connection.RedisConnectionFactory;
import org.springframework.data.redis.core.RedisTemplate;
import org.springframework.data.redis.serializer.Jackson2JsonRedisSerializer;
import org.springframework.data.redis.serializer.StringRedisSerializer;

@Configuration
public class RedisConfig {
    @Bean
    @SuppressWarnings("all")
    public RedisTemplate<String, Object> redisTemplate(RedisConnectionFactory redisConnectionFactory) {
        RedisTemplate<String, Object> template = new RedisTemplate();
        template.setConnectionFactory(redisConnectionFactory);


        Jackson2JsonRedisSerializer jackson2JsonRedisSerializer = new Jackson2JsonRedisSerializer(Object.class);
        ObjectMapper objectMapper=new ObjectMapper();
        objectMapper.setVisibility(PropertyAccessor.ALL, JsonAutoDetect.Visibility.ANY);
        objectMapper.enableDefaultTyping(ObjectMapper.DefaultTyping.NON_FINAL);
        jackson2JsonRedisSerializer.setObjectMapper(objectMapper);

        StringRedisSerializer stringredisserializer=new StringRedisSerializer();
        template.setKeySerializer(stringredisserializer);
        template.setHashKeySerializer(stringredisserializer);
        template.setValueSerializer(jackson2JsonRedisSerializer);
        template.afterPropertiesSet();
        return template;
    }
}
2、配置redis文件,applicatin-dev.properties
spring.redis.host=127.0.0.1
spring.redis.port=6379
logging.level.com.example.demo.mapper=debug
# 连接池中的最小空闲连接
spring.redis.jedis.pool.min-idle=0
3、实体类user.java
package com.example.demo.entity;

import java.io.Serializable;

public class User implements Serializable{
    private Integer id;
    private String name;
    private String password;
    private String sex;
    private String email;
    private String qq;

    public User(){}
    public User(Integer id, String name, String password, String sex, String email, String qq) {
        this.id = id;
        this.name = name;
        this.password = password;
        this.sex = sex;
        this.email = email;
        this.qq = qq;
    }

    public Integer getId() {
        return id;
    }

    public void setId(Integer id) {
        this.id = id;
    }

    public String getName() {
        return name;
    }

    public void setName(String name) {
        this.name = name;
    }

    public String getPassword() {
        return password;
    }

    public void setPassword(String password) {
        this.password = password;
    }

    public String getSex() {
        return sex;
    }

    public void setSex(String sex) {
        this.sex = sex;
    }

    public String getEmail() {
        return email;
    }

    public void setEmail(String email) {
        this.email = email;
    }

    public String getQq() {
        return qq;
    }

    public void setQq(String qq) {
        this.qq = qq;
    }
}
4、UserService.java
package com.example.demo.service;

import com.example.demo.entity.User;
import com.example.demo.mapper.UserMapping;
import org.springframework.beans.factory.annotation.Autowired;
import org.springframework.cache.annotation.CacheConfig;
import org.springframework.cache.annotation.Cacheable;
import org.springframework.data.redis.core.RedisTemplate;
import org.springframework.data.redis.serializer.RedisSerializer;
import org.springframework.data.redis.serializer.StringRedisSerializer;
import org.springframework.stereotype.Service;

import java.util.List;

@Service
public class UserService {

    @Autowired
    UserMapping userMapping;
    @Autowired
    private RedisTemplate<String,Object> redisTemplate;
    //@Cacheable(value = "users")
    public List<User> getAllUser(){
        /*redis的序列化器*/
        //RedisSerializer redisSerializer = new StringRedisSerializer();

        /*设置redisTemplate序列化器*/
        //redisTemplate.setKeySerializer(redisSerializer);

        List<User> allUser=(List<User>)redisTemplate.opsForValue().get("users");
        System.out.println("cache:"+allUser);
        if(allUser==null){
            System.out.println("数据库查询");
            allUser = userMapping.getAllUser();
            redisTemplate.opsForValue().set("users",allUser);
        }
        return allUser;
    }
}
5、UserController.java
package com.example.demo.controller;

import com.example.demo.entity.User;
import com.example.demo.mapper.UserMapping;
import com.example.demo.service.UserService;
import org.springframework.beans.factory.annotation.Autowired;
import org.springframework.web.bind.annotation.GetMapping;
import org.springframework.web.bind.annotation.RestController;
import springfox.documentation.annotations.Cacheable;

import javax.sql.DataSource;
import java.util.List;

@RestController
public class UserController {
    @Autowired
    UserService userService;


    @GetMapping("/Alluser")
    public List<User> getAllUser(){
        List<User> allUser = userService.getAllUser();
        return allUser;
    }
}
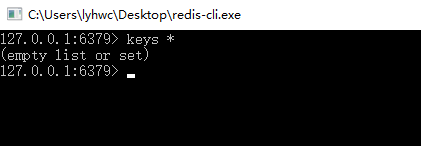
6、启动redis

7、查看redis内容(一开始为空)
8、启动springboot项目,访问指定路径
1、http://localhost:8080/Alluser

2、控制台显示

9、此时查看redis

10、进行二次查询
可以看到,此时的数据是从redis中取出的


 1941
1941


 被折叠的 条评论
为什么被折叠?
被折叠的 条评论
为什么被折叠?
 到【灌水乐园】发言


