文章目录
基础知识
webpack使用purgecss-webpack-plugin去除无用的css
调试技巧
代码某一行添加debugger;
然后浏览器f12就可以调试了
参考项目地址以及本项目的地址
https://github.com/lenve/vhr
自己搭建的快速开发脚手架的demo地址:https://gitee.com/goodshred/springboot-quick-start
公司组织架构
各类科技公司通用的组织架构图
https://www.edrawsoft.cn/orgcharting/tutorial/technology-company-templet/
互联网的常见组织架构
https://zhuanlan.zhihu.com/p/143318134
4大核心功能
权限,聊天,文件,流程
项目地址
https://gitee.com/distributed-oa-office-system/oa-front-admin
项目梳理
项目定位:我这是oa办公系统,不是人事管理系统,所以系统目前的人员是手动在数据库添加的,正式的话其实应该对接人事管理系统,从那边获取得到
个人中心【我的申请,我的待办,我的已办,个人信息】
- 我的申请(用户id)
点击新增–》弹框选择申请类型,根据类型再弹出对应表单,点击提交(附带对应的启动流程模板id) - 我的待办(用户id)
- 我的已办(用户id)
webpack
Webpack 可以将多种静态资源 js、css、less 转换成一个静态文件,减少了页面的请求
【vue-cli 3.x脚手架将webpack的基础配置全部内嵌了 已经没有了webpack.config.js文件。取而代之的是创建一个vue.config.js文件,可在该文件里面配置webpack相关内容】
vue.config.js,babel.config.js,postcss.config.js配置文件详解
babel
babel-core —babel核心依赖【es6,es7等高级语法有些浏览器并不能支持,因此需要将这些高级语法转成浏览器都能识别的es5语法,babel就是干这个事的】
比如es6的箭头函数
() => console.log(‘hello babel’)
babel会转成es5
(function(){
return console.log(‘hello babel’);
});
详情:https://segmentfault.com/a/1190000017898866
ESLint
检查代码的工具,JavaScript 是一个动态的弱类型语言,在开发中比较容易出错。因为没有编译程序,为了寻找 JavaScript 代码错误通常需要在执行过程中不断调试。ESLint 这样的工具可以让程序员在编码的过程中发现问题,而不是在执行的过程中发现问题。
需要引用的话,引入依赖就好了
 "babel-eslint": "^10.1.0",
 "@vue/cli-plugin-eslint": "~4.5.0",
 "eslint": "^6.7.2",
 "eslint-plugin-vue": "^6.2.2",
sass语法
sass-loader使sass语法变成浏览器能够识别的CSS语法
<style lang="scss" scoped>

</style>
vue
vue2.0详细目录结构注解
—-build #(webpack配置相关)
—-config #(webpack配置相关)
vue函数不生效问题
函数命令最好不要用某些特殊的词,比如preivew,svg等,否则很容易失效
自定义vue指令使elementUI的el-dialog弹窗可全屏和拉伸
https://blog.csdn.net/XU441520/article/details/101548079
移动可拖拽,双击可全屏
vue+bpmn.js+elementui实现流程设计器
https://blog.csdn.net/oJiDiLang/article/details/107254708
https://www.cnblogs.com/lemoncool/p/12660812.html 导入bpmn文件
项目引入依赖作用详解
使用webstorm初始化vue-2.6版本


vue-router用法
- 引入依赖
“vue-router”: “^2.3.0”, - 编写routers.js
import HelloWorld from "@/components/HelloWorld";
import A from "@/components/A";

let routes = [
    {
        path: '/',
        component: HelloWorld,
        name: '',
        hidden: true
    },
    {
        path: '/a',
        component: A,
        name: '',
        hidden: true
    }
];

export default routes;
- 修改main.js引入router
import Vue from 'vue'
import App from './App.vue'
import routes from './routes'
import VueRouter from 'vue-router'

Vue.config.productionTip = false

Vue.use(VueRouter)

const router = new VueRouter({
  routes
})

new Vue({
  router,
  render: h => h(App),
}).$mount('#app')
- App.vue组件中添加router视图
<template>
  <div id="app">
   <router-view/>
  </div>
</template>

<script>


export default {
  name: 'App',
  components: { }
}
</script>
vuex的使用–不懂先跳过
1.添加依赖
"vuex": "^2.0.0-rc.6"
- main.js引入vuex
Vue.use(Vuex)
import store from './vuex/store'
import Vuex from 'vuex'

new Vue({
  router,
  store,
  render: h => h(App),
}).$mount('#app')

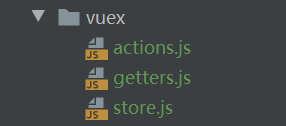
actions.js
export const increment = ({commit}) => {
    commit('increment')
}
export const decrement = ({commit}) => {
    commit('decrement')
}
export const changeTxt = ({commit}) => {
    commit('changeTxt')
}
gettters.js
export const getCount = state => {
    return state.count
}
store.js
import Vue from 'vue'
import Vuex from 'vuex'
import * as actions from './actions'
import * as getters from './getters'

Vue.use(Vuex)

// 应用初始状态
const state = {
    count: 10,
    show: ''
}

// 定义所需的 mutations(转变)
const mutations = {
    increment(state) {
        state.count++
    },
    decrement(state) {
        state.count--
    },
    changeTxt: (state, v) => {
        state.show = v
    }
}

// 创建 store 实例
export default new Vuex.Store({
    actions,
    getters,
    state,
    mutations
})
store-demo.vue
<template>
  <div class="store">
    <p>
      {{$store.state.count}}
    </p>
    <el-button @click="handleIncrement"><strong>+</strong></el-button>
    <el-button @click="handleDecrement"><strong>-</strong></el-button>
    <hr>
    <h3>{{$store.state.show}}</h3>
    <el-input
            placeholder="请输入内容"
            v-model="obj"
            @change="changObj"
            clearable>
    </el-input>
  </div>
</template>
<script>
  export default {
    name: 'A',
    data() {
      return {
        obj: ''
      }
    },
    methods: {
      handleIncrement() {
        this.$store.commit('increment')
      },
      handleDecrement() {
        this.$store.commit('decrement')
      },
      changObj() {
        this.$store.commit('changeTxt', this.obj)
      }
    }
  }
</script>

备注:
action 在 vuex 中用于异步 commit 的发送
【Vue.js进阶系列(54)–Vuex的action
https://www.jianshu.com/p/3f566f48401f
vuex 中的 action
https://www.cnblogs.com/caoleyun/p/12693173.html】
数据data()–state,视图《template》—view ,行为methods ---- actions
new Vue({
  // state
  data () {
    return {
      count: 0
    }
  },
  // view
  template: `
    <div>{{ count }}</div>
  `,
  // actions
  methods: {
    increment () {
      this.count++
    }
  }
})
定义并导出store.js实例
import Vue from 'vue'
import Vuex from 'vuex'

//在store.js中引用vue和vuex,并且使用vuex
Vue.use(Vuex)

const store = new Vuex.Store({
    //定义数据,在State里面进行定义数据
    state:{
        count:1
    },
    //定义方法,在mutation里面定义方法
    mutations:{
        increment(state){
            state.count++
        }
    }
})
//将vuex实例暴露出去,以便其他的任何文件进行共享数据
export default store
再main.js中引入,实现可以全局使用
//vuex使用
import Vuex from 'vuex'
Vue.use(Vuex)
import store from './vuex/store'

new Vue({
  router,
  store,
  render: h => h(App),
}).$mount('#app')
storedemo.vue
<template>
    <div>
        <p>A组件</p>
        <br><br><br>
        <!--在DOM中进行使用 {{ this.$store.state.count}}-->
        <p>{{ this.$store.state.count}}</p>
        <button @click="incre">+</button>
    </div>
</template>

<script>
    //在A组件中引入store.js
    import store from '@/vuex/store.js'

    export default {
        name: "StoreDemo",
        data() {
            return {}
        },
        methods: {
            incre() {
                //然后再methods 中通知 store.js
                this.$store.commit('increment')
            }
        },
        //将vuex实例暴露出去,以便其他的任何文件进行共享数据
        store,
    }
</script>
vue整合anxios
引入依赖:
"axios": "^0.15.3"
可以在main.js里面设置全局网络请求拦截处理
import axios from 'axios';
axios.interceptors.request.use(function (config) {
    if (sessionStorage.getItem('token')) {
        config.headers.Authorization = sessionStorage.getItem('token');
    }
    return config;
}, function (err) {
    return Promise.reject(err);
});
src目录下新建api目录,然后创建api.js文件
import axios from 'axios';
let withPrefix = 'http://127.0.0.1:8080/api';

//先进行http为200的请求体里面errcode为401未授权的处理
let preHandleRes = function (res) {
    if (res.data && res.data.errcode != 0) {
        console.log('ajax异常,', res);
        // try {
        //这里后端定义可能为7080401,1002333333401,不管整样,模1000就是取最后三位,模10就是取最后一位
        if (res.data.errcode % 1000 == 401) {
            window.location.href = "{tgac_rio_path}/index.html#/login";
            setTimeout(function(){window.location.reload()},500);
        }else {
            console.log(res.data.errmsg);
            Message({
                message: res.data.errmsg,
                type: 'error'
            });
            return Promise.reject(res.data.errmsg);
        }
        // } catch (e) {
        //
        // }
    }
    return res.data;
}

export const requestLogout = params => {
    return axios.get(`${withPrefix}/logout`, params);
};

export const requestLogin = params => {
    return axios.post(`${withPrefix}/login`, params).then(res => preHandleRes(res));
};
调用方式如下:
<script>
import {requestLogin , requestLogout} from "../api/api"
export default {
  methods: {
     //退出登录
            logout: function () {
                var _this = this;
                this.$confirm('确认退出吗?', '提示', {
                    //type: 'warning'
                }).then(() => {
                    requestLogout().then(_ => {
                        sessionStorage.removeItem('user');
                        _this.$router.push('/login');
                    }).catch(() => {
                        this.$message({
                            message: "退出失败,请稍后再试",
                            type: 'error'
                        });
                    });
                }).catch(() => {

                });
  },
  login(){
 // requestLogin({}).then(data => {
    requestLogin(loginParams).then(data => {
    //自己的业务逻辑代码:服务端返回的参数都封装在了data里面
                                }).catch(e => {
     //自己的业务逻辑代码:服务端返回的异常都封装在了e里面
                            });
   }
}
</script>
vue整合element-ui
-
引入依赖
“element-ui”: “^2.14.1” -
main.js中导入设置
import ElementUI from ‘element-ui’;
import ‘element-ui/lib/theme-chalk/index.css’;
Vue.use(ElementUI)
jsencrypt前端加密工具
jsencrypt可实现rsa加密
引入依赖
“jsencrypt”: “^2.3.1”


 439
439


 被折叠的 条评论
为什么被折叠?


