


在一切初始化完成后,我们需要执行bind方法,来启动服务端
ChannelFuture future = serverBootstrap.bind(9090).sync();
跟进bind方法
public ChannelFuture bind(int inetPort) {
        return bind(new InetSocketAddress(inetPort));
    }
继续跟
public ChannelFuture bind(SocketAddress localAddress) {
        //判断 group channelFactory 对象不为空    serverBootstrap.group    serverBootstrap.channel  已经设置
        validate();
        //ObjectUtil.checkNotNull(localAddress, "localAddress") 还是返回的localAddress对象  判断不为空
        return doBind(ObjectUtil.checkNotNull(localAddress, "localAddress"));
    }
validate主要是group和channelFactory的判空方法,不重要,我们主要研究doBind方法
private ChannelFuture doBind(final SocketAddress localAddress) {
        //初始化和注册
        final ChannelFuture regFuture = initAndRegister();
        final Channel channel = regFuture.channel();
        if (regFuture.cause() != null) {
            return regFuture;
        }

        //如果初始化完成,执行bind0方法
        if (regFuture.isDone()) {
            // At this point we know that the registration was complete and successful.
            ChannelPromise promise = channel.newPromise();
            doBind0(regFuture, channel, localAddress, promise);
            return promise;
        } else {
            // Registration future is almost always fulfilled already, but just in case it's not.
            final PendingRegistrationPromise promise = new PendingRegistrationPromise(channel);
            regFuture.addListener(new ChannelFutureListener() {
                @Override
                public void operationComplete(ChannelFuture future) throws Exception {
                    Throwable cause = future.cause();
                    if (cause != null) {
                        // Registration on the EventLoop failed so fail the ChannelPromise directly to not cause an
                        // IllegalStateException once we try to access the EventLoop of the Channel.
                        promise.setFailure(cause);
                    } else {
                        // Registration was successful, so set the correct executor to use.
                        // See https://github.com/netty/netty/issues/2586
                        promise.registered();

                        doBind0(regFuture, channel, localAddress, promise);
                    }
                }
            });
            return promise;
        }
    }
点进去initAndRegister方法
 //初始化并注册
    final ChannelFuture initAndRegister() {
        Channel channel = null;
        try {
            //通过反射创建NioServerSocketChannel
            //channelFactory=new ReflectiveChannelFactory  ---> constructor=NioServerSocketChannel.class.getConstructor();
            //channel=NioServerSocketChannel
            channel = channelFactory.newChannel();
            init(channel);
        } catch (Throwable t) {
            if (channel != null) {
                // channel can be null if newChannel crashed (eg SocketException("too many open files"))
                channel.unsafe().closeForcibly();
                // as the Channel is not registered yet we need to force the usage of the GlobalEventExecutor
                return new DefaultChannelPromise(channel, GlobalEventExecutor.INSTANCE).setFailure(t);
            }
            // as the Channel is not registered yet we need to force the usage of the GlobalEventExecutor
            return new DefaultChannelPromise(new FailedChannel(), GlobalEventExecutor.INSTANCE).setFailure(t);
        }
        //config().group()==bossGroup  ===》 EventLoopGroup bossGroup=new NioEventLoopGroup(1);
        //register开启了事件轮询线程
        //config().group()  boosGroup
        //register就是将得到的severSocketChannel注册到bossGroup上
        ChannelFuture regFuture = config().group().register(channel);
        if (regFuture.cause() != null) {
            if (channel.isRegistered()) {
                channel.close();
            } else {
                channel.unsafe().closeForcibly();
            }
        }
        return regFuture;
    }
我们之前设置了serverBootstrap.channel(NioServerSocketChannel.class),可以看到channel()方法
 //泛型B  为  ServerBootstrap  C  为  ServerChannel
    public B channel(Class<? extends C> channelClass) {
        //channelClass=NioServerSocketChannel.class
        //也就是将channelFactory的泛型类设置成我们填入的NioServerSocketChannel
        return channelFactory(new ReflectiveChannelFactory<C>(
                ObjectUtil.checkNotNull(channelClass, "channelClass")
        ));
    }
再看ChannelFactory的newChannel方法,
@Override
    public T newChannel() {
        try {
            // T=NioServerSocketChannel   constructor=NioServerSocketChannel.class.getConstructor();
            return constructor.newInstance();
        } catch (Throwable t) {
            throw new ChannelException("Unable to create Channel from class " + constructor.getDeclaringClass(), t);
        }
    }
可以看出通过构造器反射的方法生成的,所以到这里我们需要先执行NioServerSocketChannel的无参构造方法
public NioServerSocketChannel() {
        //newSocket(DEFAULT_SELECTOR_PROVIDER)返回 ServerSocketChannel
        this(newSocket(DEFAULT_SELECTOR_PROVIDER));
    }
newSocket():
/**
     * 根据SelectorProvider.provider()生成jdk原生的ServerSocketChannel
     */
    private static ServerSocketChannel newSocket(SelectorProvider provider) {
        try {
            /**
             *  使用{@link SelectorProvider}打开{@link SocketChannel},从而删除条件in
             *  否则,每个ServerSocketChannel.open()将调用{@link SelectorProvider#provider()}。
             *
             *  See <a href="https://github.com/netty/netty/issues/2308">#2308</a>.
             */
            return provider.openServerSocketChannel();
        } catch (IOException e) {
            throw new ChannelException(
                    "Failed to open a server socket.", e);
        }
    }
我们继续跟NioServerSocketChannel的构造方法
/**
     * ServerSocketChannel为jdk的ServerSocketChannel
     */
    public NioServerSocketChannel(ServerSocketChannel channel) {
        super(null, channel, SelectionKey.OP_ACCEPT);
        //javaChannel()==>  serverSocketChannel 这里可以直接记住,后面也会说到
        config = new NioServerSocketChannelConfig(this, javaChannel().socket());
    }
走到NioServerSocketChannel的父类构造器
protected AbstractNioMessageChannel(Channel parent, SelectableChannel ch, int readInterestOp) {
        //parent -->  null
        //ch--> serverSocketChannel  服务端channel
        //readInterestOp--->SelectionKey.OP_ACCEPT
        super(parent, ch, readInterestOp);
    }
AbstractNioMessageChannel是NioServerSocketChannel的父类,继续跟进父类
protected AbstractNioChannel(Channel parent, SelectableChannel ch, int readInterestOp) {
        //parent -->  null
        //ch--> serverSocketChannel  服务器channel
        //readInterestOp--->SelectionKey.OP_ACCEPT,这里要记住

        //创建id,unsafe pipeline
        super(parent);
        this.ch = ch;
        this.readInterestOp = readInterestOp;
        try {
            //设置channel非阻塞
            ch.configureBlocking(false);
        } catch (IOException e) {
            try {
                ch.close();
            } catch (IOException e2) {
                if (logger.isWarnEnabled()) {
                    logger.warn(
                            "Failed to close a partially initialized socket.", e2);
                }
            }

            throw new ChannelException("Failed to enter non-blocking mode.", e);
        }
    }
这里要记住在AbstractNioChannel是AbstractNioMessageChannel的父类,并且这里的readInterestOp属性现在在创建NioServerSocketChannel的过程中是SelectionKey.OP_ACCEPT
我们再看刚才提到的AbstractNioChannel的javachannel()方法
protected SelectableChannel javaChannel() {
        return ch;
    }
只是将当前的channel返回,这里就是NioServerSocketChannel
再看AbstractNioChannel的super构造器
  protected AbstractChannel(Channel parent) {
        //new ServerSocketChannel
        this.parent = parent;
        id = newId();
        unsafe = newUnsafe();
        pipeline = newChannelPipeline();
    }
发现只是保存了parent和创建了一些属性,这里我们要说下unsafe和pipeline 的创建
netty中用来直接处理交互如接收连接,发送接收数据都是用unsafe来处理的
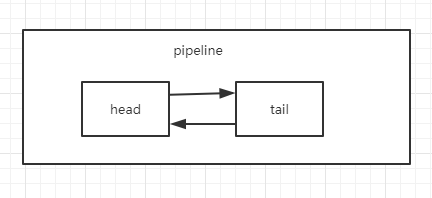
pipeline则是用来处理数据的数据结构,由多个ChannelHandlerContext构成,除了头节点(head)和尾结点(tail)外,每个都有一个handler,用来处理数据
这里来分析ChannelPipeline的构造方法
protected DefaultChannelPipeline(Channel channel) {
        this.channel = ObjectUtil.checkNotNull(channel, "channel");
        succeededFuture = new SucceededChannelFuture(channel, null);
        voidPromise =  new VoidChannelPromise(channel, true);

        //创建尾结点
        tail = new TailContext(this);
        //创建头节点   头节点中维护了AbstractChannel中unsafe对象
        head = new HeadContext(this);

        head.next = tail;
        tail.prev = head;
    }
//传入当前的channel
    protected DefaultChannelPipeline(Channel channel) {
        this.channel = ObjectUtil.checkNotNull(channel, "channel");
        //这两行不重要,可跳过
        succeededFuture = new SucceededChannelFuture(channel, null);
        voidPromise =  new VoidChannelPromise(channel, true);
        //创建尾结点
        tail = new TailContext(this);
        //创建头节点   头节点中维护了AbstractChannel中unsafe对象
        head = new HeadContext(this);
        //最初始的结构,头尾结点互相连接
        head.next = tail;
        tail.prev = head;
    }
生成的初始的pipeline为如下结构
再回到NioServerSocketChannel的构造方法,NioServerSocketChannelConfig是NioServerSocketChannel的配置类,可以得到设置好的配置
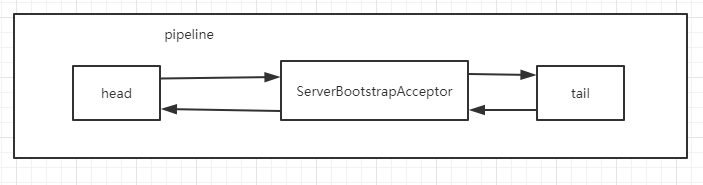
到这里,NioServerSocketChannel就创建完成了,继续回到initAndRegister方法,接下来是对channel的初始化,即initChannel()方法
    @Override
    void init(Channel channel) throws Exception {

        //channel=NioServerSocketChannel

        //options0  获取的是用户自己设置的tcp参数  ServerBootstrap.option(ChannelOption.SO_BACKLOG,128)
        //我们也要把自己写的handler添加到pipeline中
        final Map<ChannelOption<?>, Object> options = options0();
        synchronized (options) {
            //设置用户设置的tcp参数
            setChannelOptions(channel, options, logger);
        }
        //attrs0()  ServerBootstrap.attr()  获取用户设置的attr参数
        final Map<AttributeKey<?>, Object> attrs = attrs0();
        synchronized (attrs) {
            for (Entry<AttributeKey<?>, Object> e: attrs.entrySet()) {
                @SuppressWarnings("unchecked")
                AttributeKey<Object> key = (AttributeKey<Object>) e.getKey();
                channel.attr(key).set(e.getValue());
            }
        }

        //channel=NioServerSocketChannel
        //获取AbstractChannel.pipeline();的pipeline(DefaultChannelPipeline)
        ChannelPipeline p = channel.pipeline();

        final EventLoopGroup currentChildGroup = childGroup;
        final ChannelHandler currentChildHandler = childHandler;
        final Entry<ChannelOption<?>, Object>[] currentChildOptions;
        final Entry<AttributeKey<?>, Object>[] currentChildAttrs;
        //处理多线程
        synchronized (childOptions) {
            currentChildOptions = childOptions.entrySet().toArray(newOptionArray(0));
        }
        synchronized (childAttrs) {
            currentChildAttrs = childAttrs.entrySet().toArray(newAttrArray(0));
        }

        p.addLast(new ChannelInitializer<Channel>() {
            @Override
            public void initChannel(final Channel ch) throws Exception {
                //System.out.println(ch==channel);   true
                final ChannelPipeline pipeline = ch.pipeline();
                //System.out.println(pipeline==p);  true
                //config.handler()=自己创建的new ChannelInitializer<ServerSocketChannel>()
                ChannelHandler handler = config.handler();
                if (handler != null) {
                    pipeline.addLast(handler);
                }

                ch.eventLoop().execute(new Runnable() {
                    @Override
                    public void run() {
//                        System.out.println("执行了");
                        //bossGroup将客户端连接转交给workerGroup
                        pipeline.addLast(new ServerBootstrapAcceptor(
                                ch, currentChildGroup, currentChildHandler, currentChildOptions, currentChildAttrs));
                    }
                });
            }
        });
    }
主要是对pipeline的初始化,完成后pipeline结构如下

channelInitializer是一个特殊的ChannelHandlerContext,后面会讲它的特殊性
接下来走到的就是register方法
 		//config().group()==bossGroup  ===》 EventLoopGroup bossGroup=new NioEventLoopGroup(1);
        //register开启了事件轮询线程
        //config().group()  boosGroup
        //register就是将得到的severSocketChannel注册到bossGroup上
        ChannelFuture regFuture = config().group().register(channel);
我们查看register方法,走到MultithreadEventLoopGroup的register方法
 @Override
    public ChannelFuture register(Channel channel) {
        //channel=NioServerSocketChannel
        // next()=NioEventLoop
        return next().register(channel);
    }
我们查看next()方法
 @Override
    public EventExecutor next() {
        //chooser=GenericEventExecutorChooser/PowerOfTwoEventExecutorChooser
        //从executors对象数组中返回new NioEventLoop()对象
        return chooser.next();
    }
可以看到是从选择器中选择一个NioEventLoop来执行register方法,即将NioServerSocketChannel注册到NioEventLoop的selector上,跟着流程走,走到SingleThreadEventLoop的register方法
@Override
    public ChannelFuture register(final ChannelPromise promise) {
        //判空方法,promise是将SIngleThreadEventLoop和channel进行一次封装
        ObjectUtil.checkNotNull(promise, "promise");
        //promise=DefaultChannelPromise
        //promise.channel()=NioServerSocketChannel
        //Unsafe=AbstractChannel.unsafe=promise.channel().unsafe();
        promise.channel().unsafe().register(this, promise);
        return promise;
    }
然后走到unsafe的register方法
@Override
        public final void register(EventLoop eventLoop, final ChannelPromise promise) {
            //判空方法和判断是不是已经注册
            if (eventLoop == null) {
                throw new NullPointerException("eventLoop");
            }
            if (isRegistered()) {
                promise.setFailure(new IllegalStateException("registered to an event loop already"));
                return;
            }
            if (!isCompatible(eventLoop)) {
                promise.setFailure(
                        new IllegalStateException("incompatible event loop type: " + eventLoop.getClass().getName()));
                return;
            }

            //promise=DefaultChannelPromise
            //eventLoop=SingleThreadEventLoop
            //this.eventLoop=NioEventLoop==>SingleThreadEventLoop.this
            AbstractChannel.this.eventLoop = eventLoop;

            //他们最终都调用了register0   eventLoop.inEventLoop()的作用?
            //判断是否开启了reactor线程
            if (eventLoop.inEventLoop()) {
                register0(promise);
            } else {
                //第一次运行肯定是没开启reactor线程状态
                try {
                    //封装任务,交给Executor的执行方法,交给SingleThreadEventLoop的execute方法
                    eventLoop.execute(new Runnable() {
                        @Override
                        public void run() {
                            System.out.println("register0");
                            //真正的注册方法
                            register0(promise);
                        }
                    });
                } catch (Throwable t) {
                    //异常处理方法,记录日志,关闭通道等等
                    logger.warn(
                            "Force-closing a channel whose registration task was not accepted by an event loop: {}",
                            AbstractChannel.this, t);
                    closeForcibly();
                    closeFuture.setClosed();
                    safeSetFailure(promise, t);
                }
            }
        }
因为这里是在看注册,所以就先把注册方法解释清楚,再解释任务队列。
走到register0方法
private void register0(ChannelPromise promise) {
            try {
                // 检查通道是否仍然打开,因为它可以在寄存器的平均时间内关闭
                // 调用在eventLoop之外

                //promise=DefaultChannelPromise
                if (!promise.setUncancellable() || !ensureOpen(promise)) {
                    return;
                }
                boolean firstRegistration = neverRegistered;
                //调用NioServerSocketChannel 通过反射创建出来nio底层channel的register方法  选择器看不同操作系统
                doRegister();
                neverRegistered = false;
                registered = true;

                // 确保在实际通知承诺之前调用handlerAdded(…)。这是需要的
                // 用户可能已经通过ChannelFutureListener中的管道触发事件。

                //1.会执行handlerAdded方法
                pipeline.invokeHandlerAddedIfNeeded();

                safeSetSuccess(promise);
                //2.会执行channelRegistered
                pipeline.fireChannelRegistered();

                // 只有当通道从未被注册时,才激活该通道。这可以防止解雇
                // 如果取消注册并重新注册通道,则多个通道将激活。
                if (isActive()) {
                    if (firstRegistration) {
                    	//3.执行active方法
                        pipeline.fireChannelActive();
                    } else if (config().isAutoRead()) {
                        // 这个通道之前已经注册,并设置了autoRead()。这意味着我们需要开始读取
                        // 这样我们就可以处理入站数据。
                        //
                        // See https://github.com/netty/netty/issues/4805
                        beginRead();
                    }
                }
            } catch (Throwable t) {
                // 直接关闭通道,避免FD泄漏。
                closeForcibly();
                closeFuture.setClosed();
                safeSetFailure(promise, t);
            }
        }
注释已经写清楚,走到了register方法
@Override
    protected void doRegister() throws Exception {
        boolean selected = false;
        for (;;) {
            try {
                //javaChannel()   ==>  ServerSocketChannel 通过反射创建出来nio底层channel
                //调用Nio底层将ServerSocketChannel注册到selector上
                //0代表对任何事件都不感兴趣
                selectionKey = javaChannel().register(eventLoop().unwrappedSelector(), 0, this);
                return;
            } catch (CancelledKeyException e) {
                if (!selected) {
                    //强制选择器现在选择,因为“已取消”的SelectionKey可能仍然是
                    //缓存并没有删除,因为还没有调用Select.select(..)操作。
                    eventLoop().selectNow();
                    selected = true;
                } else {
                    //我们之前在选择器上强制执行了select操作,但是SelectionKey仍然缓存
                    //不管什么原因。JDK错误?
                    throw e;
                }
            }
        }
    }
这里就完成了注册,但是感兴趣的事件设置的是0,即对任何事件都不感兴趣
在nio中我们添加感兴趣事件可以直接在register方法中指定,即 channel.register(selector, SelectionKey.Accept);
或者先在register中添加0,再到后面指定事件
我们再看下register0方法,可以从中看到handler的各个方法执行顺序
1.pipeline.invokeHandlerAddedIfNeeded(); 2. pipeline.fireChannelRegistered(); 3.pipeline.fireChannelActive();
之前我们说到channelInitializer是一个特殊的handler,这里我们来看下特殊性,在invokeHandlerAddedIfNeeded方法中,会调用channelInitializer节点的handlerAdded方法,里面会调用initChannel方法,就是channelInitializer重写的initChannel,即添加节点
@Override
    public void handlerAdded(ChannelHandlerContext ctx) throws Exception {
        System.out.println("add删除");
        if (ctx.channel().isRegistered()) {
            //对于当前的DefaultChannelPipeline实现,这应该总是正确的。
            //在handlerAdded(…)中调用initChannel(…)的好处是没有订单
            //如果一个通道初始化器将添加另一个通道初始化器,会让人感到惊讶。这是所有的处理程序
            //将按预期顺序添加。


            if (initChannel(ctx)) {

                // We are done with init the Channel, removing the initializer now.
                //删除initializer方法
                removeState(ctx);
            }
        }
    }
add方法执行完成后,会调用删除当前节点的操作,总结下来就是,channelInitializer在执行完成initChannel方法后,即添加完节点后,会删除自身。到这一步,pipeline结构如下:
说完了注册事件,我们还要考虑注册事件是怎么执行的,因为之前我们并没有调用到了register方法,而是先判断有没有开启reactor线程,封装成任务,交给Executor执行,走到execute方法
 @Override
    public void execute(Runnable task) {
        if (task == null) {
            throw new NullPointerException("task");
        }

        //调用doStartThread方法启动事件轮询后此方法返回true
        boolean inEventLoop = inEventLoop();
        //将任务加入线程队列
        addTask(task);
        //判断当前执行此任务的线程是否是SingleThreadEventExecutor
        //即判断当前线程是主线程还是reactor线程,如果还没有创建reactor线程,则先进行创建
        if (!inEventLoop) {
            //开启线程,执行task
            startThread();
            if (isShutdown()) {
                boolean reject = false;
                try {
                    if (removeTask(task)) {
                        reject = true;
                    }
                } catch (UnsupportedOperationException e) {
                    // The task queue does not support removal so the best thing we can do is to just move on and
                    // hope we will be able to pick-up the task before its completely terminated.
                    // In worst case we will log on termination.
                }
                if (reject) {
                    reject();
                }
            }
        }
        if (!addTaskWakesUp && wakesUpForTask(task)) {
            //唤醒阻塞的selectT
            wakeup(inEventLoop);
        }
    }
查看startThread方法,里面调用doStartThread方法
private void doStartThread() {
        assert thread == null;
        //真正的启动线程
        executor.execute(new Runnable() {
            @Override
            public void run() {
                //将此线程保存起来
                thread = Thread.currentThread();
                if (interrupted) {
                    thread.interrupt();
                }

                boolean success = false;
                updateLastExecutionTime();
                try {
                    SingleThreadEventExecutor.this.run();
                    success = true;
                } catch (Throwable t) {
                    logger.warn("Unexpected exception from an event executor: ", t);
                }
              。。。。。后面不重要
我门先查看 executor.execute方法,
 @Override
    public void execute(Runnable task) {
        if (task == null) {
            throw new NullPointerException("task");
        }
        //队列添加任务方法
        addTask(task);
        if (!inEventLoop()) {
            //里面调用的t.start()真正开启线程方法
            startThread();
        }
    }
startThread:
private void startThread() {
        if (started.compareAndSet(false, true)) {
        	//创建一个线程
            final Thread t = threadFactory.newThread(taskRunner);
            AccessController.doPrivileged(new PrivilegedAction<Void>() {
                @Override
                public Void run() {
                    t.setContextClassLoader(null);
                    return null;
                }
            });
            thread = t;
            //开启一个线程
            t.start();
        }
    }
由此我门可以得出结论,我们的注册方法是被封装成一个任务,再由Executor创建的reactor线程执行的,而不是由主线程执行
在doStartThread方法中,执行了 SingleThreadEventExecutor.this.run();方法,SingleThreadEventExecutor.this就是NioEventLoop,走到里面的run方法
protected void run() {
        for (;;) {
            try {
                try {
                    //hasTasks()  若taskQueue or  tailTasks任务队列中有任务  返回false  没有则返回true
//                  //有任务返回selectnow的返回值   没任务返回-1
                    switch (selectStrategy.calculateStrategy(selectNowSupplier, hasTasks())) {
                    case SelectStrategy.CONTINUE:
                        continue;

                    case SelectStrategy.BUSY_WAIT:
                        // fall-through to SELECT since the busy-wait is not supported with NIO

                    case SelectStrategy.SELECT:
                        //1.首先轮询注册到reactor线程对应的selector上的所有的channel的IO事件
                        //wakenUp 表示是否应该唤醒正在阻塞的select操作,netty在每次进行新的loop之前,都会将wakeUp 被设置成false,标志新的一轮loop的开始
                        select(wakenUp.getAndSet(false));
                        if (wakenUp.get()) {
                            selector.wakeup();
                        }
                        // fall through
                    default:
                    }
                } catch (IOException e) {
                    rebuildSelector0();
                    handleLoopException(e);
                    continue;
                }

                cancelledKeys = 0;
                needsToSelectAgain = false;
                final int ioRatio = this.ioRatio;
                //处理jdk的空轮训bug
                if (ioRatio == 100) {
                    try {
                        processSelectedKeys();
                    } finally {
                        // Ensure we always run tasks.
                        runAllTasks();
                    }
                } else {
                    final long ioStartTime = System.nanoTime();
                    try {
                        //2.处理产生网络IO事件的channel
                        processSelectedKeys();
                    } finally {
                        // Ensure we always run tasks.
                        final long ioTime = System.nanoTime() - ioStartTime;
                        //3.处理任务队列
                        runAllTasks(ioTime * (100 - ioRatio) / ioRatio);
                    }
                }
            } catch (Throwable t) {
                handleLoopException(t);
            }
            // Always handle shutdown even if the loop processing threw an exception.
            try {
                if (isShuttingDown()) {
                    //关闭所有通道
                    closeAll();
                    if (confirmShutdown()) {
                        return;
                    }
                }
            } catch (Throwable t) {
                handleLoopException(t);
            }
        }
    }
我们可以看到NioEventLoop主要干三件事,1.轮询等待IO事件,2.处理接收到的IO事件,3.处理任务队列
这里我们执行到register是走到了执行任务队列方法。
runAllTasks方法
 /**
     * 轮询任务队列中的所有任务,并通过{@link Runnable#run()}方法运行它们。此方法停止运行
     * 任务队列中的任务,如果运行时间超过{@code timeoutNanos},则返回。
     */
    protected boolean runAllTasks(long timeoutNanos) {
        //从scheduledTaskQueue转移定时任务到taskQueue,即执行定时任务
        fetchFromScheduledTaskQueue();
        //取出任务
        Runnable task = pollTask();
        if (task == null) {
            //尝试在获取一次  如果有就执行
            afterRunningAllTasks();
            return false;
        }
        //计算本次任务循环的截止时间
        final long deadline = ScheduledFutureTask.nanoTime() + timeoutNanos;
        long runTasks = 0;
        long lastExecutionTime;
        //循环执行任务   到了指定时间  或者 没有任务执行了
        for (;;) {
            //执行任务
            safeExecute(task);
            runTasks ++;
            if ((runTasks & 0x3F) == 0) {
                lastExecutionTime = ScheduledFutureTask.nanoTime();
                if (lastExecutionTime >= deadline) {
                    break;
                }
            }
            task = pollTask();
            if (task == null) {
                lastExecutionTime = ScheduledFutureTask.nanoTime();
                break;
            }
        }
        afterRunningAllTasks();
        this.lastExecutionTime = lastExecutionTime;
        return true;
    }
我们再看下safeExecute
protected static void safeExecute(Runnable task) {
        try {
            //执行任务
            task.run();
        } catch (Throwable t) {
            logger.warn("A task raised an exception. Task: {}", task, t);
        }
    }
到这里我们register方法就完成了,至于NioEventLoop的run方法另外两件事我们在下一篇文章中说明


 528
528


 被折叠的 条评论
为什么被折叠?
被折叠的 条评论
为什么被折叠?
 到【灌水乐园】发言


