前言:首先本人是一个代码小白,文科出身,如果你比我基础好,那么希望本教程对你有用。
1、基本介绍,pyqt5
首先,PyQt5是一个用于创建图形用户界面(GUI)应用程序的跨平台工具集,它是Python编程语言和Qt库的结合体。Qt库是由挪威Trolltech公司(后来被诺基亚收购,现为Qt Company维护)开发的跨平台C++库,用于开发GUI应用程序,也可用于开发非GUI程序,如控制台工具和服务器。PyQt5使得开发者可以使用Python语言快速开发出具有原生外观和感觉的桌面应用程序。
PyQt5提供了超过620个类和6000个函数和方法,这使得它非常强大和灵活。使用PyQt5,开发者可以创建现代、美观且功能丰富的用户界面,它支持多种Qt功能,包括:
QWidget:这是所有用户界面对象的基类。
QMainWindow:用于创建主窗口应用程序。
QDialog:用于创建对话框窗口。
QLabel、QPushButton、QLineEdit、QComboBox等:这些是常用的界面控件。
QGraphicsView和QGraphicsItem:用于创建2D图形视图和场景。
QML和Qt Quick:用于更高级的动态UI设计。
Model-View编程架构:用于分离数据和显示逻辑,如QListView、QTableView等。
PyQt5也支持信号和槽机制,这是一种强大的事件通信机制,允许对象之间进行通信,而不需要它们之间有直接的依赖关系。
2、本代码目的
本次代码目的是将多个excel文件合并,按照条件删除,然后按照自定义的时间去自动删减。
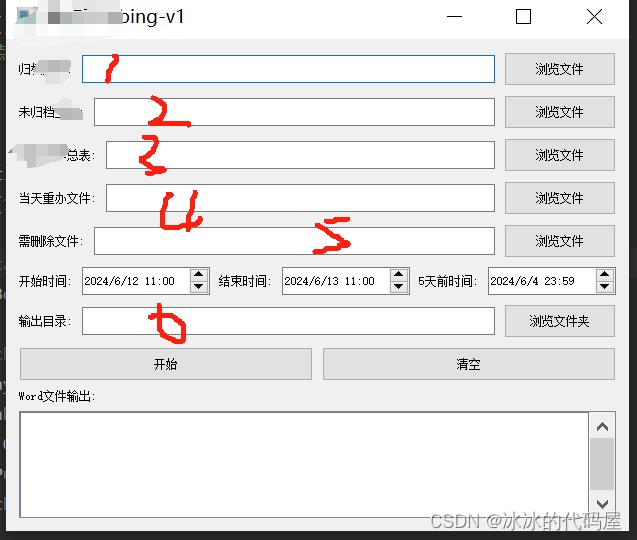
我的程序ui设计如下。

涉及功能如下:1、合并
2、自动获取当前时间
3、获取5个工作日之前的日期
4、按照条件输出excel文件
5、word输出框自适应调整
6、输出统计数据等
以上是基本功能
3、代码分解
以下是分享关于ui界面的搭建,有两种方式一种是通过designer工具直接画图,然后关联你的数据处理公式即可。这个方式不在我的这次分享范围内。

这次我分享的是直接代码写出来框架,ui设计的下次再分享,百度有很多。下面是整个框架,黏贴进去可以直接生成ui。
**下面介绍下初学者容易不会的点:1、即怎么把自己的代码和ui结合起来?怎么点击浏览文件就可以自动跳出文本选择框呢?**下面这段代码就是典型的把自己的设计和用户点击的动作结合在一起。
定义了一个名为on_click的槽函数,这个函数会用户点击的时候,触发时调用。在这个槽函数中,使用了一个QFileDialog来打开一个文件选择对话框,允许用户选择一个文件。这样你的代码就和ui设计链接在一起了。
以下是百度介绍:
filePath, _ = QFileDialog.getOpenFileName(self, “QFileDialog.getOpenFileName()”, “”, “All Files ();;Python Files (.py)”, options):这行代码调用了QFileDialog.getOpenFileName方法,这个方法会打开一个文件选择对话框,允许用户选择一个文件。这个方法接受多个参数:
self:对话框的父窗口。
“QFileDialog.getOpenFileName()”:对话框的标题。
“”:对话框中默认显示的文件路径。
“All Files ();;Python Files (.py)”:这是一个过滤字符串,它指定了在文件对话框中显示的文件类型。这里表示显示所有文件,并且特别强调了Python文件(.py扩展名)。
options:之前创建的选项对象,这里用于配置对话框。
这个方法返回一个元组,第一个元素是用户选择的文件路径(filePath),第二个元素是文件过滤器(在这个例子中没有被使用,所以用_表示忽略)。
@pyqtSlot()
def on_click(self, lineEdit):
    options = QFileDialog.Options()
    filePath, _ = QFileDialog.getOpenFileName(self, "QFileDialog.getOpenFileName()", "",
                                              "All Files (*);;Python Files (*.py)",
2、怎么自适应文本输出框呢,让文本输出框能自动添加滚动轮,当用户放大缩小都可以自动调整,不会是死板的大小。
答:你需要scrollArea这个函数,他可以让你的文件筐自适应用户选择。当他反馈会一个真实值的时候就会随之调整。
这段代码创建了一个QTextBrowser对象,它是一个用于显示富文本的控件。通过调用setReadOnly(True),确保用户不能编辑这个文本浏览器的内容。
创建了一个QScrollArea对象,它是一个提供了滚动条的容器控件,用于容纳那些可能超出视图范围的控件。通过setWidget(self.textBrowser),将文本浏览器设置为滚动区域的内部控件。setWidgetResizable(True)确保当用户调整滚动区域的大小时,内部的文本浏览器控件也会相应地调整大小。
        # New column - Word File Output
        self.label_word_output = QLabel('Word文件输出:', self)
        self.textBrowser = QTextBrowser(self)
        self.textBrowser.setReadOnly(True)
        self.scrollArea = QScrollArea(self)
        self.scrollArea.setWidget(self.textBrowser)
        self.scrollArea.setWidgetResizable(True)


        # # 将垂直布局添加到主布局
        main_layout.addLayout(layout1)
        main_layout.addLayout(layout2)
        main_layout.addLayout(layout3)
        main_layout.addLayout(layout4)
        main_layout.addLayout(layout_delete)
        main_layout.addLayout(layout5)
        main_layout.addLayout(layout6)
        main_layout.addLayout(layout7)
        main_layout.addWidget(self.label_word_output)
        main_layout.addWidget(self.scrollArea)
class App(QMainWindow):

    def __init__(self):
        super().__init__()
        self.title = '重点bing-v1'
        self.initUI()
    def initUI(self):
        self.setWindowTitle(self.title)
        self.setGeometry(100, 100, 600, 400)

        # Create a vertical layout
        main_layout = QVBoxLayout()

        # First row - Archived Work Orders
        layout1 = QHBoxLayout()
        self.label1 = QLabel('归档工单:', self)
        self.lineEdit1 = QLineEdit(self)
        self.button1 = QPushButton('浏览文件', self)
        self.button1.clicked.connect(lambda: self.on_click(self.lineEdit1))

        # Add first row widgets to the layout
        layout1.addWidget(self.label1)
        layout1.addWidget(self.lineEdit1)
        layout1.addWidget(self.button1)

        # Second row - Unarchived Work Orders
        layout2 = QHBoxLayout()
        self.label2 = QLabel('未归档工单:', self)
        self.lineEdit2 = QLineEdit(self)
        self.button2 = QPushButton('浏览文件', self)
        self.button2.clicked.connect(lambda: self.on_click(self.lineEdit2))

        # Add second row widgets to the layout
        layout2.addWidget(self.label2)
        layout2.addWidget(self.lineEdit2)
        layout2.addWidget(self.button2)

        # Third row - Key Work Orders Summary
        layout3 = QHBoxLayout()
        self.label3 = QLabel('重点工单总表:', self)
        self.lineEdit3 = QLineEdit(self)
        self.button3 = QPushButton('浏览文件', self)
        self.button3.clicked.connect(lambda: self.on_click(self.lineEdit3))

        # Add third row widgets to the layout
        layout3.addWidget(self.label3)
        layout3.addWidget(self.lineEdit3)
        layout3.addWidget(self.button3)

        # Fourth row - Repeated Work Orders for the Day
        layout4 = QHBoxLayout()
        self.label4 = QLabel('当天重办文件:', self)
        self.lineEdit4 = QLineEdit(self)
        self.button4 = QPushButton('浏览文件', self)
        self.button4.clicked.connect(lambda: self.on_click(self.lineEdit4))

        # Add fourth row widgets to the layout
        layout4.addWidget(self.label4)
        layout4.addWidget(self.lineEdit4)
        layout4.addWidget(self.button4)

        # New row - Files to be Deleted
        layout_delete = QHBoxLayout()
        self.label_delete = QLabel('需删除文件:', self)
        self.lineEdit_delete = QLineEdit(self)
        self.button_delete = QPushButton('浏览文件', self)
        self.button_delete.clicked.connect(lambda: self.on_click(self.lineEdit_delete))

        # Add delete row widgets to the layout
        layout_delete.addWidget(self.label_delete)
        layout_delete.addWidget(self.lineEdit_delete)
        layout_delete.addWidget(self.button_delete)

        # Fifth row - Start and End Time
        layout5 = QHBoxLayout()
        self.label5 = QLabel('开始时间:', self)
        from PyQt5.QtCore import QDate, QTime  # Import QDate and QTime classes
        self.dateTimeEdit = QDateTimeEdit(QDateTime(QDate.currentDate().addDays(-1), QTime(11, 0)), self)
        self.label6 = QLabel('结束时间:', self)
        self.dateTimeEdit1 = QDateTimeEdit(QDateTime(QDate.currentDate(), QTime(11, 0)),
                                           self)  # End time uses current time
        # Add label and time editor for 5 days ago
        self.label5day = QLabel('5天前时间:', self)
        today = dt.date.today()
        last_workday = self.get_last_workday(today)

        # Convert the calculated date to QDateTime and set it to dateTimeEdit5day
        self.dateTimeEdit5day = QDateTimeEdit(QDateTime.fromString(last_workday + ' 23:59', 'yyyy-MM-dd HH:mm'), self)

        # # 添加到布局
        layout5.addWidget(self.label5)
        layout5.addWidget(self.dateTimeEdit)
        layout5.addWidget(self.label6)
        layout5.addWidget(self.dateTimeEdit1)
        layout5.addWidget(self.label5day)
        layout5.addWidget(self.dateTimeEdit5day)

        # Sixth row - Output Directory
        layout6 = QHBoxLayout()
        self.label7 = QLabel('输出目录:', self)
        self.lineEdit5 = QLineEdit(self)
        self.button5 = QPushButton('浏览文件夹', self)
        self.button5.clicked.connect(lambda: self.on_directory_click(self.lineEdit5))

        # Add sixth row widgets to the layout
        layout6.addWidget(self.label7)
        layout6.addWidget(self.lineEdit5)
        layout6.addWidget(self.button5)

        # Seventh row - Start and Clear Buttons
        layout7 = QHBoxLayout()
        self.button_start = QPushButton('开始', self)
        self.button_start.clicked.connect(self.merge_and_delete)
        self.button_start.clicked.connect(self.merge_and_zhongdian)
        self.button_clear = QPushButton('清空', self)
        self.button_clear.clicked.connect(self.on_clear)
        # Add seventh row widgets to the layout
        layout7.addWidget(self.button_start)
        layout7.addWidget(self.button_clear)


        # New column - Word File Output
        self.label_word_output = QLabel('Word文件输出:', self)
        self.textBrowser = QTextBrowser(self)
        self.textBrowser.setReadOnly(True)
        self.scrollArea = QScrollArea(self)
        self.scrollArea.setWidget(self.textBrowser)
        self.scrollArea.setWidgetResizable(True)


        # # 将垂直布局添加到主布局
        main_layout.addLayout(layout1)
        main_layout.addLayout(layout2)
        main_layout.addLayout(layout3)
        main_layout.addLayout(layout4)
        main_layout.addLayout(layout_delete)
        main_layout.addLayout(layout5)
        main_layout.addLayout(layout6)
        main_layout.addLayout(layout7)
        main_layout.addWidget(self.label_word_output)
        main_layout.addWidget(self.scrollArea)

        # Set the layout on the application's window
        container = QWidget()
        container.setLayout(main_layout)
        self.setCentralWidget(container)

        self.show()

    @pyqtSlot()
    def on_click(self, lineEdit):
        options = QFileDialog.Options()
        filePath, _ = QFileDialog.getOpenFileName(self, "QFileDialog.getOpenFileName()", "",
                                                  "All Files (*);;Python Files (*.py)", options=options)
        if filePath:
            lineEdit.setText(filePath)

    @pyqtSlot()
    def on_directory_click(self, lineEdit):
        directory = QFileDialog.getExistingDirectory(self, "选择输出目录", "",
                                                     QFileDialog.ShowDirsOnly | QFileDialog.DontResolveSymlinks)
        if directory:
            lineEdit.setText(directory)


    def on_clear(self):
        self.lineEdit1.clear()
        self.lineEdit2.clear()
        self.lineEdit3.clear()
        self.lineEdit4.clear()
        self.lineEdit5.clear()
        self.dateTimeEdit.setDateTime(QDateTime.currentDateTime())
        self.dateTimeEdit1.setDateTime(QDateTime.currentDateTime())


if __name__ == '__main__':
    app = QApplication(sys.argv)
    ex = App()
    sys.exit(app.exec_())
以上是今天的分享


 1848
1848


 被折叠的 条评论
为什么被折叠?


