


Python 关于多线程处理的模块除了multiprocessing与threading之外,其实还提供1 个更为简单易用的 concurrent.futures 模块。
该模块提供ThreadPoolExecutor与ProcessPoolExecutor 2 个经过封装的classes ,让人方便上手之外,也让程序看起来更加简洁。
个人认为是相当值得学习&使用的模块之一,可以应付绝大多数日常关于多线程处理的使用场景。
本文将透过几个范例学习 concurrent.futures 模块。
本文环境
- Python 3.7
线程池执行器
首先介绍ThreadPoolExecutor。
ThreadPoolExecutor 如其名,透过Thread 的方式建立多个Executors ,用以执行消化多个任务(tasks)。
例如以下例子,建立1 个 ThreadPoolExecutor 以最多不超过5 个Threads 的方式平行执行say_hello_to,每个 say_hello_to 所需要的参数都是透过呼叫 submit 的方式交给Executer 处理:
from concurrent.futures import ThreadPoolExecutor | |
def say_hello_to(name): | |
print(name) | |
names = ['John', 'Ben', 'Bill', 'Alex', 'Jenny'] | |
with ThreadPoolExecutor(max_workers=5) as executor: | |
for n in names: | |
executor.submit(say_hello_to, n) |
上面例子执行结果:
John | |
Ben | |
Bill | |
Alex | |
Jenny |
如果前述例子多执行几次,有可能会遇到文字列混在在一起的情况,例如类似以下的输出情况,这是由于多个Thread 同时都想输出文字而造成的情况,并非什么神秘问题,本文将在稍后例子中解决此问题。
John | |
BenBill | |
Alex | |
Jenny |
未来对象
接着谈谈concurrent.futures 模块中相当重要的角色—— Future。
事实上,当呼叫submit 后,返回的并不是在Thread 执行的程序结果,而是Future 的实例,而这个实例是一个执行结果的代理(Proxy),所以我们可以透过done , running , cancelled等方法询问Future 实例在Thread 中执行的程序状态如何,如果程序已经进入done 的状态,则可以调用result取得结果。
不过Python 也提供更简单的方法—— as_completed,帮忙检查状态,所以可以少写一些代码。
因此前述例子可以进一步改成以下形式:
from concurrent.futures import ThreadPoolExecutor, as_completed | |
def say_hello_to(name): | |
return f'Hi, {name}' | |
names = ['John', 'Ben', 'Bill', 'Alex', 'Jenny'] | |
with ThreadPoolExecutor(max_workers=5) as executor: | |
futures = [] | |
for n in names: | |
future = executor.submit(say_hello_to, n) | |
print(type(future)) | |
futures.append(future) | |
for future in as_completed(futures): | |
print(future.result()) |
上述例子在第11 行取得future 实例之后,在第13 行将其放进futures列表中,接着在第15 行透过 as_completed(futures) 一个一个取得已经完成执行的future 实例,并透过 result() 取得其结果后并打印出来。
其执行结果如下:
<class 'concurrent.futures._base.Future'> | |
<class 'concurrent.futures._base.Future'> | |
<class 'concurrent.futures._base.Future'> | |
<class 'concurrent.futures._base.Future'> | |
<class 'concurrent.futures._base.Future'> | |
Hi, Jenny | |
Hi, Bill | |
Hi, Ben | |
Hi, John | |
Hi, Alex |
由于我们将打印的功能从Thread 内搬出,所以也解决打印文字可能黏在一起的情况。
除了以 submit() 先取得Future 实例再逐一检查状态并取得结果之外,也可以直接利用 map()方法直接取得Thread 的执行结果,例如以下例子:
from concurrent.futures import ThreadPoolExecutor, as_completed | |
def say_hello_to(name): | |
for i in range(100000): | |
pass | |
return f'Hi, {name}' | |
names = ['John', 'Ben', 'Bill', 'Alex', 'Jenny'] | |
with ThreadPoolExecutor(max_workers=5) as executor: | |
results = executor.map(say_hello_to, names) | |
for r in results: | |
print(r) |
进程池执行器
ProcessPoolExecutor的使用方法与ThreadPoolExecutor 一模一样,基本上视需求选择使用ThreadPoolExecutor 或ProcessPoolExecutor 即可。
不过值得注意的是Python 3.5 之后 map() 方法多了1 个 chunksize 参数可以使用,而该参数只对ProcessPoolExecutor 有效,该参数可以提升ProcessPoolExecutor 在处理大量iterables 的执行效能。
使用 ProcessPoolExecutor时,此方法将可迭代对象分成许多块,将其作为单独的任务提交给池。这些块的(近似)大小可以通过将 chunksize 设置为正整数来指定。对于非常长的可迭代对象,与默认大小 1 相比,使用较大的 chunksize 值可以显着提高性能。对于 ThreadPoolExecutor,chunksize 没有效果。
我们可以将先前例子中的 names 乘以1000 倍的长度后,再测试设定不同 chucksize 的性能:
from concurrent.futures import ProcessPoolExecutor, as_completed | |
def say_hello_to(name): | |
return f'Hi, {name}' | |
names = ['John', 'Ben', 'Bill', 'Alex', 'Jenny'] * 1000 | |
with ProcessPoolExecutor(max_workers=4) as executor: | |
results = executor.map(say_hello_to, names) |
以下用Jupyter中的 %timeit 测试其性能:
<span style="background-color:#f8f8f8"><span style="color:#212529"><code class="language-python">%timeit <span style="color:#f47067">with</span> ProcessPoolExecutor(max_workers=<span style="color:#6cb6ff">4</span>) <span style="color:#f47067">as</span> executor: executor.<span style="color:#f69d50">map</span>(say_hello_to, names, chunksize=<span style="color:#6cb6ff">6</span>)</code></span></span>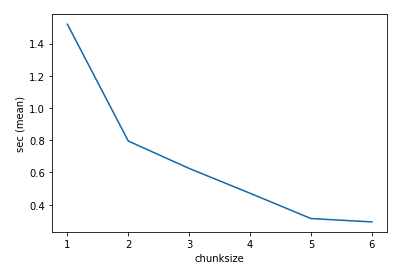
上图可以看到随着 chunksize 的增加,程序平均的执行时间越来越短,但也不是无限制的增加,到某个数量之后,加速的幅度就开始趋缓,因此chunksize 的设定还是得花点心思才行。


 204
204


 被折叠的 条评论
为什么被折叠?
被折叠的 条评论
为什么被折叠?
 到【灌水乐园】发言


