


Torchserve
Torchserve 是 AWS 和 Facebook 推出的 pytorch 模型服务库,整体架构如下

torchserve架构图.png
特点
- 提供Management API和 Inference API,用户通过API进行模型管理和模型推理
- 支持多模型,多GPU部署
- Inference API支持批量推理
- 支持模型版本控制
- 提供日志服务,默认情况下,TorchServe将日志消息打印到stderr和stout
适用性
torchserve镜像

接口地址:http://localhost:8080/predictions/bert
传入参数:data 字段
参数格式:Torchserve传入数据为 json 格式
响应参数:字符串
使用步骤
-
安装 Java 依赖
TorchServe 由 Java 实现,因此需要最新版本的 OpenJDK 来运行
sudo apt install openjdk-11-jdk安装 torchserve 及其依赖库
pip install torchserve torchvision torchtext torch-model-archiver torch-workflow-archiver -
安装 Torchserve 最好的方法是使用docker镜像
docker pull pytorch/torchserve:latest -
模型文件打包
在启动服务之前需要准备下列文件,以bert-ner任务为例
-
.pth/bin模型文件(必需)
保存bert模型文件,文件结构如下
bert_model
|____ config.json
|____ pytorch_model.bin
|____ vocab.txtimport torch import torch.nn as nn from transformers import BertForTokenClassification,BertTokenizer from transformers import WEIGHTS_NAME, CONFIG_NAME import os model = BertForTokenClassification.from_pretrained("Bert/bert", num_labels = 7) model.load_state_dict(torch.load('Bert/model/Bert.pkl')) tokenizer = BertTokenizer.from_pretrained('Bert/bert') output_dir = "./bert_model/" model_to_save = model.module if hasattr(model, 'module') else model #如果使用预定义的名称保存,则可以使用`from_pretrained`加载 output_model_file = os.path.join(output_dir, WEIGHTS_NAME) output_config_file = os.path.join(output_dir, CONFIG_NAME) torch.save(model_to_save.state_dict(), output_model_file) model_to_save.config.to_json_file(output_config_file) tokenizer.save_vocabulary(output_dir) -
model.py(非必需):该文件负责定义模型结构
-
额外文件,bert模型需要依赖 config.json,vocab.txt文件
bert_model
|____ config.json
|____ vocab.txt -
handle.py(必需):该文件需要负责数据处理以及模型推理,文件中必须要有执行的入口(entry point)。入口点只接受data和context参数,data为请求数据,context包含服务上下文信息,例如model_name,model_dir,manifest,batch_size,gpu 等。服务启动后将执行该入口点。入口点有两种实现方式
module level entry point:定义一个模块级函数作为执行的入口点,该函数可以有任何函数名称,但必须接受data,context参数并返回预测结果# Create model object model = None def entry_point_function_name(data, context): """ Works on data and context to create model object or process inference request. Following sample demonstrates how model object can be initialized for jit mode. Similarly you can do it for eager mode models. :param data: Input data for prediction :param context: context contains model server system properties :return: prediction output """ global model if not data: manifest = context.manifest properties = context.system_properties model_dir = properties.get("model_dir") device = torch.device("cuda:" + str(properties.get("gpu_id")) if torch.cuda.is_available() else "cpu") # Read model serialize/pt file serialized_file = manifest['model']['serializedFile'] model_pt_path = os.path.join(model_dir, serialized_file) if not os.path.isfile(model_pt_path): raise RuntimeError("Missing the model.pt file") model = torch.jit.load(model_pt_path) else: #infer and return result return model(data)class level entry point:定义一个类作为执行的入口点,类名任意,但必须包含initialize和 handle 类方法。handle方法只接受data,context
class ModelHandler(object):
    """
    A custom model handler implementation.
    """

    def __init__(self):
        self._context = None
        self.initialized = False
        self.model = None
        self.device = None

    def initialize(self, context):
        """
        Invoke by torchserve for loading a model
        :param context: context contains model server system properties
        :return:
        """

        #  load the model
        self.manifest = context.manifest

        properties = context.system_properties
        model_dir = properties.get("model_dir")
        self.device = torch.device("cuda:" + str(properties.get("gpu_id")) if torch.cuda.is_available() else "cpu")

        # Read model serialize/pt file
        serialized_file = self.manifest['model']['serializedFile']
        model_pt_path = os.path.join(model_dir, serialized_file)
        if not os.path.isfile(model_pt_path):
            raise RuntimeError("Missing the model.pt file")

        self.model = torch.jit.load(model_pt_path)

        self.initialized = True


    def handle(self, data, context):
        """
        Invoke by TorchServe for prediction request.
        Do pre-processing of data, prediction using model and postprocessing of prediciton output
        :param data: Input data for prediction
        :param context: Initial context contains model server system properties.
        :return: prediction output
        """
        pred_out = self.model.forward(data)
        return pred_out
以下为bert-ner任务的handle.py文件
from abc import ABC
import json
import os
from transformers import BertForTokenClassification
import torch
from ts.torch_handler.base_handler import BaseHandler

class BertHandler(BaseHandler,ABC):
    def __init__(self) -> None:
    # 父类 BertHandler 提供了基本的数据处理方法,实际任务中可按需求重写
        super(BertHandler,self).__init__()
    # 导入vocab.txt
        self.vocab = self._load_vocab('vocab.txt')
        self.max_length = 100
        self.input_text = None
        self.initialized = False

    def initialize(self,ctx):
    '''初始化类成员,加载模型
    参数 ctx : 服务系统设置,服务启动后自动传入,具体属性可参考BaseHandler源码
    '''
    # 模型文件及其依赖文件位置由model_dir属性指定,后续引用文件使用model_dir+filename
        properties = ctx.system_properties
        model_dir = properties.get("model_dir")
    # 加载模型
        self.model = BertForTokenClassification.from_pretrained(model_dir,num_labels = 7)
        if torch.cuda.is_available():
            self.model.cuda()
        self.model.eval()
        self.initialized = True

    def _load_vocab(self,vocab_file):
        vocab = {}
        index = 0
        with open(vocab_file, "r", encoding="utf-8") as reader:
            while True:
                token = reader.readline()
                if not token:
                    break
                token = token.strip()
                vocab[token] = index
                index += 1
        return vocab

    def preprocess(self,data):
    '''获取响应数据,数据预处理
    参数 data:请求数据,格式为json
    返回:模型输入张量
    '''
    # 请求数据包含在body字段中
        preprocessed_data = data[0].get("body").get("data")
        text = preprocessed_data
        tokens = [i for i in text]
        if len(tokens) > self.max_length-2:
            tokens = tokens[0:(self.max_length-2)]
        self.input_text = tokens
        tokens_f =['[CLS]'] + tokens + ['[SEP]']
        input_ids = [int(self.vocab[i]) if i in self.vocab else int(self.vocab['[UNK]']) for i in tokens_f]
        while len(input_ids) < self.max_length:
            input_ids.append(0)
        token_list = torch.tensor([input_ids], dtype=torch.long)
        return token_list

    def inference(self,data):
    '''模型预测
    参数 data:模型输入张量
    返回:模型预测结果
    '''
        with torch.no_grad():
            if torch.cuda.is_available():
                model_output = self.model(data.cuda(), token_type_ids=None, attention_mask=(data>0).cuda(), labels=torch.tensor([0 * self.max_length]).cuda()).logits
            else:
                model_output = self.model(data, token_type_ids=None, attention_mask=(data>0), labels=torch.tensor([0 * self.max_length])).logits

        return model_output

    def postprocess(self,inference_output):
    '''处理模型输出
    参数 inference_output:模型输出
    返回:响应数据
    '''
        tag = torch.squeeze(inference_output)
        tag = torch.argmax(tag, dim=1)
        tag = tag[1:1+len(self.input_text)]
        tmp = ''
        postprocess_output = []
        for t in range(len(self.input_text)):
            if tag[t] == 0:
                pass
            elif tag[t] == 1:
                tmp += self.input_text[t]
            elif tag[t] == 2:
                tmp += self.input_text[t]
                if t==len(self.input_text)-1:
                    postprocess_output.append(tmp)
                    tmp = ''
                elif tag[t+1] == 4:
                    postprocess_output.append(tmp)
                    tmp = ''
                else:
                    pass
            elif tag[t] == 3:
                tmp += self.input_text[t]
                postprocess_output.append(tmp)
                tmp = ''
    # torchserve支持批量推理,因此返回数据需要增加一个batchsize维度
        return [postprocess_output]

    def handle(self,data,context):
        if not self.initialized:
           self.initialize(context)
        if data is None:
           return None
        model_input = self.preprocess(data)
    model_output = self.inference(model_input)
        return self.postprocess(model_output)
在命令行中输入下列命令,将上述文件打包成模型存档bert.mar
torch-model-archiver --model-name bert --version 1.0 \ --serialized-file bert_model/pytorch_model.bin\ --extra-files bert_model/vocab.txt \ --handler handle.py注:
- serialized-file有多个模型,extra-files有多个依赖文件可使用逗号隔开
- 如实际任务需提供多个接口,需要对应打包多个mar文件,通过 Inference API 指定模型名称调用
在工作区创建model_store文件夹,将 bert.mar文件移至model_store 文件夹
mkdir model_store
mv bert.mar model_store/
-
-
启动服务
torchserve --start --model-store model_store --models bert.mar -
使用 Inference API 进行推理,默认端口号 8080
curl http://localhost:8080/predictions/bert -T 请求数据或
import requests res = requests.post("http://localhost:8080/predictions/bert",json=data) -
使用 Management API 管理模型,默认端口号8081
-
模型注册与注销
服务启动后需要注册模型使之生效
curl -X POST "http://localhost:8081/models?url=bert.mar"注销模型,使模型失效
curl -X DELETE http://localhost:8081/models/bert -
分配workers
curl -v -X PUT "http://localhost:8081/models/bert?min_worker=3" -
查看模型信息
curl "http://localhost:8081/models"
-
Triton Inference server
Triton推理服务能够托管/部署来自于本地存储或谷歌云平台的基于GPU或CPU的基础设施任何框架(无论是Teriton推理服务器能够托管/部署来自于本地存储或谷歌云平台的基于GPU或CPU的基础设施任何框架(无论是Tensorflow、TensorRT、Pytorch、Caffee、ONNX、Runtime的训练模型或一些自定义的框架)
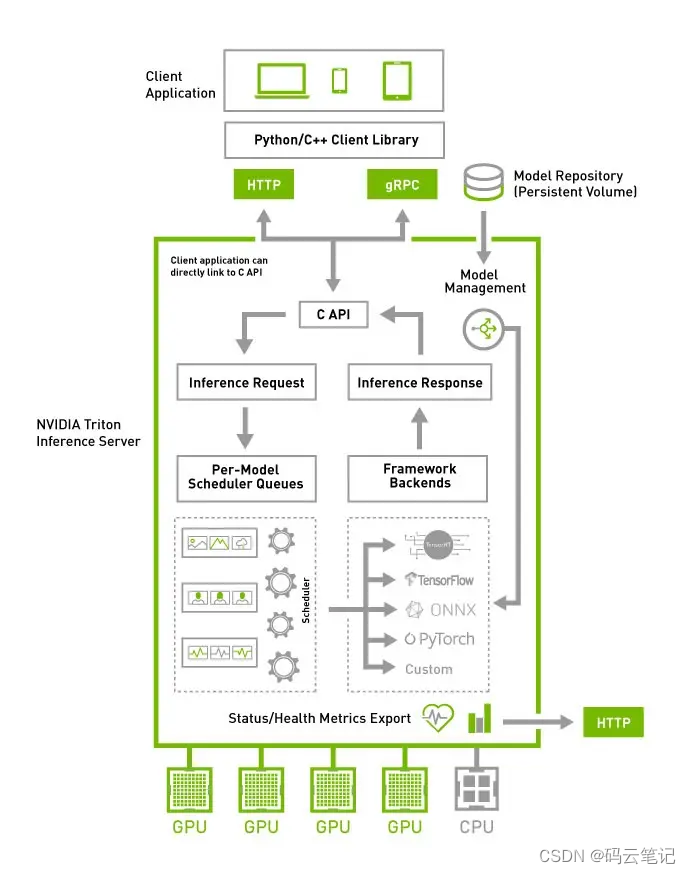
特点
- 并发模型执行支持:多个模型(或同一模型的多个实例)可以在同一个GPU上同时运行
- 批处理支持:Triton可以处理一批输入请求及其对应的一批预测结果
- 多GPU支持:Triton可以在所有系统GPU上分布推理
- 模型存储库可以驻留在本地可访问的文件系统(例如NFS)
- 提供GPU利用率、服务器吞吐量和服务器延迟的指标,指标以Prometheus数据格式提供
- 提供模型版本控制
使用步骤
-
拉取镜像
docker pull nvcr.io/nvidia/tritonserver:21.05-py3 -
准备模型文件及依赖文件,按照下面的方式组织文件目录结构
models/
└── pytorch_model               # 模型名字,需要和 config.pbtxt 中的名字对上
    ├── 1                       # 模型版本号
    │   └── model.pt            # 上面保存的模型
    ├── config.pbtxt            # 模型配置文件,规定输入输出数据类型维度
    ├── extrafiles              # 额外文件
配置文件config.pbtxt包含允许的输入/输出类型和形状,批次大小,版本控制,平台的详细信息,服务器不知道这些配置的详细信息,因此,将它们写入单独的配置文件中
name: "bert" platform: "pytorch_libtorch" input [ { name: "input__0" data_type: TYPE_INT32 dims: [1, 100] } ,{ output { name: "output__0" data_type: TYPE_FP32 dims: [1, 100] } -
启动服务
docker run --rm --gpus all \
-p8000:8000 -p8001:8001 -p8002:8002 \
-v model_repository:/models \
nvcr.io/nvidia/tritonserver:21.05-py3 \
tritonserver --strict-model-config=false --model-repository=/models


 375
375


 被折叠的 条评论
为什么被折叠?
被折叠的 条评论
为什么被折叠?
 到【灌水乐园】发言


