


shell 基础-01
- 一.shell命令
- 1.1 pwd:显示当前所在位置
- 1.2 cd:切换目录
- 1.3 tree:以树形结构显示目录下的内容
- 1.4 mkdir:创建目录
- 1.5 touch:创建空文件或改变文件的时间戳属性
- 1.6 ls:显示目录下的内容及相关属性信息
- 1.7 cp:复制文件或目录
- 1.8 mv:移动或重命名文件
- 1.9 rm:删除文件或目录
- 1.10 ln硬链接与软链接
- 1.11 md5sum:计算和校验文件的md5值
- 1.12 chown:改变文件或目录的用户和用户组
- 1.13 chmod:改变文件或目录的权限
- 1.14 tar: 打包备份
- 1.15 zip: 打包和压缩文件
- 1.16 alias: 别名
- 1.17 */? : 通配符
- 1.18 env: 列出全部系统变量
- 1.19 set: 输出环境变量
- 1.20 cut: 截取某一个字段
- 1.21 sort(排序)
- 1.22 wc: 统计文档的行数、字符数、词数
- 1.23 uniq: 删除重复行
- 1.24 $: 执行最后一个命令
- 1.25 2>和2>>: 错误重定向
- 1.26 执行多个命令
- 1.27 vim:文本编辑器
- 1.28. useradd:添加新用户
- 1.29 groupadd:创建组群
一.shell命令
1.1 pwd:显示当前所在位置
[root@shell ~]# pwd
/root
[root@shell ~]# echo $PWD
/root
1.2 cd:切换目录
使用实战
[root@shell ~]# cd /etc/init.d/
[root@shell init.d]# cd -
/root
#切换用户上一次所在的目录路径
[root@shell ~]# pwd
/root
[root@shell ~]# cd /etc/
[root@shell etc]# cd …
[root@shell /]# pwd
/
#切换到目录的上一级目录
[root@shell /]# cd ~
[root@shell ~]# pwd
/root
#切换到当前用户的家目录
1.3 tree:以树形结构显示目录下的内容
1.3.1 使用基础
[root@shell ~]# tree /boot/
/boot/
├── config-2.6.32-431.el6.x86_64
├── efi
│ └── EFI
1.3.2 显示目录下的所有内容,包括隐藏文件
[root@shell etc]# tree -a
#有对目录,文件数量的统计
1.3.3 只列出根目录的第一层目录的结构
[root@shell etc]# tree -L 1 /
/
├── 1.txt
├── bin
1.3.4 只显示所有的目录
[root@shell etc]# tree -d
.
├── alternatives
├── audisp
1.3.5 -f和-I 的使用
[root@shell etc]# tree -L 1 -if /etc
/etc
/etc/adjtime
/etc/aliases
#显示文件或者目录的完整名称,-I 不显示树枝部分
1.3.6 使用技巧

#过滤文件和目录的方法
1.4 mkdir:创建目录
1.4.1 基础操作,-p递归创建目录
[root@shell ~]# mkdir long
[root@shell ~]# mkdir -p long01/long02/long03
[root@shell ~]# ls
long long01 rose
1.4.2 同时创建多个目录和多级子目录
[root@shell ~]# mkdir -p old/{dir1,dir2}/{dir3,dir4}
[root@shell ~]# ls
long long01 old rose
[root@shell ~]# cd old/
[root@shell old]# ls
dir1 dir2
[root@shell old]# cd dir1
[root@shell dir1]# ls
dir3 dir4
[root@shell dir1]# cd …/dir2/
[root@shell dir2]# ls
dir3 dir4
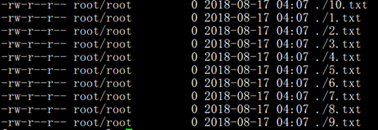
[root@shell dir2]# mkdir {1…10}.txt
[root@shell dir2]# ls
10.txt 2.txt 4.txt 6.txt 8.txt dir3
1.txt 3.txt 5.txt 7.txt 9.txt dir4
1.4.3 {}范例
[root@shell dir2]# echo {a,c}
a c
[root@shell dir2]# echo a{b,c}
ab ac
[root@shell dir2]# echo a{,c}
a ac
1.4.4 克隆目录结构
[root@shell ~]# tree -fid --noreport old
old
old/dir1
old/dir1/dir3
old/dir1/dir4
old/dir2
old/dir2/10.txt
old/dir2/1.txt
old/dir2/2.txt
old/dir2/3.txt
old/dir2/4.txt
old/dir2/5.txt
old/dir2/6.txt
old/dir2/7.txt
old/dir2/8.txt
old/dir2/9.txt
old/dir2/dir3
old/dir2/dir4
[root@shell ~]# tree -fid --noreport old>>1.txt
[root@shell ~]# cd /tmp/
[root@shell tmp]# mkdir -p `cat /root/1.txt`
#–noreport 不显示最后一行统计信息
1.5 touch:创建空文件或改变文件的时间戳属性
1.5.1 更改文件的时间戳属性
[root@shell tmp]# touch 1.txt
[root@shell tmp]# stat 1.txt
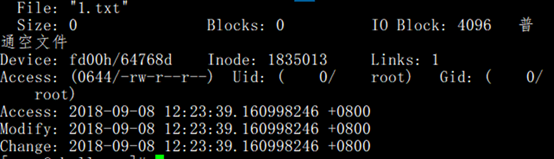
#ACCESS:最后访问文件的时间
#modify:最后修改文件的时间
#change:最后改变文件状态的时间
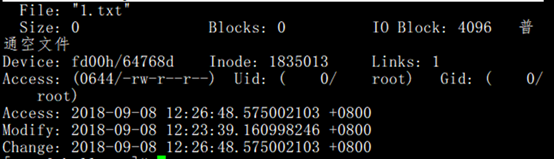
[root@shell tmp]# touch -a 1.txt
#最后更改访问的时间
[root@shell tmp]# stat 1.txt
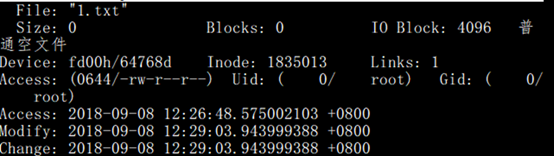
[root@shell tmp]# touch -m 1.txt
#最后修改时间
[root@shell tmp]# stat 1.txt
1.6 ls:显示目录下的内容及相关属性信息
1.6.1 不带任何参数,默认显示所有文件和目录
[root@shell tmp]# ls
10.txt 5.txt CentOS-Base.repo epel-testing.repo
显示所闻文件和目录,包括隐藏的文件,与-A的区别是,它显示”.”和”…”
[root@shell tmp]# ls -a
. 4.txt CentOS-Base.repo .ICE-unix
1.6.2 显示详细信息
[root@shell tmp]# ls -l

1.6.3 显示完整时间属性的参数
[root@shell tmp]# ls -l --time-style=long-iso
总用量 40
-rw-r–r-- 1 root root 0 2018-08-27 17:44 10.txt
-rw-r–r-- 1 root root 0 2018-09-08 12:29 1.txt
#显示完整的时间属性
1.6.4 ls带-F参数(过滤文件和目录)
[root@shell tmp]# ls -F|grep -v /
10.txt
1.txt
2.txt
[root@shell tmp]# ls -F|grep /
old/
root/
1.6.5 显示目录本身的信息
[root@shell tmp]# ls -ld /tmp/
drwxrwxrwt. 5 root root 4096 9月 8 12:51 /tmp/
1.6.6 查找最近更新的文件
[root@shell tmp]# ls -lrt --time-style=long-iso /tmp/ |tail -1
-rw-r–r-- 1 root root 0 2018-09-08 12:29 1.txt
#-r 倒序,-t按时间排序
1.7 cp:复制文件或目录
[root@shell old]# cp -a root old
[root@shell old]# ls
dir1 dir2 old root
#-a 等同于-p(复制文件时保持文件源的所有作者,权限信息,以及时间属性),-r 递归复制目录,-d保留源文件的符号链接
1.8 mv:移动或重命名文件
1.8.1 重命名文件
[root@shell test]# echo “111” >1.txt
[root@shell test]# echo “222”>2.txt
[root@shell test]# ls
1.txt 2.txt
[root@shell test]# mv 1.txt 3.txt
[root@shell test]# cat 3.txt
111
[root@shell test]# ls
2.txt 3.txt
[root@shell test]# echo “444” >4.txt
[root@shell test]# mv 2.txt 4.txt
mv:是否覆盖"4.txt"? y
[root@shell test]# cat 4.txt
222
1.8.2 移动文件
[root@shell test]# mv 3.txt 4.txt test/
[root@shell test]# ls
test
[root@shell test]# cd test/
[root@shell test]# ls
3.txt 4.txt
1.8.3 移动目录
[root@shell test]# mkdir test01
[root@shell test]# mkdir test02
[root@shell test]# mkdir test03
[root@shell test]# ls
3.txt 4.txt test01 test02 test03
[root@shell test]# mv test01 test05
[root@shell test]# ls
3.txt 4.txt test02 test03 test05
[root@shell test]# mv test02 test03
[root@shell test]# ls
3.txt 4.txt test03 test05
[root@shell test]# cd test03/
[root@shell test03]# ls
test02
1.9 rm:删除文件或目录
[root@shell test]# ls
3.txt 4.txt test03 test05
[root@shell test]# rm 3.txt
rm:是否删除普通文件 “3.txt”?y
[root@shell test]# rm -r test03
rm:是否进入目录"test03"? y
rm:是否删除目录 “test03/test02”?y
rm:是否删除目录 “test03”?yu^H
[root@shell test]# ls
4.txt test05
[root@shell test]# rm -f 4.txt
[root@shell test]# ls
test05
[root@shell test]# rm -rf test05/
[root@shell test]# ls
[root@shell test]#
#-f 表示强制删除
#-r 表示递归删除
1.10 ln硬链接与软链接
1.10.1 硬链接
(硬链接生成的是普通文件,字符”-”,通过索引节点来进行链接,正常情况下,多个文件名指向同一索引文件是允许的,这种文件就是硬链接)
11
[root@shell test]# ln /etc/hosts ./3.txt
[root@shell test]# ls
1.txt 2.txt 3.txt test01
[root@shell test]# ls -i /etc/hosts ./3.txt
394178 ./3.txt 394178 /etc/hosts
[root@shell test]# cat 3.txt

#ln 源文件 目标文件(事先不存在的)
#可以看出源文件和目标文件大小是一样的,并且目标文件的内容和源文件的内容是一样的
12
[root@shell test]# rm /etc/hosts
rm:是否删除普通文件 “/etc/hosts”?y
[root@shell test]# ln 3.txt /etc/hosts
[root@shell test]# cat /etc/hosts

#删除了源文件之后,可以通过目标文件恢复源文件
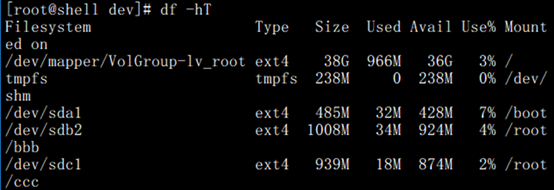
[root@shell bbb]# ln 1.txt /root/ccc/2.txt
ln: 创建硬链接"/root/ccc/2.txt" => “1.txt”: 无效的跨设备连接
#无法跨分区链接
硬链接小结:
- 具有相同inode节点的多个文件互为硬链接文件
- 删除硬链接文件或者删除源文件任意之一,文件实体未被删除
- 只有当删除了源文件和对应的硬链接文件,文件实体才会被删除
- 不可以链接目录,无法跨分区链接
1.10.2 软链接
[root@shell ~]# ln -s /etc/hosts 1.txt
[root@shell ~]# ll -hi
总用量 0
1703938 lrwxrwxrwx 1 root root 10 9月 8 15:20 1.txt -> /etc/hosts
[root@shell ~]# ll -hi /etc/hosts
394178 -rw-r–r-- 1 root root 186 1月 12 2018 /etc/hosts
#可以看出软链接文件的inodo值和源文件,硬链接文件都不同,文件类型符号为”l”
软链接小结:
- 类似与windows的快捷方式
- 软链接文件类似于文本文件,里面存放的是源文件的路径,指向源文件实体。
- 即使删除了源文件,软链接文件依然存在,但是无法访问指向的源文件内容。
- 可以链接目录
1.11 md5sum:计算和校验文件的md5值
[root@shell ~]# md5sum 1.txt
d3a6c15ed7dc6409c88aefe930a4ac90 1.txt
#得出文件的md5值
[root@shell ~]# md5sum 1.txt >md5.log
[root@shell ~]# md5sum -c md5.log
1.txt: 确定
[root@shell ~]# echo “11”>1.txt
[root@shell ~]# md5sum -c md5.log
1.txt: 失败
md5sum: 警告:1/1 生成的校验和不匹配
[root@shell ~]# md5sum --status -c md5.log
#不直接输出结果,改用返回值判断结果
[root@shell ~]# echo $?
1
1.12 chown:改变文件或目录的用户和用户组
1.12.1更改用户
[root@shell ~]# ll 1.sh
-rw-r–r-- 1 root root 265 9月 10 20:28 1.sh
[root@shell ~]# chown user01 1.sh
[root@shell ~]# ll 1.sh
1.12.2 更改组
[root@shell ~]# chown .user01 1.sh
[root@shell ~]# ll 1.sh
-rw-r–r-- 1 user01 user01 265 9月 10 20:28 1.sh
1.12.3 同时更改用户和用户组
[root@shell ~]# chown root:root 1.sh
[root@shell ~]# ll 1.sh
-rw-r–r-- 1 root root 265 9月 10 20:28 1.sh
1.12.4 递归更改
[root@shell ~]# chown -R root.root /root/
1.13 chmod:改变文件或目录的权限
1.13.1 设置权限
[root@shell ~]# chmod 777 1.sh
[root@shell ~]# ll 1.sh
-rwxrwxrwx 1 777 root 265 9月 10 20:28 1.sh
1.13.2 递归设置权限
[root@shell ~]# chmod -R 777 /root/
[root@shell ~]# ll /root/
总用量 16
-rwxrwxrwx 1 777 root 265 9月 10 20:28 1.sh
1.14 tar: 打包备份
1、压缩
[root@shell ~]# mkdir test
[root@shell ~]# cd test/
[root@shell test]# touch {1…10}.txt
[root@shell test]# tar zcvf long.tar.gz ./*.txt
#z 表示通过gzip 压缩, c表示创建新的tar包,v表示显示tar 执行的过程,f指定压缩文件的名字。
2、查看压缩包的内容
[root@shell test]# tar ztvf long.tar.gz
#不解压查看tar包的内容
3、解开压缩包
[root@shell test]# tar zxvf long.tar.gz -C /tmp/
#-C 指定解压的目录路径
1.15 zip: 打包和压缩文件
- 递归压缩
[root@shell test]# zip -r test.zip /root/test/
#-r 表示递归压缩,默认只压缩文件夹,不压缩文件 - 排除压缩
[root@shell test]# zip -r test01.zip /root/test/ -x /root/test/1.txt
#-x 表示压缩的文件夹 - 解压
[root@shell test]# unzip -d /tmp/ test01.zip
#-d 指定压缩的目录
1.16 alias: 别名
[root@shell etc]# alias a=‘pwd’
[root@shell etc]# a
/etc
[root@shell etc]# unalias a
[root@shell etc]# a
-bash: a: command not found
1.17 */? : 通配符
[root@shell long]# ls *.txt
10.txt 13.txt 16.txt 19.txt
[root@shell long]# ls ?.txt
- txt 2.txt 3.txt 4.txt 5.txt 6.txt
#*匹配0个或多个字符,?匹配一个字符
脱义字符
[root@shell jiankong]# ls *.txt
ls: 无法访问*.txt: 没有那个文件或目录
[root@shell jiankong]# ls *.txt
mv.txt
1.18 env: 列出全部系统变量
[root@shell long]# env
HOSTNAME=shell
TERM=xterm
SHELL=/bin/bash
HISTSIZE=1000
1.19 set: 输出环境变量
[root@shell long]# set
a=long01
colors=/etc/DIR_COLORS
#还可以显示用户预设的变量
变量设置(使得环境变量在任何环境都生效)
#在root设置
[root@shell long]# vi /etc/profile
export long=123
[root@shell long]# source /etc/profile
[root@shell long]# echo KaTeX parse error: Expected 'EOF', got '#' at position 10: long 123 #̲转到long用户查看 [lon… echo $long
123
取消变量
[long@shell ~]$ echo
l
o
n
g
123
[
l
o
n
g
@
s
h
e
l
l
]
long 123 [long@shell ~]
long123[long@shell ] unset long
[long@shell ~]$ echo $long
1.20 cut: 截取某一个字段
#-d:后面跟分隔字符,分隔字符要用单引号括起来。
#-c:后面接的是第几个字符
#-f:后面接的是第几个区块
[root@shell jiankong]# cat /etc/passwd|cut -d ‘:’ -f 1|head -2
root
bin
[root@shell jiankong]# head -n2 /etc/passwd|cut -c2
o
i
[root@shell jiankong]# head -n2 /etc/passwd|cut -c5-10
x:0:0
x:1:1:
[root@shell jiankong]# head -n2 /etc/passwd|cut -c1,3,10
ro0
bn:
1.21 sort(排序)
#-t:后面跟分隔字符
#-n:表示使用纯数字排序
#-r:表示反向排序
#-u:表示去重复
#-kn1,n2:表示n1~n2排序,-kn1对n1字段排序
[root@shell jiankong]# head -n5 /etc/passwd|sort
adm:x:3:4:adm:/var/adm:/sbin/nologin
bin:x:1:1:bin:/bin:/sbin/nologin
daemon:x:2:2:daemon:/sbin:/sbin/nologin
#使用第一个字母排序
[root@shell jiankong]# tail -n5 /etc/passwd|sort -t: -k3 -n

[root@shell jiankong]# tail -n5 /etc/passwd|sort -t: -k3 -nr
1.22 wc: 统计文档的行数、字符数、词数
[root@shell jiankong]# wc /etc/passwd
21 27 929 /etc/passwd
#21(行数) 27(词数) 929(字符数)
[root@shell jiankong]# cat /etc/passwd|wc -l
21
[root@shell jiankong]# cat 1.txt
abc
def
ghj
[root@shell jiankong]# cat 1.txt |wc -l
3
[root@shell jiankong]# cat 1.txt |wc -w
3
[root@shell jiankong]# cat 1.txt |wc -m
1.23 uniq: 删除重复行
[root@shell jiankong]# cat 2.txt
111
222
333
333
333
111
[root@shell jiankong]# sort 2.txt
111
111
222
333
333
333
[root@shell jiankong]# sort 2.txt |uniq -c
2 111
1 222
3 333
[root@shell jiankong]# sort 2.txt |uniq
111
222
333
1.24 $: 执行最后一个命令
[root@shell jiankong]# cat 1.txt
abc
def
ghj
[root@shell jiankong]# echo “gggg”>>!$
echo “gggg”>>1.txt
[root@shell jiankong]# cat 1.txt
abc
def
ghj
gggg
#执行最后一个变量
1.25 2>和2>>: 错误重定向
[root@shell jiankong]# ls 111111 2>/tmp/1.txt
[root@shell jiankong]# cat /tmp/1.txt
ls: 无法访问111111: 没有那个文件或目录
[root@shell jiankong]# ls 111111 2>>/tmp/1.txt
[root@shell jiankong]# cat /tmp/1.txt
ls: 无法访问111111: 没有那个文件或目录
ls: 无法访问111111: 没有那个文件或目录
1.26 执行多个命令
#命令1||命令2
#命令1 && 命令2
||:命令1成功不执行命令2,命令2成功不执行命令1
&&:命令1执行成功后才执行命令2
[root@shell jiankong]# touch lll.txt;echo “111”>111.txt
[root@shell jiankong]# cat 111.txt
111
#; 可以执行多个命令
1.27 vim:文本编辑器
vim(vi improved)是一种强大的文本编辑器,支持复杂的文本操作。相对图形界面的gedit编辑器,vim可以很方便的在命令行中使用,而且在任何Linux系统中始终可用。
vim是vi的高级版本,提供更多的功能,比如自动格式,语法高亮等。当系统中vim无法使用时,依然可以使用vi命令代替,用法相同。
1.27.1 vim的三种模式

1.27.2 进入编辑模式的命令
i:从光标所在的位置前面插入文本
I:从光标所在的行首开始插入文本
a:从光标所在的位置后面插入文本
A:从光标所在行的行尾开始插入文本
o:从光标所在行下方新增一行插入文本
O:从光标所在的行的上方新增一行插入文本
s:删除光标所在字符并开始插入文本
S:删除光标所在行并开始插入文本
1.27.3 进入末行模式的命令
: 在后面接要执行的命令,从光标位置开始向下搜索
/: 在后面接要搜索的字符串
?:在后面接要搜索的字符串,从光标位置开始向上搜索
1.27.4 退出vim编辑器
q:没有对文本做过修改,退出
q!:没有对文本做过修改,强制不保存退出
wq或x:保存退出,可以添加!表示强制保存退出
ZZ:若文档没有修改,则不保存退出,若文档修改,则保存退出
1.27.5 光标移动命令
^:光标移动到行首
$:光标移动到行尾
gg:移动到文件的第一行
G:移动到文件最后一行
nG:光标移动到第n行
1.27.6 删除、复制、粘贴
dd/ndd:删除光标所在的行/向下删除n行
yy/nyy:复制光标所在一(向下n)行
p/P:粘贴到光标位置下/上一行
1.28. useradd:添加新用户
1.28.1 用户介绍
在RHEL中,有三种不同的用户类型,root(也称管理员账户,超级用户或根用户),普通用户和系统用户。普通用户和组的ID号默认从500开始,0-499为系统用户保留。
root用户是系统内置的管理员用户,拥有系统最大权限,可以完全访问和操作系统的所有文件。正因如此,在通常系统使用时,不建议使用root用户登录系统,只有在需要管理员权限时才由普通用户切换到管理员。
普通用户是被用来登录和使用系统。普通用户默认情况下只能对自己的家目录下的文件和文件夹进行修改或删除的操作,最大程度的控制了对系统的损害。
系统用户类似于普通用户,不同之处在于系统用户通常没有自己的家目录,也不能登录到系统,仅用来控制应用程序的运行。系统用户一般由系统自带应用或其他服务程序的软件包安装时创建。
1.28.2 useradd日常用法
用法:useradd [options] user_name
常用选项:
-u UID:为新用户指定一个UID(不使用系统默认按顺序分配的),使用-r,强制建立系统账号(小于/etc/login.defs上UID_MIN),使用-o,允许新用户使用不唯一的UID。
-g GROUP:为新用户指定一个组(指定的必须存在)。
-G GROUPS:为新用户指定一个附加组。
-M:不创建用户的家目录(默认创建)。
-m:为新用户创建家目录。使用-k选项将skeleton_dir内的文件复制到家目录下。
-c:为新用户进行说明注释(/etc/passwd的说明栏)。
-d:为新用户指定家目录。默认值为default_home内的login名称。
-s:为新用户指定登录后使用的shell。
-e:为新用户指定账号的终止日期。日期的指定格式为MM/DD/YY。
-f:用户账号过期几日后永久失效。当值为0时账号则立刻失效,-1时关闭此功能。默认关闭。
[root@python ~]# useradd -u 510 -c “ftp user” -s /sbin/nologin user01
[root@python ~]# useradd -g user01 -d /home/user02 user02
[root@python ~]# useradd -G user01 -M user03
You have new mail in /var/spool/mail/root
[root@python ~]# cd /home/
[root@python home]# ls
long test01 test02 test03 user01 user02 zabbix
[root@python home]# cat /etc/passwd
user03:x:512:512::/home/user03:/bin/bash
用户名:用户密码:用户id:用户所属组的组id:用户注释说明:用户家目录:用户所使用的shell
1.28.3 usermod命令修改用户账号信息
[root@python home]# cat /etc/passwd
user01:x:510:510:ftp user:/home/user01:/sbin/nologin
[root@python home]# usermod -c “ftp” user01
[root@python home]# cat /etc/passwd
user01:x:510:510:ftp:/home/user01:/sbin/nologin
#使用-L选项锁定用户,限制用户登录
[root@python home]# cat /etc/shadow|grep user04

[root@python home]# usermod -L user04
[root@python home]# cat /etc/shadow|grep user04

#此时用户user04就算密码对登录也不行
[root@python home]# usermod -U user04

1.28.4 userdel命令删除用户
Userdel [options] user_name
-f:强制删除用户,即使用户仍在dengl
-r:删除用户的同时删除该用户的家目录和邮件
1.28.5 passwd修改用户密码
用法:passwd [options] user_name
常用选项:
-l:锁定指定的账号。
-u:解锁指定的被锁定的账号。
-n:指定密码最短时间。
-x:指定密码最长时间。
-w:指定密码过期前的警告天数。
-i:指定密码过期后,账号失效前的天数。
-S:报告指定用户密码的状态。
–stdin 从标准输入读入密码,常用于shell脚本。
示例:为用户设置密码。
#passwd tom
root可以修改任何用户的密码,普通用户仅可以修改自己的密码。
1.29 groupadd:创建组群
[root@python mail]# groupadd sales
[root@python mail]# gpasswd sales
[root@python mail]# su - test01
[test01@python ~]$ groups
test01
[test01@python ~]$ newgrp sales
Password:
[test01@python ~]$ groups
sales test01
[test01@python ~]$ id test01
uid=500(test01) gid=500(test01) groups=500(test01)
[test01@python ~]$ chage -l test01
Last password change : Apr 23, 2020
Password expires : never
Password inactive : never
Account expires : never
Minimum number of days between password change : 0
Maximum number of days between password change : 99999
Number of days of warning before password expires : 7
#查看用户是否过期
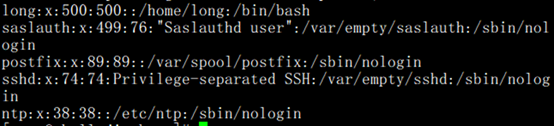
[root@python ~]# pwck
user ‘adm’: directory ‘/var/adm’ does not exist
user ‘uucp’: directory ‘/var/spool/uucp’ does not exist
user ‘gopher’: directory ‘/var/gopher’ does not exist
user ‘ftp’: directory ‘/var/ftp’ does not exist
user ‘saslauth’: directory ‘/var/empty/saslauth’ does not exist
user ‘user03’: directory ‘/home/user03’ does not exist
pwck: no changes
#对用户进行一致性检查


 2043
2043


 被折叠的 条评论
为什么被折叠?
被折叠的 条评论
为什么被折叠?
 到【灌水乐园】发言


