


一、前言
关于这个CRUD的小案例的编写因为忙于应对学校课程与考试拖了一段时间,现在总结复习一下全部过程,加深印象。
二、关于CRUD小案例的环境搭建
1、首先创建好一个web项目。在WebContent/WEB-INF/lib下导入相应jar包,因为我是Spring和SpringMVC综合使用的,所以先导入了
commons-logging-1.2.jar、spring-aop-4.2.0.RELEASE.jar、spring-beans-4.2.0.RELEASE.jar、spring-context-4.2.0.RELEASE.jar、spring-core-4.2.0.RELEASE.jar、spring-expression-4.2.0.RELEASE.jar、spring-jdbc-4.2.0.RELEASE.jar、spring-orm-4.2.0.RELEASE.jar、spring-tx-4.2.0.RELEASE.jar、spring-web-4.2.0.RELEASE.jar、spring-webmvc-4.2.0.RELEASE.jar,这些框架包。
2、写配置。直接在项目下创建一个源目录conf,然后创建一个springmvc-servlet.xml的配置文件,一个applicationContext.xml的配置文件,把springmvc和spring的配置分开写。我的项目结构如下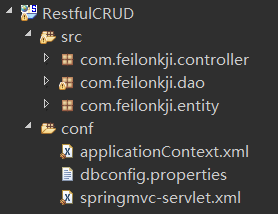 。
。
2.1 下面准备写配置文件。
首先在web项目的web.xml中添加前端控制器配置,web.xml文件一般在WEB-INF下,没有就直接找到Server项目下的web.xml拷过来,留下头部,多余的可以全删掉,其实在web项目创建时是可以勾选自动创建的。还是写配置吧。
在web.xml中添加前端控制器DispatcherServlet
<!-- 配置前端控制器 -->
	<!-- The front controller of this Spring Web application, responsible for handling all application requests -->
	<servlet>
		<servlet-name>springDispatcherServlet</servlet-name>
		<servlet-class>org.springframework.web.servlet.DispatcherServlet</servlet-class>
		<init-param>
			<param-name>contextConfigLocation</param-name>
             <!--上面创建的springmvc-servlet.xml的配置文件的路径-->
			<param-value>classpath:springmvc-servlet.xml</param-value>
		</init-param>
		<load-on-startup>1</load-on-startup>
	</servlet>

	<!-- Map all requests to the DispatcherServlet for handling -->
	<servlet-mapping>
		<servlet-name>springDispatcherServlet</servlet-name>
		<url-pattern>/</url-pattern>
	</servlet-mapping>
写完这个前端控制器之后莫急,目前还只是把SpringMVC的配置文件加载了还有Spring的配置文件没有加载。这个时候需要用到
contextConfigLocation来加载spring的配置文件,不然最后运行时会找不到资源,在使用ClassPathXmlApplicationContext("applicationContext.xml")获取ioc容器时报出Exception in thread "main" java.lang.NoClassDefFoundError: org.springframework.beans.FatalBeanException异常。
 <!-- 添加spring监听器 -->
  <listener>
    <listener-class>org.springframework.web.context.ContextLoaderListener</listener-class>
  </listener>
  <!--加载 spring 容器-->
  <context-param>
    <param-name>contextConfigLocation</param-name>
    <param-value>classpath:applicationContext.xml</param-value>
  </context-param>
2.2 一次性解决中文乱码问题,在web.xml中添加SpringMVC提供的Filter---->CharacterEncodingFilter
<!-- 配置编码过滤器 -->
	<filter>
		<filter-name>CharacterEncodingFilter</filter-name>
		<filter-class>org.springframework.web.filter.CharacterEncodingFilter</filter-class>
		<init-param>
            <!-- encoding是用来指定解决POST请求乱码 -->
			<param-name>encoding</param-name>
			<param-value>UTF-8</param-value>
		</init-param>
		<init-param>
            <!-- forceEncoding顺手解决响应乱码:response.setCharacterEncoding("UTF-8") -->
			<param-name>forceEncoding</param-name>
			<param-value>true</param-value>
		</init-param>
	</filter>
	<filter-mapping>
		<filter-name>CharacterEncodingFilter</filter-name>
		<url-pattern>/*</url-pattern>
	</filter-mapping>
2.3 web.xml暂时配置这么多了,接下来是springmvc-servlet.xml的配置,在SpringMVC的配置文件中,按照当前的需求只需要开启包扫描和配置一个视图解析器用于响应地址的拼接就行了
<!-- 开启包扫描 -->
	<context:component-scan base-package="com.feilonkji"></context:component-scan>
	<!-- 配置视图解析器 -->
	<bean class="org.springframework.web.servlet.view.InternalResourceViewResolver">
		<!-- 地址拼接 -->
		<property name="prefix" value="/WEB-INF/pages/"></property>
		<property name="suffix" value=".jsp"></property>
	</bean>
2.4 由于是连接的SqlServer数据库所以我用到了外部配置文件
首先还是导入支持数据库连接的包:c3p0-0.9.5.2.jar,mchange-commons-java-0.2.12.jar,mssql-jdbc-6.4.0.jre8.jar,在c3p0的新版本中这两个都必须要,导完包后就是新建一个外部文件dbconfig.properties,具体内容为

就是配置数据库连接的一些基本信息。然后在spring的配置文件applicationContext.xml中配置数据源,同时打开包扫描,将数据连接源给spring提供的JdbcTemplate管理,这个是用来操作数据库的。
<!-- 开启包扫描 -->
	<context:component-scan base-package="com.feilonkji"></context:component-scan>
	<!-- 导入外部配置文件 -->
	<context:property-placeholder location="classpath:dbconfig.properties"></context:property-placeholder>
	<!-- 配置数据库连接源 -->
	<bean id="comboPooledDataSource" class="com.mchange.v2.c3p0.ComboPooledDataSource">
		<property name="user" value="${jdbc.user}"></property>
		<property name="password" value="${jdbc.password}"></property>
		<property name="driverClass" value=&
最低0.47元/天 解锁文章


 481
481


 被折叠的 条评论
为什么被折叠?
被折叠的 条评论
为什么被折叠?
 到【灌水乐园】发言


