


CUDA8.0安装成功后会出现以下画面:
===========
= Summary =
===========
Driver: Not Selected
Toolkit: Installed in /usr/local/cuda-8.0
Samples: Installed in /home/textminer
Please make sure that
– PATH includes /usr/local/cuda-8.0/bin
– LD_LIBRARY_PATH includes /usr/local/cuda-8.0/lib64, or, add /usr/local/cuda-8.0/lib64 to /etc/ld.so.conf and run ldconfig as root
To uninstall the CUDA Toolkit, run the uninstall script in /usr/local/cuda-8.0/bin
Please see CUDA_Installation_Guide_Linux.pdf in /usr/local/cuda-8.0/doc/pdf for detailed information on setting up CUDA.
***WARNING: Incomplete installation! This installation did not install the CUDA Driver. A driver of version at least 361.00 is required for CUDA 8.0 functionality to work.
To install the driver using this installer, run the following command, replacing with the name of this run file:
sudo .run -silent -driver
Logfile is /opt/temp//cuda_install_6583.log
此刻我们就需要配置它的环境变量了
第一步:在.bashrc中添加环境变量
gedit ~/.bashrc

在文件的末尾加入下面两行语句:

export PATH=/usr/local/cuda-8.0/bin${PATH:+:${PATH}}
export LD_LIBRARY_PATH=/usr/local/cuda-8.0/lib64${LD_LIBRARY_PATH:+:${LD_LIBRARY_PATH}}
第二步:设置环境变量和动态链接库
$ sudo gedit /etc/profile

在末尾加入下面语句:

export PATH=/usr/local/cuda/bin:$PATH

保存退出
第三步:创建链接文件
sudo gedit /etc/ld.so.conf.d/cuda.conf

加入下面语句:

/usr/local/cuda/lib64

然后执行:
sudo ldconfig        // 使文件生效
第四步:测试CUDA的Sample
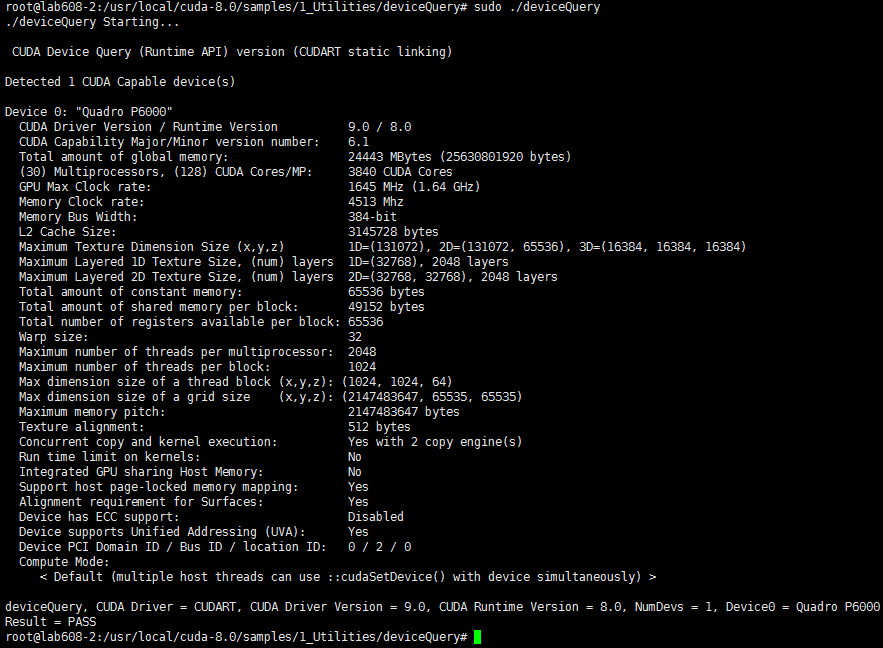
cd /usr/local/cuda-7.5/samples/1_Utilities/deviceQuery
make
sudo ./deviceQuery
如果出现与下图相似的图,说明CUDA8.0已经安装成功了


 3069
3069


 被折叠的 条评论
为什么被折叠?
被折叠的 条评论
为什么被折叠?
 到【灌水乐园】发言


