


1 数据缓存机制的使用
目的:学习如何使用微信小程序提供的数据缓存机制,包括数据存储、读取和删除。
技术要点:
wx.setStorage和wx.setStorageSync(数据存储)wx.getStorage和wx.getStorageSync(数据读取)wx.removeStorage(数据删除)- 缓存的生命周期管理
代码示例:
// pages/cache/cache.js

// 存储数据到本地缓存
wx.setStorageSync('username', 'Tom');
wx.setStorageSync('age', 25);

// 从本地缓存读取数据
const username = wx.getStorageSync('username');
const age = wx.getStorageSync('age');

console.log(`姓名: ${username}, 年龄: ${age}`);

// 删除本地缓存数据
wx.removeStorageSync('age');

// 检查删除结果
const ageAfterRemove = wx.getStorageSync('age');
console.log(`删除后的年龄: ${ageAfterRemove}`);  // undefined
2 用户授权与微信登录接口
目的:掌握微信小程序的登录流程,获取用户授权信息并使用登录接口获取openid和session_key。
技术要点:
- 使用
wx.login进行用户登录 - 获取用户授权信息 (
wx.getUserProfile) - 通过
code调用后端接口获取openid和session_key
代码示例:
// pages/auth/auth.js

// 用户登录
function userLogin() {
  wx.login({
    success(res) {
      if (res.code) {
        console.log('登录成功,code:', res.code);
        // 此处应调用后端服务换取 openid 和 session_key
        wx.request({
          url: 'https://your-server.com/api/login',
          method: 'POST',
          data: { code: res.code },
          success: function(response) {
            console.log('后端返回:', response.data);
            wx.setStorageSync('openid', response.data.openid);
          }
        });
      } else {
        console.log('登录失败!' + res.errMsg);
      }
    }
  });
}

// 获取用户授权信息
function getUserInfo() {
  wx.getUserProfile({
    desc: '用于完善用户资料',
    success(res) {
      console.log('用户信息获取成功:', res.userInfo);
      wx.setStorageSync('userInfo', res.userInfo);
    },
    fail(err) {
      console.log('用户拒绝授权:', err);
    }
  });
}

module.exports = {
  userLogin,
  getUserInfo
};
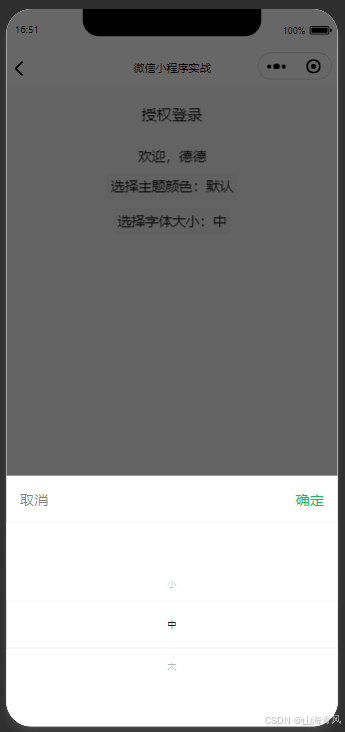
3 实战:用户信息授权及保存用户偏好设置
目的:结合数据缓存和用户授权机制,完成用户偏好设置的保存和恢复。
技术要点:
- 用户首次登录授权并保存基本信息
- 存储用户偏好设置(如主题颜色、字体大小等)
- 页面加载时从缓存恢复用户偏好设置
目录结构:
pages/
├── settings/
│   ├── settings.js
│   ├── settings.json
│   ├── settings.wxml
│   └── settings.wxss
代码示例:
settings.wxml
<view class="container">
  <button bindtap="authorizeUser">授权登录</button>

  <view wx:if="{{userInfo}}">
    <text>欢迎,{{userInfo.nickName}}</text>
  </view>

  <picker mode="selector" range="{{themes}}" bindchange="themeChange">
    <view>选择主题颜色:{{currentTheme}}</view>
  </picker>

  <picker mode="selector" range="{{fontSizes}}" bindchange="fontSizeChange">
    <view>选择字体大小:{{currentFontSize}}</view>
  </picker>
</view>
settings.js
Page({
  data: {
    userInfo: null,
    themes: ['默认', '黑暗', '柔和'],
    fontSizes: ['小', '中', '大'],
    currentTheme: '默认',
    currentFontSize: '中'
  },

  onLoad() {
    // 从缓存加载用户信息
    const userInfo = wx.getStorageSync('userInfo');
    const currentTheme = wx.getStorageSync('theme') || '默认';
    const currentFontSize = wx.getStorageSync('fontSize') || '中';

    if (userInfo) {
      this.setData({ userInfo });
    }

    this.setData({ currentTheme, currentFontSize });
  },

  authorizeUser() {
    wx.getUserProfile({
      desc: '用于完善用户资料',
      success: (res) => {
        this.setData({ userInfo: res.userInfo });
        wx.setStorageSync('userInfo', res.userInfo);
        wx.showToast({ title: '授权成功!', icon: 'success' });
      },
      fail: () => {
        wx.showToast({ title: '授权失败', icon: 'error' });
      }
    });
  },

  themeChange(e) {
    const theme = this.data.themes[e.detail.value];
    this.setData({ currentTheme: theme });
    wx.setStorageSync('theme', theme);
  },

  fontSizeChange(e) {
    const fontSize = this.data.fontSizes[e.detail.value];
    this.setData({ currentFontSize: fontSize });
    wx.setStorageSync('fontSize', fontSize);
  }
});
settings.wxss
.container {
  padding: 20rpx;
}

button {
  margin-bottom: 30rpx;
}

picker {
  margin-top: 20rpx;
  padding: 10rpx;
  background-color: #f0f0f0;
  border-radius: 10rpx;
}
小结
本章通过实战演示了微信小程序的数据缓存机制、用户登录与授权流程,以及如何利用这些技术实现保存用户偏好设置,提升用户体验。
练习题:
- 尝试实现一个清除所有本地缓存的按钮。
- 扩展偏好设置,添加更多选项,如语言或通知设置。
- 完善后端接口,模拟真实的登录流程(Node.js或Python均可)。


 被折叠的 条评论
为什么被折叠?
被折叠的 条评论
为什么被折叠?
 到【灌水乐园】发言


