


TF-Slim
TensorFlow-Slim API 官方教程 * * * * *
Slim下的函数介绍(一)
TF-Slim 是 TensorFlow 中一个用来构建、训练、评估复杂模型的轻量化库。TF-Slim 模块可以和 TensorFlow 中其它API混合使用
1. Slim 模块的导入
import tensorflow as tf
slim = tf.contrib.slim
Slim 模块的组成 
slim是独由几个独立的模块组成。
arg_scope:允许用户对该 scope 内的操作定义默认参数。
data:包含了 Slim 模块的 dataset definition、data providers、parallel_reader 及 decoding utilities。
evaluation:评估模型需要的一些东西。
layers:构建模型需要的一些高级 layers。
learning:训练模型需要的一些东西。.
losses:常见的 loss 函数。
metrics:常见的评估指标。
nets:常见的深度网络(例如 VGG、AlexNet)。注意:最新的 Slim 中已经没有 nets 了!!!
queues:提供一个容易、简单的开始和关闭 QueueRunners的 content manager。
regularizers:常见的权重 regularizer。
variables:provides convenience wrappers for variable creation and manipulation.
Slim 变量(Variables)
例如,要创建一个权重 variable,用一个截断的正态分布初始化它,用 l2_loss 进行正则,并将它放在 CPU 上。只需要进行如下的声明即可。
weights = slim.variable('weights',
                        shape=[10, 10, 3 , 3],
                        initializer=tf.truncated_normal_initializer(stddev=0.1),
                        regularizer=slim.l2_regularizer(0.05),
                        device='/CPU:0')
Slim 进一步区分了 variables 通过定义 model variables,这些变量代表一个模型的参数。(例如,由 slim.fully_connected 和 slim.conv2d 创建的 variable)。Non-model 变量指训练、评估过程中需要但推理过程不需要的变量(例如,global_step 训练评估中需要,推理时不需要)。
通过 Slim 创建和索引(retrieved)model variables 和一般的 variables 很容易:
# Model Variables
weights = slim.model_variable('weights',
                              shape=[10, 10, 3 , 3],
                              initializer=tf.truncated_normal_initializer(stddev=0.1),
                              regularizer=slim.l2_regularizer(0.05),
                              device='/CPU:0')
model_variables = slim.get_model_variables()

# Regular variables
my_var = slim.variable('my_var',
                       shape=[20, 1],
                       initializer=tf.zeros_initializer())
regular_variables_and_model_variables = slim.get_variables()
内部是怎么实现的呢?当你通过 Slim 的 layers 或者直接通过 slim.model_variable 函数创建 model variables 时,Slim 将 variable 添加到了 tf.GrapghKeys.MODEL_VARIABLES 容器中。如果你有自定义的 layers 或者 variable 创建 routine,但是仍然想要使用 Slim 去管理或者想让 Slim 知道你的 model variables,Slim 模块提供了一个很方便的添加 model variable 到对应的容器中的函数:
my_model_variable = CreateViaCustomCode()

# Letting TF-Slim know about the additional variable.
slim.add_model_variable(my_model_variable)
Slim 层(Layers)
虽然 TensorFlow 的操作集合相当广泛,但神经网络的开发人员通常会在更高的层次上考虑模型,比如:“layers”、“losses”、“metrics” 和 “networks”。layer(例如conv层、fc层、bn层)比 TensorFlow op 更加抽象,并且 layer 通常涉及多个 op。
例如,神经网络中的一个 conv 层由很多低级的 op 组成:
- 创建权重和偏差 viriable
- 对权重和输入进行卷积(输入来自前一层)
- 卷积结果加上偏差
- 应用一个激活函数
仅使用基础(plain)的 TensorFlow 代码,这可能相当费力:
input = ...
with tf.name_scope('conv1_1') as scope:
  kernel = tf.Variable(tf.truncated_normal([3, 3, 64, 128], dtype=tf.float32,
                                           stddev=1e-1), name='weights')
  conv = tf.nn.conv2d(input, kernel, [1, 1, 1, 1], padding='SAME')
  biases = tf.Variable(tf.constant(0.0, shape=[128], dtype=tf.float32),
                       trainable=True, name='biases')
  bias = tf.nn.bias_add(conv, biases)
  conv1 = tf.nn.relu(bias, name=scope)
为了避免代码的重复。Slim 提供了很多方便的神经网络 layers 的高层 op。例如:与上面的代码对应的 Slim 版的代码:
input = ...
net = slim.conv2d(input, 128, [3, 3], scope='conv1_1')#128是输出卷积核的大小,3,3,是核的大小

slim.batch_norm()函数
batch_norm处理
slim.batch_norm()函数,以及slim的各个层函数的normalizer_fn=slim.batch_norm调用都会用到,
其参数很多,需要以字典的形式传入,
batch_norm_params = {  # 定义batch normalization(标准化)的参数字典

        'is_training': is_training,

        # 是否是在训练模式,如果是在训练阶段,将会使用指数衰减函数(衰减系数为指定的decay),

        # 对moving_mean和moving_variance进行统计特性的动量更新,也就是进行使用指数衰减函数对均值和方

        # 差进行更新,而如果是在测试阶段,均值和方差就是固定不变的,是在训练阶段就求好的,在训练阶段,

        # 每个批的均值和方差的更新是加上了一个指数衰减函数,而最后求得的整个训练样本的均值和方差就是所

        # 有批的均值的均值,和所有批的方差的无偏估计


        'zero_debias_moving_mean': True,

        # 如果为True,将会创建一个新的变量对 'moving_mean/biased' and 'moving_mean/local_step',

        # 默认设置为False,将其设为True可以增加稳定性


        'decay': batch_norm_decay,             # Decay for the moving averages.

        # 该参数能够衡量使用指数衰减函数更新均值方差时,更新的速度,取值通常在0.999-0.99-0.9之间,值

        # 越小,代表更新速度越快,而值太大的话,有可能会导致均值方差更新太慢,而最后变成一个常量1,而

        # 这个值会导致模型性能较低很多.另外,如果出现过拟合时,也可以考虑增加均值和方差的更新速度,也

        # 就是减小decay


        'epsilon': batch_norm_epsilon,         # 就是在归一化时,除以方差时,防止方差为0而加上的一个数

        'scale': batch_norm_scale,

        'updates_collections': tf.GraphKeys.UPDATE_OPS,

        # force in-place updates of mean and variance estimates

        # 该参数有一个默认值,ops.GraphKeys.UPDATE_OPS,当取默认值时,slim会在当前批训练完成后再更新均

        # 值和方差,这样会存在一个问题,就是当前批数据使用的均值和方差总是慢一拍,最后导致训练出来的模

        # 型性能较差。所以,一般需要将该值设为None,这样slim进行批处理时,会对均值和方差进行即时更新,

        # 批处理使用的就是最新的均值和方差。

        #

        # 另外,不论是即使更新还是一步训练后再对所有均值方差一起更新,对测试数据是没有影响的,即测试数

        # 据使用的都是保存的模型中的均值方差数据,但是如果你在训练中需要测试,而忘了将is_training这个值

        # 改成false,那么这批测试数据将会综合当前批数据的均值方差和训练数据的均值方差。而这样做应该是不

        # 正确的。

    }
在以其他层参数的形式调用时如下,
normalizer_fn=slim.batch_norm, # 标准化器设置为BN
normalizer_params=batch_norm_params
注意一但使用batch_norm层,在训练节点定义时需要添加一些语句,slim.batch_norm里有moving_mean和moving_variance两个量,分别表示每个批次的均值和方差。在训练时还好理解,但在测试时,moving_mean和moving_variance的含义变了,在训练时,
update_ops = tf.get_collection(tf.GraphKeys.UPDATE_OPS)

    with tf.control_dependencies(update_ops):

        train_step = tf.train.GradientDescentOptimizer(0.01).minimize(total_loss)

# 注意并tf本体的batch_normal操作也需要这步操作

# 其中,tf.control_dependencies(update_ops)表示with段中的操作是在update_ops操作执行之后 再执行的
repeat 和 stack
Slim 还提供了两个 meta-operations:repeat 和 stack。 tf.contrib.layers.repeat 和 stack,普通函数可以用这两个函数。 它们允许用户去重复的进行(perform)相同的操作(operation)。例如,考虑下面的代码段(来自 VGG 网络,它的 layers 在两个 pooling 层之间进行了很多 conv):
net = ...
net = slim.conv2d(net, 256, [3, 3], scope='conv3_1')
net = slim.conv2d(net, 256, [3, 3], scope='conv3_2')
net = slim.conv2d(net, 256, [3, 3], scope='conv3_3')
net = slim.max_pool2d(net, [2, 2], scope='pool2')
一个减少代码重复的方法是使用 for 循环
net = ...
for i in range(3):
  net = slim.conv2d(net, 256, [3, 3], scope='conv3_%d' % (i+1))
net = slim.max_pool2d(net, [2, 2], scope='pool2')
一个减少代码重复的方法是使用 for 循环:
net = ...
for i in range(3):
  net = slim.conv2d(net, 256, [3, 3], scope='conv3_%d' % (i+1))
net = slim.max_pool2d(net, [2, 2], scope='pool2')
使用 slim.repeat 可以使上面的代码变得更清晰明了:
net = slim.repeat(net, 3, slim.conv2d, 256, [3, 3], scope='conv3')
net = slim.max_pool2d(net, [2, 2], scope='pool2')
注意:slim.repeat 不仅对 repeated 单元采用相同的参数,而且它对 repeated 单元的 scope 采用更好的命名方式(加下划线,再加迭代序号)。具体来说,上面例子中的 scopes 将会命名为 ‘conv3/conv3_1’,‘conv3/conv3_2’,‘conv3/conv3_3’
:
更进一步,Slim 的 slim.stack 允许去重复多个操作 with 不同的参数,从而创建一个多层的堆叠结构。slim.stack 也为每一个创建的 op 创造了一个新的 tf.variable_scope。例如,创建一个多层感知器(Multi-Layer Perceptron (MLP))的一个简单方式:
# Verbose way: 冗长的方式
x = slim.fully_connected(x, 32, scope='fc/fc_1')
x = slim.fully_connected(x, 64, scope='fc/fc_2')
x = slim.fully_connected(x, 128, scope='fc/fc_3')

# Equivalent, TF-Slim way using slim.stack:
x = slim.stack(x, slim.fully_connected, [32, 64, 128], scope='fc')
在这个例子中,slim.stack 调用 slim.fully_connected 三次,并将函数上一次调用的输出传递给下一次调用。但是,在每个调用中,隐形单元(hidden units)的数量分别为 32,64,128。相似地,我们可以使用 stack 去简化多层卷积的堆叠:
# Verbose way: 冗长的方式
x = slim.conv2d(x, 32, [3, 3], scope='core/core_1')
x = slim.conv2d(x, 32, [1, 1], scope='core/core_2')
x = slim.conv2d(x, 64, [3, 3], scope='core/core_3')
x = slim.conv2d(x, 64, [1, 1], scope='core/core_4')

# Using stack:
x = slim.stack(x, slim.conv2d, [(32, [3, 3]), (32, [1, 1]), (64, [3, 3]), (64, [1, 1])], scope='core')
Slim 作用域(Scopes
slim.arg_scope
这三个卷积层共享很多相同的超参数。两个有相同的 padding,三个都有相同的 weights_initializer 和 weight_regularizer。这段代码很难读,并且包含了很多重复的值。一个解决方案是使用变量指定默认值:
padding = 'SAME'
initializer = tf.truncated_normal_initializer(stddev=0.01)
regularizer = slim.l2_regularizer(0.0005)
net = slim.conv2d(inputs, 64, [11, 11], 4,
                  padding=padding,
                  weights_initializer=initializer,
                  weights_regularizer=regularizer,
                  scope='conv1')
net = slim.conv2d(net, 128, [11, 11],
                  padding='VALID',
                  weights_initializer=initializer,
                  weights_regularizer=regularizer,
                  scope='conv2')
net = slim.conv2d(net, 256, [11, 11],
                  padding=padding,
                  weights_initializer=initializer,
                  weights_regularizer=regularizer,
                  scope='conv3')
这个解决方案保证了三个卷积层拥有相同的参数值,但代码仍不够清晰。通过使用一个 arg_scope,我们能够在保证每一层使用相同参数值的同时,简化代码:
  with slim.arg_scope([slim.conv2d], padding='SAME',
                      weights_initializer=tf.truncated_normal_initializer(stddev=0.01)
                      weights_regularizer=slim.l2_regularizer(0.0005)):
    net = slim.conv2d(inputs, 64, [11, 11], scope='conv1')
    net = slim.conv2d(net, 128, [11, 11], padding='VALID', scope='conv2')
    net = slim.conv2d(net, 256, [11, 11], scope='conv3')
如上例所示,使用 arg_scope 使代码更清晰、简单并且容易去维护。注意,在 arg_scope 内部指定op的参数值时,指定的参数将取代默认参数。具体来讲,当 padding 参数的默认值被设置为 ‘SAME’ 时,第二个卷积的 padding 参数被指定为 ‘VALID’。
我们也可以嵌套地使用 arg_scope,并且在同一个 scope 中可以使用多个 op。例如:
with slim.arg_scope([slim.conv2d, slim.fully_connected],
                      activation_fn=tf.nn.relu,
                      weights_initializer=tf.truncated_normal_initializer(stddev=0.01),
                      weights_regularizer=slim.l2_regularizer(0.0005)):
  with slim.arg_scope([slim.conv2d], stride=1, padding='SAME'):
    net = slim.conv2d(inputs, 64, [11, 11], 4, padding='VALID', scope='conv1')
    net = slim.conv2d(net, 256, [5, 5],
                      weights_initializer=tf.truncated_normal_initializer(stddev=0.03),
                      scope='conv2')
    net = slim.fully_connected(net, 1000, activation_fn=None, scope='fc')
在这个例子中,第一个 arg_scope 中对 conv2d、fully_connected 层使用相同的 weights_initializer。在第二 arg_scope 中,给 conv2d 的其它默认参数进行了指定。
实例:创建VGG网络(Working Example: Specifying the VGG16 Layers) 
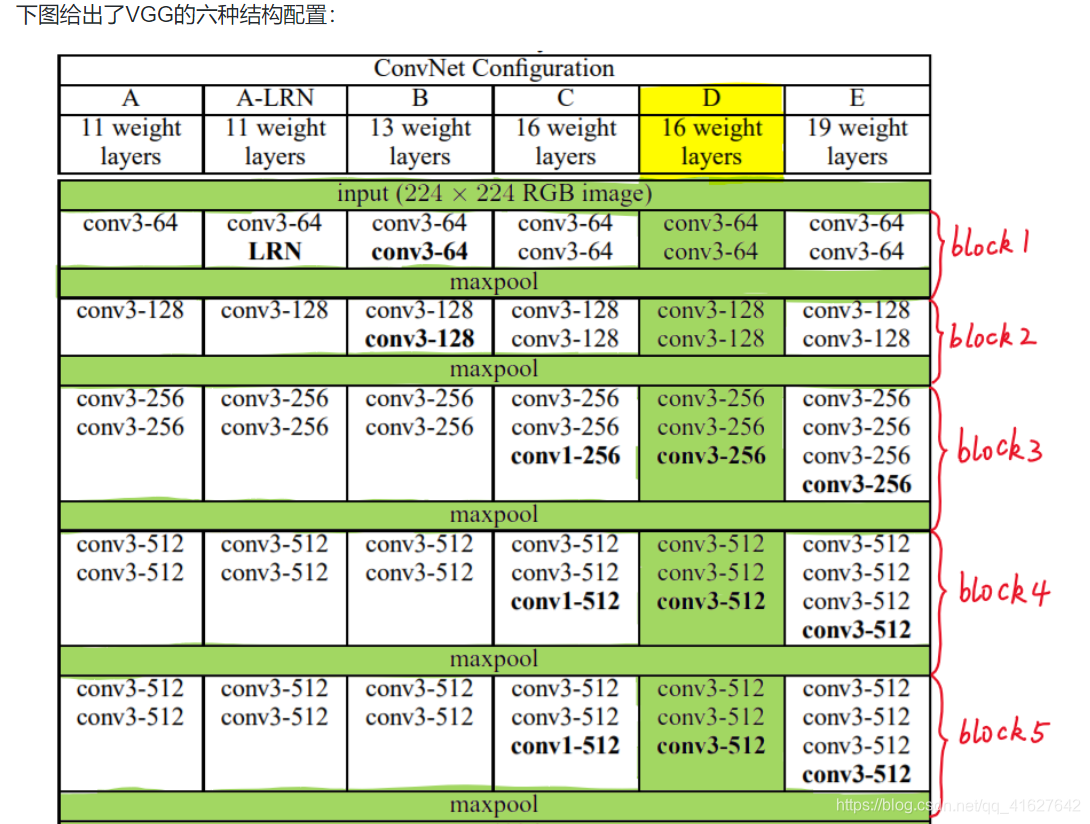

def vgg16(inputs):
  with slim.arg_scope([slim.conv2d, slim.fully_connected],
                      activation_fn=tf.nn.relu,
                      weights_initializer=tf.truncated_normal_initializer(0.0, 0.01),
                      weights_regularizer=slim.l2_regularizer(0.0005)):
    net = slim.repeat(inputs, 2, slim.conv2d, 64, [3, 3], scope='conv1')
    net = slim.max_pool2d(net, [2, 2], scope='pool1')
    net = slim.repeat(net, 2, slim.conv2d, 128, [3, 3], scope='conv2')
    net = slim.max_pool2d(net, [2, 2], scope='pool2')
    net = slim.repeat(net, 3, slim.conv2d, 256, [3, 3], scope='conv3')
    net = slim.max_pool2d(net, [2, 2], scope='pool3')
    net = slim.repeat(net, 3, slim.conv2d, 512, [3, 3], scope='conv4')
    net = slim.max_pool2d(net, [2, 2], scope='pool4')
    net = slim.repeat(net, 3, slim.conv2d, 512, [3, 3], scope='conv5')
    net = slim.max_pool2d(net, [2, 2], scope='pool5')
    net = slim.fully_connected(net, 4096, scope='fc6')
    net = slim.dropout(net, 0.5, scope='dropout6')
    net = slim.fully_connected(net, 4096, scope='fc7')
    net = slim.dropout(net, 0.5, scope='dropout7')
    net = slim.fully_connected(net, 1000, activation_fn=None, scope='fc8')
  return net
5.1 Slim 损失函数(Losses)
根据官方提示,slim.losses 模块将被去除,请使用 tf.losses 模块,两者功能完全一致
loss 函数定义了一个我们想要优化的量。对于分类问题,loss 一般是正确的类别分布(true distribution)和预测的类别分布(predicted probability distribution across classes)之间的交叉熵(cross entropy)。对于回归问题,loss 一般是
预测值和真实值之间差值的平方和。
一些模型(比如多任务学习模型)需要同时使用多个 loss 函数。换言之,loss 函数最终最小化的量是使用的多个 loss 函数的和。例如,在一个模型中,同时预测一张图片的场景(the type of scene in an image)和每个像素的景深(the depth from the camera of each pixel)。这个模型的 loss 函数将是分类 loss 和 depth prediction loss 的和。
Slim 通过 losses 模块提供了一个易用的 定义、追踪 loss 函数的方法。我们以 VGG 网络的训练为一个简单的例子来说明其的使用
#Slim 通过 losses 模块提供了一个易用的 定义、追踪 loss 函数的方法。我们以 VGG 网络的训练为一个简单的例子来说明其的使用:
import tensorflow as tf
import tensorflow.contrib.slim.nets as nets
vgg = nets.vgg

# Load the images and labels.
images, labels = ...

# Create the model.
predictions, _ = vgg.vgg_16(images)

# Define the loss functions and get the total loss.
loss = slim.losses.softmax_cross_entropy(predictions, labels)
在这个例子中,我们首先创建 model(使用 slim.nets.vgg 来实现),并且添加标准的分类损失(loss)。现在,让我们研究下多目标模型(产生多个输出)的情况:
# Load the images and labels.
images, scene_labels, depth_labels = ...

# Create the model.
scene_predictions, depth_predictions = CreateMultiTaskModel(images)

# Define the loss functions and get the total loss.
classification_loss = slim.losses.softmax_cross_entropy(scene_predictions, scene_labels)
sum_of_squares_loss = slim.losses.sum_of_squares(depth_predictions, depth_labels)

# The following two lines have the same effect:
total_loss = classification_loss + sum_of_squares_loss
total_loss = slim.losses.get_total_loss(add_regularization_losses=False)
# Load the images and labels.
images, scene_labels, depth_labels, pose_labels = ...

# Create the model.
scene_predictions, depth_predictions, pose_predictions = CreateMultiTaskModel(images)

# Define the loss functions and get the total loss.
classification_loss = slim.losses.softmax_cross_entropy(scene_predictions, scene_labels)
sum_of_squares_loss = slim.losses.sum_of_squares(depth_predictions, depth_labels)
pose_loss = MyCustomLossFunction(pose_predictions, pose_labels)
slim.losses.add_loss(pose_loss) # Letting TF-Slim know about the additional loss.

# The following two ways to compute the total loss are equivalent:
regularization_loss = tf.add_n(slim.losses.get_regularization_losses())
total_loss1 = classification_loss + sum_of_squares_loss + pose_loss + regularization_loss

# (Regularization Loss is included in the total loss by default).
total_loss2 = slim.losses.get_total_loss()
Slim 训练 Loop(Training Loop) 
Slim 为模型的训练提供了很多简单但强有力的工具(见 learning.py 中)。这包含了一个训练函数(重复地计算 loss、计算梯度、将模型保存到 disk)和很多操纵梯度的函数。例如,一旦我们我们已经指定模型、loss 函数、训练方案,我们能够调用 slim.learning.create_train_op 和 slim.learning.train 去执行优化
g = tf.Graph()

# Create the model and specify the losses...
...

total_loss = slim.losses.get_total_loss()
optimizer = tf.train.GradientDescentOptimizer(learning_rate)

# create_train_op ensures that each time we ask for the loss, the update_ops
# are run and the gradients being computed are applied too.
train_op = slim.learning.create_train_op(total_loss, optimizer)
logdir = ... # Where checkpoints are stored.

slim.learning.train(
    train_op,
    logdir,
    number_of_steps=1000,
    save_summaries_secs=300,
    save_interval_secs=600)
在这个例子中,slim.learning.train 中的 train_op 主要进行两个操作:(a) 计算 loss;(b) 进行梯度更新。logdir 指定了checkpoint 和 event 文件保存的目录。我们可以指定梯度下降步的数量。在这个例子中,我们指定只执行 1000 步梯度下降。save_summaries_secs=300 指定每5分钟计算一次 summaries。save_interval_secs=600 指定每10分钟保存一个 model checkpoint。
实例:训练 VGG 模型(Working Example: Training the VGG16 Model)
import tensorflow as tf
import tensorflow.contrib.slim.nets as nets

slim = tf.contrib.slim
vgg = nets.vgg

...

train_log_dir = ...
if not tf.gfile.Exists(train_log_dir):
  tf.gfile.MakeDirs(train_log_dir)

with tf.Graph().as_default():
  # Set up the data loading:
  images, labels = ...

  # Define the model:
  predictions = vgg.vgg_16(images, is_training=True)

  # Specify the loss function:
  slim.losses.softmax_cross_entropy(predictions, labels)

  total_loss = slim.losses.get_total_loss()
  tf.summary.scalar('losses/total_loss', total_loss)

  # Specify the optimization scheme:
  optimizer = tf.train.GradientDescentOptimizer(learning_rate=.001)

  # create_train_op that ensures that when we evaluate it to get the loss,
  # the update_ops are done and the gradient updates are computed.
  train_tensor = slim.learning.create_train_op(total_loss, optimizer)

  # Actually runs training.
  slim.learning.train(train_tensor, train_log_dir)
现有模型的微调(Fine-Tuning Existing Models) 
从ckpt中恢复变量的简介(Brief Recap on Restoring Variables from a Checkpoint) 
在一个模型训练完毕后,能够使用tf.train.Saver()从一个给定的checkpoint中恢复Variables。很多情况下,tf.train.Saver()提供了一个简单的恢复所有或一小部分变量的方法。
在一个模型训练完毕后,能够使用tf.train.Saver()从一个给定的checkpoint中恢复Variables。很多情况下,tf.train.Saver()提供了一个简单的恢复所有或一小部分变量的方法。
# Create some variables.
v1 = tf.Variable(..., name="v1")
v2 = tf.Variable(..., name="v2")
...
# Add ops to restore all the variables.
restorer = tf.train.Saver()

# Add ops to restore some variables.
restorer = tf.train.Saver([v1, v2])

# Later, launch the model, use the saver to restore variables from disk, and
# do some work with the model.
with tf.Session() as sess:
  # Restore variables from disk.
  restorer.restore(sess, "/tmp/model.ckpt")
  print("Model restored.")
  # Do some work with the model
  ...
很多时候,我们想去在一个新数据集或甚至一个新的任务上微调(fine-tune)一个已经训练好的网络。在这些情况下,我们能够使用slim的辅助函数去选择一部分的变量来进行恢复:
# Create some variables.
v1 = slim.variable(name="v1", ...)
v2 = slim.variable(name="nested/v2", ...)
...

# Get list of variables to restore (which contains only 'v2'). These are all
# equivalent methods:
variables_to_restore = slim.get_variables_by_name("v2")
# or
variables_to_restore = slim.get_variables_by_suffix("2")
# or
variables_to_restore = slim.get_variables(scope="nested")
# or
variables_to_restore = slim.get_variables_to_restore(include=["nested"])
# or
variables_to_restore = slim.get_variables_to_restore(exclude=["v1"])

# Create the saver which will be used to restore the variables.
restorer = tf.train.Saver(variables_to_restore)

with tf.Session() as sess:
  # Restore variables from disk.
  restorer.restore(sess, "/tmp/model.ckpt")
  print("Model restored.")
  # Do some work with the model
  ...
不同变量名称的模型的恢复(Restoring models with different variable names) 
当从一个checkpoint中恢复variables时,Saver会在checkpoint中寻找variable的name,并将它们映射到当前图中的variables。上面,我们在创建一个saver的时候,指定了要恢复的Variable。在这种情况下,会自动调用var.op.name来获得variables的name,然后映射、、、。
当checkpoint文件中的variable names和当前图(graph)中的variable names匹配时,恢复过程很简单。但有时checkpoint中的变量和当前图中的变量有不同的name。在这种情况下,我们必须为Saver提供一个字典,这个字典将checkpoint中的variable name映射到图中的variable。在下面的例子中,我们用了一个简单的函数来获取checkpoint中的variables names
# Assuming than 'conv1/weights' should be restored from 'vgg16/conv1/weights'
def name_in_checkpoint(var):
  return 'vgg16/' + var.op.name

# Assuming than 'conv1/weights' and 'conv1/bias' should be restored from 'conv1/params1' and 'conv1/params2'
def name_in_checkpoint(var):
  if "weights" in var.op.name:
    return var.op.name.replace("weights", "params1")
  if "bias" in var.op.name:
    return var.op.name.replace("bias", "params2")

variables_to_restore = slim.get_model_variables()
variables_to_restore = {name_in_checkpoint(var):var for var in variables_to_restore}
restorer = tf.train.Saver(variables_to_restore)

with tf.Session() as sess:
  # Restore variables from disk.
  restorer.restore(sess, "/tmp/model.ckpt")
6.4 在一个不同的任务上微调模型(Fine-Tuning a Model on a different task) 
上面的例子中,我们有一个预训练好(pre-trained)的VGG16模型。这个模型是在1000类的ImageNet数据集上训练的。但是,我们想要将它应用到只有20类的Pascal VOC数据集上。为了达到这个目的,我们可以用预训练好的模型的参数来初始化我们的新模型(除了最后一层):
# Load the Pascal VOC data
image, label = MyPascalVocDataLoader(...)
images, labels = tf.train.batch([image, label], batch_size=32)

# Create the model
predictions = vgg.vgg_16(images)

train_op = slim.learning.create_train_op(...)

# Specify where the Model, trained on ImageNet, was saved.
model_path = '/path/to/pre_trained_on_imagenet.checkpoint'

# Specify where the new model will live:
log_dir = '/path/to/my_pascal_model_dir/'

# Restore only the convolutional layers:
variables_to_restore = slim.get_variables_to_restore(exclude=['fc6', 'fc7', 'fc8'])
init_fn = slim.assign_from_checkpoint_fn(model_path, variables_to_restore)

# Start training.
slim.learning.train(train_op, log_dir, init_fn=init_fn)
slim提供了很多评价指标操作(metric operation),这些op使得模型的评估变得容易。理论上,计算评价指标的值能够被分为三部分:
初始化(Initialization):初始化评价指标相关的一些variables
聚合(Aggregation):执行很多计算评价指标需要的操作(sum等)
完成(Finalization):(可选) 执行任何计算评价指标的最终操作。例如,计算均值(means)、最小值(mins)、最大值(maxes)等。
例如,为了计算mean_absolute_error,count和total两个变量被初始化为0。在聚合过程中,我们观测(observe)一些predictions和labels,计算误差的绝对值,并且对其求和total。每一次,我们观察另一个值,count就增加一点。最后,在完成阶段,total除以count从而获得误差绝对值的均值。
下面的例子说明了定义metrics的API的使用方法。因为metrics通常在测试数据集上计算,而测试集与训练集(通常loss是在训练集上计算)是不同的,我们将假设正在使用测试数据:
images, labels = LoadTestData(...)
predictions = MyModel(images)

mae_value_op, mae_update_op = slim.metrics.streaming_mean_absolute_error(predictions, labels)
mre_value_op, mre_update_op = slim.metrics.streaming_mean_relative_error(predictions, labels)
pl_value_op, pl_update_op = slim.metrics.percentage_less(mean_relative_errors, 0.3)
正如例子所述,创建一个metric会返回两个值:一个value_op一个update_op。value_op是一个返回metric当前值的 idempotent op。update_op执行上面提及的聚合步骤(aggregation step)同时返回metric的值。
追踪每一个value_op 及update_op是非常费力的。为了处理这个问题,slim提供了两个很方便的函数:
# Aggregates the value and update ops in two lists:
value_ops, update_ops = slim.metrics.aggregate_metrics(
    slim.metrics.streaming_mean_absolute_error(predictions, labels),
    slim.metrics.streaming_mean_squared_error(predictions, labels))

# Aggregates the value and update ops in two dictionaries:
names_to_values, names_to_updates = slim.metrics.aggregate_metric_map({
    "eval/mean_absolute_error": slim.metrics.streaming_mean_absolute_error(predictions, labels),
    "eval/mean_squared_error": slim.metrics.streaming_mean_squared_error(predictions, labels),
})
实例:追踪多个评价指标(Working example: Tracking Multiple Metrics) 
import tensorflow as tf
import tensorflow.contrib.slim.nets as nets

slim = tf.contrib.slim
vgg = nets.vgg


# Load the data
images, labels = load_data(...)

# Define the network
predictions = vgg.vgg_16(images)

# Choose the metrics to compute:
names_to_values, names_to_updates = slim.metrics.aggregate_metric_map({
    "eval/mean_absolute_error": slim.metrics.streaming_mean_absolute_error(predictions, labels),
    "eval/mean_squared_error": slim.metrics.streaming_mean_squared_error(predictions, labels),
})

# Evaluate the model using 1000 batches of data:
num_batches = 1000

with tf.Session() as sess:
  sess.run(tf.global_variables_initializer())
  sess.run(tf.local_variables_initializer())

  for batch_id in range(num_batches):
    sess.run(names_to_updates.values())

  metric_values = sess.run(names_to_values.values())
  for metric, value in zip(names_to_values.keys(), metric_values):
    print('Metric %s has value: %f' % (metric, value))
评估Loop(Evaluation Loop) 
slim提供了一个评估模块(evaluation.py),这个模块包含了编写模型评估脚本(scripts)的辅助函数(这些函数定义在metric_ops.py模块)。这些函数包括周期性运行评估、在batch上计算metrics、print和summarizing metric结果。例如:
import tensorflow as tf

slim = tf.contrib.slim

# Load the data
images, labels = load_data(...)

# Define the network
predictions = MyModel(images)

# Choose the metrics to compute:
names_to_values, names_to_updates = slim.metrics.aggregate_metric_map({
    'accuracy': slim.metrics.accuracy(predictions, labels),
    'precision': slim.metrics.precision(predictions, labels),
    'recall': slim.metrics.recall(mean_relative_errors, 0.3),
})

# Create the summary ops such that they also print out to std output:
summary_ops = []
for metric_name, metric_value in names_to_values.iteritems():
  op = tf.summary.scalar(metric_name, metric_value)
  op = tf.Print(op, [metric_value], metric_name)
  summary_ops.append(op)

num_examples = 10000
batch_size = 32
num_batches = math.ceil(num_examples / float(batch_size))

# Setup the global step.
slim.get_or_create_global_step()

output_dir = ... # Where the summaries are stored.
eval_interval_secs = ... # How often to run the evaluation.
slim.evaluation.evaluation_loop(
    'local',
    checkpoint_dir,
    log_dir,
    num_evals=num_batches,
    eval_op=names_to_updates.values(),
    summary_op=tf.summary.merge(summary_ops),
    eval_interval_secs=eval_interval_secs)


 601
601


 被折叠的 条评论
为什么被折叠?
被折叠的 条评论
为什么被折叠?
 到【灌水乐园】发言


