


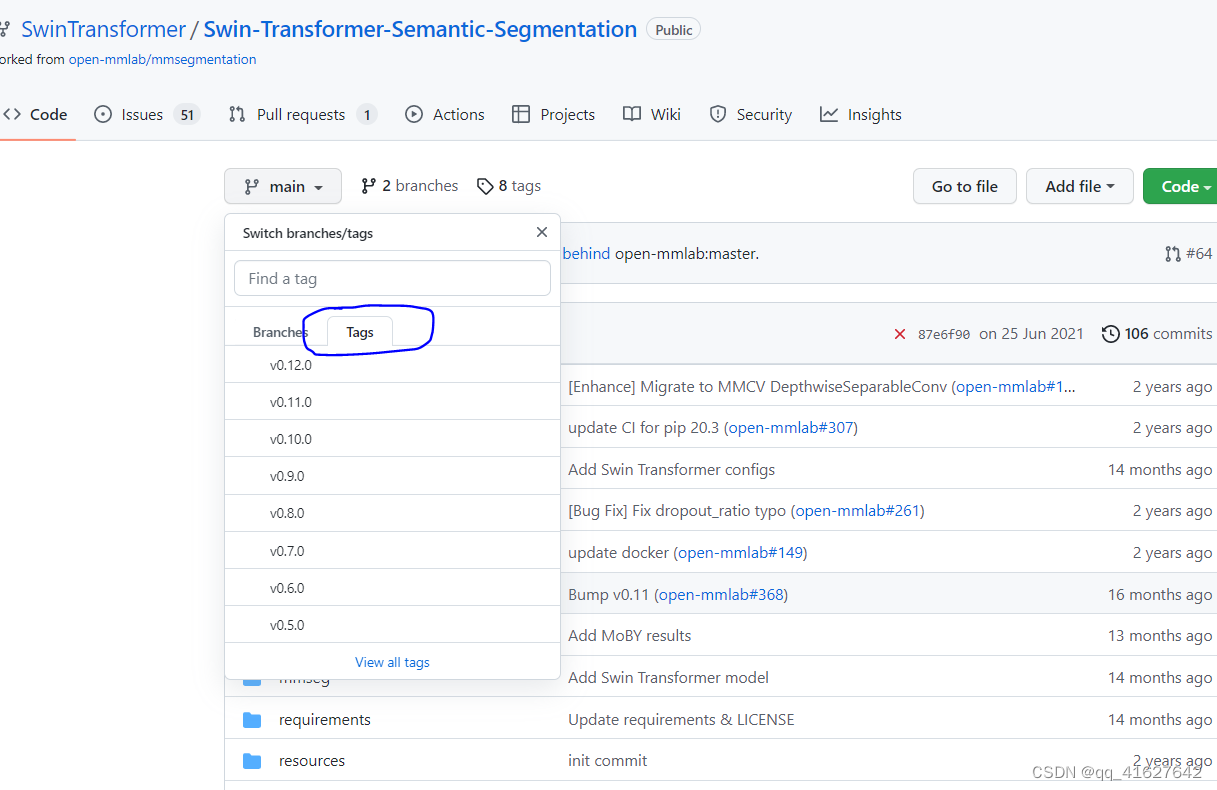
1、Swin-Transformer-Semantic-Segmentation系列版本
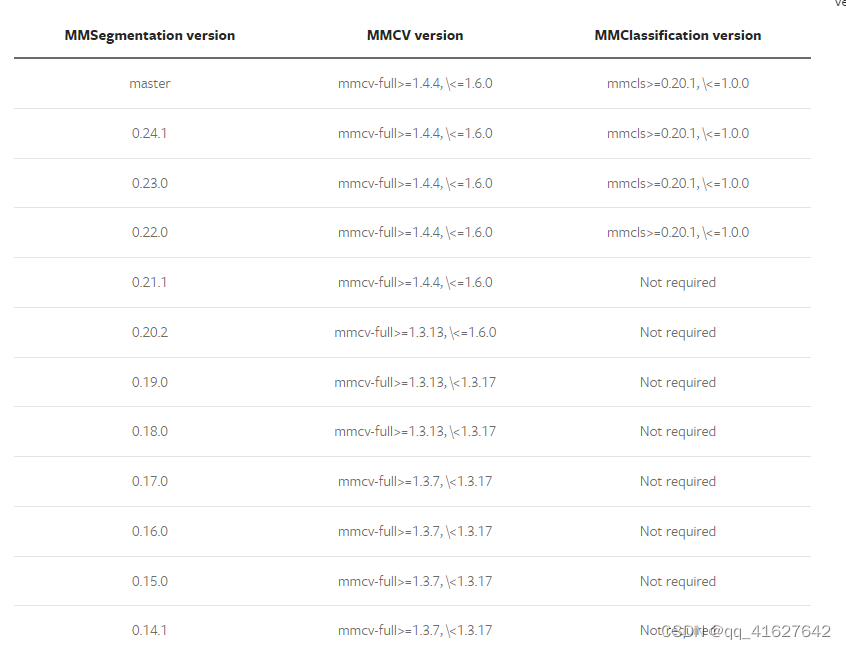
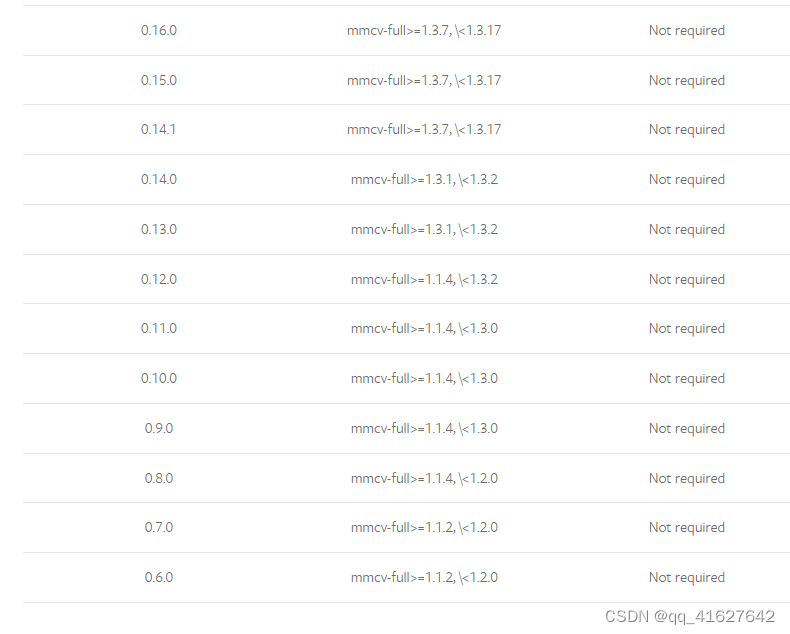
2、 兼容的MMSegmentation和MMCV版本如下。请安装正确版本的MMCV,以避免安装问题。
3、Installation(Linux系统环境安装)
1、创建虚拟环境并安装pytorch
conda create -n mmsegmention python=3.7 -y   #创建环境
source activate
conda deactivate
conda activate mmdetection                  #激活环境
conda install pytorch torchvision torchaudio cudatoolkit=10.2 -c pytorch  #安装 PyTorch and torchvision (官方)

#如果网不好,可以这样安装
pip3 install torch==1.8.2+cu102 torchvision==0.9.2+cu102 torchaudio===0.8.2 -f https://download.pytorch.org/whl/lts/1.8/torch_lts.html  -i http://mirrors.aliyun.com/pypi/simple/ --trusted-host mirrors.aliyun.com

#验证是否安装成功

>>> import torchvision
>>> import torch
>>> import.__version__
  File "<stdin>", line 1
    import.__version__
          ^
SyntaxError: invalid syntax
>>> torch.__version__
'1.8.2+cu102'
2、安装mmcv-full
下面是cuda、pytorch和mmcv-full的版本
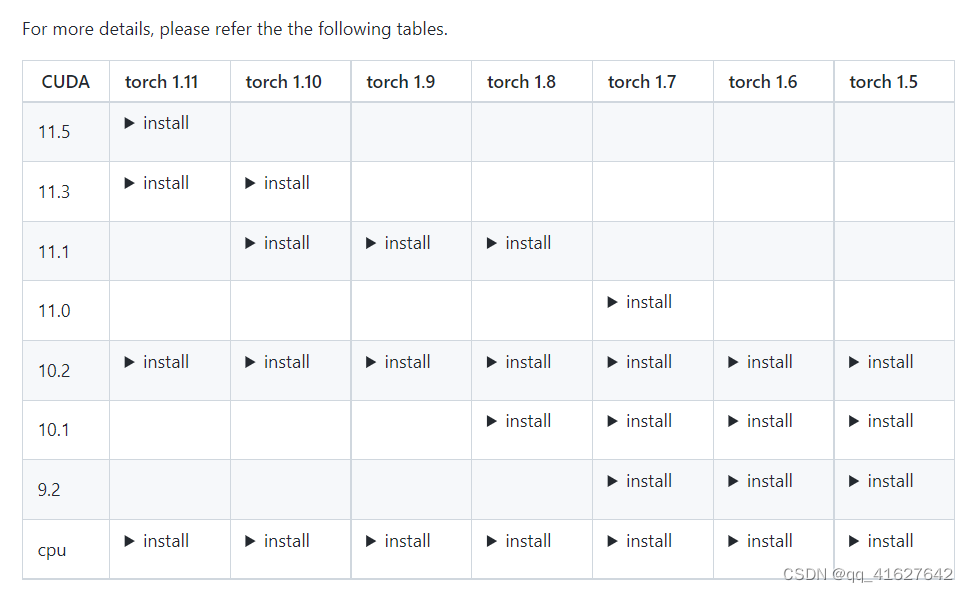
可查看cu102-torch1.8.0支持的mmcv版本号
可查看cu102-torch1.6.0支持的mmcv版本号
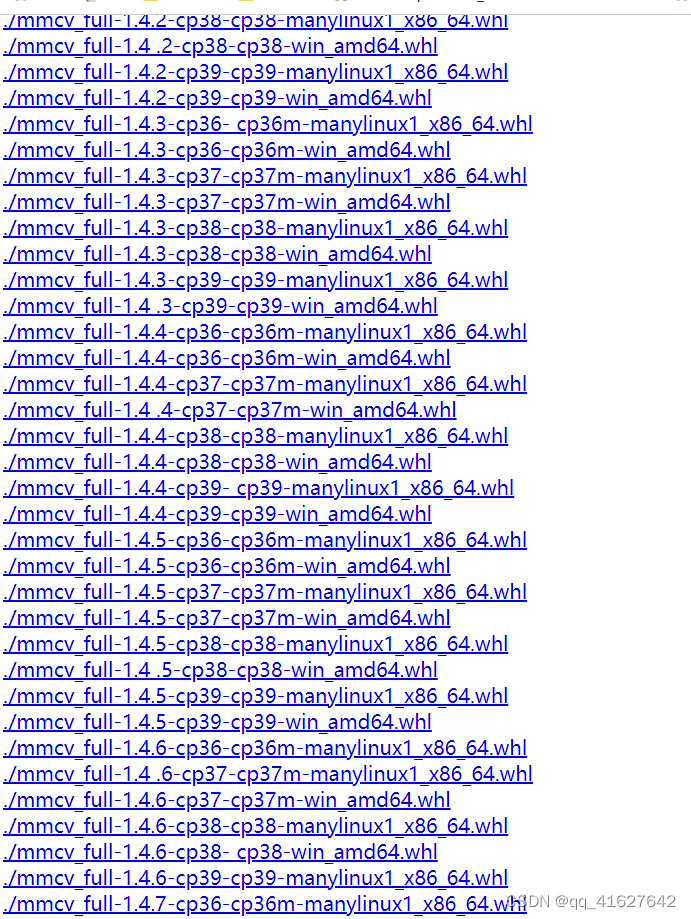
注意:上面提供的预构建包不包括所有版本的mmcv-full,您可以单击相应的链接来查看支持的版本。例如,您可以单击cu102-torch1.8.0,可以看到cu102-torch1.8.0只提供1.3.0及以上版本的mmcv-full。此外,从v1.3.17开始,我们不再提供使用PyTorch 1.3 & 1.4编译的完整mmcv预构建包。您可以在这里找到使用PyTorch 1.3和1.4编译的以前版本。在我们的Cl中仍然确保了兼容性,但我们将在明年放弃对PyTorch 1.3和1.4的支持。
#Install mmcv-full. 安装mmcv-full
pip install mmcv-full -f https://download.openmmlab.com/mmcv/dist/{cu_version}/{torch_version}/index.html

Please replace {cu_version} and {torch_version} in the url to your desired one. For example, to install the latest mmcv-full with CUDA 11.0 and PyTorch 1.7.0, use the following command:

#案例1:(安装最新版本)
pip install mmcv-full -f https://download.openmmlab.com/mmcv/dist/cu110/torch1.7.0/index.html
pip install mmcv-full -f https://download.openmmlab.com/mmcv/dist/cu102/torch1.8.0/index.html

#案例2:(安装特定版本)
pip install mmcv-full==1.3.13 -f https://download.openmmlab.com/mmcv/dist/cu111/torch1.9.0/index.html #明确mmcv-full的版本号

pip install mmcv-full==1.4.4 -f https://download.openmmlab.com/mmcv/dist/cu102/torch1.8.0/index.html -i http://mirrors.aliyun.com/pypi/simple/ --trusted-host mirrors.aliyun.com #(镜像加速安装最新版本)

#验证是否安装成功
import mmcv

#如果出现
>>> import mmcv
No CUDA runtime is found, using CUDA_HOME='/usr/local/cuda-10.2'

#我们去看看驱动:
nvidia-smi

如果返回NVIDIA驱动失效简单解决方案:NVIDIA-SMI has failed because it couldn‘t communicate with the NVIDIA driver.

这种情况是由于重启服务器,linux内核升级导致的,由于linux内核升级,之前的Nvidia驱动就不匹配连接了,但是此时Nvidia驱动还在,可以通过命令 nvcc -V 找到答案。


#解决方法:
查看已安装驱动的版本信息
ls /usr/src | grep nvidia
(mmdetection) lhy@thales-Super-Server:~$ ls /usr/src | grep nvidia
nvidia-440.33.01


#进行下列操作
sudo apt-get install dkms
sudo dkms install -m nvidia -v 440.33.01


#然后进行验证:
(mmdetection) lhy@thales-Super-Server:~$ nvidia-smi
Fri May  6 00:56:02 2022
+-----------------------------------------------------------------------------+
| NVIDIA-SMI 440.33.01    Driver Version: 440.33.01    CUDA Version: 10.2     |
|-------------------------------+----------------------+----------------------+
| GPU  Name        Persistence-M| Bus-Id        Disp.A | Volatile Uncorr. ECC |
| Fan  Temp  Perf  Pwr:Usage/Cap|         Memory-Usage | GPU-Util  Compute M. |
|===============================+======================+======================|
|   0  TITAN RTX           Off  | 00000000:02:00.0 Off |                  N/A |
|  0%   47C    P0    54W / 280W |      0MiB / 24220MiB |      0%      Default |
+-------------------------------+----------------------+----------------------+
|   1  TITAN RTX           Off  | 00000000:03:00.0 Off |                  N/A |
|  0%   47C    P0    65W / 280W |      0MiB / 24220MiB |      0%      Default |
+-------------------------------+----------------------+----------------------+
|   2  TITAN RTX           Off  | 00000000:82:00.0 Off |                  N/A |
|  0%   48C    P0    63W / 280W |      0MiB / 24220MiB |      1%      Default |
+-------------------------------+----------------------+----------------------+
|   3  TITAN RTX           Off  | 00000000:83:00.0 Off |                  N/A |
|  0%   46C    P0    42W / 280W |      0MiB / 24220MiB |      0%      Default |
+-------------------------------+----------------------+----------------------+

+-----------------------------------------------------------------------------+
| Processes:                                                       GPU Memory |
|  GPU       PID   Type   Process name                             Usage      |
|=============================================================================|
|  No running processes found                                                 |
+-----------------------------------------------------------------------------+
(mmdetection) lhy@thales-Super-Server:~$ python
Python 3.7.13 (default, Mar 29 2022, 02:18:16)
[GCC 7.5.0] :: Anaconda, Inc. on linux
Type "help", "copyright", "credits" or "license" for more information.
>>> import mmcv
>>> mmcv.__version__
'1.4.4'
3、MMSegmention安装
git clone https://github.com/open-mmlab/mmsegmentation.git
cd mmsegmentation

安装构建要求,然后安装mmdetection。(我们通过github repo安装pycocotools而不是pypi,因为pypi版本较旧并且与最新的numpy不兼容。)
pip install cython  -i http://mirrors.aliyun.com/pypi/simple/  --trusted-host mirrors.aliyun.com
pip install -r requirements.txt -i http://mirrors.aliyun.com/pypi/simple/ --trusted-host mirrors.aliyun.com


 pip install "git+https://github.com/cocodataset/cocoapi.git#subdirectory=PythonAPI"
如果网不好,可以按照下面的步骤安装
git clone https://github.com/cocodataset/cocoapi.git
cd cocoapi/PythonAPI
python setup.py build_ext --inplace
python setup.py build_ext install


pip install -e .  # or "python setup.py develop"
Using /home/lhy/anaconda3/envs/mmsegmention/lib/python3.7/site-packages
Finished processing dependencies for mmsegmentation==0.24.1
4、使用多个MMSegmentation版本
进行模型训练和测试脚本已经修改了PYTHONPATH,以确保脚本使用当前目录中的MMSegmentation。要使用在环境中安装的默认MMSegmentation,而不是你正在使用的那个,你可以删除那些脚本中的下面一行。
PYTHONPATH="$(dirname $0)/..":$PYTHONPAT
4、下载code和预训练模型
git clone https://github.com/SwinTransformer/Swin-Transformer-Semantic-Segmentation.git
5、测试环境
为了验证MMSegmentation和所需的环境是否正确安装,我们可以运行示例python代码来初始化一个检测器并推断一个演示图像:
from mmseg.apis import inference_segmentor, init_segmentor
import mmcv

config_file = 'configs/pspnet/pspnet_r50-d8_512x1024_40k_cityscapes.py'
checkpoint_file = 'checkpoints/pspnet_r50-d8_512x1024_40k_cityscapes_20200605_003338-2966598c.pth'

# build the model from a config file and a checkpoint file
model = init_segmentor(config_file, checkpoint_file, device='cuda:0')

# test a single image and show the results
img = 'test.jpg'  # or img = mmcv.imread(img), which will only load it once
result = inference_segmentor(model, img)
# visualize the results in a new window
model.show_result(img, result, show=True)
# or save the visualization results to image files
model.show_result(img, result, out_file='result.jpg')

# test a video and show the results
video = mmcv.VideoReader('video.mp4')
for frame in video:
   result = inference_segmentor(model, frame)
   model.show_result(frame, result, wait_time=1)
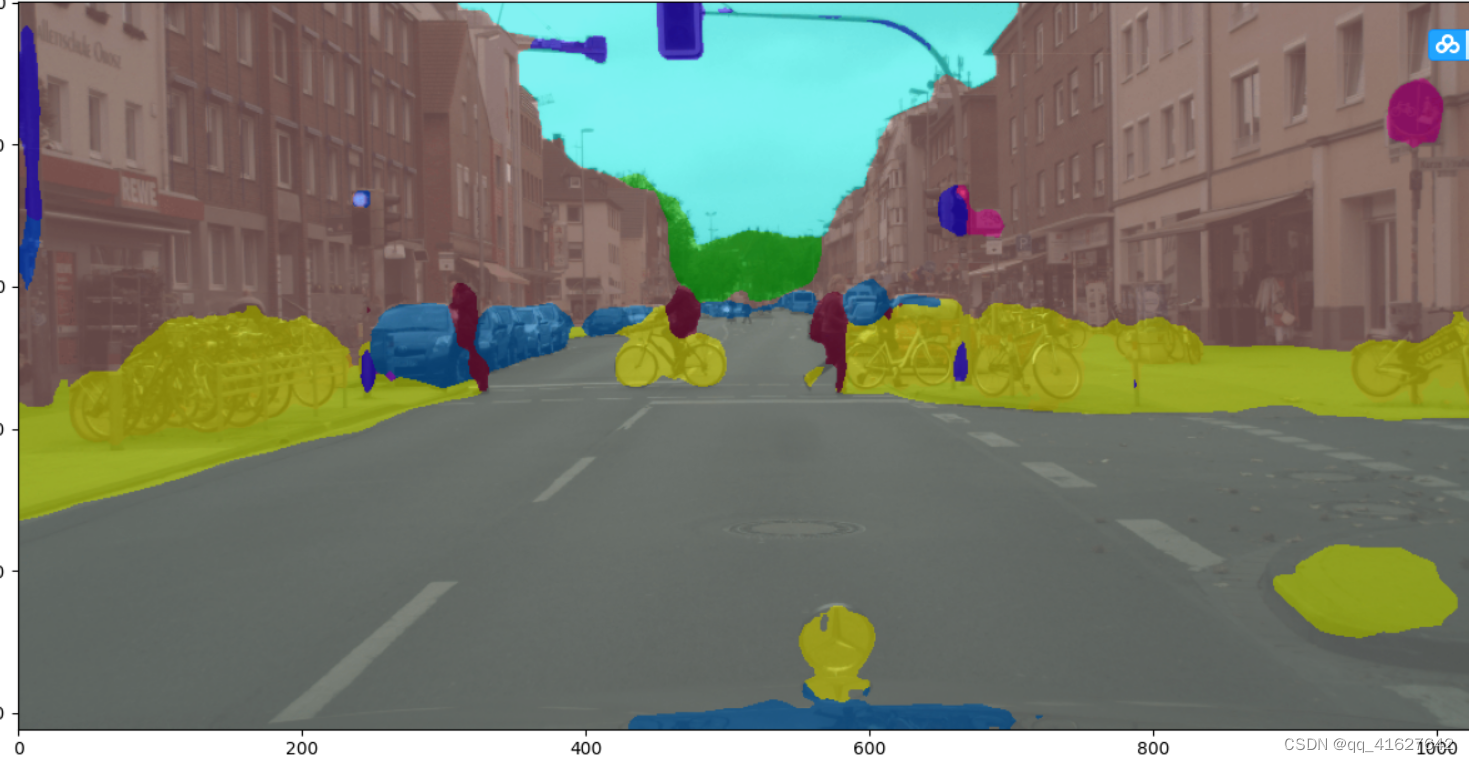
上面的代码应该在您完成安装后成功运行。我们还提供了一个演示脚本来测试单个图像。
python demo/image_demo.py ${IMAGE_FILE} ${CONFIG_FILE} ${CHECKPOINT_FILE} [--device ${DEVICE_NAME}] [--palette-thr ${PALETTE}]
IMAGE_FILE :输入的图片;
CONFIG_FILE:配置文件;
CHECKPOINT_FILE:预训练模型;
DEVICE_NAME:CPU OR GPU
Examples:
python demo/image_demo.py demo/demo.jpg configs/pspnet/pspnet_r50-d8_512x1024_40k_cityscapes.py checkpoints/pspnet_r50-d8_512x1024_40k_cityscapes_20200605_003338-2966598c.pth --device cuda:0 --palette cityscapes
python demo/image_demo.py demo/demo.png configs/swin/upernet_swin_tiny_patch4_window7_512x512_160k_ade20k.py upernet_swin_tiny_patch4_window7_512x512.pth --palette ade
程序报错显示:
解决TypeError: SwinTransformer: init() got an unexpected keyword argument ‘embed_dim‘
TypeError: EncoderDecoder: SwinTransformer: __init__() got an unexpected keyword argument 'embed_dim'
报错原因:
在不同目录下它寻找的mmseg包不同
在swin_master/(你的项目)目录下它会寻找该项目内本来包含的mmdet文件夹
但是在swin_master/tools文件夹下,它会寻找openmmlab环境中的mmseg
解决方法:
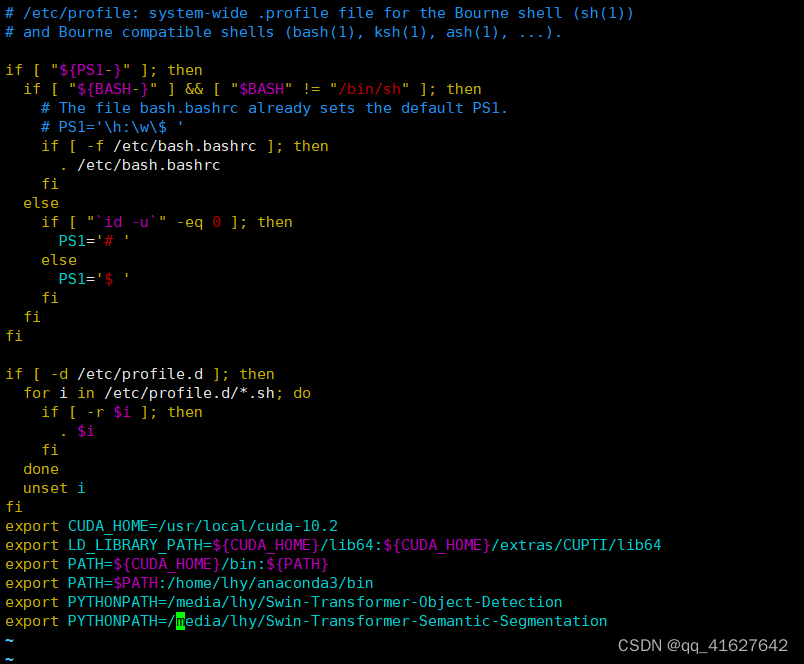
设置环境变量
指定它去该目录下寻找mmdet包
这样即使使用单GPU也可以测试
进入配置信息 sudo vi /etc/profile
再次运行又出现了版本问题

ssertionError: MMCV==1.4.4 is used but incompatible. Please install mmcv>=[1, 1, 4], <=[1, 3, 0].
原因是这个版本目前只达到了0.12.0,所以mmcv需要降到相应的版本

卸载重新安装MMCV
pip uninstall mmcv-full
pip install mmcv-full==1.3.0 -f https://download.openmmlab.com/mmcv/dist/cu102/torch1.8.0/index.html -i http://mirrors.aliyun.com/pypi/simple/ --trusted-host mirrors.aliyun.com

pip install mmcv-full==1.3.0 -f https://download.openmmlab.com/mmcv/dist/cu102/torch1.8.0/index.html -i http://mirrors.aliyun.com/pypi/simple/ --trusted-host mirrors.aliyun.com
安装其他库
linux chown命令解除文件夹的root权限限制
sudo chown -R demouser file
这个命令可以解除linux文件的超级权限限制
1、安装gdal
添加源
sudo add-apt-repository ppa:ubuntugis && sudo apt update
conda install gdal
验证库安装成功
>>> from osgeo import gdal
>>> from osgeo import ogr
>>> from osgeo import osr
2、安装scikit-image
pip install scikit-image -i https://pypi.tuna.tsinghua.edu.cn/simple


 1086
1086


 被折叠的 条评论
为什么被折叠?
被折叠的 条评论
为什么被折叠?
 到【灌水乐园】发言


