


1、MMSegmentation 算法库目录结构的主要部分
1、mmsegmentation
|
|- configs # 配置文件
| |- base ## 基配置文件
| | |- datasets ### 数据集相关配置文件
| | |- models ### 模型相关配置文件
| | |- schedules ### 训练日程如优化器,学习率等相关配置文件
| | |- default_runtime.py ### 运行相关的默认的设置
| |- swin ## 各个分割模型的配置文件,会引用 base 的配置并做修改
| |- …
|- data # 原始及转换后的数据集文件
|- mmseg
| |- core ## 核心组件
| | |- evaluation ### 评估模型性能代码
| |- datasets ## 数据集相关代码
| | |- pipelines ### 数据预处理
| | |- samplers ### 数据集采样代码
| | |- ade.py ### 各个数据集准备需要的代码
| | |- …
| |- models ## 分割模型具体实现代码
| | |- backbones ### 主干网络
| | |- decode_heads ### 解码头
| | |- losses ### 损失函数
| | |- necks ### 颈
| | |- segmentors ### 构建完整分割网络的代码
| | |- utils ### 构建模型时的辅助工具
| |- apis ## high level 用户接口,在这里调用 ./mmseg/ 内各个组件
| | |- train.py ### 训练接口
| | |- test.py ### 测试接口
| | |- …
| |- ops ## cuda 算子(即将迁移到 mmcv 中)
| |- utils ## 辅助工具
|- tools
| |- model_converters ## 各个主干网络预训练模型转 key 脚本
| |- convert_datasets ## 各个数据集准备转换脚本
| |- train.py ## 训练脚本
| |- test.py ## 测试脚本
| |- …
|- …
2、 MMSegmentation 模型实现
1、Segmentor
MMSegmentation 中将语义分割模型定义为 segmentor, 一般包括 backbone、neck、head、loss 4 个核心组件,每个模块的功能如下:
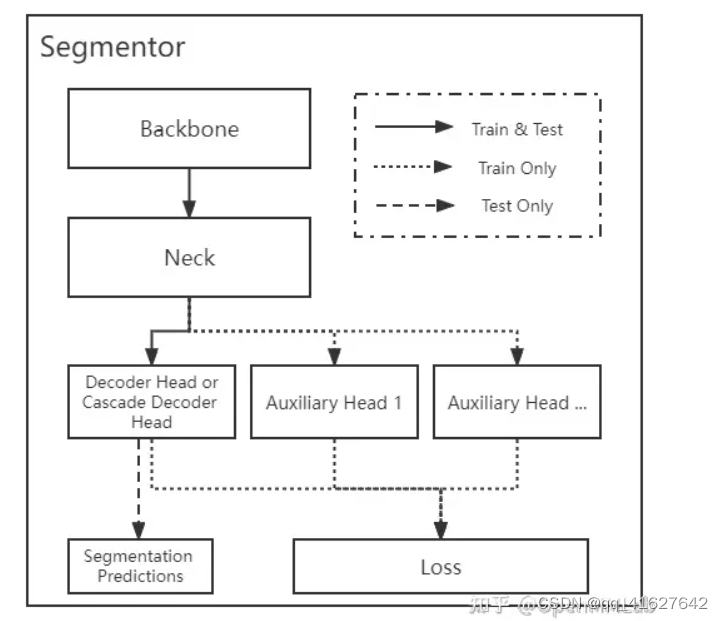
Backone:预处理后的数据输入到 backbone( 如 ResNet 和 Swin Transformer )中进行编码并提取特征;
neck:输出的单尺度或者多尺度特征图输入到 neck 模块中进行特征融合或者增强,典型的 neck 是 特征金字塔 (Feature Pyramid Networks, FPN)。
**head:**上述多尺度特征最终输入到 head 部分,一般包括 decoder head,auxiliary head 以及 cascade ,decoder head用以预测分割结果(它们的区别我们会在下文具体介绍)。
**loss:**最后一步是计算 pixel 分类的 loss,进行训练。
需要说明的是,上述 4 个组件不是每个算法都需要的,比如很多模型里没有 neck 和 auxiliary head 组件。分割器 segmentor 的具体代码见文件 ./mmseg/models/segmentors/。
MMSegmentation 里面的分割器框架可以分为 “Encoder Decoder” 结构和 “Cascade Encoder Decoder” 结构。现有的大多数模型为 “Encoder Decoder” 结构,即利用 encoder 提取图像特征,再用 decoder 去解码上述特征。 “Cascade Encoder Decoder” 的解码部分不是单独的解码头,而是级联式的 2 个或多个解码头,前一个解码头的输出作为后一个解码头的输入。
关于分割器 segmentor 的训练和测试的基本逻辑,以语义分割经典的 “Encoder Decoder” 结构为例:
class EncoderDecoder(BaseSegmentor):
   def __init__(...):
        # 构建 backbone、neck 和 head
        self.backbone = build_backbone(backbone)
        if neck is not None:
            self.neck = build_neck(neck)
        self._init_decode_head(decode_head)
        self._init_auxiliary_head(auxiliary_head)
  def forward_train(...):
        # 利用 backbone+neck 进行特征提取
        x = self.extract_feat(img)
        losses = dict()
        # decode head 输出预测特征图并计算出 loss
        loss_decode = self._decode_head_forward_train(x, img_metas,
                                                      gt_semantic_seg)
        losses.update(loss_decode)
        # auxiliary heads 输出预测特征图并计算出 loss
        if self.with_auxiliary_head:
            loss_aux = self._auxiliary_head_forward_train(
                x, img_metas, gt_semantic_seg)
            losses.update(loss_aux)
        return losses

  def simple_test(...):
        # 调用 inference 函数,对输入图片做全图或者滑动窗口的推理,得到 logits 值
        seg_logit = self.inference(img, img_meta, rescale)
        # 做 argmax 得到预测的 prediction mask
        seg_pred = seg_logit.argmax(dim=1)

   def aug_test(...):
        ...
EncoderDecoder 里面分别定义了训练和测试的接口,训练时调用 forward_train() 返回一个 dict,包含各种 loss ,测试时则会调用 simple_test() 或者测试时数据增广的 aug_test(),只返回预测的分割结果。
训练时预测结果并计算 loss 的主要逻辑是在 _decode_head_forward_train 中实现:
ef _decode_head_forward_train(...):
    # 调用每个 head 自身的 forward_train 方法, 并计算出 loss
 losses = dict()
    loss_decode = self.decode_head.forward_train(x, img_metas,
                                                 gt_semantic_seg,
                                                 self.train_cfg)

    losses.update(add_prefix(loss_decode, 'decode'))
    # 返回
    return losses
对于不同的 head,都可以抽象为:seg_logits = self.forward(inputs) ,即:网络前传得到预测的 logtis 值,然后再计算各个 head 的对应 loss:
def forward_train(...):
 seg_logits = self.forward(inputs)
    losses = self.losses(seg_logits, gt_semantic_seg)
    return losses

def losses(self, seg_logit, seg_label):
 loss = dict()
    seg_logit = resize( # 将预测得到的 logits 值 resize 成原图大小
        input=seg_logit,
        size=seg_label.shape[2:],
        mode='bilinear',
        align_corners=self.align_corners)
    ....
    for loss_decode in losses_decode: # 分别计算这个 decode head 中的各个 loss
        if loss_decode.loss_name not in loss:
            loss[loss_decode.loss_name] = loss_decode(
                seg_logit,
                seg_label,
                weight=seg_weight,
                ignore_index=self.ignore_index)
        else:
            loss[loss_decode.loss_name] += loss_decode(
                seg_logit,
                seg_label,
                weight=seg_weight,
                ignore_index=self.ignore_index)
    ....
    return loss
Backbone
目前 MMSegmengtation 中已经集成了大部分主干网络,具体见文件 ./mmseg/models/backbones/,v0.24.1 已经实现的骨架如下:
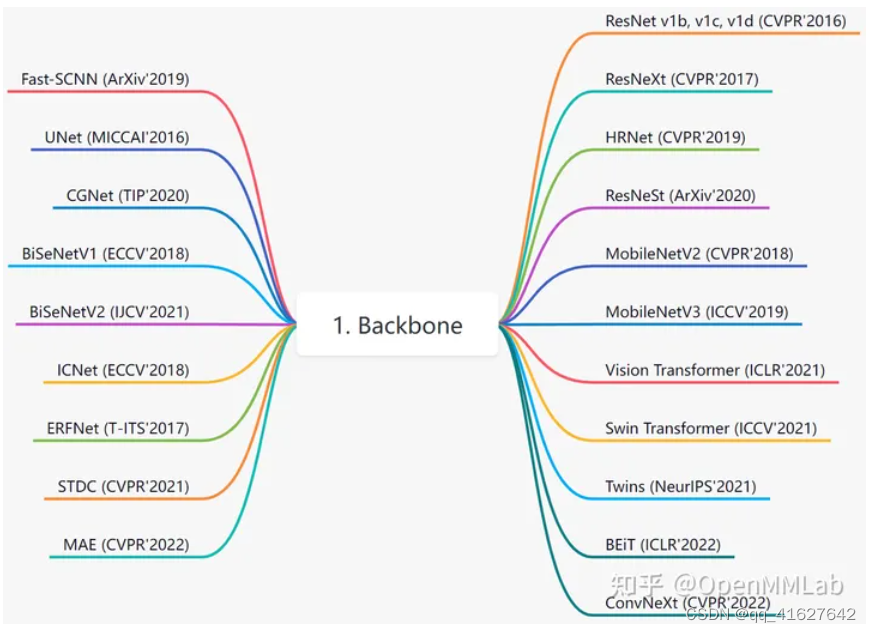
通常定义的“主干网络” 是指从上游任务(如 ImageNet )预训练,然后用于多个下游任务(如目标检测、实例分割、语义分割、姿态估计)中的网络,而在 ./mmseg/models/backbones 里主干网络的定义有所不同,会把一些分割算法的网络结构也作为“主干网络”,如 UNet、 FastSCNN、CGNet、ICNet、BiSeNetV1/V2、ERFNet、STDC。
其中最常用的是 ResNet v1c 系列和 Vision Transformer 系列。如果你需要对骨架进行扩展,可以继承上述网络,然后通过注册器机制注册使用。一个典型用法为 ./configs/base/models/segmenter_vit-b16_mask.py 里面的:
checkpoint = 'https://download.openmmlab.com/mmsegmentation/v0.5/pretrain/segmenter/vit_base_p16_384_20220308-96dfe169.pth'  # noqa
# model settings
model = dict(
    type='EncoderDecoder',
    pretrained=checkpoint, # 加载的预训练模型,这里为 Google Research提供的由 JAX 训练框架得到的 Vision Transformer
    backbone=dict(
        type='VisionTransformer', # 骨架类名,后面的参数都是该类的初始化参数
        img_size=(512, 512),
        patch_size=16,
        in_channels=3,
        embed_dims=768,
        num_layers=12,
        num_heads=12,
        drop_path_rate=0.1,
        attn_drop_rate=0.0,
        drop_rate=0.0,
        final_norm=True,
        norm_cfg= dict(type='LN', eps=1e-6, requires_grad=True),
        with_cls_token=True,
        interpolate_mode='bicubic',
    ),
同 OpenMMLab 其他算法库一样,我们使用了 MMCV 中的模块注册机制,通过修改配置文件的 type ,可以使用在 MMSegmentation 已经实现的 backbone 模型。此外,还可以使用 MMClassification 里面的更多主干网络,如 ShuffleNet、EfficientNet 等,可根据 ./configs/convnext 里面 ConvNeXt 的实现方式,详细的方式可以参考: MMDet居然能用MMCls的Backbone?论配置文件的打开方式
在 mmdet 中调用 mmcls 的 backbone
使用过 OpenMMLab 旗下开源软件,如 mmdet、mmseg 的读者们,一定知道在这些软件中,我们通过配置文件来定义深度学习任务的方方面面,比如模型结构、训练所使用的优化器、数据集等。
以 Yolo V3 模型结构为例,典型的配置文件是这样的:
model = dict(
    type='YOLOV3',
    backbone=dict(
        type='MobileNetV2',
        out_indices=(2, 4, 6),
        ...),
    neck=dict(
        type='YOLOV3Neck',
        num_scales=3,
        in_channels=[320, 96, 32],
        out_channels=[96, 96, 96]),
    ...
)
通常,在检测任务中,我们会使用一个主干网络来提取图片的特征。而由于图片特征提取对于各类图像任务是较为通用的需要,因而可以“借用”在分类任务中预训练的主干网络和相应的模型权重。因为分类任务比较简单,故而可以利用庞大的 ImageNet 数据集进行预训练,而在此基础上进一步训练检测网络,既能够提高模型收敛速度,又能够提高精度。
假设现在我们想要使用一个 MMDetection 中没有实现的主干网络进行特征提取,我们当然可以直接在 mmdet 中实现这个主干网络,但如果这个主干网络在分类代码库 MMClassification 中已经实现了,我们是可以直接通过修改配置文件来跨库调用的。比如我们想把上述 Yolo V3 中的主干网络从 MobileNet V2 换成 MobileNet V3,但 mmdet 还没有 Mobilenet V3 的实现,可以使用如下配置:
# 直接继承 yolo v3 的原始配置
_base_ = "./yolov3_mobilenetv2_320_300e_coco.py"

# 因为 mmdet 中没有 import mmcls
# 因而其中的主干网络并不会被注册到管理器中
# 这里我们需要手动用 custom_imports 来指定额外的导入
# 从而注册 mmcls 中的主干网络
custom_imports=dict(imports='mmcls.models', allow_failed_imports=False)
model = dict(
    backbone=dict(
        # 使用 "scope.type" 的语法,指定从 mmcls 中寻找需要的模块
        type='mmcls.MobileNetV3',
        # MobileNet V3 的其他设置
        arch='large',
        out_indices=(5, 11, 14),
        init_cfg=dict(
            type='Pretrained',
            checkpoint='mmcls://mobilenet_v3_large'),
        # 配置文件与继承的配置文件中相同字段的字典,默认会融合
        # 这里使用 `_delete_` 来删除继承的配置文件中的其他配置
        _delete_=True),
    # 主干网络发生变化,其他相应的配置也需要改变
    neck=dict(in_channels=[160, 112, 40])
)
跨代码库调用机制
在 OpenMMLab 的 cfg 模式和 Registry 机制 一文中,我们简要介绍了关于 config 文件和 Registry 的架构和实现。而在这里,我们将从上文中跨仓库调用中涉及的两个关键点,来更进一步地了解 config 和 Registry 一些高级用法和实现。
custom_imports
通常, 在 import 相应模块时, 都会过一遍相应的定义被装饰对象的代码, 此时装饰器就已经运行了. 例如, 对于 mmdet 的 AnchorGenerator, SSDAnchorGenerator 这些类, 他们是在何时注册到 ANCHOR_GENERATORS 这个 Registry 类实例中的? *在 train.py 执行 from mmdet.core import DistEvalHook, EvalHook 时, 会调用并执行 mmdet/core/init.py 中的 from .anchor import , 进而会调用并执行 mmdet/core/anchor/init.py 中的 from .anchor_generator import (AnchorGenerator, LegacyAnchorGenerator, YOLOAnchorGenerator), 从而完成 AnchorGenerator, SSDAnchorGenerator 这些类的注册.
也就是说只要 import 了相应的模块,模块中所有包含的类都会被注册到对应的 Registry 中。那么问题来了,这些模块是在何时被 import 的呢?答案很简单,就是在我们代码执行的入口程序 tools/train.py 和 tools/test.py 中。以 MMClassification 中的 tools/train.py 为例:
...
from mmcv.runner import get_dist_info, init_dist
...
from mmcls.datasets import build_dataset
from mmcls.models import build_classifier
通过导入 mmcv.runner 包,完成了 mmcv/runner/init.py 中一系列执行器、钩子、优化器等类的注册。通过导入 mmcls.datasets 包,完成了mmcls/datasets/init.py 中一系列数据集的注册。通过导入mmcls.models 包,完成了mmcls/models/init.py中一系列主干网络、颈部头部函数的注册。
当然,注册不一定仅仅发生在入口程序的最外层,比如在入口程序中没有导入数据处理和增强相关的包,这些类是在执行 build_dataset 时,在 mmcls/datasets/base_dataset.py 中进行的注册。
因此,Registry 的注册其实没有什么魔法,就是单纯地通过在入口程序中导入相应的包,在导入过程中完成的注册。这也就为我们的跨代码库调用带来了第一个问题,入口程序中当然不会导入与自己无关的另外一个库中的包,那怎么注册我们我需要的类呢?修改入口程序当然是一种办法,但 MMCV 中提供了更直接的在配置文件中显式导入自定义包的方法 —— custom_imports
custom_imports=dict(imports='mmcls.models', allow_failed_imports=False)
只要在配置文件中加入这么一行,MMCV 在解析配置文件时,会自动调用 mmcv.import_modules_from_strings 函数,借助 Python 的 importlib.import_module 函数实现包的导入,进而完成对应的一系列类的注册
Neck
neck 可以认为是 backbone 和 head 的连接层,主要负责对 backbone 的特征进行高效融合和增强,能够对输入的单尺度或者多尺度特征进行融合、增强输出等。具体见文件 ./mmseg/models/necks/,v0.24.1 已经实现的 neck 如下:

最常用的应该是 FPN,一个典型用法是 ./configs/base/models/pointrend_r50.py 里面:
neck=dict(
    type='FPN',
    in_channels=[256, 512, 1024, 2048], # 骨架多尺度特征图输出通道
    out_channels=256, # 增强后通道输出
    num_outs=4), # 输出num_outs个多尺度特征图
Head
MMSegmentation 的 head 是用来处理 backbone 或 neck 的特征图,对图像里的每个像素 pixel 做分类然后得到分类的结果。具体见文件 ./mmseg/models/decode_heads/,v0.24.1 已经实现的 head 如下:

虽然它们都是用来解码特征图中的信息,但在使用上,可以将它们分为 decoder head,auxiliary head 以及 cascade decoder head:
decoder head 是直接在训练和推理中作为图像预测输出的 head。
auxiliary head 是只在训练过程中输出图像预测用来辅助损失函数计算的 head。
cascade decoder head 是指级联式的2个或多个解码头,前一个解码头的输出作为后一个解码头的输入, OCRNet 和 PointRend 两种算法就使用了 cascade decoder head。
在 MMSegmentation 里每个 head 自己单独计算损失,所以把这个公共的行为抽象成了一个基类: BaseDecodeHead,每个算法的 head 都继承自这个基类,类里面包括了计算 loss 的函数,用于计算 head 输出的 logits 值和 label 的损失。
Loss
MMSegmentation 里的 loss 计算的是每个像素上的 logits 和分割标签之间的差别,使用最多的是 cross entropy loss 和 dice loss,v0.24.1 已经实现的 loss 如下:
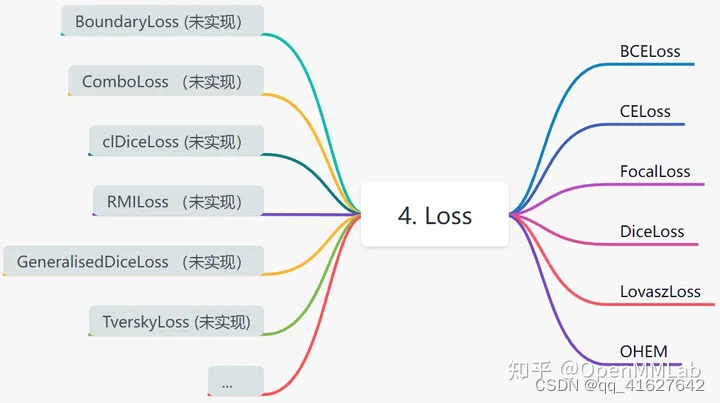
除了 ./mmseg/models/losses/ 里的这些 loss 外,计算 loss 时还可以用到一些策略和方法,比如:在线难样本挖掘策略 (OHEM, Online Hard Example Mining) 。
2、 配置文件简介
1、配置文件基本结构
在config/base、dataset、model、schedule、default_runtime下有4种基本组件类型。许多方法都可以很容易地用每一个方法构造,比如DeepLabV3, PSPNet。由来自_base_的组件组成的配置。
为了便于理解,我们建议贡献者继承现有的方法。例如,如果在DeepLabV3基础上做了一些修改,用户可以首先通过指定_base_= …/ DeepLabV3 /deeplabv3_r50_512x1024_40ki_cityscapes.py继承基本的DeepLabV3结构,然后修改配置文件中必要的字段。
如果您正在构建一个全新的方法,它不与任何现有方法共享结构,您可以在configs下创建一个文件夹xxxnet,请参考mmcv获得详细的文档添加链接描述。
2、 打印查看和更新配置文件
1、查看完整的配置文件
python tools/print_config.py /PATH/TO/CONFIG
2、更新配置文件
.You may also pass --cfg-options xxx.yyy=zzz to see updated config.
3、配置名称的命名风格
我们遵循下面的风格来命名配置文件。建议贡献者遵循相同的风格
{model}_{backbone}_[misc]_[gpu x batch_per_gpu]_{resolution}_{iterations}_{dataset}
{xxx} is required field and [yyy] is optional.
{model}: model type like psp, deeplabv3, etc.
{backbone}: backbone type like r50 (ResNet-50), x101 (ResNeXt-101).
[misc]: miscellaneous setting/plugins of model, e.g. dconv, gcb, attention, mstrain.
[gpu x batch_per_gpu]: GPUs and samples per GPU, 8x2 is used by default.
{iterations}: number of training iterations like 160k.
{dataset}: dataset like cityscapes, voc12aug, ade.
3、An Example of PSPNet
为了帮助用户对现代语义切分系统的完整配置和模块有一个基本的认识,我们对使用ResNet50V1c的PSPNet的配置做了简要的评述。要了解每个模块的更详细用法和相应的替代方案,请参阅API文档。
norm_cfg = dict(type='SyncBN', requires_grad=True)  # Segmentation usually uses SyncBN,分割多GPU训练通常使用SyncBN,单个GPU使用BN.
model = dict(
    type='EncoderDecoder',  # Name of segmentor,分割器的名称
    pretrained='open-mmlab://resnet50_v1c',  # The ImageNet pretrained backbone to be loaded,ImageNet预训练的主干网将被加载
    backbone=dict(
        type='ResNetV1c',  # The type of backbone. Please refer to mmseg/models/backbones/resnet.py for details.
        depth=50,  # Depth of backbone. Normally 50, 101 are used.
        num_stages=4,  # Number of stages of backbone.
        out_indices=(0, 1, 2, 3),  # The index of output feature maps produced in each stages.
        dilations=(1, 1, 2, 4),  # The dilation rate of each layer.各层的膨胀率
        strides=(1, 2, 1, 1),  # The stride of each layer.
        norm_cfg=dict(  # The configuration of norm layer.规范层配置
            type='SyncBN',  # Type of norm layer. Usually it is SyncBN.
            requires_grad=True),   # Whether to train the gamma and beta in norm
        norm_eval=False,  # Whether to freeze the statistics in BN
        style='pytorch',  # The style of backbone, 'pytorch' means that stride 2 layers are in 3x3 conv, 'caffe' means stride 2 layers are in 1x1 convs.
        contract_dilation=True),  # When dilation > 1, whether contract first layer of dilation.
    decode_head=dict(
        type='PSPHead',  # Type of decode head. Please refer to mmseg/models/decode_heads for available options.
        in_channels=2048,  # Input channel of decode head.
        in_index=3,  # The index of feature map to select.
        channels=512,  # The intermediate channels of decode head.
        pool_scales=(1, 2, 3, 6),  # The avg pooling scales of PSPHead. Please refer to paper for details.
        dropout_ratio=0.1,  # The dropout ratio before final classification layer.
        num_classes=19,  # Number of segmentation class. Usually 19 for cityscapes, 21 for VOC, 150 for ADE20k.
        norm_cfg=dict(type='SyncBN', requires_grad=True),  # The configuration of norm layer.
        align_corners=False,  # The align_corners argument for resize in decoding.align_corners参数用于解码时调整大小
        loss_decode=dict(  # Config of loss function for the decode_head.
            type='CrossEntropyLoss',  # Type of loss used for segmentation.
            use_sigmoid=False,  # Whether use sigmoid activation for segmentation.
            loss_weight=1.0)),  # Loss weight of decode head.
    auxiliary_head=dict(
        type='FCNHead',  # Type of auxiliary head辅助头类型. Please refer to mmseg/models/decode_heads for available options.
        in_channels=1024,  # Input channel of auxiliary head.
        in_index=2,  # The index of feature map to select.
        channels=256,  # The intermediate channels of decode head.
        num_convs=1,  # Number of convs in FCNHead. It is usually 1 in auxiliary head.
        concat_input=False,  # Whether concat output of convs with input before classification layer.
        dropout_ratio=0.1,  # The dropout ratio before final classification layer.
        num_classes=19,  # Number of segmentation class. Usually 19 for cityscapes, 21 for VOC, 150 for ADE20k.
        norm_cfg=dict(type='SyncBN', requires_grad=True),  # The configuration of norm layer.
        align_corners=False,  # The align_corners argument for resize in decoding.
        loss_decode=dict(  # Config of loss function for the decode_head.
            type='CrossEntropyLoss',  # Type of loss used for segmentation.
            use_sigmoid=False,  # Whether use sigmoid activation for segmentation.是否使用sigmoid激活进行分割
            loss_weight=0.4)))  # Loss weight of auxiliary head, which is usually 0.4 of decode head.
train_cfg = dict()  # train_cfg is just a place holder for now.
test_cfg = dict(mode='whole')  # The test mode, options are 'whole' and 'sliding'. 'whole': whole image fully-convolutional test. 'sliding': sliding crop window on the image.
dataset_type = 'CityscapesDataset'  # Dataset type, this will be used to define the dataset.
data_root = 'data/cityscapes/'  # Root path of data.
img_norm_cfg = dict(  # Image normalization config to normalize the input images.
    mean=[123.675, 116.28, 103.53],  # Mean values used to pre-training the pre-trained backbone models.
    std=[58.395, 57.12, 57.375],  # Standard variance used to pre-training the pre-trained backbone models.
    to_rgb=True)  # The channel orders of image used to pre-training the pre-trained backbone models.
crop_size = (512, 1024)  # The crop size during training.
train_pipeline = [  # Training pipeline.
    dict(type='LoadImageFromFile'),  # First pipeline to load images from file path.第一个从文件路径加载图像的管道
    dict(type='LoadAnnotations'),  # Second pipeline to load annotations for current image.
    dict(type='Resize',  # Augmentation pipeline that resize the images and their annotations.调整图像及其注释大小的增强管道
        img_scale=(2048, 1024),  # The largest scale of image.最大尺度的图像
        ratio_range=(0.5, 2.0)), # The augmented scale range as ratio.
    dict(type='RandomCrop',  # Augmentation pipeline that randomly crop a patch from current image.从当前图像随机裁剪补丁的增强管道
        crop_size=(512, 1024),  # The crop size of patch.
        cat_max_ratio=0.75),  # The max area ratio that could be occupied by single category.单个类别所能占据的最大面积比
    dict(
        type='RandomFlip',  # Augmentation pipeline that flip the images and their annotations
        flip_ratio=0.5),  # The ratio or probability to flip
    dict(type='PhotoMetricDistortion'),  # Augmentation pipeline that distort current image with several photo metric methods.
    dict(
        type='Normalize',  # Augmentation pipeline that normalize the input images
        mean=[123.675, 116.28, 103.53],  # These keys are the same of img_norm_cfg since the
        std=[58.395, 57.12, 57.375],  # keys of img_norm_cfg are used here as arguments
        to_rgb=True),
    dict(type='Pad',  # Augmentation pipeline that pad the image to specified size.将图像填充到指定大小的增强管道
        size=(512, 1024),  # The output size of padding.
        pad_val=0,  # The padding value for image.
        seg_pad_val=255),  # The padding value of 'gt_semantic_seg'.
    dict(type='DefaultFormatBundle'),  # Default format bundle to gather data in the pipeline
    dict(type='Collect',  # Pipeline that decides which keys in the data should be passed to the segmentor
        keys=['img', 'gt_semantic_seg'])
]
test_pipeline = [
    dict(type='LoadImageFromFile'),  # First pipeline to load images from file path
    dict(
        type='MultiScaleFlipAug',  # An encapsulation that encapsulates the test time augmentations
        img_scale=(2048, 1024),  # Decides the largest scale for testing, used for the Resize pipeline
        flip=False,  # Whether to flip images during testing
        transforms=[
            dict(type='Resize',  # Use resize augmentation
                 keep_ratio=True),  # Whether to keep the ratio between height and width, the img_scale set here will be suppressed by the img_scale set above.
            dict(type='RandomFlip'),  # Thought RandomFlip is added in pipeline, it is not used when flip=False
            dict(
                type='Normalize',  # Normalization config, the values are from img_norm_cfg
                mean=[123.675, 116.28, 103.53],
                std=[58.395, 57.12, 57.375],
                to_rgb=True),
            dict(type='ImageToTensor', # Convert image to tensor
                keys=['img']),
            dict(type='Collect', # Collect pipeline that collect necessary keys for testing.
                keys=['img'])
        ])
]
data = dict(
    samples_per_gpu=2,  # Batch size of a single GPU
    workers_per_gpu=2,  # Worker to pre-fetch data for each single GPU
    train=dict(  # Train dataset config
        type='CityscapesDataset',  # Type of dataset, refer to mmseg/datasets/ for details.
        data_root='data/cityscapes/',  # The root of dataset.
        img_dir='leftImg8bit/train',  # The image directory of dataset.
        ann_dir='gtFine/train',  # The annotation directory of dataset.
        pipeline=[  # pipeline, this is passed by the train_pipeline created before.
            dict(type='LoadImageFromFile'),
            dict(type='LoadAnnotations'),
            dict(
                type='Resize', img_scale=(2048, 1024), ratio_range=(0.5, 2.0)),
            dict(type='RandomCrop', crop_size=(512, 1024), cat_max_ratio=0.75),
            dict(type='RandomFlip', flip_ratio=0.5),
            dict(type='PhotoMetricDistortion'),
            dict(
                type='Normalize',
                mean=[123.675, 116.28, 103.53],
                std=[58.395, 57.12, 57.375],
                to_rgb=True),
            dict(type='Pad', size=(512, 1024), pad_val=0, seg_pad_val=255),
            dict(type='DefaultFormatBundle'),
            dict(type='Collect', keys=['img', 'gt_semantic_seg'])
        ]),
    val=dict(  # Validation dataset config
        type='CityscapesDataset',
        data_root='data/cityscapes/',
        img_dir='leftImg8bit/val',
        ann_dir='gtFine/val',
        pipeline=[  # Pipeline is passed by test_pipeline created before
            dict(type='LoadImageFromFile'),
            dict(
                type='MultiScaleFlipAug',
                img_scale=(2048, 1024),
                flip=False,
                transforms=[
                    dict(type='Resize', keep_ratio=True),
                    dict(type='RandomFlip'),
                    dict(
                        type='Normalize',
                        mean=[123.675, 116.28, 103.53],
                        std=[58.395, 57.12, 57.375],
                        to_rgb=True),
                    dict(type='ImageToTensor', keys=['img']),
                    dict(type='Collect', keys=['img'])
                ])
        ]),
    test=dict(
        type='CityscapesDataset',
        data_root='data/cityscapes/',
        img_dir='leftImg8bit/val',
        ann_dir='gtFine/val',
        pipeline=[
            dict(type='LoadImageFromFile'),
            dict(
                type='MultiScaleFlipAug',
                img_scale=(2048, 1024),
                flip=False,
                transforms=[
                    dict(type='Resize', keep_ratio=True),
                    dict(type='RandomFlip'),
                    dict(
                        type='Normalize',
                        mean=[123.675, 116.28, 103.53],
                        std=[58.395, 57.12, 57.375],
                        to_rgb=True),
                    dict(type='ImageToTensor', keys=['img']),
                    dict(type='Collect', keys=['img'])
                ])
        ]))
log_config = dict(  # config to register logger hook
    interval=50,  # Interval to print the log
    hooks=[
        # dict(type='TensorboardLoggerHook')  # The Tensorboard logger is also supported
        dict(type='TextLoggerHook', by_epoch=False)
    ])
dist_params = dict(backend='nccl')  # Parameters to setup distributed training, the port can also be set.
log_level = 'INFO'  # The level of logging.
load_from = None  # load models as a pre-trained model from a given path. This will not resume training.
resume_from = None  # Resume checkpoints from a given path, the training will be resumed from the iteration when the checkpoint's is saved.
workflow = [('train', 1)]  # Workflow for runner. [('train', 1)] means there is only one workflow and the workflow named 'train' is executed once. The workflow trains the model by 40000 iterations according to the `runner.max_iters`.
cudnn_benchmark = True  # Whether use cudnn_benchmark to speed up, which is fast for fixed input size.
optimizer = dict(  # Config used to build optimizer, support all the optimizers in PyTorch whose arguments are also the same as those in PyTorch
    type='SGD',  # Type of optimizers, refer to https://github.com/open-mmlab/mmcv/blob/master/mmcv/runner/optimizer/default_constructor.py#L13 for more details
    lr=0.01,  # Learning rate of optimizers, see detail usages of the parameters in the documentation of PyTorch
    momentum=0.9,  # Momentum
    weight_decay=0.0005)  # Weight decay of SGD
optimizer_config = dict()  # Config used to build the optimizer hook, refer to https://github.com/open-mmlab/mmcv/blob/master/mmcv/runner/hooks/optimizer.py#L8 for implementation details.
lr_config = dict(
    policy='poly',  # The policy of scheduler, also support Step, CosineAnnealing, Cyclic, etc. Refer to details of supported LrUpdater from https://github.com/open-mmlab/mmcv/blob/master/mmcv/runner/hooks/lr_updater.py#L9.
    power=0.9,  # The power of polynomial decay.
    min_lr=0.0001,  # The minimum learning rate to stable the training.
    by_epoch=False)  # Whether count by epoch or not.
runner = dict(
    type='IterBasedRunner', # Type of runner to use (i.e. IterBasedRunner or EpochBasedRunner)
    max_iters=40000) # Total number of iterations. For EpochBasedRunner use `max_epochs`
checkpoint_config = dict(  # Config to set the checkpoint hook, Refer to https://github.com/open-mmlab/mmcv/blob/master/mmcv/runner/hooks/checkpoint.py for implementation.
    by_epoch=False,  # Whether count by epoch or not.
    interval=4000)  # The save interval.
evaluation = dict(  # The config to build the evaluation hook. Please refer to mmseg/core/evaluation/eval_hook.py for details.
    interval=4000,  # The interval of evaluation.
    metric='mIoU')  # The evaluation metric.
4、忽略基本配置中的一些字段
有时,您可以设置_delete_=True来忽略基本配置中的一些字段。你可以参考mmcv来做简单的说明。
1、例如,在MMSegmentation中,用下面的配置来改变PSPNet的主干网络。
norm_cfg = dict(type='SyncBN', requires_grad=True)
model = dict(
    type='MaskRCNN',
    pretrained='torchvision://resnet50',
    backbone=dict(
        type='ResNetV1c',
        depth=50,
        num_stages=4,
        out_indices=(0, 1, 2, 3),
        dilations=(1, 1, 2, 4),
        strides=(1, 2, 1, 1),
        norm_cfg=norm_cfg,
        norm_eval=False,
        style='pytorch',
        contract_dilation=True),
    decode_head=dict(...),
    auxiliary_head=dict(...))
2、ResNet and HRNet use different keywords to construct.
将用新关键字_delete_=True替换字段中的所有旧backbon的关键字。
_base_ = '../pspnet/psp_r50_512x1024_40ki_cityscpaes.py'
norm_cfg = dict(type='SyncBN', requires_grad=True)
model = dict(
    pretrained='open-mmlab://msra/hrnetv2_w32',
    backbone=dict(
        _delete_=True,#替换主干网络
        type='HRNet',
        norm_cfg=norm_cfg,
        extra=dict(
            stage1=dict(
                num_modules=1,
                num_branches=1,
                block='BOTTLENECK',
                num_blocks=(4, ),
                num_channels=(64, )),
            stage2=dict(
                num_modules=1,
                num_branches=2,
                block='BASIC',
                num_blocks=(4, 4),
                num_channels=(32, 64)),
            stage3=dict(
                num_modules=4,
                num_branches=3,
                block='BASIC',
                num_blocks=(4, 4, 4),
                num_channels=(32, 64, 128)),
            stage4=dict(
                num_modules=3,
                num_branches=4,
                block='BASIC',
                num_blocks=(4, 4, 4, 4),
                num_channels=(32, 64, 128, 256)))),
    decode_head=dict(...),
    auxiliary_head=dict(...))
3、在配置中使用中间变量。
一些中间变量在配置文件中使用,比如数据集中的train_pipeline /test_pipeline。值得注意的是,当修改子配置中的中间变量时,用户需要将中间变量再次传递到相应的字段中。例如,我们想要改变多尺度策略来训练/测试PSPNet。Train_pipeline /test_pipeline是我们想要修改的中间变量。
_base_ = '../pspnet/psp_r50_512x1024_40ki_cityscapes.py'
crop_size = (512, 1024)
img_norm_cfg = dict(
    mean=[123.675, 116.28, 103.53], std=[58.395, 57.12, 57.375], to_rgb=True)
train_pipeline = [
    dict(type='LoadImageFromFile'),
    dict(type='LoadAnnotations'),
    dict(type='Resize', img_scale=(2048, 1024), ratio_range=(1.0, 2.0)),  # change to [1., 2.]
    dict(type='RandomCrop', crop_size=crop_size, cat_max_ratio=0.75),
    dict(type='RandomFlip', flip_ratio=0.5),
    dict(type='PhotoMetricDistortion'),
    dict(type='Normalize', **img_norm_cfg),
    dict(type='Pad', size=crop_size, pad_val=0, seg_pad_val=255),
    dict(type='DefaultFormatBundle'),
    dict(type='Collect', keys=['img', 'gt_semantic_seg']),
]
test_pipeline = [
    dict(type='LoadImageFromFile'),
    dict(
        type='MultiScaleFlipAug',
        img_scale=(2048, 1024),
        img_ratios=[0.5, 0.75, 1.0, 1.25, 1.5, 1.75],  # change to multi scale testing,改为多尺度测试
        flip=False,
        transforms=[
            dict(type='Resize', keep_ratio=True),
            dict(type='RandomFlip'),
            dict(type='Normalize', **img_norm_cfg),
            dict(type='ImageToTensor', keys=['img']),
            dict(type='Collect', keys=['img']),
        ])
]
data = dict(
    train=dict(pipeline=train_pipeline),
    val=dict(pipeline=test_pipeline),
    test=dict(pipeline=test_pipeline))
4、我们首先定义新的train_pipeline / test_pipeline,并将它们传递给数据。类似地,如果我们想从SyncBN切换到BN或MMSyncBN,我们需要替换配置中的每个norm_cfg。
_base_ = '../pspnet/psp_r50_512x1024_40ki_cityscpaes.py'
norm_cfg = dict(type='BN', requires_grad=True)
model = dict(
    backbone=dict(norm_cfg=norm_cfg),
    decode_head=dict(norm_cfg=norm_cfg),
    auxiliary_head=dict(norm_cfg=norm_cfg))


 被折叠的 条评论
为什么被折叠?
被折叠的 条评论
为什么被折叠?
 到【灌水乐园】发言


