


引言
网上有不少OpenAI的API资料,实测下来,可能是环境因素踩了不少坑,这里分享一下我实践成功的技术路线。出于篇幅考虑,本文不会对开发前的部分工作,例如openai账号注册,外网访问权限获取,java,python环境搭建等问题过多赘述
相关资源地址
| 名称 | 地址 | 作用 |
|---|---|---|
| ChatGPT访问地址 | https://chat.openai.com/chat | chatgpt官方访问网址 |
| GPT_KEY | https://platform.openai.com/account/api-keys | 获取允许程序访问的key |
| discord | https://dler.pro/auth/register?affid=142134 | 获取外网访问权限 |
| 高德开放平台 | https://console.amap.com/dev/key/app | 获取高德开发平台服务,此案例中是需要高德的天气预报服务 |
| 163邮箱服务 | https://mail.163.com | 此案例中,通过邮件通知用户天气信息 |
| 腾讯云函数服务 | https://console.cloud.tencent.com/scf/list?rid=15&ns=default | 在本案例中没用到这个服务,曾经尝试过使用此服务作为python中转服务,因为节点可以选在国外,天然支持外网访问 |
设计思路
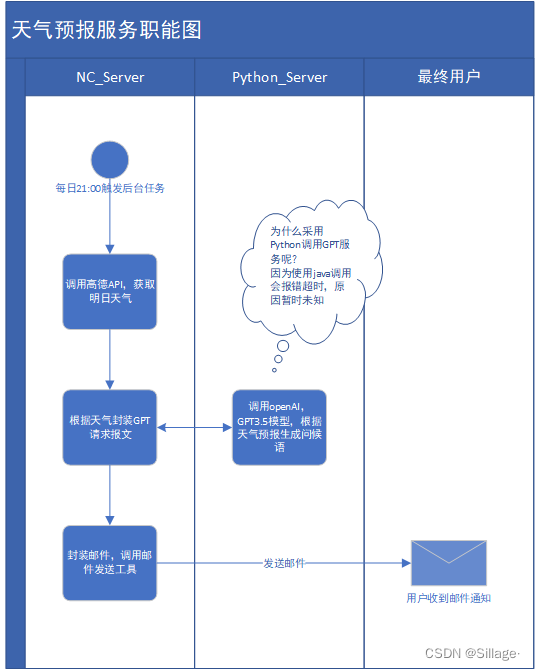
java端技术点及代码示例
- 后台任务:目的是每天定时执行某段代码,此处采用的是公司产品自己封装的定时任务服务,用开源的同学可以自行去spring全家桶中找类似的框架
- HTTP请求:采用的是post请求,代码可复用提供的HttpConnection类
- 邮件发送:此处采用的是smtp协议,服务商为163,在使用163服务前需要去163邮箱官网开启smtp服务,并获取授权码。
定时任务及整体逻辑如下
package nc.plugin.cw_ext.reminder;

import java.util.Map;
import java.util.regex.Matcher;
import java.util.regex.Pattern;

import com.alibaba.fastjson.JSON;
import com.alibaba.fastjson.JSONArray;
import com.alibaba.fastjson.JSONObject;

import nc.bs.logging.Logger;
import nc.bs.pub.pa.PreAlertObject;
import nc.bs.pub.taskcenter.BgWorkingContext;
import nc.bs.pub.taskcenter.IBackgroundWorkPlugin;
import nc.util.mrsy.CommonUtil;
import nc.util.mrsy.HttpConnection;
import nc.util.mrsy.UtilConstants.MaillSender;
import nc.vo.pub.BusinessException;
import nc.vo.pub.lang.UFDateTime;
import nccloud.message.util.MessageCenter;
import nccloud.message.vo.NCCMessage;
import nccloud.message.vo.NCCNoticeMessageVO;
import nccloud.util.cw_ext.JdbcUtil;
import nccloud.util.email.EmailUtil;


/**
 * WeatherReminderTaskPlugin:天气预报邮件通知插件
 * @author	CYQ
 * @date	2023年5月20日 下午5:05:14
 * @version	1.0.0
*/
public class WeatherReminderTaskPlugin implements IBackgroundWorkPlugin {

	private CommonUtil util = CommonUtil.getCommonUtil();
	@Override
	public PreAlertObject executeTask(BgWorkingContext context) throws BusinessException {
		try {
			String msg = sendEmail();

			//通过系统内置能力,调用消息通知,请忽略此功能
			sendMsg("CYQ",msg);

			context.setLogStr("天气预报邮件通知任务调用完成!");
			return null;
		} catch (Exception e) {
			throw new BusinessException("发生了未定义异常,"+e.getMessage());
		}
	}
	/**
	 * sendEmail:	发送邮件
	 * @param data	void	TODO(参数说明)
	 * 创  建  人 :CYQ
	 * 创建时间:2023年5月20日-下午5:53:50
	 * @throws Exception
	*/
	private String sendEmail() throws Exception {
		Logger.error("begin...sendEmail");
		//获取明天天气
		String weather = getGDAPI();

		//通过gpt3.5获取信息
		String gptbody = getGPTbody(weather);

		//发送邮件
		EmailUtil.sendEmail(MaillSender.we, "明日天气预报,请查收~", gptbody);

		return "天气预报发送完毕";
	}
	/**
	 * 获取明天的天气
	 * @throws BusinessException
	 */
	private String getGDAPI() throws BusinessException {
		//url为高德天气预报服务的url,详情请参阅:https://console.amap.com/dev/key/app
		String url = util.getParameter("gd_url");
		String msg = HttpConnection.doGet(url, null, null);
		Logger.error("高德返回消息:"+msg);
		Map map = util.initMap(msg);
		JSONArray forecasts = (JSONArray)JSON.parse(util.initstr(map.get("forecasts")));
		Map info = util.initMap(forecasts.get(0));
		JSONArray casts = (JSONArray)JSON.parse(util.initstr(info.get("casts")));
		String tomorrow = util.initstr(casts.get(1));
		return tomorrow;
	}
	/**
	 * 调用GPT3.5中转服务,获取报文
	 * @param body
	 * @return
	 * @throws BusinessException
	 */
	private String getGPTbody(String data) throws BusinessException {
		Logger.error("begin...getGPTbody");
		//请将XX,YY替换为身份和昵称
		String req = "请替我向我的XX,昵称YY,用中文讲述天气及注意事项,并问好。以下是明天的天气信息:"+data;
		JSONObject json = new JSONObject();
		json.put("msg", req);
		//由于python服务和java服务部署在一台机器上,所以访问127即可
		String msg = HttpConnection.doPost("http://127.0.0.1:8001/openai_gpt3", json.toString(), null);
		StringBuffer sb = new StringBuffer(msg);
		sb.delete(sb.length()-1, sb.length());
		sb.delete(0, 1);

		//解码unicode字符
		String text = unicodeDecode(sb.toString());
		Logger.error("getGPTbody...msg="+text);


		return text;
	}
    /**
     * @param string
     * @return 转换之后的内容
     * @Title: unicodeDecode
     * @Description: unicode解码 将Unicode的编码转换为中文
     */
    private String unicodeDecode(String string) {
        Pattern pattern = Pattern.compile("(\\\\u(\\p{XDigit}{4}))");
        Matcher matcher = pattern.matcher(string);
        char ch;
        while (matcher.find()) {
            ch = (char) Integer.parseInt(matcher.group(2), 16);
            string = string.replace(matcher.group(1), ch + "");
        }
        return string;
    }

	/**
	 * 失败信息发送指定业务员
	 *
	 * @MethodName: sendMsg
	 * memo by CYQ 2023年4月26日 理论代码没问题,前台不显示通知,怀疑是标准bug
	 * @author CYQ
	 * @date 2023年2月26日
	 */
	private void sendMsg(String msg_users, String msg) throws BusinessException {
		try {
			if (msg_users == null || msg_users.isEmpty()) {
				throw new BusinessException("未加载到有效的[msg_users]参数,请检查!");
			}
			NCCMessage message = new NCCMessage();
			NCCNoticeMessageVO msgvo = new NCCNoticeMessageVO();
			// 消息标题内容
			msgvo.setSubject(msg);
			msgvo.setSender("NC_USER0000000000000");
			// 可以一次群发,发送人
			String pk = JdbcUtil.queryColumn("sm_user", "cuserid", "user_code", msg_users);
			msgvo.setReceiver(pk);
			// 消息内容
			msgvo.setContent(msg);
			msgvo.setMsgsourcetype("reconcilemeg");
			msgvo.setSendtime(new UFDateTime());
//			msgvo.setDetail(msg);
			msgvo.setContenttype("BIZ");// 内容格式
			msgvo.setMsgtype("nc");// 消息发送类型
			msgvo.setMsgsourcetype("notice");// 消息来源类型
			msgvo.setPriority(0);// 优先级
			msgvo.setSendtime(new UFDateTime());// 发送时间
			message.setMessage(msgvo);

			message.setMessageType("notice");// 消息类型——通知
			// 发送确认消息
			MessageCenter.sendMessage(new NCCMessage[] { message });

		} catch (Exception e) {
			throw new BusinessException("业务执行完毕,NC消息发送异常..." + e.getMessage());
		}
	}


}
email工具类如下
package nccloud.util.email;
import java.util.Properties;

import javax.mail.Message;
import javax.mail.PasswordAuthentication;
import javax.mail.Session;
import javax.mail.Transport;
import javax.mail.internet.InternetAddress;
import javax.mail.internet.MimeMessage;

import nc.bs.logging.Logger;
import nc.util.mrsy.UtilConstants.MaillSender;
import nc.vo.pub.BusinessException;

/**
 * 邮箱服务工具类
 */
public class EmailUtil {

    public static void sendEmail(String to, String subject, String body) throws BusinessException {
    	try {
	    	Logger.error("begin...sendEmail");
	        // 设置邮件服务器属性
	        Properties props = new Properties();
	        props.put("mail.smtp.host", "smtp.163.com");
	        props.put("mail.smtp.socketFactory.port", "465");
	        props.put("mail.smtp.socketFactory.class", "javax.net.ssl.SSLSocketFactory");
	        props.put("mail.smtp.auth", "true");
	        props.put("mail.smtp.port", "465");

	        // 创建邮件会话
	        Session session = Session.getInstance(props,
	                new javax.mail.Authenticator() {
	                    protected PasswordAuthentication getPasswordAuthentication() {
	                        return new PasswordAuthentication(MaillSender.me, MaillSender.mailkey);
	                    }
	                });

	        // 创建邮件消息
	        Message message = new MimeMessage(session);
	        message.setFrom(new InternetAddress(MaillSender.me));
	        message.setRecipients(Message.RecipientType.TO, InternetAddress.parse(to));
	        message.setSubject(subject);
	        message.setText(body);

	        // 发送邮件
	        Transport.send(message);
		} catch (Exception e) {
			// TODO: handle exception
			throw new BusinessException("邮件发送失败,"+e.getMessage(),"-1001");
		}
    }
}
http工具类如下
package nc.util.mrsy;

import java.io.BufferedReader;
import java.io.IOException;
import java.io.InputStream;
import java.io.InputStreamReader;
import java.io.OutputStream;
import java.net.HttpURLConnection;
import java.net.URL;
import java.util.Map;

import nc.vo.pub.BusinessException;

/**
 * HttpConnection:HTTP工具类
 *
 * @author CYQ
 * @date 2021年12月6日 下午5:45:31
 * @version 1.0.0
 */
public class HttpConnection {

	/**
	 * doPost:	doPost方法
	 * @param json
	 * @param url
	 * @return
	 * @throws Exception	String	TODO(参数说明)
	 * 创  建  人 :CYQ
	 * 创建时间:2022年5月19日
	*/
	public static String doPost(String url, String json, Map<String,String> head) throws BusinessException {

		BufferedReader in = null;
		InputStream inputStream = null;
		OutputStream outputStream = null;
		HttpURLConnection httpURLConnection = null;
		try {
			if(url == null || url.isEmpty()) {
				throw new BusinessException("URL不能为空!");
			}
			URL adress=new URL(url);
			// 创建连接 测试
			httpURLConnection = (HttpURLConnection) adress.openConnection();
			// 设置请求的内容类型
			httpURLConnection.setRequestProperty("x-zop-ns", "budget");
			httpURLConnection.setRequestProperty("accept", "*/*");
			httpURLConnection.setRequestProperty("connection", "Keep-Alive");
			httpURLConnection.setRequestProperty("user-agent","Mozilla/4.0 (compatible; MSIE 6.0; Windows NT 5.1; SV1)");
			httpURLConnection.setRequestProperty("Content-Type","application/json");

			httpURLConnection.setRequestProperty("User-Agent","PostmanRuntime/7.32.2");
			httpURLConnection.setRequestProperty("Accept","*/*");
			httpURLConnection.setRequestProperty("Accept-Encoding","gzip, deflate, br");
			httpURLConnection.setRequestProperty("Connection","keep-alive");
			httpURLConnection.setConnectTimeout(30000000);
			httpURLConnection.setReadTimeout(30000000);
			//追加请求头
			if(head!=null && head.size()>0) {
				for(String key:head.keySet()) {
					httpURLConnection.setRequestProperty(key,head.get(key));
				}
			}
			// 设置发送数据
			httpURLConnection.setDoOutput(true);
			// 设置接受数据
			httpURLConnection.setDoInput(true);
			httpURLConnection.setUseCaches(false);
			// 发送数据,使用输出流
			outputStream = httpURLConnection.getOutputStream();
			// 发送的soap协议的数据
			String content = json.toString();
			// 发送数据
			outputStream.write(content.getBytes("UTF-8"));
			// 接收数据
			inputStream = httpURLConnection.getInputStream();
			in = new BufferedReader(new InputStreamReader(inputStream, "UTF-8"));
			StringBuffer buffer = new StringBuffer();
			String line = "";
			while ((line = in.readLine()) != null)
				buffer.append(line);
			String result = buffer.toString();
			outputStream.flush();
			outputStream.close();
			try {
				in.close();
				httpURLConnection.disconnect();
			} catch (IOException e) {
				e.printStackTrace();
				throw new Exception( e.getMessage()+e.getCause());
			}
			return result;
		} catch (Exception e) {
			e.printStackTrace();
			throw new BusinessException("doPost异常,"+e.getMessage()+e.getCause());
		}
	}

}
python端技术点及代码示例
- python版本采用的是3.11
- 使用falcon发布http_post接口
- 调用openai依赖获取gpt服务
具体服务发布步骤如下:
- 请确保python服务及pip服务安装正确
- 执行以下指令安装falcon依赖
pip install falcon
- 执行以下指令安装openai依赖
pip install openai
- 编写openai调用工具,文件命名为【api.py】,具体代码如下
案例中使用的gpt-3.5-turbo模型是综合了使用体验和费用的综合选择,若想使用其他模型,可以修改模型编码
# -*- coding: utf-8 -*-

import openai

openai.api_key = "填入openai中的key"
model_engine = "gpt-3.5-turbo"


def getgpt(reqmsg):
    # 发送API请求,获取响应
    response = openai.ChatCompletion.create(
        model=model_engine,
        messages=[
            {"role": "user", "content": reqmsg}
        ]
    )
    # 解析响应,获取回复
    output_text = response["choices"][0]["message"]["content"]
    return output_text
- 发布post接口,文件命名为【app.py】,具体代码如下
# -*- coding: utf-8 -*-

import falcon
import json
import api


class AppResource(object):

    # get请求
    def on_get(req, resp):
        msg = {
            "message": "Welcome to the Falcon"
        }
        resp.body = json.dumps(msg)

    # post请求
    def on_post(self, req, resp):
        try:
            result = req.media
            reqmsg = result['msg']
            msg = api.getgpt(reqmsg)
            resp.body = json.dumps(msg)
        except Exception as e:
            print(str(e))
            resp.body = '调用发生异常'+str(e)
        except SyntaxError as e1:
            print(str(e1))
            resp.body = '调用发生异常'+str(e1)


app = falcon.API()
app.add_route("/openai_gpt3", AppResource())

if __name__ == "__main__":
    from wsgiref import simple_server

    httpd = simple_server.make_server("127.0.0.1", 8001, app)
    httpd.serve_forever()
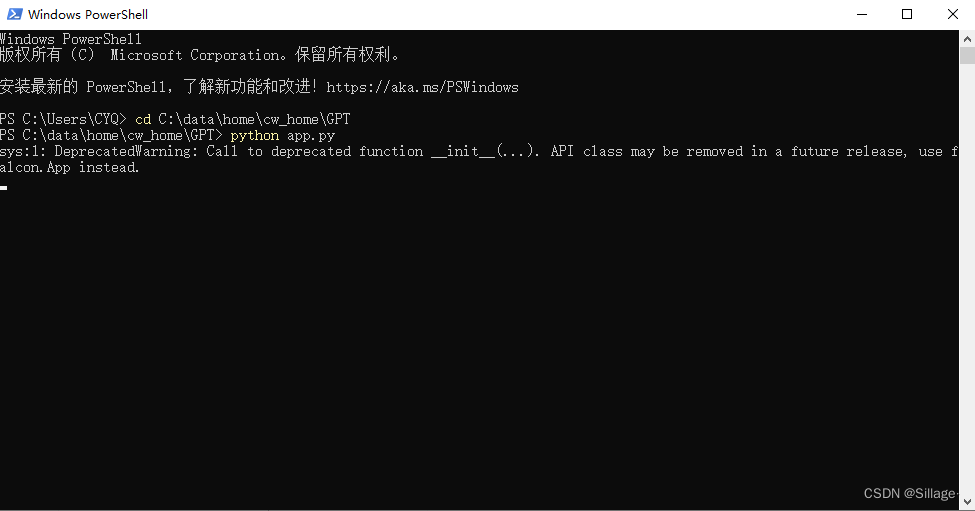
- 在cmd中执行以下指令,启动python中转服务
python app.py
效果如图所示
效果展示

注:此技术路线仅为最终测试通过的路线,中间还验证过使用java,okhttp访问openai服务,使用腾讯云函数实现免费访问外网等技术路线,最终因种种原因未能验证通过。


 744
744

 被折叠的 条评论
为什么被折叠?
被折叠的 条评论
为什么被折叠?
 到【灌水乐园】发言


