


一、概述
数据增强(也叫数据扩增)的目的是为了扩充数据和提升模型的泛化能力。有效的数据扩充不仅能扩充训练样本数量,还能增加训练样本的多样性,一方面可避免过拟合,另一方面又会带来模型性能的提升。
数据增强几种常用方法有: 图像水平/竖直翻转、随机抠取、尺度变换和旋转。其中尺度变换(scaling)、旋转(rotating)等方法用来增加卷积卷积神经网络对物体尺度和方向上的鲁棒性。
在此基础上,对原图或已变换的图像(或图像块)进行色彩抖动(color jittering)也是一种常用的数据扩充手段,即改变图像颜色的四个方面: 亮度、对比度、饱和度和色调。色彩抖动是在 RGB 颜色空间对原有 RGB 色彩分布进行轻微的扰动,也可在 HSV 颜色空间尝试随机改变图像原有的饱和度和明度(即改变 S 和 V 通道的值)或对色调进行微调(小范围改变 该通道的值)。
HSV 表达彩色图像的方式由三个部分组成:Hue(色调、色相) Saturation(饱和度、色彩纯净度) Value(明度)
在数据送入模型之前进行数据增强,一般分为线下和线上两种方式:
线下增强(offline augmentation): 适用于较小的数据集(smaller dataset)。
线上增强(online augmentation): 适用于较大的数据集(larger datasets)。
二、opencv 图像增强-几何变换
OpenCV 提供的几何变换函数如下所示:
1,拓展缩放: 拓展缩放,改变图像的尺寸大小
cv2.resize(): 。常用的参数有设定图像尺寸、缩放因子和插值方法。
2,平移: 将对象换一个位置。
cv2.warpAffine(): 函数第一个参数是原图像,第二个参数是移动矩阵,第三个参数是输出图像大小 (width, height)。举例,如果要沿x方向移动,移动的距离是(Tx,Ty),则以下面的方式构建移动矩阵:

3,旋转: 对一个图像旋转角度 。
先使用 cv2.getRotationMatrix2D 函数构建旋转矩阵 ,再使用 cv2.warpAffine() 函数将对象移动位置。
getRotationMatrix2D 函数第一个参数为旋转中心,第二个为旋转角度,第三个为旋转后的缩放因子。
4,放射变换(也叫平面变换/径向变换): 在仿射变换中,原图中所有的平行线在结果图像中依旧平行。
为找到变换矩阵,我们需要从输入图像中得到三个点,以及它们在输出图像中的对应位置。然后用 cv2. getAffineTransform 先构建一个 2x3 变换矩阵,最后该矩阵将传递给 cv2.warpAffine 函数。
5,透视变换(也叫空间变换): 转换之后,直线仍是直线。

对于透视变换,需要先构建一个 变换矩阵。要找到此变换矩阵,需要在输入图像上找 4 个点,以及它们在输出图像中的对应位置。在这 4 个点中,其中任意 3 个不共线。然后可以通过函数 cv2.getPerspectiveTransform 找到变换矩阵,将 cv2.warpPerspective 应用于此 3*3 变换矩阵。
图像几何变换的python代码示例如下:
import cv2
import matplotlib.pyplot as plt
from PIL import Image
import numpy as np

def show_images(imgs, num_rows, num_cols, titles=None, scale=8.5):
    """Plot a list of images.

    Defined in :numref:`sec_utils`"""
    figsize = (num_cols * scale, num_rows * scale)
    _, axes = plt.subplots(num_rows, num_cols, figsize=figsize)
    axes = axes.flatten()
    for i, (ax, img) in enumerate(zip(axes, imgs)):
        try:
            img = np.array(img)
        except:
            pass
        ax.imshow(img)
        ax.axes.get_xaxis().set_visible(False)
        ax.axes.get_yaxis().set_visible(False)
        if titles:
            ax.set_title(titles[i])
    return axes

# Some Geometric Transformation of Images
class GeometricTransAug(object):
    def __init__(self, image_path):
        img = Image.open(image_path) # load the image
        self.img_np = np.array(img) # convert PIL image to numpy array
        self.rows, self.cols, self.ch = self.img_np.shape
        self.geometry_trans_aug_visual(self.img_np)

    def resize_aug(self, img_np):
        # 直接设置了缩放因子, 缩放原大小的2倍
        res = cv2.resize(img_np, None, fx=2, fy=2, interpolation = cv2.INTER_CUBIC)
        return res

    def warpAffine_aug(self, img_np):
        # 先构建转换矩阵, 将图像像素点整体进行(100,50)位移:
        M = np.float32([[1,0,100],[0,1,50]])
        res = cv2.warpAffine(img_np, M,(self.cols, self.rows))
        return res

    def rotation_aug(self, img_np):
        rows, cols, ch = img_np.shape
        # 先构建转换矩阵,图像相对于中心旋转90度而不进行任何缩放。
        M = cv2.getRotationMatrix2D((self.cols/2, self.rows/2), 90, 1)
        res = cv2.warpAffine(img_np, M, (self.cols, self.rows))
        return res

    def radial_trans_aug(self, img_np):
        # 仿射变换需要从原图像中找到三个点以及他们在输出图像中的位置
        pts1 = np.float32([[50,50],[200,50],[50,200]])
        pts2 = np.float32([[10,100],[200,50],[100,250]])
        # 通过 getAffineTransform 创建一个 2x3 的转换矩阵
        M = cv2.getAffineTransform(pts1,pts2)

        res = cv2.warpAffine(img_np, M, dsize = (self.cols, self.rows))
        return res

    def perspective_trans_aug(self, img_np):
        # 透视变换需要一个 3x3 变换矩阵
        pts1 = np.float32([[56,65],[368,52],[28,387],[389,390]])
        pts2 = np.float32([[0,0],[300,0],[0,300],[300,300]])

        M = cv2.getPerspectiveTransform(pts1,pts2)
        # dsize: size of the output image.
        res = cv2.warpPerspective(img_np, M, dsize = (300,300))

        return res

    def geometry_trans_aug_visual(self, img_np):
        res1 = self.resize_aug(img_np)
        res2 = self.warpAffine_aug(img_np)
        res3 = self.rotation_aug(img_np)
        res4 = self.radial_trans_aug(img_np)
        res5 = self.perspective_trans_aug(img_np)
        imgs = [res1, res2, res3, res4, res5]
        aug_titles = ["resize_aug", "warpAffine_aug", "rotation_aug", "radial_trans_aug", "perspective_trans_aug"]
        # show_images 函数前文已经给出,这里不再复制过来
        axes = show_images(imgs, 2, 3, titles=aug_titles, scale=8.5)

if __name__ == '__main__':
    img_path = 'Koalainputimage.jpeg'
    geometry_trans_aug = GeometricTransAug(img_path)
    img_np2 = geometry_trans_aug.img_np
    print(img_np2.shape)
程序运行后输出的几何变换增强效果如下所示:

三、pytorch图像增强
在 pytorch 框架中,transforms 类提供了 22 个数据增强方法,对应代码在 transforms.py 文件中,它们既可以对 PIL Image 也能对 torch.*Tensor 数据类型进行增强。
api 的详细介绍可以参考官网文档-Transforming and augmenting images[1]。本章只对 transforms 的 22 个方法进行简要介绍和总结。
总的来说 transforms.py 中的各个预处理方法可以归纳为四大类:
1,裁剪-Crop
中心裁剪: transforms.CenterCrop
随机裁剪: transforms.RandomCrop
随机长宽比裁剪: transforms.RandomResizedCrop
上下左右中心裁剪: transforms.FiveCrop
上下左右中心裁剪后翻转: transforms.TenCrop
2,翻转和变换-Flip and Rotations
依概率 p 水平翻转:transforms.RandomHorizontalFlip(p=0.5)
依概率 p 垂直翻转:transforms.RandomVerticalFlip(p=0.5)
随机旋转:transforms.RandomRotation
3,图像变换
resize: transforms.Resize
min-max Normalization: 对应 torchvision.transforms.ToTensor() 方法
zero-mean Normalization: 对应 torchvision.transforms.Normalize() 方法
填充: transforms.Pad
修改亮度、对比度和饱和度:transforms.ColorJitter
转灰度图: transforms.Grayscale
线性变换: transforms.LinearTransformation()
仿射变换: transforms.RandomAffine
依概率 p 转为灰度图: transforms.RandomGrayscale
将数据转换为 PILImage: transforms.ToPILImage
transforms.Lambda: Apply a user-defined lambda as a transform.
4,对 transforms 操作,使数据增强更灵活
transforms.RandomChoice(transforms): 从给定的一系列 transforms 中选一个进行操作
transforms.RandomApply(transforms, p=0.5): 给一个 transform 加上概率,依概率进行操作
transforms.RandomOrder: 将 transforms 中的操作随机打乱。
此处以 resize 图像增强方法为例,可视化其调整输入图像大小的效果。
# 为了节省空间,这里不再列出导入相应库的代码和show_images函数
img_PIL = Image.open('astronaut.jpeg')
print(img_PIL.size)
# if you change the seed, make sure that the randomly-applied transforms
# properly show that the image can be both transformed and *not* transformed!
torch.manual_seed(0)
# size 参数: desired output size.
resized_imgs = [transforms.Resize(size=size)(orig_img) for size in (30, 50, 100, orig_img.size)]
show_images(resized_imgs, 1, 4)
程序运行后的输出图如下:

四、imgaug 图像增强
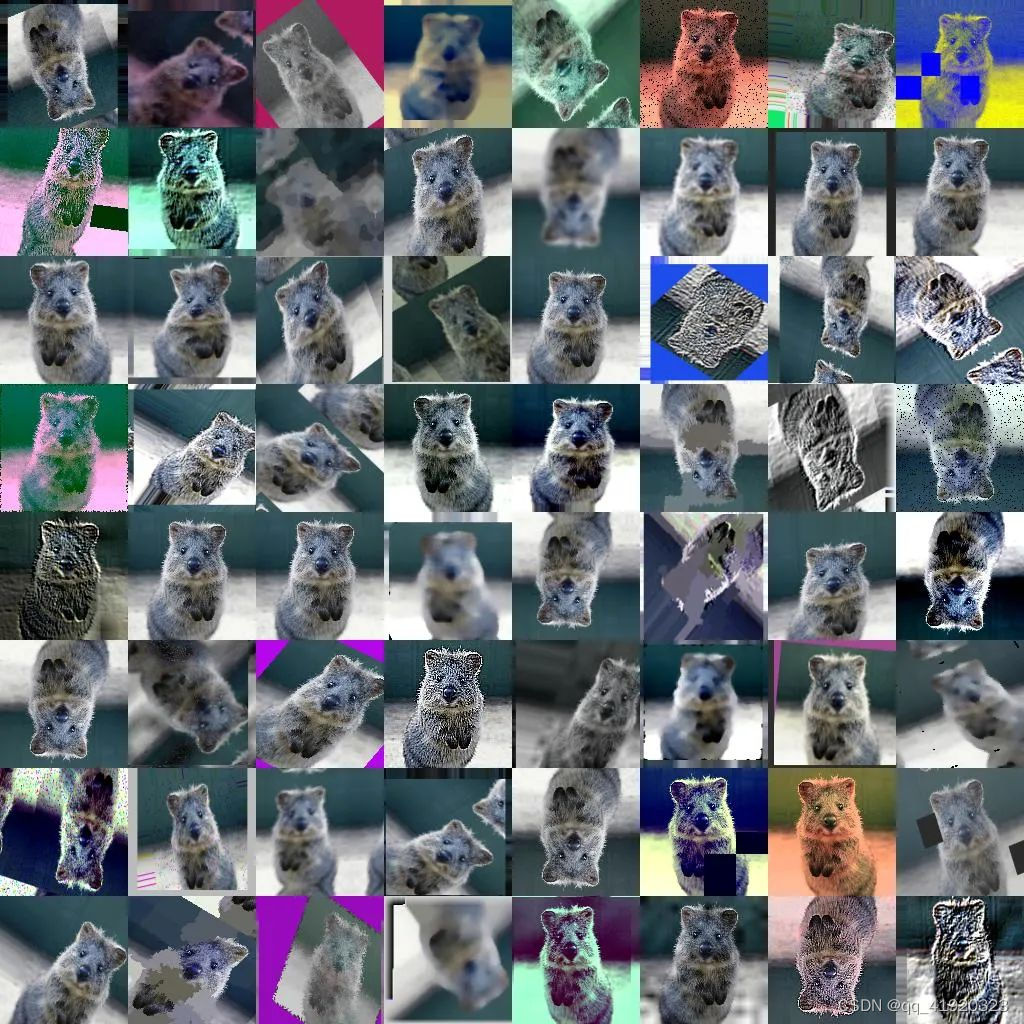
imgaug 是一个用于机器学习实验中图像增强的库。它支持广泛的增强技术,允许轻松组合这些技术并以随机顺序或在多个 CPU 内核上执行它们,具有简单而强大的随机接口,不仅可以增强图像,还可以增强关键点/地标、边界框、 热图和分割图。
单个输入图像的示例增强如下所示:
imgaug 的图像增强方法如下所示:
Basics
Keypoints
Bounding Boxes
Heatmaps
Segmentation Maps and Masks
Stochastic Parameters: 随机参数
Blending/Overlaying images: 混合/叠加图像
Augmenters: 增强器概述
各个方法的使用请参考 imaug 官网。
imaug 官网: https://imgaug.readthedocs.io/en/latest/source/installation.html


 1万+
1万+


 被折叠的 条评论
为什么被折叠?
被折叠的 条评论
为什么被折叠?
 到【灌水乐园】发言


