


一、ansible简介
Ansible 是一个开源的基于 OpenSSH 的自动化配置管理工具。可以用它来配置系统、部署软件和编排更高级的 IT 任务,比如持续部署或零停机更新。Ansible 的主要目标是简单和易用,并且它还高度关注安全性和可靠性。基于这样的目标,Ansible 适用于开发人员、系统管理员、发布工程师、IT 经理,以及介于两者之间的所有人。Ansible 适合管理几乎所有的环境,从拥有少数实例的小型环境到有数千个实例的企业环境。
使用 Ansible 无须在被管理的机器上安装代理,所以不存在如何升级远程守护进程的问题,也不存在由于卸载了守护进程而无法管理系统的问题。
ansible的主要功能
管理员可以通过 Ansible 在成百上千台计算机上同时执行指令(任务)。
对于管理员来说,经常需要执行下面的任务:
- 维护现存的比较复杂的服务器时,手动登录的方式很容易遗漏一些操作,或者是执行一些未预期的操作。
- 手动初始化新的服务器耗时耗力!
对于这两种情况,如果完全通过 shell 脚本实现。脚本会过于复杂,极难维护。当然我们也可以使用同类的工具,比如 Puppet and Chef。这两个工具的特点是:需要学习新的知识栈(其实 Ansible 也是有学习成本的)。
相比 Puppet 和 Chef 使用 Ansible 可以延续之前使用 shell 脚本的工作习惯和方式,因而其学习成本会低一些。下面是 Ansible 的一些优势:
- 可以逐行的执行 shell 命令。
- 不需要另外的客户端工具(linux 一般会自带 ssh 工具)。
- 相同的配置只被执行一次(多次执行同一配置不会出问题)。
ansible的工作方式:
使用 Ansible 无须在被管理的客户端电脑上安装代理之类的组件。它通过普通的 SSH 进行通信,以便从远程计算机检索信息、发出命令和复制文件。这是 Ansible 简化服务器管理的一种方式。任何公开 SSH 端口的服务器都可以通过 Ansible 进行配置和管理。
Ansible 采用模块化的设计,所以非常容易扩展到各种特定的使用场景。模块可以用任何语言编写,并使用标准 JSON 进行通信。Ansible 的配置文件是用 YAML 格式编写的,因为它使用起来非常简单,并且与主流的标记语言很相似。除了通过命令行工具 Ansible 还可以通过配置脚本(Playbooks)与客户端交互。
二、ansible的安装
真机:172.25.7.130
| 172.25.7.131 | node1(管理节点) |
|---|---|
| 172.25.7.132 | node2 |
| 172.25.7.133 | node3 |
配置yum源:
[root@node1 ~]# cat /etc/yum.repos.d/hh.repo
[rhel7.6]
name=rhel7.6
baseurl=http://172.25.7.130/rhel7.6
gpgcheck=0
[epel]
name=epel
baseurl=https://mirrors.tuna.tsinghua.edu.cn/epel/7/x86_64/
gpgcheck=0

安装:yum install -y ansible
查看ansibel手册有多少个指令和版本:

在/etc/ansible/里编辑hosts,加入节点:

在node1节点上,ping两个节点,-k表示输入密码,第一次失败:


做一个免密登录:


实现了免密登录:

查看节点df和建立文件:

三、ansible配置清单
(1)ansible命令示例:
| ansible all -m ping -u ansible | 以ansible用户执行ping存活检测 |
|---|---|
| ansible all -m ping -u ansible -b | 以ansible用户sudo至root执行ping存活检测 |
| ansible all -m ping -u ansible -b --become-user batman | 以ansible用户sudo至batman执行ping存活检测 |
node2和node3设置ansible用户并设置密码


以ansible用户执行ping检测,失败,ssh是以超级用户登录访问其他节点。以ansible用户需要-k输入密码:


| ansible all -a “touch /tmp/testfile” -u ansible | 以ansible用户在两个节点建立testfile文件 |
|---|---|
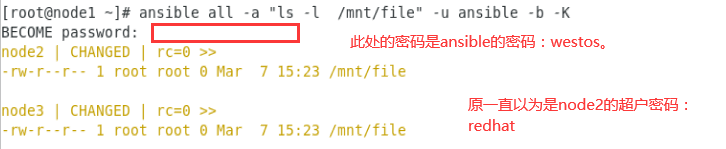
| ansible all -a “touch /mnt/file” -u ansible -b -K | 以ansible用户登录并切换到超户在两个节点建立testfile文件,-b是sudo,-K 验证普通用户的身份 |
| ansible all -a “touch /mnt/33” -u ansible -b --become-user=batman | -b后面什么也不加,默认就是root用户。-b=-b --become-user=root |


去node2和node3节点,visudo加入ansible用户:
[root@node2 ~]# visudo

K是输sudo的密码,k是输入ssh的密码
再次在管理节点执行建立文件指令:
在节点的viduso加入NOPASSWD实现免密:

ansi
(2)ansible命令使用场景
- 非固化需求
- 临时一次性操作
- 二次开发接口调用
Inventory是Ansible管理主机信息的配置文件,相当于系统HOSTS文件的功能,默认存放在/etc/ansible/hosts。可以使用-i 选项指定inventory文件。
# inventory可以直接为ip地址:172.25.7.2
# 端口号不是默认22端口时,可明确的表示为:
node2:2222
node2 ansible_port=2222 ansible_host=172.25.7.2

1.定义主机和组
- 中括号表示一个组,也可表示一个 范围
[webserver]
www[1:10].example.com
db-[a:f].example.com
2.定义主机变量’
- 在playbook中使用时对主机进行个性化定制,在命令行中不可以,必须在playbook中
[webserver]
web1 http_port=8080 maxRequestsPerChild=1024
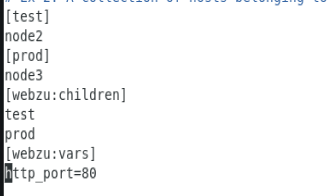
3.定义组嵌套及组变量
[appache]    --第一个组
node2
[nginx]   --第二个组
node3
node4

[webzu:children]   ---嵌套组,组名webzu可以任意起,后面的关键字children固定不变
appache
nginx
[webzu:vars]  ---嵌套组的变量
http_port=80

组与组之间可以相互调用,并且可以向组中的主机指定变量。不过,这些变量只能在ansible-palybook中使用,而ansible不支持。

4.在inventory主文件中保存的所有变量并不是最佳的方式,还可以保存在独立的文件中:
-
这些独立文件的格式为YAML
/etc/ansible/group_vars/raleigh
/etc/ansible/group_vars/webservers
/etc/ansible/host_vars/foosball -
当变量太多时,分文件定义变量更方便进行管理和组织
/etc/ansible/group_vars/raleigh/db_settings
/etc/ansible/group_vars/raleigh/cluster_settings
5.变量的检索位置
- inventory配置文件(默认/etc/ansible/hosts)
- Roles中vars定义的区域
- Roles中vars目录下的文件
- Roles同级目录group_vars和hosts_vars目录下的文件
6.ansible与正则
匹配所有主机,all或*号功能相同
- ansible all -m ping
- ansible “*” -m ping
- ansible 172.25.0.* -m ping
对多台主机或多个组同时执行,相互之间可以用冒号分离即可 - ansible “web1:web2” -m ping
在webserver组但不在database组的主机,用感叹号表示,同时存在的用&表示 - ansible ‘webserver:!database’ -m ping
四、Ansible Ad-Hoc命令集
Asible提供两种方式去完成任务:
(1) ad-hoc命令:解决一些简单或工作中临时遇到的任务,相当于Linux系统命令下的shell命令
(2)playbooks:解决复杂或者需固化下来的任务,相当于linux系统的shell scripts。
使用场景:
- 关闭所有不必要的服务器
- 临时更新apache或nginx的配置文件
node1建立一个用户ansible,ssh-keygen生成钥匙并发送到node2和node3:
[ansible@node1 ~]$ ssh-keygen
[ansible@node1 ~]$ ssh-copy-id node2
[ansible@node1 ~]$ ssh-copy-id node3
测试下是否免密登录:
[ansible@node1 ~]$ ssh node2
Last failed login: Sat Mar  7 19:24:53 CST 2020 from node1 on ssh:notty
There were 2 failed login attempts since the last successful login.
Last login: Sat Mar  7 16:38:46 2020 from node1
[ansible@node2 ~]$ logout
Connection to node2 closed.
[ansible@node1 ~]$ ssh node3
Last login: Sat Mar  7 16:38:46 2020 from node1
[ansible@node3 ~]$ logout
Connection to node3 closed.
以ansible用户身份过去:


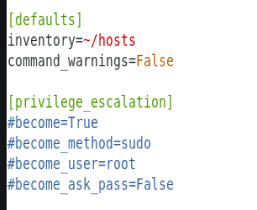
在ansible 用户的家目录里,编辑ansible.cfg文件

[ansible@node1 ~]$ cat hosts #只读当前家目录的,不读全局的
node2
2.copy指令
[ansible@node1 ~]$ ansible test -m copy -a "src=hosts dest=/tmp"
[ansible@node1 ~]$ ansible test -a 'ls -l /tmp'

[ansible@node1 ~]$ ansible test -m copy -a 'src=hosts dest=/mnt'   #copy到mnt目录不行。没权限
node2 | FAILED! => {
    "ansible_facts": {
        "discovered_interpreter_python": "/usr/bin/python"
    },
    "changed": false,
    "checksum": "6b2fddeb47c4984968fccc9bd69fbd8534b8fd5f",
    "msg": "Destination /mnt not writable"
}
[ansible@node1 ~]$ vim .ansible.cfg
[defaults]
inventory=~/hosts
command_warnings=False

[privilege_escalation]  #将注释(#)全部删除掉
#become=True
#become_method=sudo
#become_user=root
#become_ask_pass=False

3.yum 安装指令

启动服务:service
[ansible@node1 ~]$ ansible test -m service -a ‘name=httpd state=started’

node2:ps -ax 查看是否开启 :

编写默认发布页面:hello world

node2测试:
[ansible@node2 tmp]$ curl node2
hello world
工作原理:node1对当前目录搜寻ansible.cfg。有此文件则按照此文件中的inventory指的路径(读取主机分组:[test] node2),然后输入安装指令,对hosts文件里的node2进行安装,会node2的ansible用户目录里的tmp目录下建立文件,待删除完毕后再删除。

4。防火墙的配置
[ansible@node1 ~]$ ansible test -m service -a 'name=firewalld state=started'
[ansible@node1 ~]$ ansible test -m service -a 'name=firewalld enabled=yes'
node2查看防火墙策略:
[root@node2 ~]# iptables -nL  #只开启22端口
[ansible@node1 ~]$ ansible test -m firewalld -a 'service=http permanent=yes state=enabled immediate=yes'
node2 | CHANGED => {
    "ansible_facts": {
        "discovered_interpreter_python": "/usr/bin/python"
    },
    "changed": true,
    "msg": "Permanent and Non-Permanent(immediate) operation, Changed service http to enabled"
}

[ansible@node1 ~]$ curl node2
hello world
5.file模块
[ansible@node1 ~]$ ansible test -m file -a "path=/tmp/ii mode=755 state=directory"  #删除的时候state=absent
node2 | CHANGED => {
    "ansible_facts": {
        "discovered_interpreter_python": "/usr/bin/python"
    },
    "changed": true,
    "gid": 0,
    "group": "root",
    "mode": "0755",
    "owner": "root",
    "path": "/tmp/ii",
    "size": 6,
    "state": "directory",
    "uid": 0
}
[root@node2 ~]# ls -ld /tmp/ii/
drwxr-xr-x 2 root root 6 Mar  8 11:57 /tmp/ii/
6.service模块
[ansible@node1 ~]$ ansible test -m service -a "name=httpd state=started"
[ansible@node1 ~]$ ansible test -m service -a "name=httpd state=restarted"
[ansible@node1 ~]$ ansible test -m service -a "name=httpd state=stopped"
在node1上给node2改端口
[ansible@node1 ~]$ scp node2:/etc/httpd/conf/httpd.conf .
httpd.conf    #从node2复制到node1上
[ansible@node1 ~]$ vim httpd.conf  #将端口改成8080
[ansible@node1 ~]$ ansible test -m copy -a "src=./httpd.conf dest=/etc/httpd/conf/httpd.conf "  #发给node2并覆盖
[ansible@node1 ~]$ ansible test -m service -a "name=httpd state=restarted"  #将node2httpd服务重启
此时node2端口8080已经开启,但是node1执行curl node2:8080命令的时候被拒绝,原因是node2的防火墙开启

[ansible@node1 ~]$ ansible test -m firewalld -a "port=8080/tcp permanent=yes state=enabled immediate=yes"
node2 | CHANGED => {
    "ansible_facts": {
        "discovered_interpreter_python": "/usr/bin/python"
    },
    "changed": true,
    "msg": "Permanent and Non-Permanent(immediate) operation, Changed port 8080/tcp to enabled"
}
[ansible@node1 ~]$ curl node2:8080
hello world
7.user模块
[ansible@node1 ~]$ ansible test -m user -a "name=user1 password=123"
[ansible@node1 ~]$ ssh user1@node2  #建立的用户密码是明文,为了安全,不能登录
user1@node2's password:
Permission denied, please try again.
[root@node2 ~]# cat /etc/shadow   #明文密码可以看见
user1:123:18329:0:99999:7:::
生成加密密码:
[ansible@node1 ~]$ ansible test -m user -a "name=user1 password={{ 'westos' | password_hash('sha512', 'mysecretsalt') }}"
再次登录:
[ansible@node1 ~]$ ssh user1@node2     #成功
user1@node2's password:
Last failed login: Sun Mar  8 15:17:29 CST 2020 from node1 on ssh:notty
There were 2 failed login attempts since the last successful login.
删除用户:
[ansible@node1 ~]$ ansible test -m user -a "name=user1 state=absent remove=yes"    #同时删除用户家目录,加remove=yes
8.mariadb

[ansible@node1 ~]$ ansible test -m yum -a "name=mariadb state=started"
[ansible@node1 ~]$ ansible test -m service -a "name=mariadb state=started"
[ansible@node1 ~]$ ansible test -m yum -a 'name=MySQL-python state=present'  #安装连接软件
[ansible@node1 ~]$ ansible test -m mysql_db -a 'name=westos11 state=present'   #建立用户
去node2查看:

在node1上当前用户是ansible,但其实登录过去的时候默认切换root用户身份(.ansible.cfg文件里规定的)

若注释掉,则登录不上。
需要在命令行加入login_user=root,就可以成功登陆

在node1上下载mysql:
yum install -y mysql
[root@node1 ~]# mysql -h node2 -u wetosuser -p
Enter password:
ERROR 2003 (HY000): Can't connect to MySQL server on 'node2' (113)
因为防火墙打开着的,添加防火墙端口:
[ansible@node1 ~]$ ansible test -m firewalld -a "port=3306/tcp permanent=yes state=enabled immediate=yes"
再次登录:


 708
708


 被折叠的 条评论
为什么被折叠?
被折叠的 条评论
为什么被折叠?
 到【灌水乐园】发言


