1,i2c协议和时序
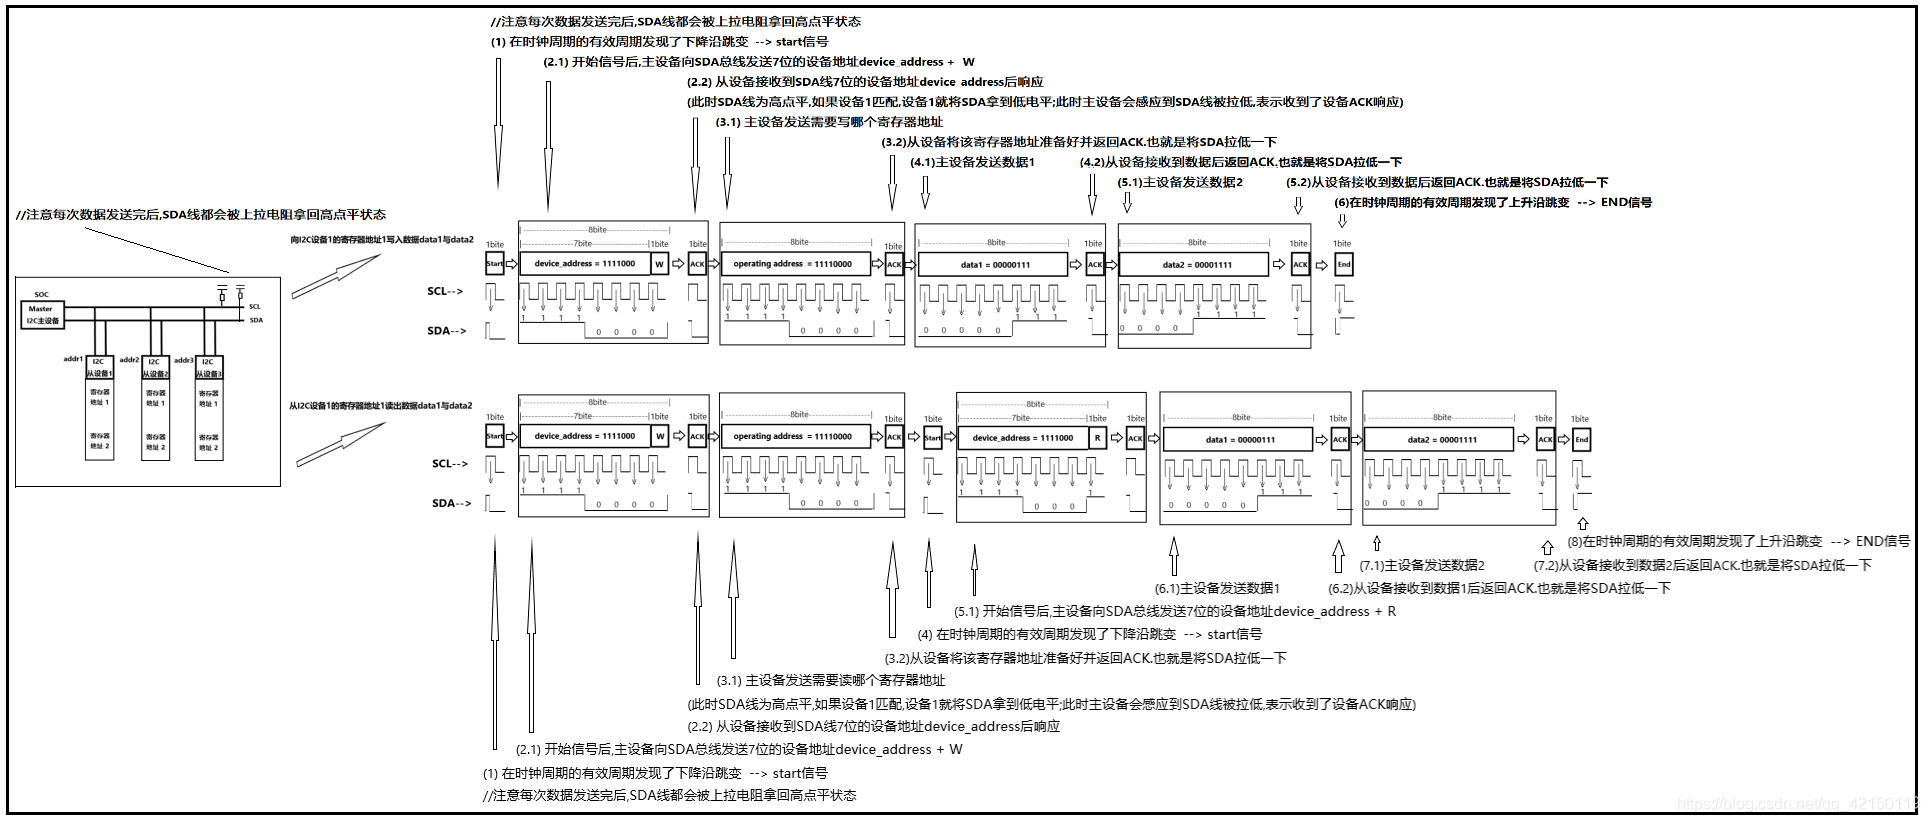
[1] >> I2C子系统
-->><1>打开Linux内核I2C子系统功能
[
make menuconfig #内核
Device Drivers --->
[ √ ] I2C support --->
I2C Hardware Bus support --->
[ √ ] S3C2410 I2C Driver
]
-->><2>
2,i2c子系统软件框架
===========一个soc芯片有多组i2c=============
	i2c0  -->  0x1386_0000,
	i2c1  -->  0x1387_0000,
	i2c2  -->  0x1388_0000,
	i2c3  -->  0x1389_0000,
	i2c4  -->  0x138A_0000,
	i2c5  -->  0x138B_0000, ------ MPU6050(7位i2c设备地址 = 0x68 = 1101000) (我们需要用到的i2c)
	i2c6  -->  0x138C_0000,
	i2c7  -->  0x138D_0000,
	i2c8  -->  0x138E_0000

====================编写i2c5设备树节点=====================
	查看原理图 --> MPU6050模块接入的是i2c5,但是i2c总线中没有找到i2c5的设备;
	我们发现设备树只有i2c0节点,所以我们需要自己仿照i2c0写i2c5节点 ;
	然后重新编译文件树,并替换开发板的设备树文件
  arch/arm/boot/dts/exynos4412-fs4412.dts中
    i2c@138B0000 {/*i2c5 设备树节点 ; 138B0000是i2c5的基地址*/
            #address-cells = <1>;
            #size-cells = <0>;
            samsung,i2c-sda-delay = <100>;
            samsung,i2c-max-bus-freq = <20000>;
            pinctrl-0 = <&i2c5_bus>;
            pinctrl-names = "default";
            status = "okay";

            mpu6050@68 { /*i2c client信息 == i2c5下的子节点信息*/
                    compatible = "invensense,mpu6050";
                    reg = <0x68>;   //0x68 = 设备的i2c7位地址 = 1101000
			};
    };

====================i2c_driver 结构体=====================
struct i2c_driver {//表示是一个从设备的驱动对象
	int (*probe)(struct i2c_client *, const struct i2c_device_id *);  //probe接口
	int (*remove)(struct i2c_client *);             //remove接口
	struct device_driver driver; //继承了父类
				const struct of_device_id	*of_match_table;
	const struct i2c_device_id *id_table;//用于做比对,非设备树的情况
}

====================i2c_client 结构体=====================
struct i2c_client {					//描述的是I2C从设备
	unsigned short addr;		//i2c从设备地址,来自于设备树中<reg>
	char name[I2C_NAME_SIZE]; //用于和i2c driver进行匹配,来自于设备树中compatible
	struct i2c_adapter *adapter;     //指向当前从设备所存在的i2c adapter
	struct device dev;	               	// 继承了父类
};

====================i2c_adapter 结构体=====================
	struct i2c_adapter {          //描述一个i2c主设备/soc信息,也不是我们要构建,原厂的代码会帮我们构建
	.....
	}

====================i2c_msg  结构体=====================
struct i2c_msg {//描述一个从设备要发送的数据的数据包
	__u16 addr;	 //从设备地址
	__u16 flags; //读1还是写0
	__u16 len;	//发送数据的长度
	__u8 *buf;	//发送的数据
};


=========================陀螺仪的基础知识============================
陀螺仪原理:小时候玩过陀螺,如果给它一定的旋转速度,陀螺会竖立旋转起来而不会倒
陀螺仪能测量3维层面(X,Y,Z轴)的加速度数据,角度数据


=========================================i2c系统架构如下=======================================
==============================================================================================
							app 								level
==============================================================================================
							i2c 			driver				level 				[程序员编写]
>>i2c_msg对象
>>完成fops
>>创建i2c_driver对象
>>与i2c_client匹配后进入probe()
==============================================================================================
						   i2c 		 	     core		        level     [i2c-core.c 内核提供]
维护i2c总线的 driver链表,device链表
//需要将i2c core level 代码i2c_core.c 编译进内核 -->	 /sys/bus/i2c/
==============================================================================================
						   i2c 				 adapt 				level   [i2c-s3c2410.c 芯片商提供]
>>i2c_adapt  -->  i2c主设备对象
>>i2c_client -->  i2c从设备对象
问:如何确定将i2c adapt level 层的代码 i2c-s3c2410.c编译进内核了?
答:可以找到/sys/bus/i2c/devices/i2c-0
(为什么只有一组i2c呢,由于设备树文件中只写了i2c0(第一组i2c)的设备树节点,我们需要写i2c5的设备树节点才会有i2c5)

问:为什么是4412的开发板为什么用i2c-s3c2410.c呢?
答:因为 i2c-s3c2410.cs不仅作为i2c总线的device,还作为platform bus的device(平台总线是用于升级的,所以4412平台也能用)
==============================================================================================
mpu6050_i2c_driver.c
#include <linux/init.h>
#include <linux/module.h>
#include <linux/input.h>
#include <linux/interrupt.h>
#include <linux/slab.h>
#include <linux/of.h>
#include <linux/of_irq.h>
#include <linux/of_gpio.h>
#include <linux/i2c.h>
#include <asm/io.h>
#include <asm/uaccess.h>
#include "mpu6050.h"
#define SMPLRT_DIV 0x19
#define CONFIG 0x1A
#define GYRO_CONFIG 0x1B
#define ACCEL_CONFIG 0x1C
#define ACCEL_XOUT_H 0x3B
#define ACCEL_XOUT_L 0x3C
#define ACCEL_YOUT_H 0x3D
#define ACCEL_YOUT_L 0x3E
#define ACCEL_ZOUT_H 0x3F
#define ACCEL_ZOUT_L 0x40
#define TEMP_OUT_H 0x41
#define TEMP_OUT_L 0x42
#define GYRO_XOUT_H 0x43
#define GYRO_XOUT_L 0x44
#define GYRO_YOUT_H 0x45
#define GYRO_YOUT_L 0x46
#define GYRO_ZOUT_H 0x47
#define GYRO_ZOUT_L 0x48
#define PWR_MGMT_1 0x6B
struct mpu6050{
int dmajor;
struct device *dev;
struct class *cls;
struct i2c_client *client;
};
struct mpu6050 *mpu6050_dev;
int mpu6050_write_reg_bytes(struct i2c_client *client, char *buf, int count)
{
int ret;
struct i2c_adapter *adapter = client->adapter;
struct i2c_msg msg[2];
msg[0].addr = client->addr;
msg[0].flags = 0;
msg[0].len = count;
msg[0].buf = buf;
msg[1].addr = client->addr;
msg[1].flags = 0;
msg[1].len = count;
msg[1].buf = buf+1;
ret = i2c_transfer(adapter, &msg, 2);
return ret==1?count:ret;
}
int mpu6050_read_reg_byte(struct i2c_client *client, char reg)
{
int ret;
struct i2c_adapter *adapter = client->adapter;
struct i2c_msg msg[2];
char rxbuf[1];
msg[0].addr = client->addr;
msg[0].flags = 0;
msg[0].len = 1;
msg[0].buf = ®
msg[1].addr = client->addr;
msg[1].flags = 1;
msg[1].len = 1;
msg[1].buf = rxbuf;
ret = i2c_transfer(adapter, msg, 2);
if(ret < 0)
{
printk("i2c_transfer read error\n");
return ret;
}
return rxbuf[0];
}
int mpu6050_drv_open(struct inode *inode, struct file *filp)
{
return 0;
}
int mpu6050_drv_close(struct inode *inode, struct file *filp)
{
return 0;
}
long mpu6050_drv_ioctl (struct file *filp, unsigned int cmd, unsigned long args)
{
union mpu6050_data data;
switch(cmd){
case IOC_GET_ACCEL:
data.accel.x = mpu6050_read_reg_byte(mpu6050_dev->client, ACCEL_XOUT_L);
data.accel.x |= mpu6050_read_reg_byte(mpu6050_dev->client, ACCEL_XOUT_H) << 8;
data.accel.y = mpu6050_read_reg_byte(mpu6050_dev->client, ACCEL_YOUT_L);
data.accel.y |= mpu6050_read_reg_byte(mpu6050_dev->client, ACCEL_YOUT_H) << 8;
data.accel.z = mpu6050_read_reg_byte(mpu6050_dev->client, ACCEL_ZOUT_L);
data.accel.z |= mpu6050_read_reg_byte(mpu6050_dev->client, ACCEL_ZOUT_H) << 8;
break;
case IOC_GET_GYRO:
data.gyro.x = mpu6050_read_reg_byte(mpu6050_dev->client, GYRO_XOUT_L);
data.gyro.x |= mpu6050_read_reg_byte(mpu6050_dev->client, GYRO_XOUT_H) << 8;
data.gyro.y = mpu6050_read_reg_byte(mpu6050_dev->client, GYRO_YOUT_L);
data.gyro.y |= mpu6050_read_reg_byte(mpu6050_dev->client, GYRO_YOUT_H) << 8;
data.gyro.z= mpu6050_read_reg_byte(mpu6050_dev->client, GYRO_ZOUT_L);
data.gyro.z |= mpu6050_read_reg_byte(mpu6050_dev->client, GYRO_ZOUT_H) << 8;
break;
case IOC_GET_TEMP:
data.temp = mpu6050_read_reg_byte(mpu6050_dev->client, TEMP_OUT_L);
data.temp |= mpu6050_read_reg_byte(mpu6050_dev->client, TEMP_OUT_H) << 8;
break;
default:
printk("invalid cmd\n");
return -EINVAL;
}
if(copy_to_user((void __user * )args, &data, sizeof(data)) > 0)
return -EFAULT;
return 0;
}
const struct file_operations mpu6050_fops = {
.open = mpu6050_drv_open,
.release = mpu6050_drv_close,
.unlocked_ioctl = mpu6050_drv_ioctl,
};
int mpu6050_drv_probe(struct i2c_client *client, const struct i2c_device_id *id)
{
printk("-----%s----\n", __FUNCTION__);
mpu6050_dev = kzalloc(sizeof(struct mpu6050), GFP_KERNEL);
mpu6050_dev->client = client;
mpu6050_dev->major = register_chrdev(0,"mpu_drv", &mpu6050_fops);
mpu6050_dev->cls = class_create(THIS_MODULE, "mpu_cls");
mpu6050_dev->dev = device_create(mpu6050_dev->cls, NULL, MKDEV(mpu6050_dev->major, 0),
NULL, "mpu6050");
char buf1[2] = {PWR_MGMT_1, 0x0};
mpu6050_write_reg_bytes(mpu6050_dev->client, buf1, 2);
char buf2[2] = {SMPLRT_DIV, 0x07};
mpu6050_write_reg_bytes(mpu6050_dev->client, buf2, 2);
char buf3[2] = {CONFIG, 0x06};
mpu6050_write_reg_bytes(mpu6050_dev->client, buf3, 2);
char buf4[2] ={GYRO_CONFIG, 0x18};
mpu6050_write_reg_bytes(mpu6050_dev->client, buf4, 2);
char buf5[2] = {ACCEL_CONFIG, 0x01};
mpu6050_write_reg_bytes(mpu6050_dev->client, buf5, 2);
return 0;
}
int mpu5060_drv_remove(struct i2c_client *client)
{
printk("-----%s----\n", __FUNCTION__);
device_destroy(mpu6050_dev->cls, MKDEV(mpu6050_dev->major, 0));
class_destroy(mpu6050_dev->cls);
unregister_chrdev(mpu6050_dev->major, "mpu_drv");
kfree(mpu6050_dev);
return 0;
}
const struct of_device_id of_mpu6050_id[] = {
{
.compatible = "invensense,mpu6050",
},
};
struct i2c_driver mpu6050_drv = {
.probe = mpu6050_drv_probe,
.remove = mpu5060_drv_remove,
.driver = {
.name = "mpu6050_drv",
.of_match_table = of_match_ptr(of_mpu6050_id),
},
};
static int __init mpu6050_drv_init(void)
{
return i2c_add_driver(&mpu6050_drv);
}
static void __exit mpu6050_drv_exit(void)
{
i2c_del_driver(&mpu6050_drv);
}
module_init(mpu6050_drv_init);
module_exit(mpu6050_drv_exit);
MODULE_LICENSE("GPL");
mpu6050.h
#define IOC_GET_ACCEL 0
#define IOC_GET_GYRO 1
#define IOC_GET_TEMP 2
#ifndef __MPU6050_H__
#define __MPU6050_H__
union mpu6050_data{
struct{
short x;
short y;
short z;
}accel;
struct{
short x;
short y;
short z;
}gyro;
short temp;
};
#endif
mpu6050_text.c
#include <stdio.h>
#include <string.h>
#include <stdlib.h>
#include <sys/types.h>
#include <sys/stat.h>
#include <fcntl.h>
#include <unistd.h>
#include <sys/ioctl.h>
#include "mpu6050.h"
int main(int argc, char *argv[])
{
int fd;
union mpu6050_data data;
fd = open("/dev/mpu_sensor", O_RDWR);
if(fd < 0)
{
perror("open");
exit(1);
}
while(1)
{
ioctl(fd, IOC_GET_ACCEL, &data);
printf("accel data : x = %d, y=%d, z=%d\n", data.accel.x, data.accel.y, data.accel.z);
ioctl(fd, IOC_GET_GYRO, &data);
printf("gyro data : x = %d, y=%d, z=%d\n", data.gyro.x, data.gyro.y, data.gyro.z);
sleep(1);
}
close(fd);
return 0;
}
Makefile文件
obj-m += $(MODULE_NAME).o

ROOTFS_DIR = /opt/4412/rootfs
MODULE_NAME = mpu6050_i2c_drv
APP_NAME = mpu6050_test
CROSS_COMPILE = /home/george/Linux_4412/toolchain/gcc-4.6.4/bin/arm-none-linux-gnueabi-
CC = $(CROSS_COMPILE)gcc
KERNEL_DIR = /home/george/Linux_4412/kernel/linux-3.14
CUR_DIR = $(shell pwd)

all :
	make -C  $(KERNEL_DIR) M=$(CUR_DIR) modules
	$(CC) $(APP_NAME).c  -o $(APP_NAME)

install:
	cp -raf *.ko $(APP_NAME)   $(ROOTFS_DIR)/drv_module


 722
722

 被折叠的 条评论
为什么被折叠?
被折叠的 条评论
为什么被折叠?
 到【灌水乐园】发言


