


SpringBoot
SpringBoot
原理初探
pom.xml
- spring-boot-dependenices 核心依赖在父工程中
- 在引入springboot时不需要填写版本号,因为版本仓库
启动器
父依赖
其中主要依赖一个父项目,主要时管理项目的资源过滤及插件
<parent>
    <groupId>org.springframework.boot</groupId>
    <artifactId>spring-boot-starter-parent</artifactId>
    <version>2.2.5.RELEASE</version>
    <relativePath/> <!-- lookup parent from repository -->
</parent>
点进去,其中还有一个父依赖
<parent>
    <groupId>org.springframework.boot</groupId>
    <artifactId>spring-boot-dependencies</artifactId>
    <version>2.2.5.RELEASE</version>
    <relativePath>../../spring-boot-dependencies</relativePath>
</parent>
这里才是真正管理SpringBoot应用里面所有依赖版本的地方,SpringBoot的版本控制中心;
启动器spring-boot-starter
<dependency>
    <groupId>org.springframework.boot</groupId>
    <artifactId>spring-boot-starter-web</artifactId>
</dependency>
springboot-boot-starter-xxx:就是spring-boot的场景启动器
spring-boot-starter-web:帮我们导入了web模块正常运行所依赖的组件;
SpringBoot将所有的功能场景都抽取出来,做成一个个的starter (启动器),只需要在项目中引入这些starter即可,所有相关的依赖都会导入进来 , 我们要用什么功能就导入什么样的场景启动器即可 ;我们未来也可以自己自定义 starter;
默认主启动类
pom.xml
//@SpringBootApplication 来标注一个主程序类
//说明这是一个Spring Boot应用
@SpringBootApplication
public class SpringbootApplication {

   public static void main(String[] args) {
     //以为是启动了一个方法,没想到启动了一个服务
      SpringApplication.run(SpringbootApplication.class, args);
   }
}
@SpringBootApplication
作用: 标注在某个类上说明这个类是SpringBoot的主配置类 , SpringBoot就应该运行这个类的main方法来启动SpringBoot应用;
@SpringBootConfiguration
@EnableAutoConfiguration
@ComponentScan(
    excludeFilters = {@Filter(
    type = FilterType.CUSTOM,
    classes = {TypeExcludeFilter.class}
), @Filter(
    type = FilterType.CUSTOM,
    classes = {AutoConfigurationExcludeFilter.class}
)}
)
public @interface SpringBootApplication {
    // ......
}
@ComponentScan
这个注解在Spring中很重要 ,它对应XML配置中的元素。
作用:自动扫描并加载符合条件的组件或者bean , 将这个bean定义加载到IOC容器中
@SpringBootConfiguration
作用:SpringBoot的配置类 ,标注在某个类上 , 表示这是一个SpringBoot的配置类;
我们继续进去这个注解查看
// 点进去得到下面的 @Component
@Configuration
public @interface SpringBootConfiguration {}

@Component
public @interface Configuration {}
这里的 @Configuration,说明这是一个配置类 ,配置类就是对应Spring的xml 配置文件;
里面的 @Component 这就说明,启动类本身也是Spring中的一个组件而已,负责启动应用!
我们回到 SpringBootApplication 注解中继续看。
yaml 配置输入
SpringBoot 使用一个配置文件,配置文件名称固定
application.properties
application.yml
配置文件的作用:修改SpringBoot自动配置的默认值,因为SpringBoot在底层都给我们自动配置好了;
yaml概述
YAML是 “YAML Ain’t a Markup Language” (YAML不是一种标记语言)的递归缩写。在开发的这种语言时,YAML 的意思其实是:“Yet Another Markup Language”(仍是一种标记语言)
这种语言以数据作为中心,而不是以标记语言为重点!
注入配置
- 编写一个实体类
@Component  //注册bean到容器中
public class Dog {
    private String name;
    private Integer age;
    //有参无参构造、get、set方法、toString()方法
}
- 以前如何 给bean注入
@Component //注册bean
public class Dog {
    @Value("阿黄")
    private String name;
    @Value("18")
    private Integer age;
}
- 测试
@SpringBootTest
class DemoApplicationTests {
@Autowired //将狗狗自动注入进来
Dog dog;
@Test
public void contextLoads() {
System.out.println(dog); //打印看下狗狗对象
}
}
4. person类
@Component //注册bean到容器中
public class Person {
    private String name;
    private Integer age;
    private Boolean happy;
    private Date birth;
    private Map<String,Object> maps;
    private List<Object> lists;
    private Dog dog;
    //有参无参构造、get、set方法、toString()方法
}
- 使用yaml配置的方式注入
person:
  name: qinjiang
  age: 3
  happy: false
  birth: 2000/01/01
  maps: {k1: v1,k2: v2}
  lists:
   - code
   - girl
   - music
  dog:
    name: 旺财
    age: 1
- 我们刚才已经把person这个对象的所有值都写好了,我们现在来注入到我们的类中!
/*
@ConfigurationProperties作用:
将配置文件中配置的每一个属性的值,映射到这个组件中;
告诉SpringBoot将本类中的所有属性和配置文件中相关的配置进行绑定
参数 prefix = “person” : 将配置文件中的person下面的所有属性一一对应
*/
@Component //注册bean
@ConfigurationProperties(prefix = "person")
public class Person {
    private String name;
    private Integer age;
    private Boolean happy;
    private Date birth;
    private Map<String,Object> maps;
    private List<Object> lists;
    private Dog dog;
}
- springboot配置注解处理器
<!-- 导入配置文件处理器,配置文件进行绑定就会有提示,需要重启 -->
<dependency>
  <groupId>org.springframework.boot</groupId>
  <artifactId>spring-boot-configuration-processor</artifactId>
  <optional>true</optional>
</dependency>
- 确认以上配置都OK之后,我们去测试类中测试一下:
@SpringBootTest
class DemoApplicationTests {
    @Autowired
    Person person; //将person自动注入进来
    @Test
    public void contextLoads() {
        System.out.println(person); //打印person信息
    }
}
对比
@Value这个使用起来并不友好!我们需要为每个属性单独注解赋值,比较麻烦;我们来看个功能对比图
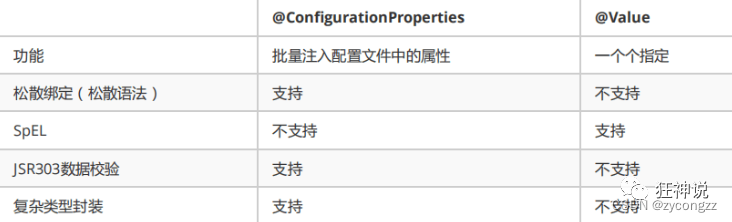
1、@ConfigurationProperties只需要写一次即可 , @Value则需要每个字段都添加
2、松散绑定:这个什么意思呢? 比如我的yml中写的last-name,这个和lastName是一样的, - 后面跟着的字母默认是大写的。这就是松散绑定。可以测试一下
3、JSR303数据校验 , 这个就是我们可以在字段是增加一层过滤器验证 , 可以保证数据的合法性
4、复杂类型封装,yml中可以封装对象 , 使用value就不支持
JSR303数据校验及多环境切换
使用
SpringBoot 中可以用@validated 来校验数据,如果数据异常就会统一抛出异常,方便异常中心统一处理。
@Component //注册bean
@ConfigurationProperties(prefix = "person")
@Validated  //数据校验
public class Person {
    @Email(message="邮箱格式错误") //name必须是邮箱格式
    private String name;
}
运行结果 :default message [不是一个合法的电子邮件地址];
使用数据校验,保证数据的正确性
@NotNull(message="名字不能为空")
private String userName;
@Max(value=120,message="年龄最大不能查过120")
private int age;
@Email(message="邮箱格式错误")
private String email;
空检查
@Null       验证对象是否为null
@NotNull    验证对象是否不为null, 无法查检长度为0的字符串
@NotBlank   检查约束字符串是不是Null还有被Trim的长度是否大于0,只对字符串,且会去掉前后空格.
@NotEmpty   检查约束元素是否为NULL或者是EMPTY.

Booelan检查
@AssertTrue     验证 Boolean 对象是否为 true
@AssertFalse    验证 Boolean 对象是否为 false

长度检查
@Size(min=, max=) 验证对象(Array,Collection,Map,String)长度是否在给定的范围之内
@Length(min=, max=) string is between min and max included.

日期检查
@Past       验证 Date 和 Calendar 对象是否在当前时间之前
@Future     验证 Date 和 Calendar 对象是否在当前时间之后
@Pattern    验证 String 对象是否符合正则表达式的规则
多环境切换
profile是Spring对不同环境提供不同配置功能的支持,可以通过激活不同的环境版本,实现快速切换环境;
多配置文件
我们在主配置文件编写的时候,文件名可以是 application-{profile}.properties/yml , 用来指定多个环境版本;
例如:
application-test.properties 代表测试环境配置
application-dev.properties 代表开发环境配置
但是Springboot并不会直接启动这些配置文件,它默认使用application.properties主配置文件;
我们需要通过一个配置来选择需要激活的环境:
#比如在配置文件中指定使用dev环境,我们可以通过设置不同的端口号进行测试;
#我们启动SpringBoot,就可以看到已经切换到dev下的配置了;
spring.profiles.active=dev
yaml多文档块
server:
  port: 8081
#选择要激活那个环境块
spring:
  profiles:
    active: prod
---
server:
  port: 8083
spring:
  profiles: dev #配置环境的名称
---
server:
  port: 8084
spring:
  profiles: prod  #配置环境的名称
  注意:如果yml和properties同时都配置了端口,并且没有激活其他环境 , 默认会使用properties配置文件的!

springboot 启动会扫描以下位置的application.properties或者application.yml文件作为Spring boot的默认配置文件:
优先级1:项目路径下的config文件夹配置文件
优先级2:项目路径下配置文件
优先级3:资源路径下的config文件夹配置文件
优先级4:资源路径下配置文件
自动配置原理
以HttpEncodingAutoConfiguration(Http编码自动配置)为例解释自动配置原理;
//表示这是一个配置类,和以前编写的配置文件一样,也可以给容器中添加组件;
@Configuration
//启动指定类的ConfigurationProperties功能;
//进入这个HttpProperties查看,将配置文件中对应的值和HttpProperties绑定起来;
//并把HttpProperties加入到ioc容器中
@EnableConfigurationProperties({HttpProperties.class})
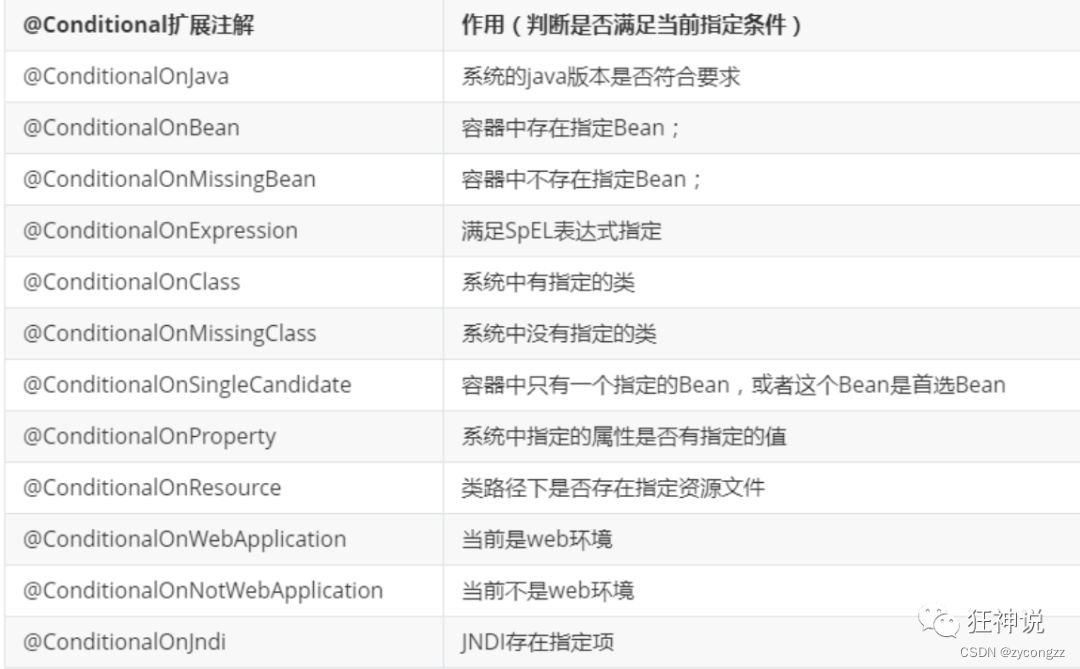
//Spring底层@Conditional注解
//根据不同的条件判断,如果满足指定的条件,整个配置类里面的配置就会生效;
//这里的意思就是判断当前应用是否是web应用,如果是,当前配置类生效
@ConditionalOnWebApplication(
type = Type.SERVLET
)
//判断当前项目有没有这个类CharacterEncodingFilter;SpringMVC中进行乱码解决的过滤器;
@ConditionalOnClass({CharacterEncodingFilter.class})
//判断配置文件中是否存在某个配置:spring.http.encoding.enabled;
//如果不存在,判断也是成立的
//即使我们配置文件中不配置pring.http.encoding.enabled=true,也是默认生效的;
@ConditionalOnProperty(
prefix = "spring.http.encoding",
value = {"enabled"},
matchIfMissing = true
)
public class HttpEncodingAutoConfiguration {
//他已经和SpringBoot的配置文件映射了
private final Encoding properties;
//只有一个有参构造器的情况下,参数的值就会从容器中拿
public HttpEncodingAutoConfiguration(HttpProperties properties) {
this.properties = properties.getEncoding();
}
//给容器中添加一个组件,这个组件的某些值需要从properties中获取
@Bean
@ConditionalOnMissingBean //判断容器没有这个组件?
public CharacterEncodingFilter characterEncodingFilter() {
CharacterEncodingFilter filter = new OrderedCharacterEncodingFilter();
filter.setEncoding(this.properties.getCharset().name());
filter.setForceRequestEncoding(this.properties.shouldForce(org.springframework.boot.autoconfigure.http.HttpProperties.Encoding.Type.REQUEST));
filter.setForceResponseEncoding(this.properties.shouldForce(org.springframework.boot.autoconfigure.http.HttpProperties.Encoding.Type.RESPONSE));
return filter;
}
//。。。。。。。
一句话总结 :根据当前不同的条件判断,决定这个配置类是否生效!
- 一但这个配置类生效;这个配置类就会给容器中添加各种组件;
- 这些组件的属性是从对应的properties类中获取的,这些类里面的每一个属性又是和配置文件绑定的;
- 所有在配置文件中能配置的属性都是在xxxxProperties类中封装着;
- 配置文件能配置什么就可以参照某个功能对应的这个属性
//从配置文件中获取指定的值和bean的属性进行绑定
@ConfigurationProperties(prefix = "spring.http")
public class HttpProperties {
    // .....
}
自动配置的原理
1、SpringBoot启动会加载大量的自动配置类
2、我们看我们需要的功能有没有在SpringBoot默认写好的自动配置类当中;
3、我们再来看这个自动配置类中到底配置了哪些组件;(只要我们要用的组件存在在其中,我们就不需要再手动配置了)
4、给容器中自动配置类添加组件的时候,会从properties类中获取某些属性。我们只需要在配置文件中指定这些属性的值即可;
xxxxAutoConfigurartion:自动配置类;给容器中添加组件
xxxxProperties:封装配置文件中相关属性;
自动配置类必须在一定的条件下才能生效;
整合JDBC
SpringData 简介
对于数据访问层,无论是 SQL(关系型数据库) 还是 NOSQL(非关系型数据库),Spring Boot 底层都是采用 Spring Data 的方式进行统一处理。
Spring Boot 底层都是采用 Spring Data 的方式进行统一处理各种数据库,Spring Data 也是 Spring 中与 Spring Boot、Spring Cloud 等齐名的知名项目。
spring data 官网
数据库相关的启动器 :可以参考官方文档
整合JDBC
创建测试项目测试数据源
创建一个新的项目springboot-data-jdbc ; 引入相应的模块!基础模块
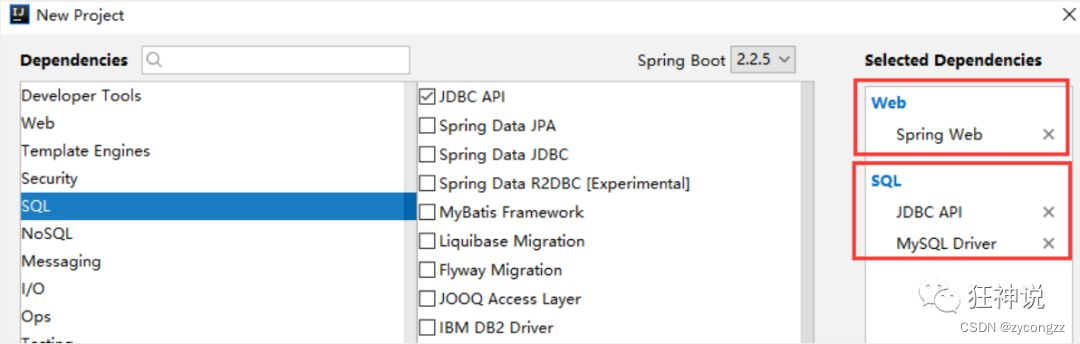
导入启动器
<dependency>
    <groupId>org.springframework.boot</groupId>
    <artifactId>spring-boot-starter-jdbc</artifactId>
</dependency>
<dependency>
    <groupId>mysql</groupId>
    <artifactId>mysql-connector-java</artifactId>
    <scope>runtime</scope>
</dependency>
编写yaml配置文件链接数据库
spring:
  datasource:
    username: root
    password: 123456
    #?serverTimezone=UTC解决时区的报错
    url: jdbc:mysql://localhost:3306/springboot?serverTimezone=UTC&useUnicode=true&characterEncoding=utf-8
    driver-class-name: com.mysql.cj.jdbc.Driver
配置完这一些东西后,我们就可以直接去使用了,因为SpringBoot已经默认帮我们进行了自动配置;去测试类测试一下
@SpringBootTest
class SpringbootDataJdbcApplicationTests {
    //DI注入数据源
    @Autowired
    DataSource dataSource;
    @Test
    public void contextLoads() throws SQLException {
        //看一下默认数据源
        System.out.println(dataSource.getClass());
        //获得连接
        Connection connection =   dataSource.getConnection();
        System.out.println(connection);
        //关闭连接
        connection.close();
    }
}
结果:我们可以看到他默认给我们配置的数据源为 : class com.zaxxer.hikari.HikariDataSource , 我们并没有手动配置
我们来全局搜索一下,找到数据源的所有自动配置都在 :DataSourceAutoConfiguration文件:
@Import(
    {Hikari.class, Tomcat.class, Dbcp2.class, Generic.class, DataSourceJmxConfiguration.class}
)
protected static class PooledDataSourceConfiguration {
    protected PooledDataSourceConfiguration() {
    }
}
这里导入的类都在 DataSourceConfiguration 配置类下,可以看出 Spring Boot 2.2.5 默认使用HikariDataSource 数据源,而以前版本,如 Spring Boot 1.5 默认使用 org.apache.tomcat.jdbc.pool.DataSource 作为数据源;
HikariDataSource 号称 Java WEB 当前速度最快的数据源,相比于传统的 C3P0 、DBCP、Tomcat jdbc 等连接池更加优秀;
可以使用 spring.datasource.type 指定自定义的数据源类型,值为 要使用的连接池实现的完全限定名。
可以 CRUD 操作数据库了。但是我们需要先了解一个对象 JdbcTemplate
JDBCTemplate
1、有了数据源(com.zaxxer.hikari.HikariDataSource),然后可以拿到数据库连接(java.sql.Connection),有了连接,就可以使用原生的 JDBC 语句来操作数据库;
2、即使不使用第三方第数据库操作框架,如 MyBatis等,Spring 本身也对原生的JDBC 做了轻量级的封装,即JdbcTemplate。
3、数据库操作的所有 CRUD 方法都在 JdbcTemplate 中。
4、Spring Boot 不仅提供了默认的数据源,同时默认已经配置好了 JdbcTemplate 放在了容器中,程序员只需自己注入即可使用
5、JdbcTemplate 的自动配置是依赖 org.springframework.boot.autoconfigure.jdbc 包下的 JdbcTemplateConfiguration 类
JdbcTemplate主要提供以下几类方法:
- execute方法:可以用于执行任何SQL语句,一般用于执行DDL语句;
- update方法及batchUpdate方法:update方法用于执行新增、修改、删除等语句;batchUpdate方法用于执行批处理相关语句;
- query方法及queryForXXX方法:用于执行查询相关语句;
- call方法:用于执行存储过程、函数相关语句。
测试
package com.kuang.controller;

import org.springframework.beans.factory.annotation.Autowired;
import org.springframework.jdbc.core.JdbcTemplate;
import org.springframework.web.bind.annotation.GetMapping;
import org.springframework.web.bind.annotation.PathVariable;
import org.springframework.web.bind.annotation.RequestMapping;
import org.springframework.web.bind.annotation.RestController;

import java.util.Date;
import java.util.List;
import java.util.Map;

@RestController
@RequestMapping("/jdbc")
public class JdbcController {

    /**
     * Spring Boot 默认提供了数据源,默认提供了 org.springframework.jdbc.core.JdbcTemplate
     * JdbcTemplate 中会自己注入数据源,用于简化 JDBC操作
     * 还能避免一些常见的错误,使用起来也不用再自己来关闭数据库连接
     */
    @Autowired
    JdbcTemplate jdbcTemplate;

    //查询employee表中所有数据
    //List 中的1个 Map 对应数据库的 1行数据
    //Map 中的 key 对应数据库的字段名,value 对应数据库的字段值
    @GetMapping("/list")
    public List<Map<String, Object>> userList(){
        String sql = "select * from employee";
        List<Map<String, Object>> maps = jdbcTemplate.queryForList(sql);
        return maps;
    }

    //新增一个用户
    @GetMapping("/add")
    public String addUser(){
        //插入语句,注意时间问题
        String sql = "insert into employee(last_name, email,gender,department,birth)" +
                " values ('狂神说','24736743@qq.com',1,101,'"+ new Date().toLocaleString() +"')";
        jdbcTemplate.update(sql);
        //查询
        return "addOk";
    }

    //修改用户信息
    @GetMapping("/update/{id}")
    public String updateUser(@PathVariable("id") int id){
        //插入语句
        String sql = "update employee set last_name=?,email=? where id="+id;
        //数据
        Object[] objects = new Object[2];
        objects[0] = "秦疆";
        objects[1] = "24736743@sina.com";
        jdbcTemplate.update(sql,objects);
        //查询
        return "updateOk";
    }

    //删除用户
    @GetMapping("/delete/{id}")
    public String delUser(@PathVariable("id") int id){
        //插入语句
        String sql = "delete from employee where id=?";
        jdbcTemplate.update(sql,id);
        //查询
        return "deleteOk";
    }
}
整合Druid
Java程序很大一部分要操作数据库,为了提高性能操作数据库的时候,又不得不使用数据库连接池。
Druid 是阿里巴巴开源平台上一个数据库连接池实现,结合了 C3P0、DBCP 等 DB 池的优点,同时加入了日志监控。
Druid 可以很好的监控 DB 池连接和 SQL 的执行情况,天生就是针对监控而生的 DB 连接池。
Druid已经在阿里巴巴部署了超过600个应用,经过一年多生产环境大规模部署的严苛考验。
Spring Boot 2.0 以上默认使用 Hikari 数据源,可以说 Hikari 与 Driud 都是当前 Java Web 上最优秀的数据源,我们来重点介绍 Spring Boot 如何集成 Druid 数据源,如何实现数据库监控。
driud github网址
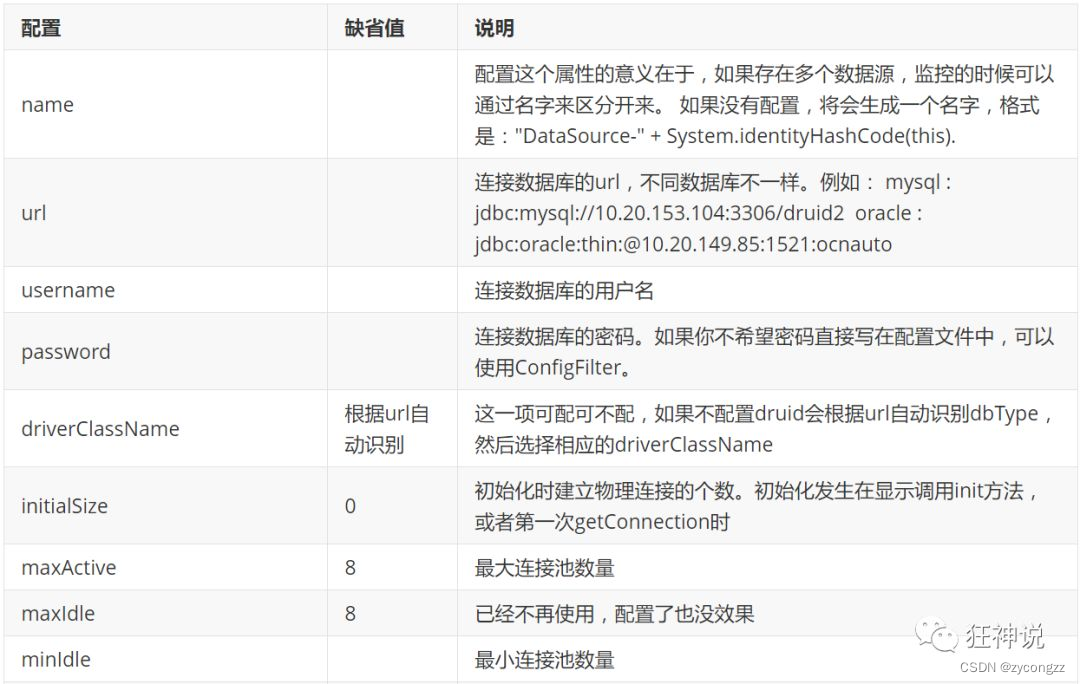
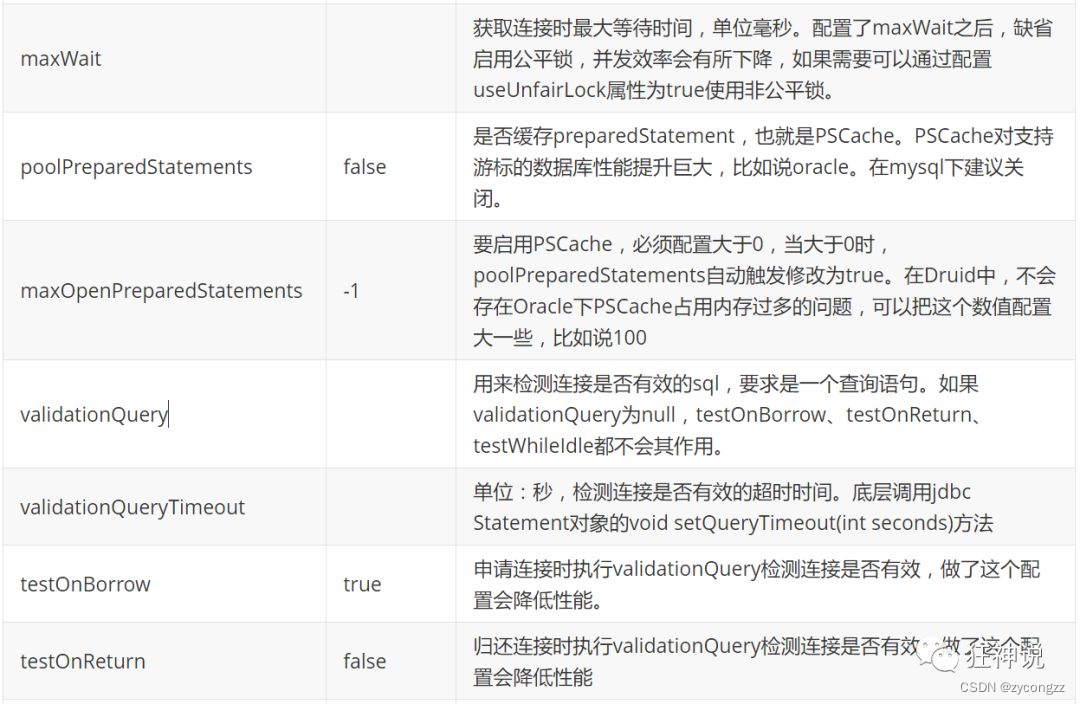
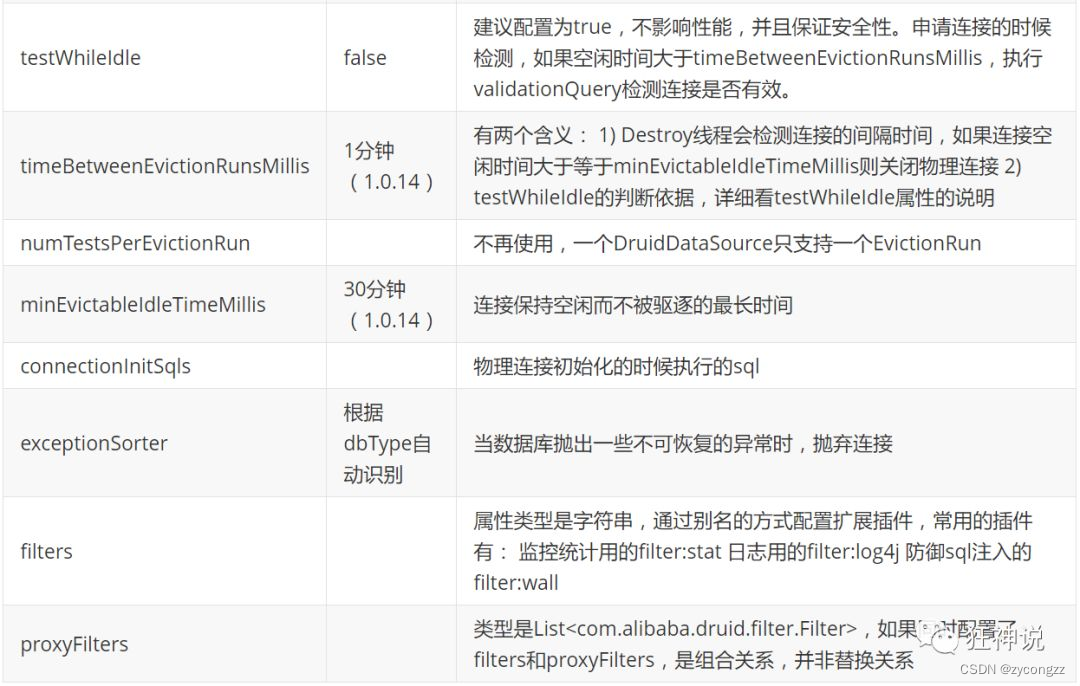
com.alibaba.druid.pool.DruidDataSource 基本配置参数如下:

配置数据源
1.添加Druid 数据源依赖
<!-- https://mvnrepository.com/artifact/com.alibaba/druid -->
<dependency>
    <groupId>com.alibaba</groupId>
    <artifactId>druid</artifactId>
    <version>1.1.21</version>
</dependency>
2.切换数据源。
之前已经说过 Spring Boot 2.0 以上默认使用 com.zaxxer.hikari.HikariDataSource 数据源,但可以 通过 spring.datasource.type 指定数据源。
spring:
  datasource:
    username: root
    password: 123456
    url: jdbc:mysql://localhost:3306/springboot?serverTimezone=UTC&useUnicode=true&characterEncoding=utf-8
    driver-class-name: com.mysql.cj.jdbc.Driver
    type: com.alibaba.druid.pool.DruidDataSource # 自定义数据源
3.数据源切换,再测试类中注入DataSource
4.切换成功,设置数据源链接初始化、最大连接数、等待时间、最小连接数 等设置项;可以查看源码
spring:
  datasource:
    username: root
    password: 123456
    #?serverTimezone=UTC解决时区的报错
    url: jdbc:mysql://localhost:3306/springboot?serverTimezone=UTC&useUnicode=true&characterEncoding=utf-8
    driver-class-name: com.mysql.cj.jdbc.Driver
    type: com.alibaba.druid.pool.DruidDataSource

    #Spring Boot 默认是不注入这些属性值的,需要自己绑定
    #druid 数据源专有配置
    initialSize: 5
    minIdle: 5
    maxActive: 20
    maxWait: 60000
    timeBetweenEvictionRunsMillis: 60000
    minEvictableIdleTimeMillis: 300000
    validationQuery: SELECT 1 FROM DUAL
    testWhileIdle: true
    testOnBorrow: false
    testOnReturn: false
    poolPreparedStatements: true

    #配置监控统计拦截的filters,stat:监控统计、log4j:日志记录、wall:防御sql注入
    #如果允许时报错  java.lang.ClassNotFoundException: org.apache.log4j.Priority
    #则导入 log4j 依赖即可,Maven 地址:https://mvnrepository.com/artifact/log4j/log4j
    filters: stat,wall,log4j
    maxPoolPreparedStatementPerConnectionSize: 20
    useGlobalDataSourceStat: true
    connectionProperties: druid.stat.mergeSql=true;druid.stat.slowSqlMillis=500
5.导入Log4J 依赖
<!-- https://mvnrepository.com/artifact/log4j/log4j -->
<dependency>
    <groupId>log4j</groupId>
    <artifactId>log4j</artifactId>
    <version>1.2.17</version>
</dependency>
6.、现在需要程序员自己为 DruidDataSource 绑定全局配置文件中的参数,再添加到容器中,而不再使用 Spring Boot 的自动生成了;我们需要 自己添加 DruidDataSource 组件到容器中,并绑定属性;
import com.alibaba.druid.pool.DruidDataSource;
import org.springframework.boot.context.properties.ConfigurationProperties;
import org.springframework.context.annotation.Bean;
import org.springframework.context.annotation.Configuration;

import javax.sql.DataSource;

@Configuration
public class DruidConfig {

    /*
       将自定义的 Druid数据源添加到容器中,不再让 Spring Boot 自动创建
       绑定全局配置文件中的 druid 数据源属性到 com.alibaba.druid.pool.DruidDataSource从而让它们生效
       @ConfigurationProperties(prefix = "spring.datasource"):作用就是将 全局配置文件中
       前缀为 spring.datasource的属性值注入到 com.alibaba.druid.pool.DruidDataSource 的同名参数中
     */
    @ConfigurationProperties(prefix = "spring.datasource")
    @Bean
    public DataSource druidDataSource() {
        return new DruidDataSource();
    }
}
7.测试
@SpringBootTest
class SpringbootDataJdbcApplicationTests {

    //DI注入数据源
    @Autowired
    DataSource dataSource;

    @Test
    public void contextLoads() throws SQLException {
        //看一下默认数据源
        System.out.println(dataSource.getClass());
        //获得连接
        Connection connection =   dataSource.getConnection();
        System.out.println(connection);

        DruidDataSource druidDataSource = (DruidDataSource) dataSource;
        System.out.println("druidDataSource 数据源最大连接数:" + druidDataSource.getMaxActive());
        System.out.println("druidDataSource 数据源初始化连接数:" + druidDataSource.getInitialSize());
        //关闭连接
        connection.close();
    }
}
8.配置Druid数据源监控
Druid 数据源具有监控的功能,并提供了一个 web 界面方便用户查看,类似安装 路由器 时,人家也提供了一个默认的 web 页面。
所以第一步需要设置 Druid 的后台管理页面,比如 登录账号、密码 等;配置后台管理;
//配置 Druid 监控管理后台的Servlet;
//内置 Servlet 容器时没有web.xml文件,所以使用 Spring Boot 的注册 Servlet 方式
@Bean
public ServletRegistrationBean statViewServlet() {
    ServletRegistrationBean bean = new ServletRegistrationBean(new StatViewServlet(), "/druid/*");

    // 这些参数可以在 com.alibaba.druid.support.http.StatViewServlet
    // 的父类 com.alibaba.druid.support.http.ResourceServlet 中找到
    Map<String, String> initParams = new HashMap<>();
    initParams.put("loginUsername", "admin"); //后台管理界面的登录账号
    initParams.put("loginPassword", "123456"); //后台管理界面的登录密码

    //后台允许谁可以访问
    //initParams.put("allow", "localhost"):表示只有本机可以访问
    //initParams.put("allow", ""):为空或者为null时,表示允许所有访问
    initParams.put("allow", "");
    //deny:Druid 后台拒绝谁访问
    //initParams.put("kuangshen", "192.168.1.20");表示禁止此ip访问

    //设置初始化参数
    bean.setInitParameters(initParams);
    return bean;
}
http://localhost:8080/druid/login.html 访问
配置Druid web监控filter 过滤器
//配置 Druid 监控 之  web 监控的 filter
//WebStatFilter:用于配置Web和Druid数据源之间的管理关联监控统计
@Bean
public FilterRegistrationBean webStatFilter() {
    FilterRegistrationBean bean = new FilterRegistrationBean();
    bean.setFilter(new WebStatFilter());

    //exclusions:设置哪些请求进行过滤排除掉,从而不进行统计
    Map<String, String> initParams = new HashMap<>();
    initParams.put("exclusions", "*.js,*.css,/druid/*,/jdbc/*");
    bean.setInitParameters(initParams);

    //"/*" 表示过滤所有请求
    bean.setUrlPatterns(Arrays.asList("/*"));
    return bean;
}
整合MyBatis
Maven仓库地址:
1.导入MyBatis所需要的依赖
<dependency>
    <groupId>org.mybatis.spring.boot</groupId>
    <artifactId>mybatis-spring-boot-starter</artifactId>
    <version>2.1.1</version>
</dependency>
2.配置数据库链接信息不变
spring:
  datasource:
    username: root
    password: 123456
    #?serverTimezone=UTC解决时区的报错
    url: jdbc:mysql://localhost:3306/springboot?serverTimezone=UTC&useUnicode=true&characterEncoding=utf-8
    driver-class-name: com.mysql.cj.jdbc.Driver
    type: com.alibaba.druid.pool.DruidDataSource

    #Spring Boot 默认是不注入这些属性值的,需要自己绑定
    #druid 数据源专有配置
    initialSize: 5
    minIdle: 5
    maxActive: 20
    maxWait: 60000
    timeBetweenEvictionRunsMillis: 60000
    minEvictableIdleTimeMillis: 300000
    validationQuery: SELECT 1 FROM DUAL
    testWhileIdle: true
    testOnBorrow: false
    testOnReturn: false
    poolPreparedStatements: true
    #配置监控统计拦截的filters,stat:监控统计、log4j:日志记录、wall:防御sql注入
    #如果允许时报错  java.lang.ClassNotFoundException: org.apache.log4j.Priority
    #则导入 log4j 依赖即可,Maven 地址:https://mvnrepository.com/artifact/log4j/log4j
    filters: stat,wall,log4j
    maxPoolPreparedStatementPerConnectionSize: 20
    useGlobalDataSourceStat: true
    connectionProperties: druid.stat.mergeSql=true;druid.stat.slowSqlMillis=500
3.创建实体类,导入Lombok
Dapartment.java
package com.kuang.pojo;

import lombok.AllArgsConstructor;
import lombok.Data;
import lombok.NoArgsConstructor;
@Data
@NoArgsConstructor
@AllArgsConstructor
public class Department {
    private Integer id;
    private String departmentName;

}
4.创建mapper目录以及对应的mapper接口
DapartmentMapper.java
//@Mapper : 表示本类是一个 MyBatis 的 Mapper
@Mapper
@Repository
public interface DepartmentMapper {

    // 获取所有部门信息
    List<Department> getDepartments();

    // 通过id获得部门
    Department getDepartment(Integer id);

}
5.对应的mapper映射文件
<?xml version="1.0" encoding="UTF-8" ?>
<!DOCTYPE mapper
        PUBLIC "-//mybatis.org//DTD Mapper 3.0//EN"
        "http://mybatis.org/dtd/mybatis-3-mapper.dtd">
<mapper namespace="com.kuang.mapper.DepartmentMapper">
    <select id="getDepartments" resultType="Department">
       select * from department;
    </select>
    <select id="getDepartment" resultType="Department" parameterType="int">
       select * from department where id = #{id};
    </select>
</mapper>
6.maven配置资源过滤问题
<resources>
    <resource>
        <directory>src/main/java</directory>
        <includes>
            <include>**/*.xml</include>
        </includes>
        <filtering>true</filtering>
    </resource>
</resources>
7.编写部门的Departmentcontroller 测试
@RestController
public class DepartmentController {

    @Autowired
    DepartmentMapper departmentMapper;

    // 查询全部部门
    @GetMapping("/getDepartments")
    public List<Department> getDepartments(){
        return departmentMapper.getDepartments();
    }
    // 查询全部部门
    @GetMapping("/getDepartment/{id}")
    public Department getDepartment(@PathVariable("id") Integer id){
        return departmentMapper.getDepartment(id);
    }

}
启动项目测试
增加一个员工类测试
1.新建一个pojo Employee
@Data
@AllArgsConstructor
@NoArgsConstructor
public class Employee {

    private Integer id;
    private String lastName;
    private String email;
    //1 male, 0 female
    private Integer gender;
    private Integer department;
    private Date birth;
    private Department eDepartment; // 冗余设计

}
2.新建一个EmployeeMapper接口
//@Mapper : 表示本类是一个 MyBatis 的 Mapper
@Mapper
@Repository
public interface EmployeeMapper {

    // 获取所有员工信息
    List<Employee> getEmployees();

    // 新增一个员工
    int save(Employee employee);

    // 通过id获得员工信息
    Employee get(Integer id);

    // 通过id删除员工
    int delete(Integer id);

}
3.编写 EmployeeMapper.xml 配置文件
<?xml version="1.0" encoding="UTF-8" ?>
<!DOCTYPE mapper
        PUBLIC "-//mybatis.org//DTD Mapper 3.0//EN"
        "http://mybatis.org/dtd/mybatis-3-mapper.dtd">

<mapper namespace="com.kuang.mapper.EmployeeMapper">

    <resultMap id="EmployeeMap" type="Employee">
        <id property="id" column="eid"/>
        <result property="lastName" column="last_name"/>
        <result property="email" column="email"/>
        <result property="gender" column="gender"/>
        <result property="birth" column="birth"/>
        <association property="eDepartment"  javaType="Department">
            <id property="id" column="did"/>
            <result property="departmentName" column="dname"/>
        </association>
    </resultMap>

    <select id="getEmployees" resultMap="EmployeeMap">
        select e.id as eid,last_name,email,gender,birth,d.id as did,d.department_name as dname
        from department d,employee e
        where d.id = e.department
    </select>

    <insert id="save" parameterType="Employee">
        insert into employee (last_name,email,gender,department,birth)
        values (#{lastName},#{email},#{gender},#{department},#{birth});
    </insert>

    <select id="get" resultType="Employee">
        select * from employee where id = #{id}
    </select>

    <delete id="delete" parameterType="int">
        delete from employee where id = #{id}
    </delete>

</mapper>
4.编写EmployController测试
@RestController
public class EmployeeController {

    @Autowired
    EmployeeMapper employeeMapper;

    // 获取所有员工信息
    @GetMapping("/getEmployees")
    public List<Employee> getEmployees(){
        return employeeMapper.getEmployees();
    }
    @GetMapping("/save")
    public int save(){
        Employee employee = new Employee();
        employee.setLastName("kuangshen");
        employee.setEmail("qinjiang@qq.com");
        employee.setGender(1);
        employee.setDepartment(101);
        employee.setBirth(new Date());
        return employeeMapper.save(employee);
    }
    // 通过id获得员工信息
    @GetMapping("/get/{id}")
    public Employee get(@PathVariable("id") Integer id){
        return employeeMapper.get(id);
    }
    // 通过id删除员工
    @GetMapping("/delete/{id}")
    public int delete(@PathVariable("id") Integer id){
        return employeeMapper.delete(id);
    }
}
实战
Web开发静态资源
主要体会SpringBoot 的自动装配
1、创建一个SpringBoot应用,选择我们需要的模块,SpringBoot就会默认将我们的需要的模块自动配置好
2、手动在配置文件中配置部分配置项目就可以运行起来了
3、专注编写业务代码,不需要考虑以前那样一大堆的配置了。
要熟悉掌握开发,之前学习的自动配置的原理一定要搞明白!
静态映射规则
搭建一个简单的springboot项目
写请求非常简单,那我们要引入我们前端资源,我们项目中有许多的静态资源,比如css,js等文件,这个SpringBoot怎么处理呢?
如果我们是一个web应用,我们的main下会有一个webapp,我们以前都是将所有的页面导在这里面的,对吧!但是我们现在的pom呢,打包方式是为jar的方式,那么这种方式SpringBoot能不能来给我们写页面呢?当然是可以的,但是SpringBoot对于静态资源放置的位置,是有规定的!
静态资源映射规则:
SpringBoot中,SpringMVC的web配置都在 WebMvcAutoConfiguration 这个配置类里面;
我们可以去看看 WebMvcAutoConfigurationAdapter 中有很多配置方法;
有一个方法:addResourceHandlers 添加资源处理
@Override
public void addResourceHandlers(ResourceHandlerRegistry registry) {
    if (!this.resourceProperties.isAddMappings()) {
        // 已禁用默认资源处理
        logger.debug("Default resource handling disabled");
        return;
    }
    // 缓存控制
    Duration cachePeriod = this.resourceProperties.getCache().getPeriod();
    CacheControl cacheControl = this.resourceProperties.getCache().getCachecontrol().toHttpCacheControl();
    // webjars 配置
    if (!registry.hasMappingForPattern("/webjars/**")) {
        customizeResourceHandlerRegistration(registry.addResourceHandler("/webjars/**")
                                             .addResourceLocations("classpath:/META-INF/resources/webjars/")
                                             .setCachePeriod(getSeconds(cachePeriod)).setCacheControl(cacheControl));
    }
    // 静态资源配置
    String staticPathPattern = this.mvcProperties.getStaticPathPattern();
    if (!registry.hasMappingForPattern(staticPathPattern)) {
        customizeResourceHandlerRegistration(registry.addResourceHandler(staticPathPattern)
                                             .addResourceLocations(getResourceLocations(this.resourceProperties.getStaticLocations()))
                                             .setCachePeriod(getSeconds(cachePeriod)).setCacheControl(cacheControl));
    }
}
什么是Webjar?
Webjars本质就是以jar包的方式引入我们的静态资源 , 我们以前要导入一个静态资源文件,直接导入即可。
使用SpringBoot需要使用Webjars,我们可以去搜索一下:
网站:https://www.webjars.org
要使用jQuery,我们只要要引入jQuery对应版本的pom依赖即可!
<dependency>
    <groupId>org.webjars</groupId>
    <artifactId>jquery</artifactId>
    <version>3.4.1</version>
</dependency>
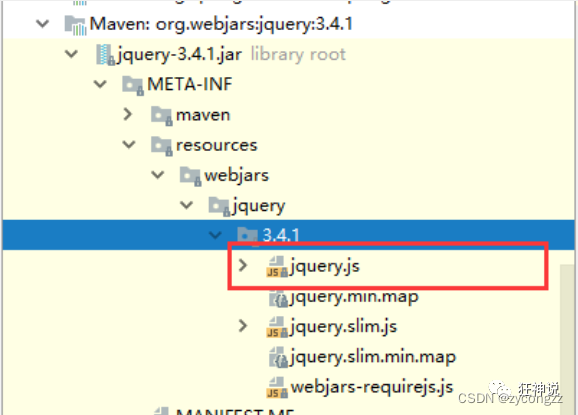
访问:只要是静态资源,SpringBoot就会去对应的路径寻找资源,我们这里访问:http://localhost:8080/webjars/jquery/3.4.1/jquery.js
第二种静态资源映射规则
那我们项目中要是使用自己的静态资源该怎么导入呢?我们看下一行代码;
我们去找staticPathPattern发现第二种映射规则 :/** , 访问当前的项目任意资源,它会去找 resourceProperties 这个类,我们可以点进去看一下分析:
// 进入方法
public String[] getStaticLocations() {
    return this.staticLocations;
}
// 找到对应的值
private String[] staticLocations = CLASSPATH_RESOURCE_LOCATIONS;
// 找到路径
private static final String[] CLASSPATH_RESOURCE_LOCATIONS = {
    "classpath:/META-INF/resources/",
  "classpath:/resources/",
    "classpath:/static/",
    "classpath:/public/"
};
ResourceProperties 可以设置和我们静态资源有关的参数;这里面指向了它会去寻找资源的文件夹,即上面数组的内容。
所以得出结论,以下四个目录存放的静态资源可以被我们识别:
“classpath:/META-INF/resources/”
“classpath:/resources/”
“classpath:/static/”
“classpath:/public/”
我们也可以自己通过配置文件来指定一下,哪些文件夹是需要我们放静态资源文件的,在application.properties中配置;
spring.resources.static-locations=classpath:/coding/,classpath:/kuang/
一旦自己定义了静态文件夹的路径,原来的自动配置就都会失效了!
Thymeleaf模板引擎
模板引擎
前端交给我们的页面,是html页面。如果是我们以前开发,我们需要把他们转成jsp页面,jsp好处就是当我们查出一些数据转发到JSP页面以后,我们可以用jsp轻松实现数据的显示,及交互等。
jsp支持非常强大的功能,包括能写Java代码,但是呢,我们现在的这种情况,SpringBoot这个项目首先是以jar的方式,不是war,像第二,我们用的还是嵌入式的Tomcat,所以呢,他现在默认是不支持jsp的。
SpringBoot推荐你可以来使用模板引擎:
模板引擎,我们其实大家听到很多,其实jsp就是一个模板引擎,还有用的比较多的freemarker,包括SpringBoot给我们推荐的Thymeleaf,模板引擎有非常多,但再多的模板引擎,他们的思想都是一样的,什么样一个思想呢我们来看一下这张图:
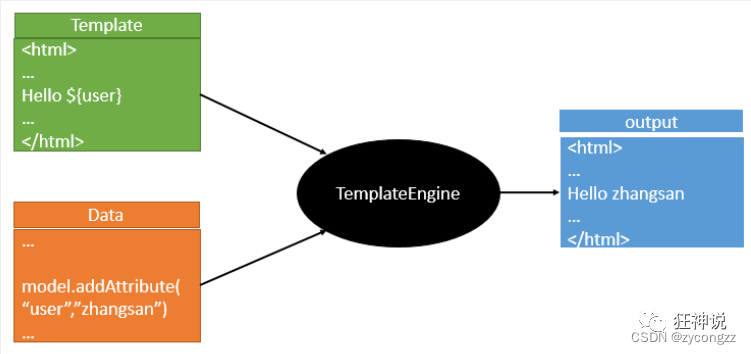
模板引擎的作用就是我们来写一个页面模板,比如有些值呢,是动态的,我们写一些表达式。而这些值,从哪来呢,就是我们在后台封装一些数据。然后把这个模板和这个数据交给我们模板引擎,模板引擎按照我们这个数据帮你把这表达式解析、填充到我们指定的位置,然后把这个数据最终生成一个我们想要的内容给我们写出去,这就是我们这个模板引擎,不管是jsp还是其他模板引擎,都是这个思想。只不过呢,就是说不同模板引擎之间,他们可能这个语法有点不一样。其他的我就不介绍了,我主要来介绍一下SpringBoot给我们推荐的Thymeleaf模板引擎,这模板引擎呢,是一个高级语言的模板引擎,他的这个语法更简单。而且呢,功能更强大。
引入Thymeleaf
怎么引入呢,对于springboot来说,什么事情不都是一个start的事情嘛,我们去在项目中引入一下。给大家三个网址:
Thymeleaf 官网:https://www.thymeleaf.org/
Thymeleaf 在Github 的主页:https://github.com/thymeleaf/thymeleaf
Spring官方文档:找到我们对应的版本
https://docs.spring.io/spring-boot/docs/2.2.5.RELEASE/reference/htmlsingle/#using-boot-starter
<!--thymeleaf-->
<dependency>
    <groupId>org.springframework.boot</groupId>
    <artifactId>spring-boot-starter-thymeleaf</artifactId>
</dependency>
Thymeleaf分析
前面呢,我们已经引入了Thymeleaf,那这个要怎么使用呢?
我们首先得按照SpringBoot的自动配置原理看一下我们这个Thymeleaf的自动配置规则,在按照那个规则,我们进行使用。
我们去找一下Thymeleaf的自动配置类:ThymeleafProperties
@ConfigurationProperties(
    prefix = "spring.thymeleaf"
)
public class ThymeleafProperties {
    private static final Charset DEFAULT_ENCODING;
    public static final String DEFAULT_PREFIX = "classpath:/templates/";
    public static final String DEFAULT_SUFFIX = ".html";
    private boolean checkTemplate = true;
    private boolean checkTemplateLocation = true;
    private String prefix = "classpath:/templates/";
    private String suffix = ".html";
    private String mode = "HTML";
    private Charset encoding;
}
我们只需要把我们的html页面放在类路径下的templates下,thymeleaf就可以帮我们自动渲染了。
使用thymeleaf什么都不需要配置,只需要将他放在指定的文件夹下即可!
1.编写一个controller
我们只需要把我们的html页面放在类路径下的templates下,thymeleaf就可以帮我们自动渲染了。
使用thymeleaf什么都不需要配置,只需要将他放在指定的文件夹下即可!
2.编写一个测试界面test.html
<!DOCTYPE html>
<html lang="en">
<head>
    <meta charset="UTF-8">
    <title>Title</title>
</head>
<body>
<h1>测试页面</h1>
</body>
</html>
Thymeleaf 语法学习
:我们需要查出一些数据,在页面中展示
1.测试请求
@RequestMapping("/t1")
public String test1(Model model){
    //存入数据
    model.addAttribute("msg","Hello,Thymeleaf");
    //classpath:/templates/test.html
    return "test";
}
2、我们要使用thymeleaf,需要在html文件中导入命名空间的约束,方便提示。
xmlns:th=“http://www.thymeleaf.org”
3.前端页面
<!DOCTYPE html>
<html lang="en" xmlns:th="http://www.thymeleaf.org">
<head>
    <meta charset="UTF-8">
    <title>狂神说</title>
</head>
<body>
<h1>测试页面</h1>

<!--th:text就是将div中的内容设置为它指定的值,和之前学习的Vue一样-->
<div th:text="${msg}"></div>
</body>
</html>
MVC自动配置原理
在进行项目编写之前,SpringBoot对我们的SpringMVC还做了哪些配置,包括如何扩展,如何定制。
官方文档
Spring MVC Auto-configuration
// Spring Boot为Spring MVC提供了自动配置,它可以很好地与大多数应用程序一起工作。
Spring Boot provides auto-configuration for Spring MVC that works well with most applications.
// 自动配置在Spring默认设置的基础上添加了以下功能:
The auto-configuration adds the following features on top of Spring’s defaults:
// 包含视图解析器
Inclusion of ContentNegotiatingViewResolver and BeanNameViewResolver beans.
// 支持静态资源文件夹的路径,以及webjars
Support for serving static resources, including support for WebJars
// 自动注册了Converter:
// 转换器,这就是我们网页提交数据到后台自动封装成为对象的东西,比如把"1"字符串自动转换为int类型
// Formatter:【格式化器,比如页面给我们了一个2019-8-10,它会给我们自动格式化为Date对象】
Automatic registration of Converter, GenericConverter, and Formatter beans.
// HttpMessageConverters
// SpringMVC用来转换Http请求和响应的的,比如我们要把一个User对象转换为JSON字符串,可以去看官网文档解释;
Support for HttpMessageConverters (covered later in this document).
// 定义错误代码生成规则的
Automatic registration of MessageCodesResolver (covered later in this document).
// 首页定制
Static index.html support.
// 图标定制
Custom Favicon support (covered later in this document).
// 初始化数据绑定器:帮我们把请求数据绑定到JavaBean中!
Automatic use of a ConfigurableWebBindingInitializer bean (covered later in this document).

/*
如果您希望保留Spring Boot MVC功能,并且希望添加其他MVC配置(拦截器、格式化程序、视图控制器和其他功能),则可以添加自己
的@configuration类,类型为webmvcconfiguer,但不添加@EnableWebMvc。如果希望提供
RequestMappingHandlerMapping、RequestMappingHandlerAdapter或ExceptionHandlerExceptionResolver的自定义
实例,则可以声明WebMVCregistrationAdapter实例来提供此类组件。
*/
If you want to keep Spring Boot MVC features and you want to add additional MVC configuration
(interceptors, formatters, view controllers, and other features), you can add your own
@Configuration class of type WebMvcConfigurer but without @EnableWebMvc. If you wish to provide
custom instances of RequestMappingHandlerMapping, RequestMappingHandlerAdapter, or
ExceptionHandlerExceptionResolver, you can declare a WebMvcRegistrationsAdapter instance to provide such components.

// 如果您想完全控制Spring MVC,可以添加自己的@Configuration,并用@EnableWebMvc进行注释。
If you want to take complete control of Spring MVC, you can add your own @Configuration annotated with @EnableWebMvc.
ContentNegotiatingViewResolver 内容协商视图解析器
自动配置了ViewResolver,就是我们之前学习的SpringMVC的视图解析器;
即根据方法的返回值取得视图对象(View),然后由视图对象决定如何渲染(转发,重定向)。
我们去看看这里的源码:我们找到 WebMvcAutoConfiguration , 然后搜索ContentNegotiatingViewResolver。找到如下方法!
@Bean
@ConditionalOnBean(ViewResolver.class)
@ConditionalOnMissingBean(name = "viewResolver", value = ContentNegotiatingViewResolver.class)
public ContentNegotiatingViewResolver viewResolver(BeanFactory beanFactory) {
    ContentNegotiatingViewResolver resolver = new ContentNegotiatingViewResolver();
    resolver.setContentNegotiationManager(beanFactory.getBean(ContentNegotiationManager.class));
    // ContentNegotiatingViewResolver使用所有其他视图解析器来定位视图,因此它应该具有较高的优先级
    resolver.setOrder(Ordered.HIGHEST_PRECEDENCE);
    return resolver;
}
页面国际化
有的时候,我们的网站会去涉及中英文甚至多语言的切换,这时候我们就需要学习国际化了!
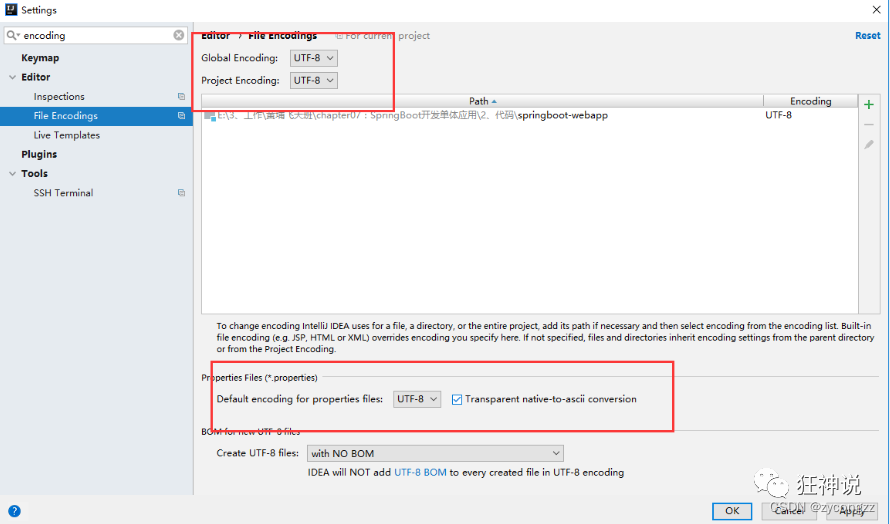
1.准备工作
在idea中设置properties编码问题
编写国际化配置文件,抽取页面需要显示的国际化页面消息。我们可以去登录页面查看一下,哪些内容我们需要编写国际化的配置!
配置文件编写
1.我们在resources资源文件下新建一个i18n目录,存放国际化配置文件
2.建立一个login.properties文件,还有一个login_zh_CN.properties;发现IDEA自动识别了我们要做国际化操作;文件夹变了!
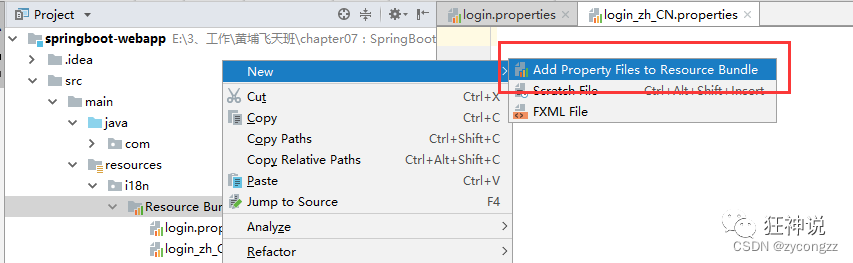
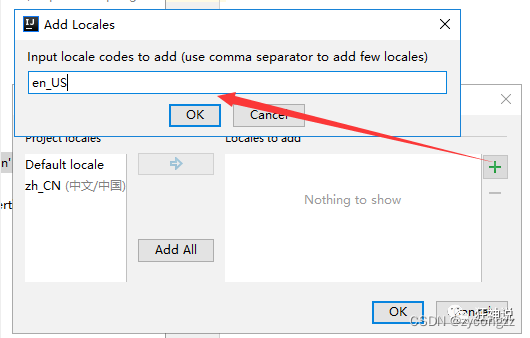
弹出如下页面:我们再添加一个英文的;
3.编写配置,我们可以看到idea下面有另外一个视图;
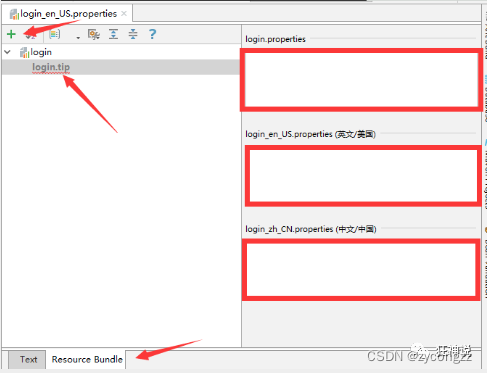
添加一下首页的内容!
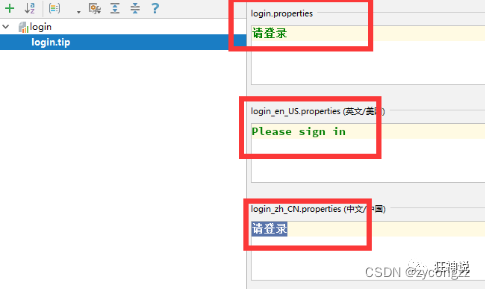
然后依次添加其他页面内容即可!
login.properties :默认
login.btn=登录
login.password=密码
login.remember=记住我
login.tip=请登录
login.username=用户名
英文:
login.btn=Sign in
login.password=Password
login.remember=Remember me
login.tip=Please sign in
login.username=Username
中文:
login.btn=登录
login.password=密码
login.remember=记住我
login.tip=请登录
login.username=用户名
配置文件步骤搞定!
配置文件生效探究
SpringBoot对国际化的自动配置!这里又涉及到一个类:MessageSourceAutoConfiguration
SpringBoot已经自动配置好了管理我们国际化资源文件的组件 ResourceBundleMessageSource;
// 获取 properties 传递过来的值进行判断
@Bean
public MessageSource messageSource(MessageSourceProperties properties) {
    ResourceBundleMessageSource messageSource = new ResourceBundleMessageSource();
    if (StringUtils.hasText(properties.getBasename())) {
        // 设置国际化文件的基础名(去掉语言国家代码的)
        messageSource.setBasenames(
            StringUtils.commaDelimitedListToStringArray(
                                       StringUtils.trimAllWhitespace(properties.getBasename())));
    }
    if (properties.getEncoding() != null) {
        messageSource.setDefaultEncoding(properties.getEncoding().name());
    }
    messageSource.setFallbackToSystemLocale(properties.isFallbackToSystemLocale());
    Duration cacheDuration = properties.getCacheDuration();
    if (cacheDuration != null) {
        messageSource.setCacheMillis(cacheDuration.toMillis());
    }
    messageSource.setAlwaysUseMessageFormat(properties.isAlwaysUseMessageFormat());
    messageSource.setUseCodeAsDefaultMessage(properties.isUseCodeAsDefaultMessage());
    return messageSource;
}
我们真实 的情况是放在了i18n目录下,所以我们要去配置这个messages的路径;
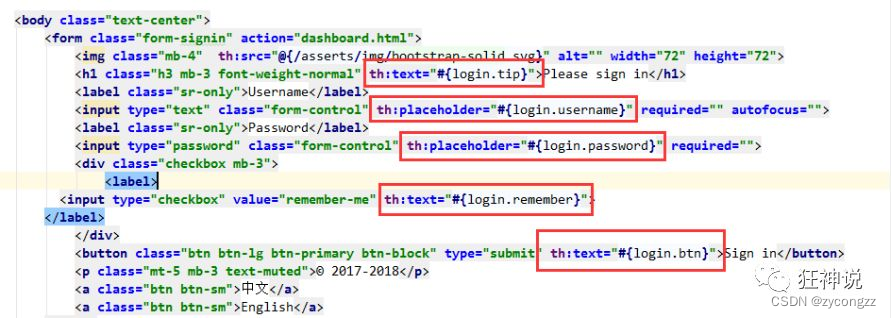
配置页面国际化值
去页面获取国际化的值,查看Thymeleaf的文档,找到message取值操作为:#{…}。我们去页面测试下:
IDEA还有提示,非常智能的!
配置国际化解析
在Spring中有一个国际化的Locale (区域信息对象);里面有一个叫做LocaleResolver (获取区域信息对象)的解析器!
我们去我们webmvc自动配置文件,寻找一下!看到SpringBoot默认配置:
@Bean
@ConditionalOnMissingBean
@ConditionalOnProperty(prefix = "spring.mvc", name = "locale")
public LocaleResolver localeResolver() {
    // 容器中没有就自己配,有的话就用用户配置的
    if (this.mvcProperties.getLocaleResolver() == WebMvcProperties.LocaleResolver.FIXED) {
        return new FixedLocaleResolver(this.mvcProperties.getLocale());
    }
    // 接收头国际化分解
    AcceptHeaderLocaleResolver localeResolver = new AcceptHeaderLocaleResolver();
    localeResolver.setDefaultLocale(this.mvcProperties.getLocale());
    return localeResolver;
}
AcceptHeaderLocaleResolver 这个类中有一个方法
public Locale resolveLocale(HttpServletRequest request) {
    Locale defaultLocale = this.getDefaultLocale();
    // 默认的就是根据请求头带来的区域信息获取Locale进行国际化
    if (defaultLocale != null && request.getHeader("Accept-Language") == null) {
        return defaultLocale;
    } else {
        Locale requestLocale = request.getLocale();
        List<Locale> supportedLocales = this.getSupportedLocales();
        if (!supportedLocales.isEmpty() && !supportedLocales.contains(requestLocale)) {
            Locale supportedLocale = this.findSupportedLocale(request, supportedLocales);
            if (supportedLocale != null) {
                return supportedLocale;
            } else {
                return defaultLocale != null ? defaultLocale : requestLocale;
            }
        } else {
            return requestLocale;
        }
    }
}
那假如我们现在想点击链接让我们的国际化资源生效,就需要让我们自己的Locale生效!
我们去自己写一个自己的LocaleResolver,可以在链接上携带区域信息!
修改一下前端页面的跳转连接:
<!-- 这里传入参数不需要使用 ?使用 (key=value)-->
<a class="btn btn-sm" th:href="@{/index.html(l='zh_CN')}">中文</a>
<a class="btn btn-sm" th:href="@{/index.html(l='en_US')}">English</a>
写一个处理的组件类!
import org.springframework.util.StringUtils;
import org.springframework.web.servlet.LocaleResolver;

import javax.servlet.http.HttpServletRequest;
import javax.servlet.http.HttpServletResponse;
import java.util.Locale;

//可以在链接上携带区域信息
public class MyLocaleResolver implements LocaleResolver {

    //解析请求
    @Override
    public Locale resolveLocale(HttpServletRequest request) {

        String language = request.getParameter("l");
        Locale locale = Locale.getDefault(); // 如果没有获取到就使用系统默认的
        //如果请求链接不为空
        if (!StringUtils.isEmpty(language)){
            //分割请求参数
            String[] split = language.split("_");
            //国家,地区
            locale = new Locale(split[0],split[1]);
        }
        return locale;
    }
    @Override
    public void setLocale(HttpServletRequest httpServletRequest, HttpServletResponse httpServletResponse, Locale locale) {

    }
}
为了让我们的区域化信息能够生效,我们需要再配置一下这个组件!在我们自己的MvcConofig下添加bean;
@Bean
public LocaleResolver localeResolver(){
    return new MyLocaleResolver();
}
集成Swagger终极版
swagger 简介
前后端分离
前端 -> 前端控制层、视图层
后端 -> 后端控制层、服务层、数据访问层
前后端通过API进行交互
前后相对独立且松耦合
产生的问题
前后端集成,前端或者后端无法做到“及时协商,尽早解决”,最终导致问题集中爆发
解决方案
首先定义schema [ 计划的提纲 ],并实时跟踪最新的API,降低集成风险
Swagger
号称世界上最流行的API框架
Restful Api 文档在线自动生成器 => API 文档 与API 定义同步更新
直接运行,在线测试API
支持多种语言 (如:Java,PHP等)
Swgger官网
SpringBoot集成Swagger
SpringBoot集成Swagger => springfox,两个jar包
Springfox-swagger2
swagger-springmvc
使用Swagger
要求:jdk 1.8 + 否则swagger2无法运行
1.添加maven依赖
<!-- https://mvnrepository.com/artifact/io.springfox/springfox-swagger2 -->
<dependency>
   <groupId>io.springfox</groupId>
   <artifactId>springfox-swagger2</artifactId>
   <version>2.9.2</version>
</dependency>
<!-- https://mvnrepository.com/artifact/io.springfox/springfox-swagger-ui -->
<dependency>
   <groupId>io.springfox</groupId>
   <artifactId>springfox-swagger-ui</artifactId>
   <version>2.9.2</version>
</dependency>
2.编写helloControl
3.要使用Swagger,我们需要编写一个配置类-SwaggerConfig来配置 Swagger
@Configuration //配置类
@EnableSwagger2// 开启Swagger2的自动配置
public class SwaggerConfig {
}
配置Swagger
1、Swagger实例Bean是Docket,所以通过配置Docket实例来配置Swaggger。
异步、定时、邮件任务
在我们的工作中,常常会用到异步处理任务,比如我们在网站上发送邮件,后台会去发送邮件,此时前台会造成响应不动,直到邮件发送完毕,响应才会成功,所以我们一般会采用多线程的方式去处理这些任务。还有一些定时任务,比如需要在每天凌晨的时候,分析一次前一天的日志信息。还有就是邮件的发送,微信的前身也是邮件服务呢?这些东西都是怎么实现的呢?其实SpringBoot都给我们提供了对应的支持,我们上手使用十分的简单,只需要开启一些注解支持,配置一些配置文件即可!那我们来看看吧~
1.创建一个service包
2.创建一个类AsyncService
异步处理,采用多线程的方式来处理任务
@Service
public class AsyncService {

   public void hello(){
       try {
           Thread.sleep(3000);
      } catch (InterruptedException e) {
           e.printStackTrace();
      }
       System.out.println("业务进行中....");
  }
}
3、编写controller包
4、编写AsyncController类
我们去写一个Controller测试一下
@RestController
public class AsyncController {

   @Autowired
   AsyncService asyncService;

   @GetMapping("/hello")
   public String hello(){
       asyncService.hello();
       return "success";
  }
}
5、访问http://localhost:8080/hello进行测试,3秒后出现success,这是同步等待的情况。
:我们如果想让用户直接得到消息,就在后台使用多线程的方式进行处理即可,但是每次都需要自己手动去编写多线程的实现的话,太麻烦了,我们只需要用一个简单的办法,在我们的方法上加一个简单的注解即可,如下:
6、给hello方法添加@Async注解;
//告诉Spring这是一个异步方法
@Async
public void hello(){
   try {
       Thread.sleep(3000);
  } catch (InterruptedException e) {
       e.printStackTrace();
  }
   System.out.println("业务进行中....");
}
SpringBoot就会自己开一个线程池,进行调用!但是要让这个注解生效,我们还需要在主程序上添加一个注解@EnableAsync ,开启异步注解功能;
@EnableAsync //开启异步注解功能
@SpringBootApplication
public class SpringbootTaskApplication {

   public static void main(String[] args) {
       SpringApplication.run(SpringbootTaskApplication.class, args);
  }
you邮件任务
springboot做了支持:
- 邮件发送需要引入spring-boot-start-mail
- SpringBoot 自动配置MailSenderAutoConfiguration
- 定义MailProperties内容,配置在application.yml中
- 自动装配JavaMailSender
测试邮件发送
1.引入依赖
<dependency>
   <groupId>org.springframework.boot</groupId>
   <artifactId>spring-boot-starter-mail</artifactId>
</dependency>
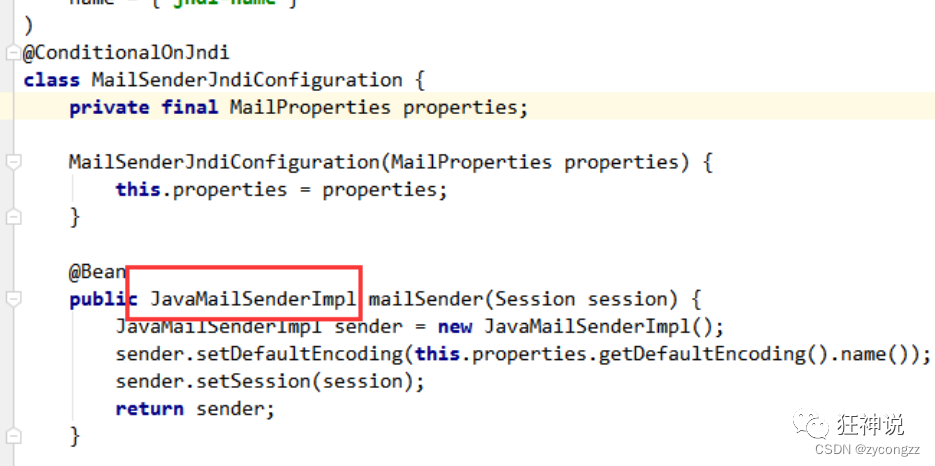
2.查看自动配置类MailSenderAutoConfiguration

这个类中存在bean,JavaMailSenderImpl
配置文件
@ConfigurationProperties(
   prefix = "spring.mail"
)
public class MailProperties {
   private static final Charset DEFAULT_CHARSET;
   private String host;
   private Integer port;
   private String username;
   private String password;
   private String protocol = "smtp";
   private Charset defaultEncoding;
   private Map<String, String> properties;
   private String jndiName;
}

spring.mail.username=24736743@qq.com
spring.mail.password=你的qq授权码
spring.mail.host=smtp.qq.com
# qq需要配置ssl
spring.mail.properties.mail.smtp.ssl.enable=true
获取授权码:在QQ邮箱中的设置->账户->开启pop3和smtp服务
3.测试
@Autowired
JavaMailSenderImpl mailSender;

@Test
public void contextLoads() {
   //邮件设置1:一个简单的邮件
   SimpleMailMessage message = new SimpleMailMessage();
   message.setSubject("通知-明天来狂神这听课");
   message.setText("今晚7:30开会");

   message.setTo("24736743@qq.com");
   message.setFrom("24736743@qq.com");
   mailSender.send(message);
}

@Test
public void contextLoads2() throws MessagingException {
   //邮件设置2:一个复杂的邮件
   MimeMessage mimeMessage = mailSender.createMimeMessage();
   MimeMessageHelper helper = new MimeMessageHelper(mimeMessage, true);

   helper.setSubject("通知-明天来狂神这听课");
   helper.setText("<b style='color:red'>今天 7:30来开会</b>",true);

   //发送附件
   helper.addAttachment("1.jpg",new File(""));
   helper.addAttachment("2.jpg",new File(""));

   helper.setTo("24736743@qq.com");
   helper.setFrom("24736743@qq.com");

   mailSender.send(mimeMessage);
}
富文本编辑器
Editor.md——功能非常丰富的编辑器,左端编辑,右端预览,非常方便,完全免费
官网:https://pandao.github.io/editor.md/
wangEditor——基于javascript和css开发的 Web富文本编辑器, 轻量、简洁、界面美观、易用、开源免费。
官网:http://www.wangeditor.com/
TinyMCE——TinyMCE是一个轻量级的基于浏览器的所见即所得编辑器,由JavaScript写成。它对IE6+和Firefox1.5+都有着非常良好的支持。功能齐全,界面美观,就是文档是英文的,对开发人员英文水平有一定要求。
官网:https://www.tiny.cloud/docs/demo/full-featured/
博客园
百度ueditor——UEditor是由百度web前端研发部开发所见即所得富文本web编辑器,具有轻量,功能齐全,可定制,注重用户体验等特点,开源基于MIT协议,允许自由使用和修改代码,缺点是已经没有更新了
官网:https://ueditor.baidu.com/website/onlinedemo.html
kindeditor——界面经典。
官网:http://kindeditor.net/demo.php
Textbox——Textbox是一款极简但功能强大的在线文本编辑器,支持桌面设备和移动设备。主要功能包含内置的图像处理和存储、文件拖放、拼写检查和自动更正。此外,该工具还实现了屏幕阅读器等辅助技术,并符合WAI-ARIA可访问性标准。
官网:https://textbox.io/
CKEditor——国外的,界面美观。
官网:https://ckeditor.com/ckeditor-5/demo/
quill——功能强大,还可以编辑公式等
官网:https://quilljs.com/
simditor——界面美观,功能较全。
官网:https://simditor.tower.im/
summernote——UI好看,精美
官网:https://summernote.org/
jodit——功能齐
官网:https://xdsoft.net/jodit/
froala Editor——界面非常好看,功能非常强大,非常好用(非免费)
官网:https://www.froala.com/wysiwyg-editor
Editor.md
官网下载
基础工程搭建
数据库设计
article: 文章表
| 字段 | 备注 |
|---|---|
| id | int |
| auter | varchar |
| title | varchar |
| content | longtext |
CREATE TABLE article (
id int(10) NOT NULL AUTO_INCREMENT COMMENT ‘int文章的唯一ID’,
author varchar(50) NOT NULL COMMENT ‘作者’,
title varchar(100) NOT NULL COMMENT ‘标题’,
content longtext NOT NULL COMMENT ‘文章的内容’,
PRIMARY KEY (id)
) ENGINE=InnoDB DEFAULT CHARSET=utf8
基础项目搭建
1.建一个springBoot项目配置
spring:
datasource:
  username: root
  password: 123456
  #?serverTimezone=UTC解决时区的报错
  url: jdbc:mysql://localhost:3306/springboot?serverTimezone=UTC&useUnicode=true&characterEncoding=utf-8
  driver-class-name: com.mysql.cj.jdbc.Driver
<resources>
   <resource>
       <directory>src/main/java</directory>
       <includes>
           <include>**/*.xml</include>
       </includes>
       <filtering>true</filtering>
   </resource>
</resources>
2.实体类:
//文章类
@Data
@NoArgsConstructor
@AllArgsConstructor
public class Article implements Serializable {

   private int id; //文章的唯一ID
   private String author; //作者名
   private String title; //标题
   private String content; //文章的内容

}
- mapper接口
@Mapper
@Repository
public interface ArticleMapper {
   //查询所有的文章
   List<Article> queryArticles();

   //新增一个文章
   int addArticle(Article article);

   //根据文章id查询文章
   Article getArticleById(int id);

   //根据文章id删除文章
   int deleteArticleById(int id);

}
<?xml version="1.0" encoding="UTF-8"?>
<!DOCTYPE mapper PUBLIC "-//mybatis.org//DTD Mapper 3.0//EN"
       "http://mybatis.org/dtd/mybatis-3-mapper.dtd">

<mapper namespace="com.kuang.mapper.ArticleMapper">

   <select id="queryArticles" resultType="Article">
      select * from article
   </select>

   <select id="getArticleById" resultType="Article">
      select * from article where id = #{id}
   </select>

   <insert id="addArticle" parameterType="Article">
      insert into article (author,title,content) values (#{author},#{title},#{content});
   </insert>

   <delete id="deleteArticleById" parameterType="int">
      delete from article where id = #{id}
   </delete>

</mapper>
mybatis:
mapper-locations: classpath:com/kuang/mapper/*.xml
type-aliases-package: com.kuang.pojo
接下来的步骤跟着链接
Link
Dubbo和Zookeeper集成
什么是分布式系统?
在《分布式系统原理与范型》一书中有如下定义:“分布式系统是若干独立计算机的集合,这些计算机对于用户来说就像单个相关系统”;
分布式系统是由一组通过网络进行通信、为了完成共同的任务而协调工作的计算机节点组成的系统。分布式系统的出现是为了用廉价的、普通的机器完成单个计算机无法完成的计算、存储任务。其目的是利用更多的机器,处理更多的数据。
分布式系统(distributed system)是建立在网络之上的软件系统。
首先需要明确的是,只有当单个节点的处理能力无法满足日益增长的计算、存储任务的时候,且硬件的提升(加内存、加磁盘、使用更好的CPU)高昂到得不偿失的时候,应用程序也不能进一步优化的时候,我们才需要考虑分布式系统。因为,分布式系统要解决的问题本身就是和单机系统一样的,而由于分布式系统多节点、通过网络通信的拓扑结构,会引入很多单机系统没有的问题,为了解决这些问题又会引入更多的机制、协议,带来更多的问题。。。
Dubbo文档
随着互联网的发展,网站应用的规模不断扩大,常规的垂直应用架构已无法应对,分布式服务架构以及流动计算架构势在必行,急需一个治理系统确保架构有条不紊的演进。
单一应用架构
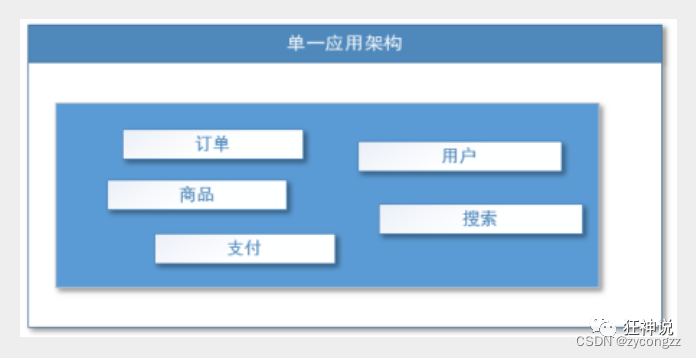
缺点: 1、性能扩展比较难
2、协同开发问题
3、不利于升级维护
垂直应用架构
当访问量逐渐增大,单一应用增加机器带来的加速度越来越小,将应用拆成互不相干的几个应用,以提升效率。此时,用于加速前端页面开发的Web框架(MVC)是关键。
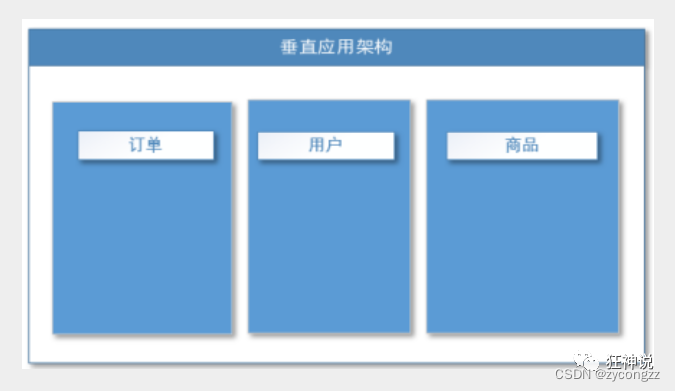
通过切分业务来实现各个模块独立部署,降低了维护和部署的难度,团队各司其职更易管理,性能扩展也更方便,更有针对性。
缺点:公用模块无法重复利用,开发性的浪费
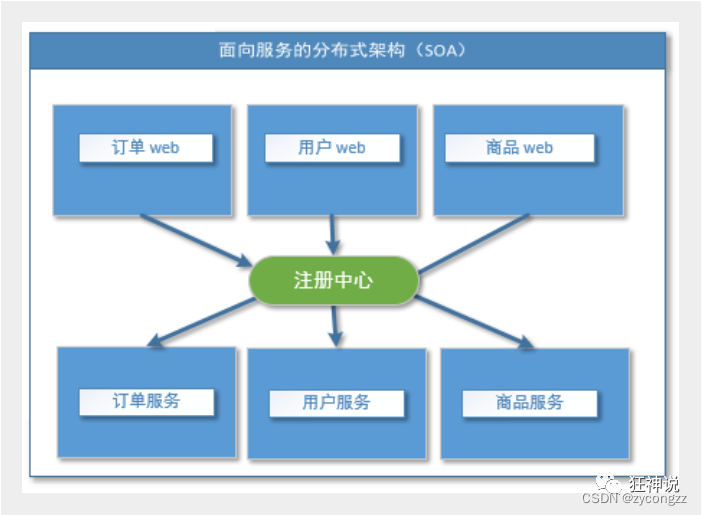
分布式服务框架
当垂直应用越来越多,应用之间交互不可避免,将核心业务抽取出来,作为独立的服务,逐渐形成稳定的服务中心,使前端应用能更快速的响应多变的市场需求。此时,用于提高业务复用及整合的分布式服务框架(RPC)是关键。

流动计算架构
当服务越来越多,容量的评估,小服务资源的浪费等问题逐渐显现,此时需增加一个调度中心基于访问压力实时管理集群容量,提高集群利用率。此时,用于提高机器利用率的资源调度和治理中心(SOA)[ Service Oriented Architecture]是关键。
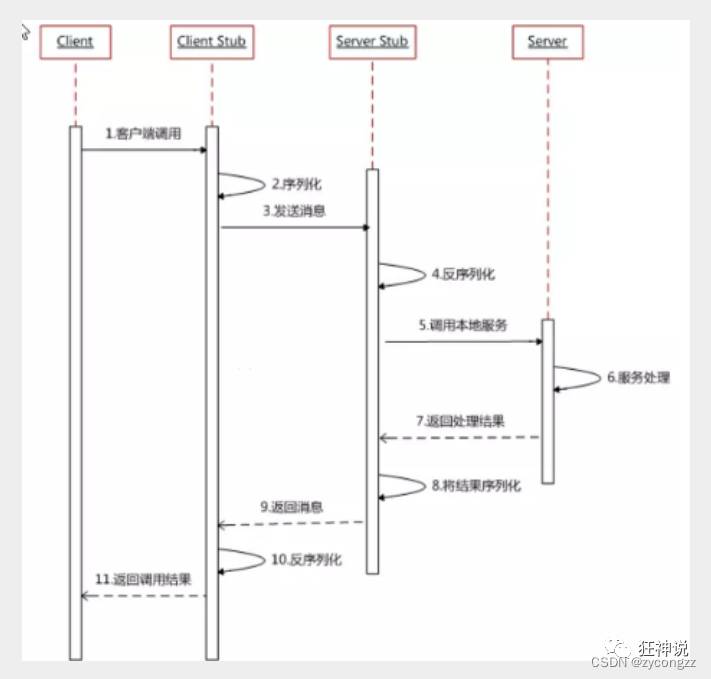
PC【Remote Procedure Call】是指远程过程调用,是一种进程间通信方式,他是一种技术的思想,而不是规范。它允许程序调用另一个地址空间(通常是共享网络的另一台机器上)的过程或函数,而不用程序员显式编码这个远程调用的细节。即程序员无论是调用本地的还是远程的函数,本质上编写的调用代码基本相同。
也就是说两台服务器A,B,一个应用部署在A服务器上,想要调用B服务器上应用提供的函数/方法,由于不在一个内存空间,不能直接调用,需要通过网络来表达调用的语义和传达调用的数据。为什么要用RPC呢?就是无法在一个进程内,甚至一个计算机内通过本地调用的方式完成的需求,比如不同的系统间的通讯,甚至不同的组织间的通讯,由于计算能力需要横向扩展,需要在多台机器组成的集群上部署应用。RPC就是要像调用本地的函数一样去调远程函数;
Dubbo
Apache Dubbo |ˈdʌbəʊ| 是一款高性能、轻量级的开源Java RPC框架,它提供了三大核心能力:面向接口的远程方法调用,智能容错和负载均衡,以及服务自动注册和发现。
1.了解Dubbo的特性
2.查看官方文档
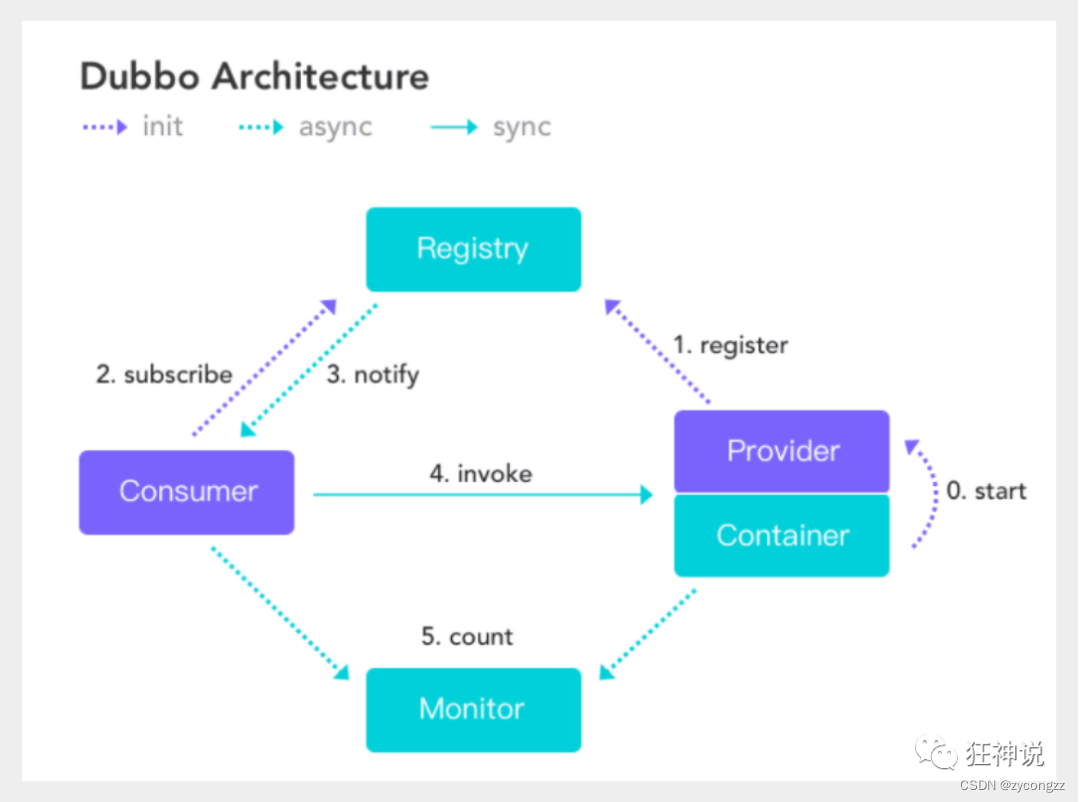
服务提供者(Provider):暴露服务的服务提供方,服务提供者在启动时,向注册中心注册自己提供的服务。
服务消费者(Consumer):调用远程服务的服务消费方,服务消费者在启动时,向注册中心订阅自己所需的服务,服务消费者,从提供者地址列表中,基于软负载均衡算法,选一台提供者进行调用,如果调用失败,再选另一台调用。
注册中心(Registry):注册中心返回服务提供者地址列表给消费者,如果有变更,注册中心将基于长连接推送变更数据给消费者
监控中心(Monitor):服务消费者和提供者,在内存中累计调用次数和调用时间,定时每分钟发送一次统计数据到监控中心
Dubbo环境搭建
推荐我们使用Zookeeper 注册中心
Window下安装zookeeper
1.下载zookeeper :地址, 我们下载3.4.14 , 最新版!解压zookeeper
2、运行/bin/zkServer.cmd ,初次运行会报错,没有zoo.cfg配置文件;
编辑zkServer.cmd文件末尾添加pause 。这样运行出错就不会退出,会提示错误信息,方便找到原因。
3、修改zoo.cfg配置文件
将conf文件夹下面的zoo_sample.cfg复制一份改名为zoo.cfg即可。
注意几个重要位置:
dataDir=./ 临时数据存储的目录(可写相对路径)
clientPort=2181 zookeeper的端口号
修改完成后再次启动zookeeper
4、使用zkCli.cmd测试
ls /:列出zookeeper根下保存的所有节点
[zk: 127.0.0.1:2181(CONNECTED) 4] ls /
[zookeeper]
create –e /kuangshen 123:创建一个kuangshen节点,值为123
get /kuangshen:获取/kuangshen节点的值
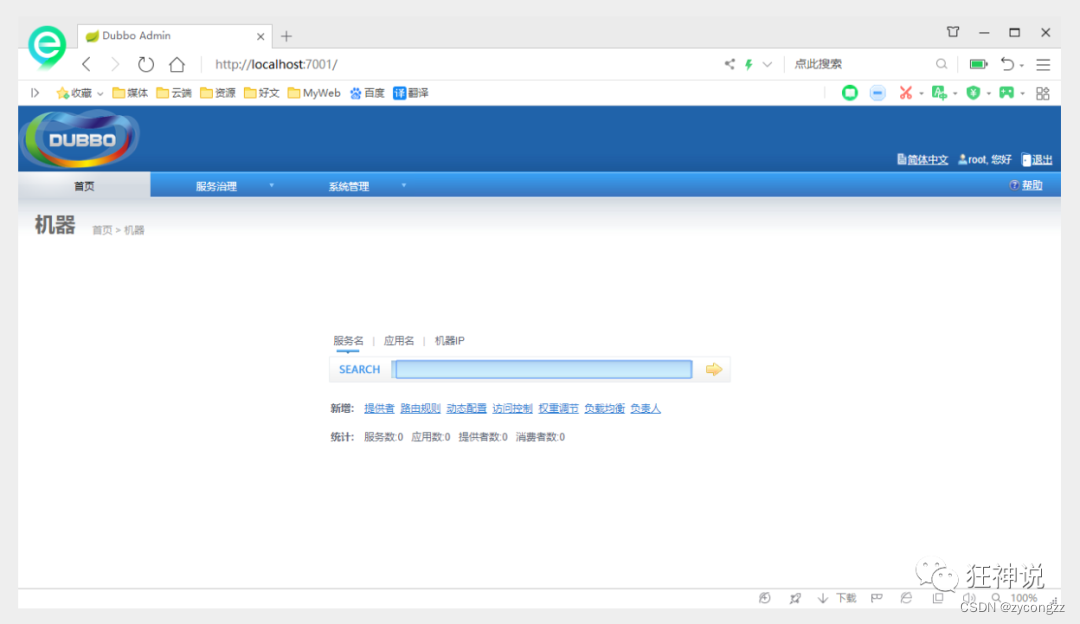
window下安装dubbo-admin
dubbo本身并不是一个服务软件。它其实就是一个jar包,能够帮你的java程序连接到zookeeper,并利用zookeeper消费、提供服务。
但是为了让用户更好的管理监控众多的dubbo服务,官方提供了一个可视化的监控程序dubbo-admin,不过这个监控即使不装也不影响使用。
我们这里来安装一下:
1、下载dubbo-admin
地址 :https://github.com/apache/dubbo-admin/tree/master
2、解压进入目录
修改 dubbo-admin\src\main\resources \application.properties 指定zookeeper地址
server.port=7001
spring.velocity.cache=false
spring.velocity.charset=UTF-8
spring.velocity.layout-url=/templates/default.vm
spring.messages.fallback-to-system-locale=false
spring.messages.basename=i18n/message
spring.root.password=root
spring.guest.password=guest
dubbo.registry.address=zookeeper://127.0.0.1:2181
在项目目录下打包dubbo-admin
mvn clean package -Dmaven.test.skip=true
mvn clean package -Dmaven.test.skip=true
4、执行 dubbo-admin\target 下的dubbo-admin-0.0.1-SNAPSHOT.jar
java -jar dubbo-admin-0.0.1-SNAPSHOT.jar
【注意:zookeeper的服务一定要打开!】
执行完毕,我们去访问一下 http://localhost:7001/ , 这时候我们需要输入登录账户和密码,我们都是默认的root-root;
登录成功后,查看界面
SpringBoot + Dubbo + zookeeper
框架搭建
- 启动zookeeper !
- IDEA创建一个空项目;
3.创建一个模块,实现服务提供者:provider-server , 选择web依赖即可
4.项目创建完毕,我们写一个服务,比如卖票的服务;
编写接口
package com.kuang.provider.service;

public interface TicketService {
   public String getTicket();
}
编写实现类
package com.kuang.provider.service;
public class TicketServiceImpl implements TicketService {
   @Override
   public String getTicket() {
       return "《狂神说Java》";
  }
5.创建一个模块,实现服务消费者:consumer-server , 选择web依赖即可
6.项目创建完毕,我们写一个服务,比如用户的服务;
编写service
package om.kuang.consumer.service;
public class UserService {
//我们需要去拿去注册中心的服务
}
服务提供者
1、将服务提供者注册到注册中心,我们需要整合Dubbo和zookeeper,所以需要导包
我们从dubbo官网进入github,看下方的帮助文档,找到dubbo-springboot,找到依赖包
<!-- Dubbo Spring Boot Starter -->
<dependency>
   <groupId>org.apache.dubbo</groupId>
   <artifactId>dubbo-spring-boot-starter</artifactId>
   <version>2.7.3</version>
</dependency>
zookeeper的包我们去maven仓库下载,zkclient;
<!-- https://mvnrepository.com/artifact/com.github.sgroschupf/zkclient -->
<dependency>
   <groupId>com.github.sgroschupf</groupId>
   <artifactId>zkclient</artifactId>
   <version>0.1</version>
</dependency>
【新版的坑】zookeeper及其依赖包,解决日志冲突,还需要剔除日志依赖;
<!-- 引入zookeeper -->
<dependency>
   <groupId>org.apache.curator</groupId>
   <artifactId>curator-framework</artifactId>
   <version>2.12.0</version>
</dependency>
<dependency>
   <groupId>org.apache.curator</groupId>
   <artifactId>curator-recipes</artifactId>
   <version>2.12.0</version>
</dependency>
<dependency>
   <groupId>org.apache.zookeeper</groupId>
   <artifactId>zookeeper</artifactId>
   <version>3.4.14</version>
   <!--排除这个slf4j-log4j12-->
   <exclusions>
       <exclusion>
           <groupId>org.slf4j</groupId>
           <artifactId>slf4j-log4j12</artifactId>
       </exclusion>
   </exclusions>
</dependency>
2.在springboot配置文件中配置dubbo相关属性
#当前应用名字
dubbo.application.name=provider-server
#注册中心地址
dubbo.registry.address=zookeeper://127.0.0.1:2181
#扫描指定包下服务
dubbo.scan.base-packages=com.kuang.provider.service
3.在service的实现类中配置服务注解,发布服务!注意导包问题
import org.apache.dubbo.config.annotation.Service;
import org.springframework.stereotype.Component;

@Service //将服务发布出去
@Component //放在容器中
public class TicketServiceImpl implements TicketService {
   @Override
   public String getTicket() {
       return "《说Java》";
  }
}
逻辑理解 :应用启动起来,dubbo就会扫描指定的包下带有@component注解的服务,将它发布在指定的注册中心中!
服务消费者
1、导入依赖,和之前的依赖一样;
<!--dubbo-->
<!-- Dubbo Spring Boot Starter -->
<dependency>
   <groupId>org.apache.dubbo</groupId>
   <artifactId>dubbo-spring-boot-starter</artifactId>
   <version>2.7.3</version>
</dependency>
<!--zookeeper-->
<!-- https://mvnrepository.com/artifact/com.github.sgroschupf/zkclient -->
<dependency>
   <groupId>com.github.sgroschupf</groupId>
   <artifactId>zkclient</artifactId>
   <version>0.1</version>
</dependency>
<!-- 引入zookeeper -->
<dependency>
   <groupId>org.apache.curator</groupId>
   <artifactId>curator-framework</artifactId>
   <version>2.12.0</version>
</dependency>
<dependency>
   <groupId>org.apache.curator</groupId>
   <artifactId>curator-recipes</artifactId>
   <version>2.12.0</version>
</dependency>
<dependency>
   <groupId>org.apache.zookeeper</groupId>
   <artifactId>zookeeper</artifactId>
   <version>3.4.14</version>
   <!--排除这个slf4j-log4j12-->
   <exclusions>
       <exclusion>
           <groupId>org.slf4j</groupId>
           <artifactId>slf4j-log4j12</artifactId>
       </exclusion>
   </exclusions>
</dependency>
2.配置参数
#当前应用名字
dubbo.application.name=consumer-server
#注册中心地址
dubbo.registry.address=zookeeper://127.0.0.1:2181
本来正常步骤是需要将服务提供者的接口打包,然后用pom文件导入,我们这里使用简单的方式,直接将服务的接口拿过来,路径必须保证正确,即和服务提供者相同;
本来正常步骤是需要将服务提供者的接口打包,然后用pom文件导入,我们这里使用简单的方式,直接将服务的接口拿过来,路径必须保证正确,即和服务提供者相同;
4.完善消费者的服务类
import com.kuang.provider.service.TicketService;
import org.apache.dubbo.config.annotation.Reference;
import org.springframework.stereotype.Service;
@Service //注入到容器中
public class UserService {
   @Reference //远程引用指定的服务,他会按照全类名进行匹配,看谁给注册中心注册了这个全类名
   TicketService ticketService;
   public void bugTicket(){
       String ticket = ticketService.getTicket();
       System.out.println("在注册中心买到"+ticket);
  }
}
5.测试类的编写
@RunWith(SpringRunner.class)
@SpringBootTest
public class ConsumerServerApplicationTests {
   @Autowired
   UserService userService;
   @Test
   public void contextLoads() {
       userService.bugTicket();
  }
}
启动测试
- 开启zookeeper
- 打开dubbo-admin实现监控【可以不用做】
- 开启服务者
- 消费者消费测试,结果:
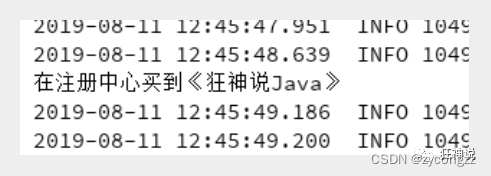
ok , 这就是SpingBoot + dubbo + zookeeper实现分布式开发的应用,其实就是一个服务拆分的思想;
集成SpringSecurity
安全简介
在 Web 开发中,安全一直是非常重要的一个方面。安全虽然属于应用的非功能性需求,但是应该在应用开发的初期就考虑进来。如果在应用开发的后期才考虑安全的问题,就可能陷入一个两难的境地:一方面,应用存在严重的安全漏洞,无法满足用户的要求,并可能造成用户的隐私数据被攻击者窃取;另一方面,应用的基本架构已经确定,要修复安全漏洞,可能需要对系统的架构做出比较重大的调整,因而需要更多的开发时间,影响应用的发布进程。因此,从应用开发的第一天就应该把安全相关的因素考虑进来,并在整个应用的开发过程中。
市面上存在比较有名的:Shiro,Spring Security !
这里需要阐述一下的是,每一个框架的出现都是为了解决某一问题而产生了,那么Spring Security框架的出现是为了解决什么问题呢?
Spring Security是一个功能强大且高度可定制的身份验证和访问控制框架。它实际上是保护基于spring的应用程序的标准。
Spring Security是一个框架,侧重于为Java应用程序提供身份验证和授权。与所有Spring项目一样,Spring安全性的真正强大之处在于它可以轻松地扩展以满足定制需求
从官网的介绍中可以知道这是一个权限框架。想我们之前做项目是没有使用框架是怎么控制权限的?对于权限 一般会细分为功能权限,访问权限,和菜单权限。代码会写的非常的繁琐,冗余。
怎么解决之前写权限代码繁琐,冗余的问题,一些主流框架就应运而生而Spring Scecurity就是其中的一种。
Spring 是一个非常流行和成功的 Java 应用开发框架。Spring Security 基于 Spring 框架,提供了一套 Web 应用安全性的完整解决方案。一般来说,Web 应用的安全性包括用户认证(Authentication)和用户授权(Authorization)两个部分。用户认证指的是验证某个用户是否为系统中的合法主体,也就是说用户能否访问该系统。用户认证一般要求用户提供用户名和密码。系统通过校验用户名和密码来完成认证过程。用户授权指的是验证某个用户是否有权限执行某个操作。在一个系统中,不同用户所具有的权限是不同的。比如对一个文件来说,有的用户只能进行读取,而有的用户可以进行修改。一般来说,系统会为不同的用户分配不同的角色,而每个角色则对应一系列的权限。
对于上面提到的两种应用情景,Spring Security 框架都有很好的支持。在用户认证方面,Spring Security 框架支持主流的认证方式,包括 HTTP 基本认证、HTTP 表单验证、HTTP 摘要认证、OpenID 和 LDAP 等。在用户授权方面,Spring Security 提供了基于角色的访问控制和访问控制列表(Access Control List,ACL),可以对应用中的领域对象进行细粒度的控制。
实验测试
1.新建一个初始SpringBoot项目的Web模块, thymeleaf模块
welcome.html
|views
|level1
1.html
2.html
3.html
|level2
1.html
2.html
3.html
|level3
1.html
2.html
3.html
Login.html
2.controll 挑战
import org.springframework.stereotype.Controller;
import org.springframework.web.bind.annotation.PathVariable;
import org.springframework.web.bind.annotation.RequestMapping;

@Controller
public class RouterController {

   @RequestMapping({"/","/index"})
   public String index(){
       return "index";
  }

   @RequestMapping("/toLogin")
   public String toLogin(){
       return "views/login";
  }

   @RequestMapping("/level1/{id}")
   public String level1(@PathVariable("id") int id){
       return "views/level1/"+id;
  }

   @RequestMapping("/level2/{id}")
   public String level2(@PathVariable("id") int id){
       return "views/level2/"+id;
  }

   @RequestMapping("/level3/{id}")
   public String level3(@PathVariable("id") int id){
       return "views/level3/"+id;
  }

}
认识SpringSecurity
Spring Security 是针对Spring项目的安全框架,也是Spring Boot底层安全模块默认的技术选型,他可以实现强大的Web安全控制,对于安全控制,我们仅需要引入 spring-boot-starter-security 模块,进行少量的配置,即可实现强大的安全管理!
几个重要的类:
WebSecurityConfigurerAdapter:自定义Security策略
AuthenticationManagerBuilder:自定义认证策略
@EnableWebSecurity:开启WebSecurity模式
Spring Security的两个主要目标是 “认证” 和 “授权”(访问控制)。
“认证”(Authentication)
身份验证是关于验证您的凭据,如用户名/用户ID和密码,以验证您的身份。
身份验证通常通过用户名和密码完成,有时与身份验证因素结合使用。
“授权” (Authorization)
授权发生在系统成功验证您的身份后,最终会授予您访问资源(如信息,文件,数据库,资金,位置,几乎任何内容)的完全权限。
这个概念是通用的,而不是只在Spring Security 中存在。
目前我们的测试环境,是谁都可以访问的,我们使用 Spring Security 增加上认证和授权的功能
1.引入Spring Security 模块
<dependency>
   <groupId>org.springframework.boot</groupId>
   <artifactId>spring-boot-starter-security</artifactId>
</dependency>
参考官网:https://spring.io/projects/spring-security
查看我们自己项目中的版本,找到对应的帮助文档:
https://docs.spring.io/spring-security/site/docs/5.3.0.RELEASE/reference/html5 #servlet-applications 8.16.4


 3364
3364


 被折叠的 条评论
为什么被折叠?
被折叠的 条评论
为什么被折叠?
 到【灌水乐园】发言


