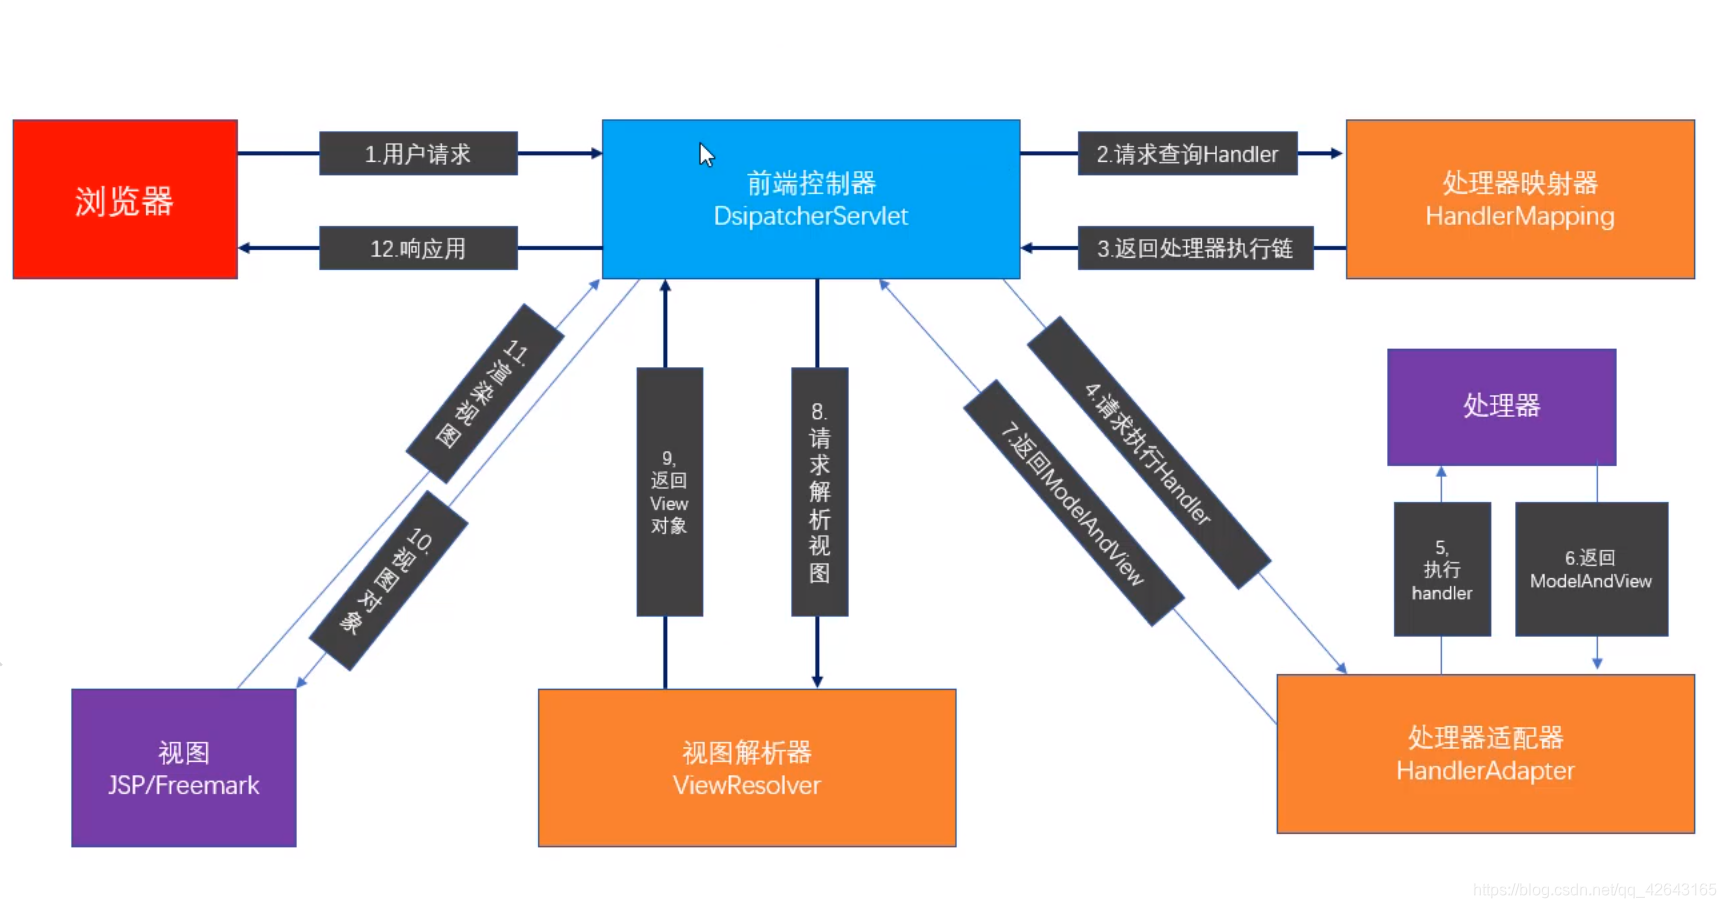
一、入门
1、创建web项目
1)打开idea ->new ->project->java enterprise->(勾选上)web application->next ->输入项目名
2)导入jar包
再WEB-INF下创建一个lib文件夹->将jar包导入lib文件夹中->选择右键->add as library
3)添加配置文件
再src目录下创建一个springmvc.xml文件
在springmvc.xml中添加如下内容:
<?xml version="1.0" encoding="UTF-8"?>
<beans xmlns="http://www.springframework.org/schema/beans"
xmlns:xsi="http://www.w3.org/2001/XMLSchema-instance"
xmlns:context="http://www.springframework.org/schema/context"
xmlns:mvc="http://www.springframework.org/schema/mvc"
xmlns:aop="http://www.springframework.org/schema/aop"
xmlns:tx="http://www.springframework.org/schema/tx"
xsi:schemaLocation="http://www.springframework.org/schema/beans
http://www.springframework.org/schema/beans/spring-beans.xsd
http://www.springframework.org/schema/context
http://www.springframework.org/schema/context/spring-context.xsd
http://www.springframework.org/schema/aop
http://www.springframework.org/schema/aop/spring-aop.xsd
http://www.springframework.org/schema/mvc
http://www.springframework.org/schema/mvc/spring-mvc-4.0.xsd
http://www.springframework.org/schema/tx
http://www.springframework.org/schema/tx/spring-tx.xsd">
<!--开启注解扫描-->
<context:component-scan base-package="com.itlike"/>
</beans>
4)配置前端控制器
再web.xml中配置如下内容:
<?xml version="1.0" encoding="UTF-8"?>
<web-app xmlns="http://xmlns.jcp.org/xml/ns/javaee"
xmlns:xsi="http://www.w3.org/2001/XMLSchema-instance"
xsi:schemaLocation="http://xmlns.jcp.org/xml/ns/javaee http://xmlns.jcp.org/xml/ns/javaee/web-app_4_0.xsd"
version="4.0">
<!--配置前端控制器-->
<servlet>
<servlet-name>mySpringMVC</servlet-name>
<servlet-class>org.springframework.web.servlet.DispatcherServlet</servlet-class>
<init-param>
<param-name>contextConfigLocation</param-name>
<param-value>classpath:springmvc.xml</param-value>
</init-param>
</servlet>
<servlet-mapping>
<servlet-name>mySpringMVC</servlet-name>
<url-pattern>*.action</url-pattern>
</servlet-mapping>
</web-app>
5)创建控制器
(1)在src目录下创建一个包com.itlike.springmvc
(2)在包中创建一个l类MyController
@Controller
public class MyController {
@RequestMapping("/first.action")
public ModelAndView show(){
ModelAndView modelAndView=new ModelAndView();
modelAndView.addObject("name","myxq");
modelAndView.setViewName(/result.jsp");
return modelAndView;
}
}
6)创建jsp
(1)ideal实现热部署
https://blog.csdn.net/weixin_42831477/article/details/82229436
(2)点击项目名称SpringMVCProject1 点击RJebel 进行热部署
(3)在web目录下建立两个jsp文件
index.jsp:
<html>
<head>
<title>$Title$</title>
</head>
<body>
<a href="${pageContext.request.contextPath}/first.action">发送多个,</a>
</body>
</html>
result.jsp
<html>
<head>
<title>Title</title>
</head>
<body>
<h1>result ${name} </h1>
</body>
</html>
7)执行
点击rebel debug Tomcat 7.0
如果在web-inf下的myxq文件下建立一个itlike.jsp文件
使index.jsp能跳转到itlike.jsp有两种方式:
(1)modelAndView.setViewName("/WEB-INF/myxq/itlike.jsp");
(2)在springmvc.xml中配置
<bean class="org.springframework.web.servlet.view.InternalResourceViewResolver">
<property name="prefix" value="/WEB-INF/myxq"></property>
<property name="suffix" value=".jsp"></property>
</bean>
在控制器中 modelAndView.setViewName("itlike")
8)执行转发的两种方式
@Controller
public class MyController {
@RequestMapping("/first.action")
public ModelAndView show() {
ModelAndView modelAndView = new ModelAndView();
modelAndView.addObject("name", "myxq");
modelAndView.setViewName("/result.jsp");
return modelAndView;
}
@RequestMapping("/second.action")
public String show2() {
return "/result.jsp";
}
}
9)重定向
@Controller
public class MyController {
@RequestMapping("/first.action")
public ModelAndView show() {
ModelAndView modelAndView = new ModelAndView();
modelAndView.addObject("name", "myxq");
modelAndView.setViewName("redirect:/result.jsp");
return modelAndView;
}
@RequestMapping("/second.action")
public String show2() {
return "redirect:/result.jsp";
}
}
二、SpringMVC Request接收参数
1、创建web项目 如上
2、在项目下创建单独的source文件夹存放.xml文件
右击source文件夹 mark resource as-> resourse root
3、web.xml
中使用/
<servlet-mapping>
<servlet-name>mySpringMVC</servlet-name>
<url-pattern>/</url-pattern>
</servlet-mapping>
4、
在index.jsp中输入参数
<a href="${pageContext.request.contextPath}/first?id=1&name=itlike">first.jsp</a>
<a href="${pageContext.request.contextPath}/second?id=1&name=itlike">second.jsp</a>
在控制器中接收
@Controller
public class MyController {
@RequestMapping("/first")
public String myform(HttpServletRequest request){
String id=request.getParameter("id");
String name=request.getParameter("name");
System.out.println(id);
System.out.println(name);
return "/second.jsp";
}
@RequestMapping("/second")
public String myform2(Integer id,String name) {
System.out.println(id);
System.out.println(name);
return "/result.jsp";
}
@RequestMapping("/second")
public String myform3(@RequestParam(value="id",required = false,defaultValue = "100") Integer idkey, String name) {
System.out.println(idkey);
System.out.println(name);
return "/result.jsp";
}
}
三、javebean接收参数
1、在com.itlike.domain包下创建一个javebean User
里面有两属性 和getter setter toString
private String user_name;
private String user_age;
2、MyControler
@RequestMapping("/fouth")
public String myform4(User user) {
System.out.println(user);
return "/result.jsp";
}
四、数组接收参数
1、纯数组
1)MyController
@RequestMapping("/five")
public String myform4(String name[]) {
System.out.println(Arrays.toString(name));
return "/result.jsp";
}
2)index.jsp
<form action="${pageContext.request.contextPath}/five">
user:<input type="text" name="user_name"><br>
age:<<input type="text" name="user_age"><<br>
<input type="submit" value="提交">
</form>
2、封装
1)MyController
@RequestMapping("/six")
public String myform5(User user) {
System.out.println(user);
return "/result.jsp";
}
2)javabean User
private String user_name;
private String user_age;
private String hobby[];
3)jsp
<form action="${pageContext.request.contextPath}/six">
user:<input type="text" name="user_name"><br>
age:<<input type="text" name="user_age"><<br>
爱好:<input type="checkbox" name="hobby" value="篮球">篮球
<input type="checkbox" name="hobby" value="乒乓">乒乓
<input type="checkbox" name="hobby" value="足球">足球
<input type="submit" value="提交">
</form>
3、包装类接收
1)MyController
@RequestMapping("/seven")
public String myform7(User user) {
System.out.println(user);
return "/result.jsp";
}
2)index.jsp
<form action="${pageContext.request.contextPath}/seven">
user:<input type="text" name="user_name"><br>
age:<<input type="text" name="user_age"><<br>
爱好:<input type="checkbox" name="hobby" value="篮球">篮球
<input type="checkbox" name="hobby" value="乒乓">乒乓
<input type="checkbox" name="hobby" value="足球">足球<br>
------宠物------<br>
宠物名称:<input type="text" name="dog.name"><br>
宠物颜色:<<input type="text" name="dog.color"><br>
<input type="submit" value="提交">
</form>
3)javabean
Dog:
private String name;
private String color;
User:
private String user_name;
private String user_age;
private String hobby[];
private Dog dog;
4、list接收
1)MyController:
@RequestMapping("/eight")
public String myform8(User user) {
System.out.println(user);
return "/result.jsp";
}
2)index.jsp
<form action="${pageContext.request.contextPath}/eight">
user:<input type="text" name="user_name"><br>
age:<<input type="text" name="user_age"><<br>
爱好:<input type="checkbox" name="hobby" value="篮球">篮球
<input type="checkbox" name="hobby" value="乒乓">乒乓
<input type="checkbox" name="hobby" value="足球">足球<br>
------宠物------<br>
宠物名称:<input type="text" name="dog.name"><br>
宠物颜色:<<input type="text" name="dog.color"><br>
宠物名称:<input type="text" name="dog[0].name"><br>
宠物颜色:<<input type="text" name="dog[0].color"><br>
宠物名称:<input type="text" name="dog[1].name"><br>
宠物颜色:<<input type="text" name="dog[1].color"><br>
<input type="submit" value="提交">
</form>
3)javabean
User:
private String user_name;
private String user_age;
private String hobby[];
private Dog dog;
private List<Dog> dogs;
Dog:
private String name;
private String color;
5、日期转换
1)Mycontroller2:
@RequestMapping("/convert")
public ModelAndView testconvert(String age, Date date) {
System.out.println(age);
System.out.println(date);
ModelAndView modelAndView = new ModelAndView();
modelAndView.setViewName("/result.jsp");
return modelAndView;
}
2)convert.jsp
<form action="${pageContext.request.contextPath}/convert">
年龄:<input type="text" name="age">
生日:<input type="text" name="date">
<input type="submit" value="提交">
</form>
3)存在的问题:
上面做和这种形式 日期输入格式智能是2020/10/01
6、转换器的使用
1)定义转换器
public class DateConverter implements Converter<String, Date> {
@Override
public Date convert(String s){
if(s!=null){
SimpleDateFormat simpleDateFormat=new SimpleDateFormat("yyyy-MM-dd");
try{
return simpleDateFormat.parse(s);
}catch (ParseException e){
e.printStackTrace();
}
}
return null;
}
2)在springmvc.xml中进行配置
<bean id="dateConverter" class="org.springframework.format.support.FormattingConversionServiceFactoryBean">
<property name="converters">
<list>
<bean class="com.itlike.web.converter.DateConverter"></bean>
</list>
</property>
</bean>
<!--注解驱动-->
<mvc:annotation-driven conversion-service="dateConverter"/>
7、post请求乱码问题解决方案
在web.xml中配置过滤器
<!-- 解决post乱码问题 -->
<filter>
<filter-name>encoding</filter-name>
<filter-class>org.springframework.web.filter.
CharacterEncodingFilter</filter-class>
<!-- 设置编码参是UTF8 -->
<init-param>
<param-name>encoding</param-name>
<param-value>UTF-8</param-value>
</init-param>
</filter>
<filter-mapping>
<filter-name>encoding</filter-name>
<url-pattern>
五、RequestMapping相关属性
1、value :多个路径访问同一个方法
1)MyController3:
@RequestMapping(value={"testrequestmapping1","testrequestmapping2"})
public String testquest(){
return "/second.jsp";
}
2)index.jsp
<a href="${pageContext.request.contextPath}/testrequestmapping1">请求方式一</a>
<a href="${pageContext.request.contextPath}/testrequestmapping2">请求方式二</a>
2、method
1)MyController3:
@RequestMapping(value="testmethod",method = {RequestMethod.GET,RequestMethod.POST})
public String testmethod(){
System.out.println("testmethod...");
return "/second.jsp";
}
2)jsp:
<form action="${pageContext.request.contextPath}/testmethod" method="get">
<input type="submit" value="提交">
</form>
3、param
1)MyController
@RequestMapping(value="testparams",params = {"name=itlike","age!=1"})
public String testparams(){
System.out.println("testparams...");
return "/second.jsp";
}
2)jsp
<a href="${pageContext.request.contextPath}/testparam?name=itlike">请求方式三</a>
4、headers:
1)MyController
@RequestMapping(value="testheaders",params = {"name=itlike","age!=1"},headers = {"Host=localhost:8080","Referer=http://localhost:8080/requestmapping.jsp"})
public String testheaders(){
System.out.println("testheaders...");
return "/second.jsp";
}
2)jsp:
<a href="${pageContext.request.contextPath}/testheaders?name=itlike">请求方式四</a>
5、地址通配符
?:匹配单个字符
*:匹配多个字符:@RequestMapping("testant/*/ac")代表中间只能是一级
**:匹配多重路径:@RequestMapping("testant/**/ac")代表中间可以是任意级目录
1)jsp:
<a href="${pageContext.request.contextPath}/testant/ac">请求方式五</a>
2)MyController
@RequestMapping("testant/??")
public String testant(){
System.out.println("testant...");
return "/second.jsp";
}
@PathVariable
1、rest风格:
资源定位及资源操作的风格
不是协议,可以遵循,也可以不遵循
2、REST风格请求
REST 即 Representational State Transfer (资源)
表现层状态转化
用URL定位资源,用HTTP描述操作
是目前最流行的一种互联网软件架构
它结构清晰、符合标准、易于理解、扩展方便,所以正得
到越来越多网站的采用
使用POST, DELETE, PUT, GET 分别对应 CRUD
Spring3.0 开始支持 REST 风格的请求
3、传统的操作资源
http://localhost:8080/get.action?id=10 查询
get
http://localhost:8080/add.action 新
增 post
http://localhost:8080/update.action 修
改 post
http://localhost:8080/delete.action?id=10
删除 post
4、restful操作资源
http://localhost:8080/goods/1 查询GET
http://localhost:8080/goods 新增POST
http://localhost:8080/goods 更新PUT
http://localhost:8080/goods/1 删除DELETE
5、rest
1)MyController3
@RequestMapping("rest/{id}")
public String testrest(@PathVariable Integer id){
System.out.println(id);
return "/second.jsp";
}
2)jsp
<a href="${pageContext.request.contextPath}/rest/1">请求方式rest</a>
6、发送put与delete请求
默认情况下form表单是bbu不支持put delete请求
spring3.0添加了一个HiddenHttpMethodFilter
可以将post转换为put delete请求
1)在web.xml中配置过滤器
<!--解决put delete请求问题-->
<filter>
<filter-name>hiddenmethod</filter-name>
<filter-class>org.springframework.web.filter.HiddenHttpMethodFilter</filter-class>
</filter>
<filter-mapping>
<filter-name>hiddenmethod</filter-name>
<url-pattern>
</filter-mapping>
2)jsp
<form action="${pageContext.request.contextPath}/testRestForm" method="post">
<input type="hidden" name="_method" value="put">
<input type="submit" >
</form>
3)MyController
@RequestMapping(value = "testRestForm/{id}",method = RequestMethod.PUT)
public String testRestForm(@PathVariable Integer id){
System.out.println(id);
return "redirect:/localsecond";
}
@RequestMapping("localsecond")
public String localsecond(){
return "/second.jsp";
}
7、@RequestHeader:
七、@RequestHeader
	1、作用:获取请求头信息
	2、MyController
		 	@RequestMapping("testHeader")
		    public String testHeader(@RequestHeader("Host") String host,
		                             @RequestHeader("Referer") String referer,
		                             @RequestHeader("Cookie") String cookie){
		        System.out.println("testHeader");
		        System.out.println(host);
		        System.out.println(referer);
		        System.out.println(cookie);
		        return "/second.jsp";
		    }
八、@CookieValue
	1、在@RequestHeader中获取的cookie是一系列cookie的集合
	2、通过JSESSIONID获取单个cookie
	@RequestMapping("testHeader")
    public String testHeader(@RequestHeader("Host") String host,
                             @RequestHeader("Referer") String referer,
                             @RequestHeader("Cookie") String cookie,
                             @CookieValue("JSESSIONID") String sessionid){
        System.out.println("testHeader");
        System.out.println(host);
        System.out.println(referer);
        System.out.println(cookie);
        System.out.println(sessionid);
        return "/second.jsp";
    }
九、页面传值
1、ModelAndView 传递和接收数据
1)MyController
@RequestMapping("testModelAndView")
public ModelAndView testModelAndView(){
ModelAndView modelAndView=new ModelAndView();
modelAndView.addObject("name","itlike");
modelAndView.setViewName("result.jsp");
return modelAndView;
}
2)index.jsp:
<a href="${pageContext.request.contextPath}/testModelAndView">测试testModelAndView</a>
3)result.jsp
<h1>result...${requestScope.name}</h1>
2、model接收参数
1)addAttribute(String attributeName,Object attributeValue)
1)MyController
@RequestMapping("testModel")
public String testModel(Model model){
model.addAttribute("name","itlike001");
return "result.jsp";
}
2)index.jsp
<a href="${pageContext.request.contextPath}/testModel">测试testModel</a>
3)result.jsp
<h1>result...${requestScope.name}</h1>
2)Map<String,Object>asMap();
将当前的model转换成Map
3)Model addAttribute(Object attributeValue);
1)MyController
@RequestMapping("testModelAddAttribute")
public String testModelAddAttribute(Model model){
model.addAttribute("name","itlike001");
Goods mygoods=new Goods();
mygoods.setName("goods1");
mygoods.setPrice("10");
model.addAttribute(mygoods);
System.out.println(model.asMap());
return "result.jsp";
}
2)index.jsp
<a href="${pageContext.request.contextPath}/testModelAddAttribute">测试testModelAddAttribute</a>
3)result.jsp
<h1>result...${goods.name}---${goods.price}</h1>
4)Model addAllAttributes(Map<String,?>attributes)
1)MyController
@RequestMapping("testModelAddAllAttributes1")
public String testModelAddAllAttributes1(Model model){
HashMap<String,Object> hashMap=new HashMap<>();
hashMap.put("name","itlike002");
hashMap.put("hot",1000);
model.addAllAttributes(hashMap);
System.out.println(model.asMap());
return "result.jsp";
}
2)index.jsp
<a href="${pageContext.request.contextPath}/testModelAddAllAttributes1">测试testModelAddAllAttributes1</a>
5)Model addAllAttributes(Collection<?>attributeValues)
1)MyController
@RequestMapping("testModelAddAllAttributes2")
public String testModelAddAllAttributes2(Model model){
ArrayList<Object> arrayList=new ArrayList<>();
arrayList.add("myxq");
arrayList.add(100);
model.addAllAttributes(arrayList);
System.out.println(model.asMap());
return "result.jsp";
}
2)index.jsp
<a href="${pageContext.request.contextPath}/testModelAddAllAttributes2">测试testModelAddAllAttributes2</a>
6)Model mergeAttributes(Map<String,?>attributes)
和Model addAttributes(Map<String,?>attributes)一样 只是它不会覆盖之前的内容
7)boolean containsAttribute(String attributeName);
判断model里有没有包含对应key值 有则返回true没有返回 false
@RequestMapping("testModelContainsAttribute")
public String testModelContainsAttribute(Model model){
model.addAttribute("name","itlike");
Map map=new HashMap<>();
map.put("name","itlike110");
model.mergeAttributes(map);
System.out.println(model.containsAttribute("name"));
return "result.jsp";
}
3、Map接收参数
1)index.jsp
<a href="${pageContext.request.contextPath}/testMap">测试testMap</a>
2)MyController
@RequestMapping("testMap")
public String testMap(Map map){
map.put("key1","value1");
map.put("key2","value2");
return "/result.jsp";
}
3)result.jsp
<h1>result...${requestScope.key1}</h1>
4、SessionAttributes注解
1)再类上加注解
@Controller
@SessionAttributes("name")
public class MyController {}
2)MyController
@RequestMapping("testSession")
public String testSession(Model model){
model.addAttribute("name","itkkk") ;
model.addAttribute("name2","bd");
return "/result2.jsp";
}
3)index.jsp
<a href="${pageContext.request.contextPath}/testSession">测试testSession</a>
5、@SessionAttribute注解
1)MyController
@RequestMapping("testSession2")
public String testSession2(@SessionAttribute("name") String name){
System.out.println(name);
return "/result2.jsp";
}
2)index.jsp
<a href="${pageContext.request.contextPath}/testSession2">测试testSession2</a><br>
十、form标签与验证
	1、mvc-view-controller配置:
		当我们发送一个请求时,如果没有找到对应的mapping 则会到配置文件当中匹配mvc:view-controller
		可以从index.jsp跳转到result.jsp 无需借助Controller
		1)index.jsp
			<a href="${pageContext.request.contextPath}/testView">测试View</a>
		2)result.jsp
			 <h1>结果页---</h1>
		3)springmvc.xml
			<!--可以从index.jsp跳转到result.jsp 不需要借助MyController-->
        	<mvc:view-controller path="testView" view-name="result.jsp"/>
	2、mvc:annotation-driven:
		1)Controller
			@Controller
			public class MyController {
			    @RequestMapping("testController")
			    public String testController(){
			        return "/result.jsp";
			    }
			}
		2)index.jsp
			<a href="${pageContext.request.contextPath}/testView">测试View</a>
		    <a href="${pageContext.request.contextPath}/testController">测试Controller</a>
		3)result.jsp
			<h1>result--</h1>
		4)springmvc.xml
			 <!--可以从index.jsp跳转到result.jsp 不需要借助MyController-->
	        <mvc:view-controller path="testView" view-name="result.jsp"/>
	        <mvc:annotation-driven/>
	   如果springmvc不加<mvc:annotation-driven>则
	   <a href="${pageContext.request.contextPath}/testController">测试Controller</a>将会时效 因为mvc:view-controller的使用回答导致Controller失效
	3、form标签
		1)index.jsp
			 <a href="${pageContext.request.contextPath}/update/1">测试update更新</a>
		2)MyController
			@RequestMapping("update/{id}")
		    public String testUpdate(@PathVariable Integer id, Model model){
		        System.out.println(id);
		        User user=new User();
		        user.setAge(10);
		        user.setName("LL");
		        model.addAttribute("user",user);
		        return "/result.jsp";
		    }
		3)result.jsp
			再html标签之前添加:
				<%@taglib uri="http://www.springframework.org/tags/form" prefix="fm"%>
			body标签中添加:
				<fm:form modelAttribute="user">
		        	<fm:input path="username"/>
		        	<fm:input path="age"/>
		    	</fm:form>
		    必须添加modelAttribute="user"  如果不想添加则再Controller的model.addAttribute("user",user);中"user"改成"command" 因为form默认为command
	4、check-box标签的使用
		1)MyController
			  @RequestMapping("testCheckBox/{id}")
			    public String testCheckBox(@PathVariable Integer id, Model model){
			        System.out.println(id);
			        User user=new User();
			        user.setAge(10);
			        user.setUsername("LL");
			        user.setGender(0);
			        String[] hobby=new String[]{"篮球","足球"};
			        user.setHobby(hobby);
			        model.addAttribute("user",user);

			        ArrayList<Object> arrayList=new ArrayList<>();
			        arrayList.add("足球");
			        arrayList.add("篮球");
			        arrayList.add("乒乓求");

			        model.addAttribute("allhobby",arrayList);
			        return "/result.jsp";
			    }
		2)index.jsp
			<a href="${pageContext.request.contextPath}/testCheckBox/1">测试testCheckBox更新</a>
		3)result.jsp
			<fm:form modelAttribute="user">
		        <fm:input path="username"/>
		        <fm:input path="age"/>
		        性别:<fm:radiobutton path="gender" value="0" label="男"/>
		        <fm:radiobutton path="gender" value="1" label="女"/>
		        爱好:<fm:checkboxes path="hobby" items="${allhobby}"/>
		    </fm:form>
		 再上述基础上进行修改:
		 	1)index.jsp
		 		 <a href="${pageContext.request.contextPath}/testCheckBox/1">测试testCheckBox更新</a>
		 	2)Conteolller
		 		@RequestMapping("update2")
			    public String testCheckBox(User user){
			        System.out.println(user);
			        return "/result2.jsp";
			    }
			3)result.jsp
				<fm:form modelAttribute="user" action="${pageContext.request.contextPath}/pudate2">
		        <fm:input path="username"/>
		        <fm:input path="age"/>
		        性别:<fm:radiobutton path="gender" value="0" label="男"/>
		        <fm:radiobutton path="gender" value="1" label="女"/>
		        爱好:<fm:checkboxes path="hobby" items="${allhobby}"/>

		        <input type="submit" value="修改">
		    </fm:form>
	5、select标签使用
		1)index.jsp
			<a href="${pageContext.request.contextPath}/testSelect">测试testSelect</a>
		2)Controller
			 @RequestMapping("testSelect")
		    public String testSelect(@PathVariable Integer id, Model model){
		        ArrayList<Object> arrayList=new ArrayList<>();
		        arrayList.add("足球");
		        arrayList.add("篮球");
		        arrayList.add("乒乓求");
		        model.addAttribute("allhobby",arrayList);

		        ArrayList<Object> petList=new ArrayList<>();
		        Pet pet1=new Pet();
		        pet1.setId(1);
		        pet1.setName("狗");
		        Pet pet2=new Pet();
		        pet1.setId(1);
		        pet1.setName("猫");
		        Pet pet3=new Pet();
		        pet1.setId(1);
		        pet1.setName("老虎");
		        petList.add(pet1);
		        petList.add(pet2);
		        petList.add(pet3);
		        model.addAttribute("petList",petList);

		        System.out.println(id);
		        User user=new User();
		        user.setAge(10);
		        user.setUsername("LL");
		        user.setGender(0);
		        String[] hobby=new String[]{"篮球","足球"};
		        user.setHobby(hobby);
		        user.setPet(pet2);
		        model.addAttribute("user",user);
		        return "/result.jsp";
		    }
		3)result.jsp
			<fm:form modelAttribute="user" action="${pageContext.request.contextPath}/pudate2">
	        <fm:input path="username"/>
	        <fm:input path="age"/>
	        性别:<fm:radiobutton path="gender" value="0" label="男"/>
	        <fm:radiobutton path="gender" value="1" label="女"/>
	        爱好:<fm:checkboxes path="hobby" items="${allhobby}"/>
	        宠物:<fm:select path="pet.id" items="${petList}" itemValue="id" itemLabel="name"/>
	        <input type="submit" value="修改">
	    </fm:form>
	6、服务器表单校验
十一、JSON数据格式处理
1、静态资源访问


 780
780

 被折叠的 条评论
为什么被折叠?
被折叠的 条评论
为什么被折叠?
 到【灌水乐园】发言


