以用户列表中下拉框加载角色列表为例
<script src="${pageContext.request.contextPath}/js/axios.min.js"></script>
<script>
   window.addEventListener("load",function(){
        //发送axios请求
        axios.get("${pageContext.request.contextPath}/getRoleList")
            .then(function(res){
            //console.log(res.data);
            // let jsonObj = JSON.parse(jsonStr);
            // let jsonStr2 = JSON.stringify(jsonObj);

            //加载
            let ops = document.querySelector("select[name=queryUserRole]").options;
            for(let role of res.data){
                console.log(role);
                ops.add(new Option(role.roleName,role.id));
            }
        });
    });
</script>

<span>用户角色:</span>
<select name="queryUserRole">
    <option value="0">--请选择--</option>
</select>
RoleController
@Controller
public class RoleController {
    @Autowired
    private RoleService roleService;

    @GetMapping("/getRoleList")
    @ResponseBody  //针对于ajax请求设置此注解
    public List<Role> getRoleList(){
        List<Role> roleList = roleService.getRoleList();
        return roleList;
    }
}
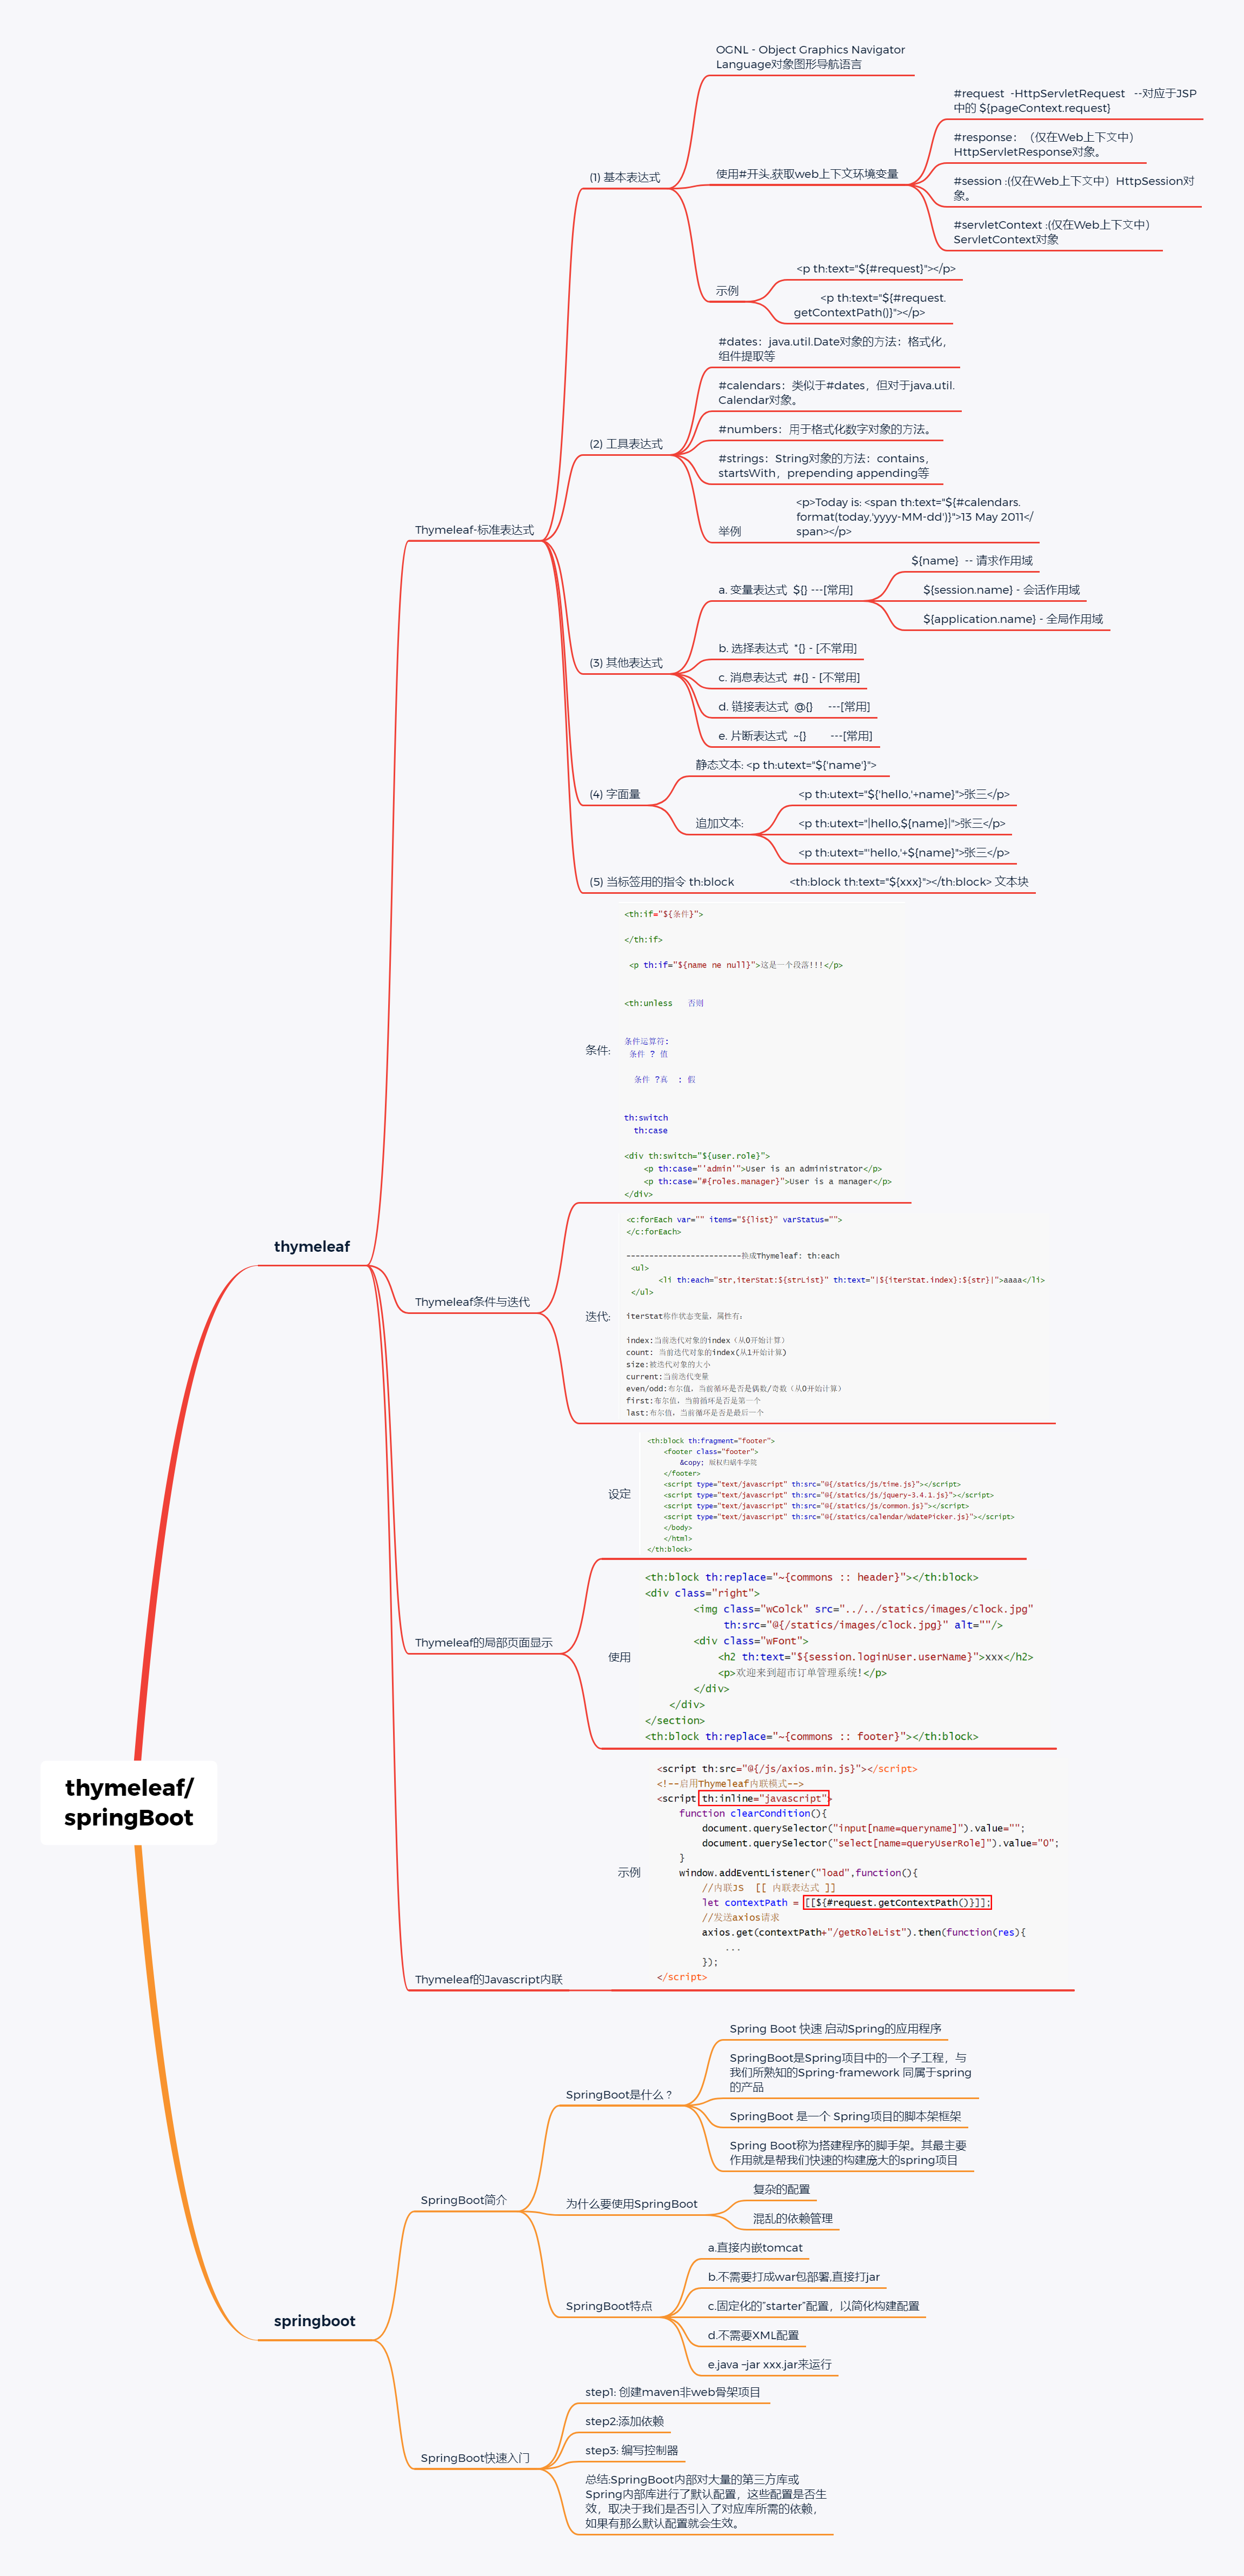
2.Thymeleaf - 进阶
2-1 Thymeleaf-标准表达式
(1) 基本表达式
OGNL - Object Graphics Navigator Language对象图形导航语言
使用#开头,获取web上下文环境变量
#request  -HttpServletRequest   --对应于JSP中的 ${pageContext.request}
#response:(仅在Web上下⽂中)HttpServletResponse对象。
#session :(仅在Web上下⽂中)HttpSession对象。
#servletContext :(仅在Web上下⽂中)ServletContext对象

例如:访问HttpServletRequest对象
         <p th:text="${#request}"></p>
         <p th:text="${#request.getContextPath()}"></p>
(2) 工具表达式
#dates:java.util.Date对象的⽅法:格式化,组件提取等

#calendars:类似于#dates,但对于java.util.Calendar对象。

#numbers:⽤于格式化数字对象的⽅法。

#strings:String对象的⽅法:contains,startsWith,prepending appending等


例如:将日期格式化输出
<p>
Today is: <span th:text="${#calendars.format(today,'yyyy-MM-dd')}">13 May 2011</span>
</p>
(3) 其他表达式
a. 变量表达式  ${} ---[常用]
    ${name}  -- 请求作用域
    ${session.name} - 会话作用域
    ${application.name} - 全局作用域

b. 选择表达式  *{} - [不常用]

c. 消息表达式  #{} - [不常用]

d. 链接表达式  @{}     ---[常用]
      |-@{/}  会在每个链接的前面加上当前web应用的上下文路径
         <script th:src="@{/xxx/xxx/axios.js}">

e. 片断表达式  ~{}        ---[常用]
(4) 字面量
静态文本: <p th:utext="${'name'}">

追加文本:   <p th:utext="${'hello,'+name}">张三</p>
            效果相同的输出:
          <p th:utext="|hello,${name}|">张三</p>
          <p th:utext="'hello,'+${name}">张三</p>
(5) 当标签用的指令 th:block
<th:block th:text="${xxx}"></th:block> 文本块2-2 Thymeleaf条件与迭代
条件:
<th:if="${条件}">

</th:if>

 <p th:if="${name ne null}">这是一个段落!!!</p>


<th:unless   否则


条件运算符:
 条件 ? 值

  条件 ?真  : 假


th:switch
  th:case

<div th:switch="${user.role}">
    <p th:case="'admin'">User is an administrator</p>
    <p th:case="#{roles.manager}">User is a manager</p>
</div>
迭代:
<c:forEach var="" items="${list}" varStatus="">
</c:forEach>

-------------------------换成Thymeleaf: th:each
 <ul>
       <li th:each="str,iterStat:${strList}" th:text="|${iterStat.index}:${str}|">aaaa</li>
 </ul>

iterStat称作状态变量,属性有:

index:当前迭代对象的index(从0开始计算)
count: 当前迭代对象的index(从1开始计算)
size:被迭代对象的大小
current:当前迭代变量
even/odd:布尔值,当前循环是否是偶数/奇数(从0开始计算)
first:布尔值,当前循环是否是第一个
last:布尔值,当前循环是否是最后一个
2-3 Thymeleaf应用-1
登录页面
<!DOCTYPE html>
<html xmlns:th="http://www.thymeleaf.org">
<head lang="en">
    <meta charset="UTF-8">
    <title>系统登录 - 超市订单管理系统</title>
    <link type="text/css" rel="stylesheet" href="../../statics/css/style.css"
        th:href="@{/statics/css/style.css}"/>
    <script type="text/javascript">
 </script>
</head>
<body class="login_bg">
    <section class="loginBox">
        <header class="loginHeader">
            <h1>超市订单管理系统</h1>
        </header>
        <section class="loginCont">
         <form class="loginForm"
                  th:action="@{/user/login}"  name="actionForm" id="actionForm"  method="post" >
    <div class="info" th:text="${error}"></div>
    <div class="inputbox">
                    <label for="userCode">用户名:</label>
     <input type="text" class="input-text" id="userCode" name="userCode"
                           value="admin"
                           placeholder="请输入用户名" required/>
    </div>
    <div class="inputbox">
                    <label for="userPassword">密码:</label>
                    <input type="password" id="userPassword" name="userPassword"
                           value="1111111" placeholder="请输入密码" required/>
                </div>
    <div class="subBtn">
                    <input type="submit" value="登录"/>
                    <input type="reset" value="重置"/>
                </div>
   </form>
        </section>
    </section>
</body>
</html>
后台首页
commons.html公共文件
<th:block th:fragment="header">
<!DOCTYPE html>
<html xmlns:th="http://www.thymeleaf.org">
<head lang="en">
<meta charset="UTF-8">
<title>超市订单管理系统</title>
<link type="text/css" rel="stylesheet" href="../../statics/css/style.css"
th:href="@{/statics/css/style.css}" />
<link type="text/css" rel="stylesheet" href="../../statics/css/public.css"
th:href="@{/statics/css/public.css}" />
</head>
<body>
<!--头部-->
<header class="publicHeader">
<h1>超市订单管理系统</h1>
<div class="publicHeaderR">
<p><span>下午好!</span><span style="color: #fff21b" th:text="${session.loginUser.userName}"> xxx</span> , 欢迎你!</p>
<a href="login.html" th:href="@{/user/logout.do}">退出</a>
</div>
</header>
<!--时间-->
<section class="publicTime">
<span id="time">2020年1月1日 11:11 星期一</span>
<a href="#">温馨提示:为了能正常浏览,请使用高版本浏览器!(IE10+)</a>
</section>
<!--主体内容-->
<section class="publicMian ">
<div class="left">
<h2 class="leftH2"><span class="span1"></span>功能列表 <span></span></h2>
<nav>
<ul class="list">
<li><a th:href="@{/jsp/bill.do?method=query}">订单管理</a></li>
<li><a th:href="@{/provider/providerlist.do}">供应商管理</a></li>
<li><a th:href="@{/user/userList}">用户管理</a></li>
<li><a th:href="@{/user/pwdmodify.do}">密码修改</a></li>
<li><a th:href="@{/user/logout.do}">退出系统</a></li>
</ul>
</nav>
</div>
<input type="hidden" id="path" name="path" th:value="@{/}" />
<input type="hidden" id="referer" name="referer" th:value="${#request.getHeader('Referer')}" />
</th:block>
<th:block th:fragment="footer">
<footer class="footer">
© 版权归蜗牛学院
</footer>
<script type="text/javascript" th:src="@{/statics/js/time.js}"></script>
<script type="text/javascript" th:src="@{/statics/js/jquery-3.4.1.js}"></script>
<script type="text/javascript" th:src="@{/statics/js/common.js}"></script>
<script type="text/javascript" th:src="@{/statics/calendar/WdatePicker.js}"></script>
</body>
</html>
</th:block>frame.html首页文件
<th:block th:replace="~{commons :: header}"></th:block>
<div class="right">
        <img class="wColck" src="../../statics/images/clock.jpg"
             th:src="@{/statics/images/clock.jpg}" alt=""/>
        <div class="wFont">
            <h2 th:text="${session.loginUser.userName}">xxx</h2>
            <p>欢迎来到超市订单管理系统!</p>
        </div>
    </div>
</section>
<th:block th:replace="~{commons :: footer}"></th:block>
2-4 Thymeleaf应用-2
用户列表
JavaScript内联允许在HTML模板模式中更好地集成JavaScript
th:inline =“javascript”
<script th:src="@{/js/axios.min.js}"></script>
<!--启用Thymeleaf内联模式-->
<script th:inline="javascript">
    function clearCondition(){
        document.querySelector("input[name=queryname]").value="";
        document.querySelector("select[name=queryUserRole]").value="0";
    }
    window.addEventListener("load",function(){
        //内联JS  [[ 内联表达式 ]]
        let contextPath = [[${#request.getContextPath()}]];
        //发送axios请求
        axios.get(contextPath+"/getRoleList").then(function(res){
            ...
        });
</script><th:block th:replace="~{commons :: header}"></th:block>
<script th:src="@{/js/axios.min.js}"></script>
<!--启用Thymeleaf内联模式-->
<script th:inline="javascript">
function clearCondition(){
document.querySelector("input[name=queryname]").value="";
document.querySelector("select[name=queryUserRole]").value="0";
}
window.addEventListener("load",function(){
//内联JS [[ 内联表达式 ]]
let contextPath = [[${#request.getContextPath()}]];
//发送axios请求
axios.get(contextPath+"/getRoleList").then(function(res){
//console.log(res.data);
// let jsonObj = JSON.parse(jsonStr);
// let jsonStr2 = JSON.stringify(jsonObj);
//加载
// let ops = document.querySelector("select[name=queryUserRole]").options;
// for(let role of res.data){
// console.log(role);
// ops.add(new Option(role.roleName,role.id));
// }
});
});
</script>
<div class="right">
<div class="location">
<strong>你现在所在的位置是:</strong> <span>用户管理页面</span>
</div>
<div class="search">
<form method="get" th:action="@{/user/userList}" id="queryform">
<span>用户名:</span> <input name="queryname" class="input-text"
type="text" th:value="${queryUserName}">
<span>用户角色:</span>
<select name="queryUserRole">
<option value="0">--请选择--</option>
<option th:if="${roleList != null}" th:each="role:${roleList}"
th:selected="${role.id} eq ${queryUserRole} ? 'selected'"
th:value="${role.id}" th:text="${role.roleName}">xxx</option>
</select>
<input type="hidden" name="pageIndex" value="1"/>
<input value="查 询" type="submit" id="searchbutton">
<input type="button" value="清空条件" onclick="clearCondition()" />
<a th:href="@{/user/useradd.do}" href="useradd.html">添加用户</a>
</form>
</div>
<!--用户-->
<table class="providerTable" cellpadding="0" cellspacing="0">
<tr class="firstTr">
<th width="10%">用户编码</th>
<th width="20%">用户名称</th>
<th width="10%">性别</th>
<th width="20%">电话</th>
<th width="20%">生日</th>
<th width="10%">用户角色</th>
<th width="30%">操作</th>
</tr>
<tr th:if="${pageInfo.list.size()==0}">
<td colspan="7" align="center">对不起,没有找到相关数据</td>
</tr>
<tr th:unless="${pageInfo.list.size()==0}" th:each="user,stastus:${pageInfo.list}">
<td><span th:text="${user.userCode}">jack</span>
</td>
<td><span th:text="${user.userName }">张三</span>
</td>
<td><span th:text="${user.gender} eq 1 ? '男' : '女'">男</span>
</td>
<td><span th:text="${user.phone}">1000000000000</span>
</td>
<td><span th:text="${user.birthday}">1900-1-1</span>
</td>
<td><span th:text="${user.role.roleName}">角色名</span>
</td>
<td><span><a class="viewUser" th:href="|javascript:goViewUser(${user.id});|">
<img th:src="@{/statics/images/read.png}"
src="../../statics/images/read.png"
alt="查看" title="查看"/>
</a>
</span>
<span>
<a class="modifyUser"
th:href="@{|/user/userModify.do?id=${user.id}|}">
<img th:src="@{/statics/images/xiugai.png}"
src="../../statics/images/xiugai.png"
alt="修改" title="修改"/>
</a> </span> <span>
<a class="deleteUser" userid=${user.id }
href="#">
<img src="../../statics/images/schu.png"
th:src="@{/statics/images/schu.png}"
alt="删除" title="删除"/>
</a>
</span>
</td>
</tr>
</c:forEach>
</table>
<input type="hidden" id="totalPageCount" th:value="${pageInfo.pages}"/>
<center>
<div style="margin-top:10px">
<a href="javascript:goPage(1)">首页</a>
<a th:href="|javascript:goPage(${pageInfo.pageNum-1})|">上一页</a>
<a th:if="${pageInfo.pages gt 0}"
th:each="s:${pageInfo.navigatepageNums}"
th:href="|javascript:goPage(${s})|" th:utext="|${s} |">1</a>
<a th:href="|javascript:goPage(${pageInfo.pageNum + 1 })|">下一页</a>
<a th:href="|javascript:goPage(${pageInfo.pages})|">尾页</a>
第<input type="text" style="width:20px;text-align: center"
id="index" name="index" th:value="${pageInfo.pageNum}"/>页
<input type="button" value="确定"
onclick="goPage(document.getElementById('index').value)"></button>
</div>
</center>
<div class="providerAdd" style="height:350px;border:1px solid red">
<div style="float:left;border:1px solid red">
<div>
<label>用户编码:</label> <input type="text" id="v_userCode" value=""
readonly="readonly">
</div>
<div>
<label>用户名称:</label> <input type="text" id="v_userName" value=""
readonly="readonly">
</div>
<div>
<label>用户性别:</label> <input type="text" id="v_gender" value=""
readonly="readonly">
</div>
<div>
<label>出生日期:</label> <input type="text" Class="Wdate" id="v_birthday"
value="" readonly="readonly" onclick="WdatePicker();">
</div>
<div>
<label>用户电话:</label> <input type="text" id="v_phone" value=""
readonly="readonly">
</div>
<div>
<label>用户角色:</label> <input type="text" id="v_userRoleName" value=""
readonly="readonly">
</div>
<div>
<label>用户地址:</label> <input type="text" id="v_address" value=""
readonly="readonly">
</div>
</div>
<div style="border:1px solid red;float:right;width:200px;height:200px;">
<img style="width:200px;height:200px;"
src="" alt="看看"
title="看看" id="idpicpath"/>
</div>
</div>
</div>
</section>
<!--点击删除按钮后弹出的页面-->
<div class="zhezhao"></div>
<div class="remove" id="removeUse">
<div class="removerChid">
<h2>提示</h2>
<div class="removeMain">
<p>你确定要删除该用户吗?</p>
<a href="#" id="yes">确定</a> <a href="#" id="no">取消</a>
</div>
</div>
</div>
<th:block th:replace="~{commons :: footer}"></th:block>3.SpringBoot-基础
3-1 SpringBoot简介
SpringBoot是什么 ?
Spring Boot 快速 启动Spring的应用程序
SpringBoot是Spring项目中的一个子工程,与我们所熟知的Spring-framework 同属于spring的产品

SpringBoot 是一个 Spring项目的脚本架框架

Spring Boot称为搭建程序的脚手架。其最主要作用就是帮我们快速的构建庞大的spring项目
  注解+XML
为什么要使用SpringBoot
复杂的配置
混乱的依赖管理SpringBoot特点
a.直接内嵌tomcat
b.不需要打成war包部署,直接打jar
c.固定化的”starter”配置,以简化构建配置
            |-启动器 --"场景" --自动配置
d.不需要XML配置
e.java –jar xxx.jar来运行
3-2 SpringBoot快速入门
(1) 入门示例
step1: 创建maven非web骨架项目
step2:添加依赖
<?xml version="1.0" encoding="UTF-8"?>
<project xmlns="http://maven.apache.org/POM/4.0.0"
         xmlns:xsi="http://www.w3.org/2001/XMLSchema-instance"
         xsi:schemaLocation="http://maven.apache.org/POM/4.0.0 http://maven.apache.org/xsd/maven-4.0.0.xsd">
    <modelVersion>4.0.0</modelVersion>

    <!--所有springboot项目都以此项目作为父工程-->
    <parent>
        <groupId>org.springframework.boot</groupId>
        <artifactId>spring-boot-starter-parent</artifactId>
        <version>2.3.7.RELEASE</version>
    </parent>

    <groupId>com.woniu</groupId>
    <artifactId>springboot-demo01</artifactId>
    <version>1.0-SNAPSHOT</version>

    <properties>
        <maven.compiler.source>8</maven.compiler.source>
        <maven.compiler.target>8</maven.compiler.target>
    </properties>

    <dependencies>
        <!--springboot的web启动器依赖-->
        <dependency>
            <groupId>org.springframework.boot</groupId>
            <artifactId>spring-boot-starter-web</artifactId>
        </dependency>
    </dependencies>
</project>

需要注意的是,我们并没有在这里指定版本信息。因为SpringBoot的父工程已经对版本进行了管理了。
step3: 编写控制器
@Controller
@EnableAutoConfiguration //开启自动配置功能
public class HelloController {
    @RequestMapping("/sayHello")
    @ResponseBody
    public String sayHello(){
        return "hello,欢迎学习SpringBoot!!!";
    }

    public static void main(String[] args) {
        //启动SpringBoot应用程序
        SpringApplication.run(HelloController.class,args);
    }
}
总结:SpringBoot内部对大量的第三方库或Spring内部库进行了默认配置,这些配置是否生效,取决于我们是否引入了对应库所需的依赖,如果有那么默认配置就会生效。
所以,我们使用SpringBoot构建一个项目,只需要引入所需依赖,配置就可以交给SpringBoot处理了
(2) 优化入门示例
现在工程中只有一个Controller,可以这么玩;那么如果有多个Controller,怎么办呢?
解决方案: springboot程序引入了一个全局的引导类
注意:该类放在比较浅的包中,比如com.woniu
/**
 * SpringBoot 程序引导类
 */
//@EnableAutoConfiguration
//@ComponentScan //如果此时省略"com.woniu"属性值,则默认的扫描范围为当前类所在的包及子包
@SpringBootApplication // 组合了三个重要注解: @SpringBootConfiguration  @EnableAutoConfiguration @ComponentScan
public class App {
    //启动方法
    public static void main(String[] args) {
        SpringApplication.run(App.class,args);
    }
}


 1万+
1万+


 被折叠的 条评论
为什么被折叠?


