


弄的时候费了我不少事,就把过程记录一下
**
QT的编译环境:
**
参考资料:《iTOP-4418&6818-QtE5.7移植文档_V1.0》
怎么说呢,当第一遍成功之后第二遍也就简单了,最开始当然要模仿了
1.基础软件:
移植 QtE5.7 需要 Ubuntu16.04 环境,arm 编译器需要使用“arm-2014.05-29”,触摸
tslib 需要使用 1.4 版本,QtE 的源码为 QtE5.7.0。
下面是具体的下载链接和详细的版本信息。
环境:ubuntu16.04(Qt5.7creater 需要在 16.04 版本上运行)
下载链接:http://cn.ubuntu.com/download/
编译器:arm-2014.05-29-arm-none-linux-gnueabi-i686-pc-linux-gnu.tar.bz2
下载链接: http://www.veryarm.com/arm-none-linux-gnueabi-gcc
触摸工具:tslib-1.4.tar.gz
下载链接: http://vdisk.weibo.com/s/AcUHxOERV2k0?sudaref=www.baidu.com
Qt 源码:qt-everywhere-opensource-src-5.7.0.tar.gz
下载链接: http://download.qt.io/official_releases/qt/5.7/5.7.0/
2.搭建编译环境
2.1编译 tslib
(tslib是用于触摸屏校准的,本来想省略,但貌似编译qt会报错,有兴趣的可以尝试省略这一步)
解压源码 tslib-1.4.tar.gz
cd tslib
sudo apt-get install autoconf
sudo apt-get install automake
sudo apt-get install libtool
安装完之后执行
./autogen.sh
./configure CC=arm-none-linux-gnueabi-gcc CXX=arm-none-linux-gnueabi-g++
--host=arm-none-linux-gnueabi --prefix=/opt/tslib1.4 ac_cv_func_malloc_0_nonnull=yes
make
make install
CC=arm-none-linux-gnueabi-gcc :选择交叉编译工具
–prefix=/opt/tslib1.4:选择安装路径
这个还是要看着你用的交叉编译工具进行更改的
比如:
./configure CC=arm-linux-gcc CXX=arm-linux-g++
–host=arm-linux --prefix=/opt/tslib1.4 ac_cv_func_malloc_0_nonnull=yes
vim /opt/tslib1.4/etc/ts.conf 修改第二行如下

2.2 编译 Qt5.7 的源码
解压源码:
tar -vxf qt-everywhere-opensource-src-5.7.0
cd qt-everywhere-opensource-src-5.7.0
修改配置项:
vi qtbase/mkspecs/linux-arm-gnueabi-g++/qmake.conf
#
# qmake configuration for building with arm-linux-gnueabi-g++
#
MAKEFILE_GENERATOR = UNIX
CONFIG += incremental
QMAKE_INCREMENTAL_STYLE = sublib

QT_QPA_DEFAULT_PLATFORM = linux #eglfs
QMAKE_CFLAGS_RELEASE += -O2 -march=armv7-a
QMAKE_CXXFLAGS_RELEASE += -O2 -march=armv7-a

include(../common/linux.conf)
include(../common/gcc-base-unix.conf)include(../common/g++-unix.conf)
# modifications to g++.conf
QMAKE_CC = arm-none-linux-gnueabi-gcc
QMAKE_CXX = arm-none-linux-gnueabi-g++
QMAKE_LINK = arm-none-linux-gnueabi-g++
QMAKE_LINK_SHLIB = arm-none-linux-gnueabi-g++
# modifications to linux.conf
QMAKE_AR = arm-none-linux-gnueabi-ar cqs
QMAKE_OBJCOPY = arm-none-linux-gnueabi-objcopy
QMAKE_NM = arm-none-linux-gnueabi-nm -P
QMAKE_STRIP = arm-none-linux-gnueabi-strip
load(qt_config)
添加三行
QT_QPA_DEFAULT_PLATFORM = linux #eglfs
QMAKE_CFLAGS_RELEASE += -O2 -march=armv7-a
QMAKE_CXXFLAGS_RELEASE += -O2 -march=armv7-a
修改下方arm-none-linux-gnueabi字样为你需要的交叉编译工具
新建“autoconfigure.sh”脚本,添加如下字样。-no表示不安装某项
#!/bin/sh
./configure \
-v \
-prefix /opt/qt5.7.0 \
-release \
-opensource \
-make libs \
-xplatform linux-arm-gnueabi-g++ \
-optimized-qmake \
-pch \
-qt-sql-sqlite \
-qt-libjpeg \
-qt-zlib \
-no-opengl \
-skip qt3d \
-skip qtcanvas3d \
-skip qtpurchasing \
-no-sse2 \
-no-openssl \
-no-nis \
-no-cups \
-no-glib \
-no-iconv \
-nomake examples \
-nomake tools \
-skip qtvirtualkeyboard \
-I/opt/tslib1.4/include \
-L/opt/tslib1.4/lib
exit
chmod +x autoconfigure.sh给定可执行权限
./autoconfigure.sh
运行完后就可以make,make install了
大概要1~2个小时的编译时间。
我在make的时候报错了,如
fatal error: pcre.h: No such file or directory
等几十条,但是下方仍提示编译完成,安装pcre后重新编译也显示那个报错,就没有继续管
2.3 安装 qtcreater 编译测试程序 hello
将“qt-opensource-linux-x64-5.7.0.run”拷贝到 ubuntu16.04 任意文件夹下,
“chmod 777 qt-opensource-linux-x64-5.7.0.run”,之后直接“./qt-opensource-
linux-x64-5.7.0.run”执行,安装一直点下一步就 OK
交叉编译:
点击工具->选项
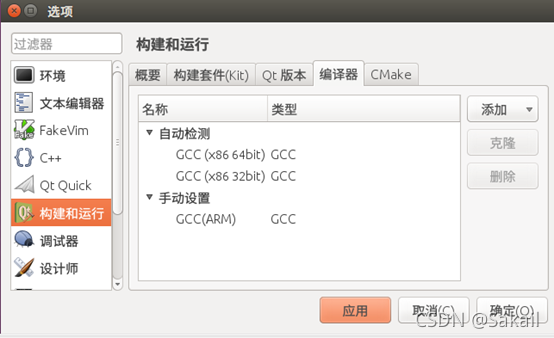
点击添加,选择你要使用的交叉编译工具
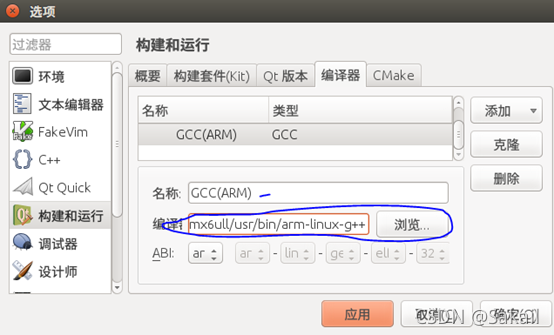
点击Qt版本->添加,从刚编译的qt路径中找出qmake
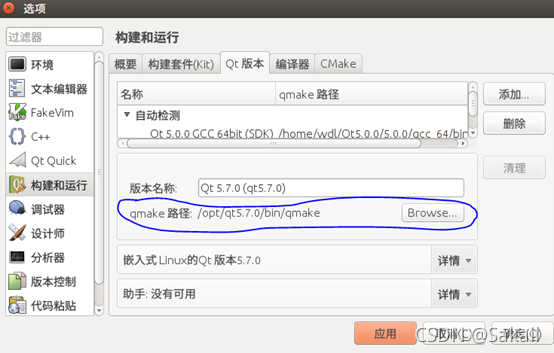
点击构建套件->添加,选择你刚刚设置的编译器,名称要记一下,设置完后点击确认
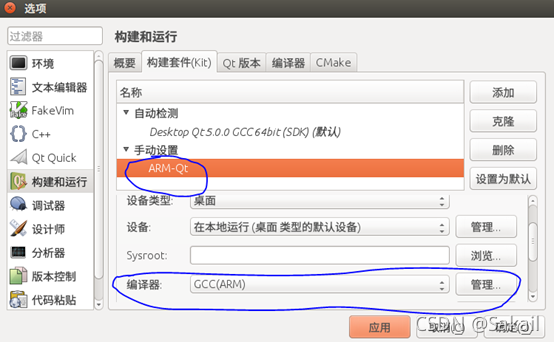
点击左侧的项目,打开你刚刚设置的套件,然后点击下方小电脑,选择编译环境
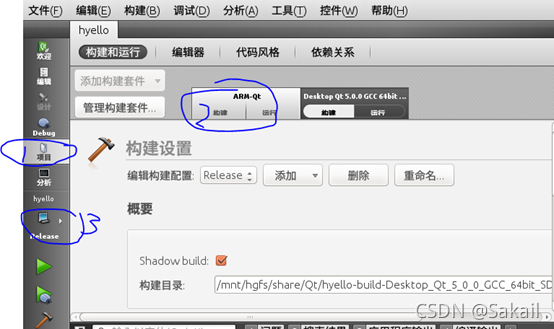
好了,可以尝试编译了,看看能不能生成可执行程序。当然,如果用ARM环境运行指定失败的啦,但还是会生成文件的
2.给arm搭建运行环境
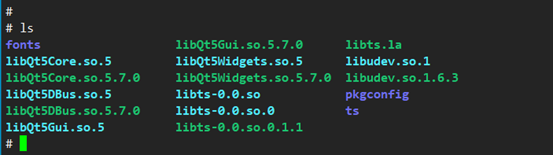
我是先把可执行文件拷贝到ARM板里然后再逐步找的库
将编译好的/opt/qt5.7.0拷贝到ARM板的/opt目录下,如果嫌大,只拷贝lib和plugins也可以。
修改ARM的环境变量 vi /etc/profile
export TSLIB_ROOT=/opt/tslib1.4
export QT_ROOT=/opt/qt-5.7.0
export TSLIB_TSDEVICE=/dev/input/event2
export TSLIB_TSEVENTTYPE=input
export TSLIB_CONFFILE=/opt/tslib1.4/etc/ts.conf
export TSLIB_PLUGINDIR=/opt/tslib1.4/lib/ts
export TSLIB_CONSOLEDEVICE=none
export TSLIB_FBDEVICE=/dev/fb0
export QWS_MOUSE_PROTO=tslib:/dev/input/event2
export LD_LIBRARY_PATH=/lib:/usr/lib:/usr/local/lib:$QT_ROOT/lib:$TSLIB_ROOT/lib:$TSLIB_ROOT/lib/
export QT_QPA_PLATFORM_PLUGIN_PATH=$QT_ROOT/plugins
export QT_QPA_PLATFORM=linuxfb:tty=/dev/fb0
export QT_QPA_FONTDIR=$QT_ROOT/lib/fonts
export QT_QPA_GENERIC_PLUGINS=tslib
更新source /etc/profile
这里边的软连接指定是copy不上的,运行程序看看缺哪个自个挨个ln吧,以下是我最后移植的库的样子
ln -s libQt5Widgets.so.5.1.0 libQt5Widgets.so.5
ln -s libQt5Gui.so.5.1.0 libQt5Gui.so.5
ln -s libQt5Core.so.5.1.0 libQt5Core.so.5
关于
This application failed to start because it could not find or load the Qt platform plugin “linuxfb”
这个错误,百度的建议大都是修改配置文件,但我修改后也没有任何作用,./hyello -platform linuxfb也不行
可下载工具strace用来诊断
strace -f 1.log -o hello 查看库的打开情况

网盘所用的包分享:
链接:https://pan.baidu.com/s/10RoVPH-2Lb-_FXFdINWCqQ
提取码:xkna
下边是我遇到的各种问题,以及一些解决方式,希望有帮助
通过终端安装程序sudo apt-get install 时出错:
E: Could not get lock /var/lib/dpkg/lock - open (11: Resource temporarily unavailable)
E: Unable to lock the administration directory (/var/lib/dpkg/), is another process using it?
出现这个问题可能是有另外一个程序正在运行,导致资源被锁不可用。而导致资源被锁的原因可能是上次运行安装或更新时没有正常完成,进而出现此状况,解决的办法其实很简单:
在终端中敲入以下两句
sudo rm /var/cache/apt/archives/lock
sudo rm /var/lib/dpkg/lock
Package has no installation candidate解决方法
今天在安装软件的时候出现了Package has no installation candidate的问题,如:
apt-get install <packagename>
Reading package lists... Done
Building dependency tree... Done
Package aptitude is not available, but is referred to by another package.
This may mean that the package is missing, has been obsoleted, or
is only available from another source
E: Package <packagename> has no installation candidate
解决方法如下:
apt-get update
apt-get upgrade
apt-get install
fatal error: pcre.h: No such file or directory
apt-get install libpcre3 libpcre3-dev
./stdio.h:1010:1: error: ‘gets’ undeclared here (not in a function)报错
修改srclib/stdio.in.h
去掉:
_GL_WARN_ON_USE (gets, “gets is a security hole - use fgets instead”);
增加:
#if defined(GLIBC) && !defined(UCLIBC) && !__GLIBC_PREREQ(2, 16)
_GL_WARN_ON_USE (gets, “gets is a security hole - use fgets instead”);
#endif
在执行QT程序是出现如下错误
QIconvCodec::convertToUnicode: using Latin-1 for conversion, iconv_open failed
QIconvCodec::convertFromUnicode: using Latin-1 for conversion, iconv_open failed
解决办法:
参考链接:http://www.qtcn.org/bbs/simple/?t55852.html
问题 3:./system/rootlib/helloworld -qws ,程序运行起来,仍报错
QIconvCodec::convertFromUnicode: using Latin-1 for conversion, iconv_open failed
QIconvCodec::convertToUnicode: using Latin-1 for conversion, iconv_open failed
解决 :下载 http://ftp.gnu.org/gnu/libiconv/libiconv-1.14.tar.gz
./configure -prefix=$PWD/_install -host=arm-linux-gnueabihf
make
make install
把_install/lib 下的preloadable_libiconv.so 拷到系统的/system/lib 下,
export LD_PRELOAD=/system/lib/preloadable_libiconv.so
安装OpenGL Utility Toolkit
首先不可或缺的就是编译器与基本的函式库,如果系统没有安装的话,依照下面的方式安装:
sudo apt-get install build-essential
安装OpenGL Library
sudo apt-get install libgl1-mesa-dev
安装OpenGL Utilities
sudo apt-get install libglu1-mesa-dev
OpenGL Utilities 是一组建构于 OpenGL Library 之上的工具组,提供许多很方便的函式,使 OpenGL 更强大且更容易使用。
1.$ sudo apt-get install libglut-dev
OpenGL Utility Toolkit 是建立在 OpenGL Utilities 上面的工具箱,除了强化了 OpenGL Utilities 的不足之外,也增加了 OpenGL 对于视窗介面支援。
注意:在这一步的时候,可能会出现以下情况,shell提示:
1.Reading package lists… Done
2.Building dependency tree
3.Reading state information… Done
4.E: Unable to locate package libglut-dev
将上述 sudoapt−getinstalllibglut−dev命令改成 sudoapt−getinstalllibglut−dev命令改成sudo apt-get install freeglut3-dev即可。
测试示例test.c源码:
#include <GL/glut.h>
void init(void)
{
    glClearColor(0.0, 0.0, 0.0, 0.0);
    glMatrixMode(GL_PROJECTION);
    glOrtho(-5, 5, -5, 5, 5, 15);
    glMatrixMode(GL_MODELVIEW);
    gluLookAt(0, 0, 10, 0, 0, 0, 0, 1, 0);
    return;
}
void display(void)
{
    glClear(GL_COLOR_BUFFER_BIT);
    glColor3f(1.0, 0, 0);
    glutWireTeapot(3);
    glFlush();
    return;
}
int main(int argc, char *argv[])
{
    glutInit(&argc, argv);
    glutInitDisplayMode(GLUT_RGB | GLUT_SINGLE);
    glutInitWindowPosition(0, 0);
    glutInitWindowSize(300, 300);
    glutCreateWindow(“OpenGL 3D View”);
   init();
    glutDisplayFunc(display);
    glutMainLoop();
    return 0;
}
编译程式时,执行以下指令:
1.$ gcc -o test test.c -lGL -lGLU -lglut


 1432
1432


 被折叠的 条评论
为什么被折叠?
被折叠的 条评论
为什么被折叠?
 到【灌水乐园】发言


