


透传,插槽,组件实例方法的绑定,深入理解 Vue.js 组件扩展与插槽
前言
Vue.js 提供了强大的组件化系统,允许开发者构建可复用、可组合的UI组件。在实际项目中,直接使用第三方库提供的基础组件(如Element UI)往往不能完全满足定制化需求。这时,对这些基础组件进行二次封装,使其更加符合项目需求就显得尤为重要。
目标组件:hsk-input
本示例的目标是创建一个名为HSK-Input的组件,它基于Element UI的el-input,但增加了额外的功能和灵活性,比如自动绑定el-input的所有实例方法,并提供一个自定义方法customMethod。
核心知识点
属性与事件的透传
v-bind="$attrs" v-on="$listeners":这是Vue中用于透传所有未被组件自身声明使用的属性和事件的关键技巧。$attrs包含所有没有被作为props声明的属性,$listeners则包含了父组件传递给当前组件的所有事件监听器。这样,我们就可以无需明确列出所有可能的属性和事件,而让HSK-Input能够自由接受并传递任何来自父组件的额外配置或交互逻辑。
<el-input v-bind="$attrs" v-on="$listeners" ref="inputRef"></el-input>
使用插槽(Slots)
v-for="(_, slotName) in $slots" 和 v-slot:[slotName]:这部分代码展示了如何动态地遍历并渲染传递给组件的所有插槽内容。Vue的插槽机制允许我们在封装组件时保留高度的灵活性,即用户可以在封装后的组件内部插入任意内容或组件,这对于保持UI组件的通用性和可定制性至关重要。
<el-input v-bind="$attrs" v-on="$listeners" ref="inputRef">
      <template v-for="(_, slotName) in $slots" v-slot:[slotName] >
        <slot :name="slotName"></slot>
      </template>
    </el-input>
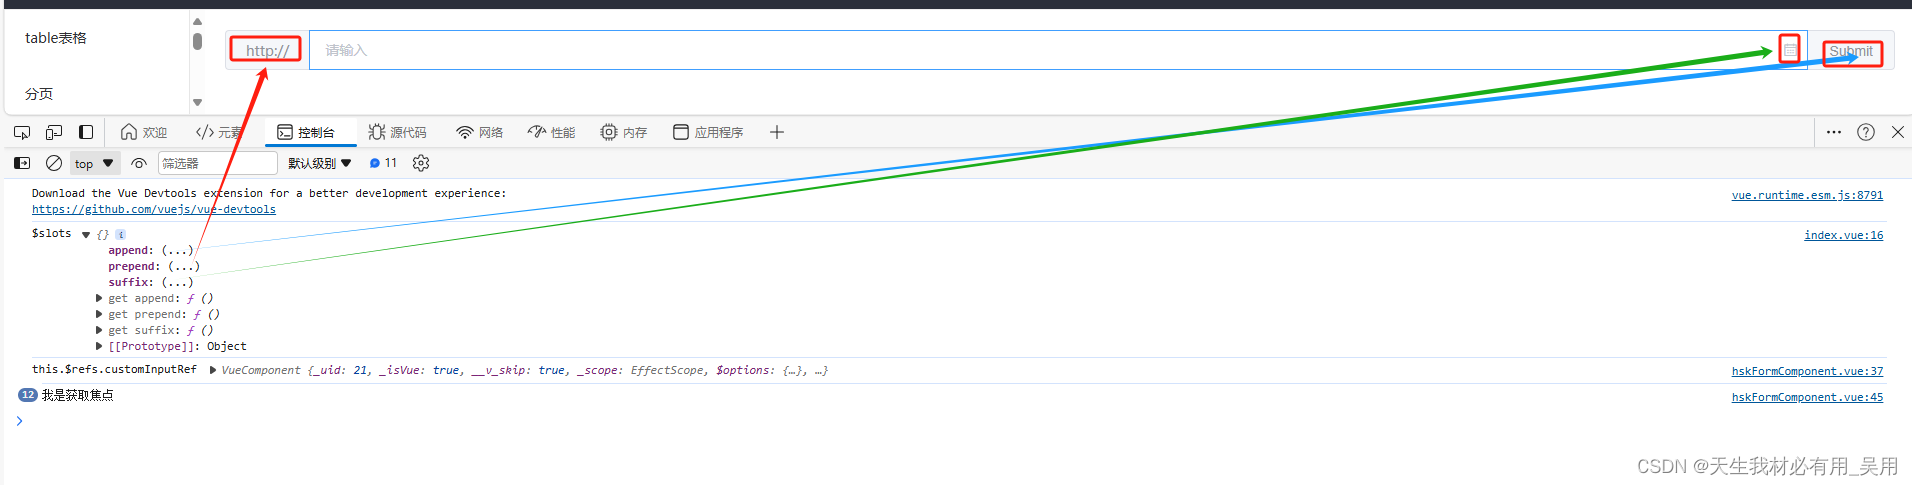
父组件使用
<hsk-input
      v-model="inputValue"
      placeholder="请输入"
      ref="customInputRef"
      @focus="handleFocus"
      type="text"
      clearable
    >
      <template v-slot:prepend
        ><span>http://</span></template
      >
      <template v-slot:suffix>
        <i class="el-input__icon el-icon-date"></i>
      </template>
      <template v-slot:append>
        <el-button @click="handleButtonClick">Submit</el-button>
      </template>
    </hsk-input>
其子组件中打印this.$slots,就会出现父组件传递过来的插槽,只需要遍历一下this.$slots即可使用。
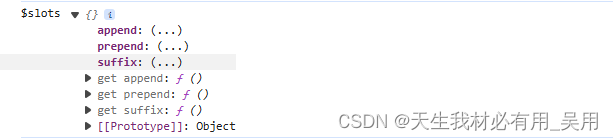
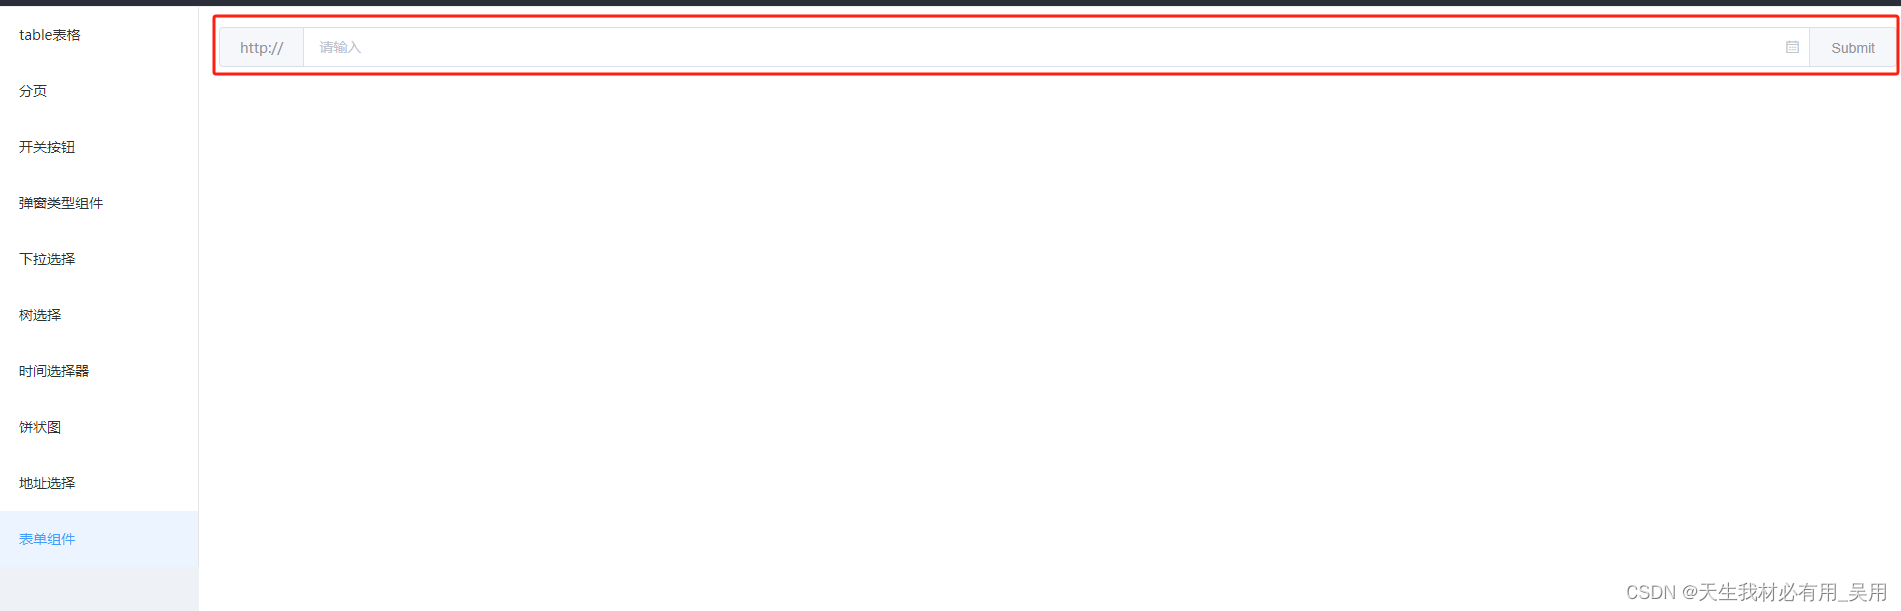
使用效果:
组件实例方法的绑定
mounted() 钩子中的方法绑定:通过遍历el-input实例的方法并绑定到HSK-Input组件上,我们确保了所有原生输入框的功能都能在封装组件中直接调用。这种方法利用了JavaScript的bind()函数来改变函数执行时的上下文(this),使得在封装组件外部也能访问和控制基础组件的内部方法。
子组件添加ref,然后进行实例方法的绑定
<el-input v-bind="$attrs" v-on="$listeners" ref="inputRef">
  <template v-for="(_, slotName) in $slots" v-slot:[slotName]>
     <slot :name="slotName"></slot>
   </template>
 </el-input>
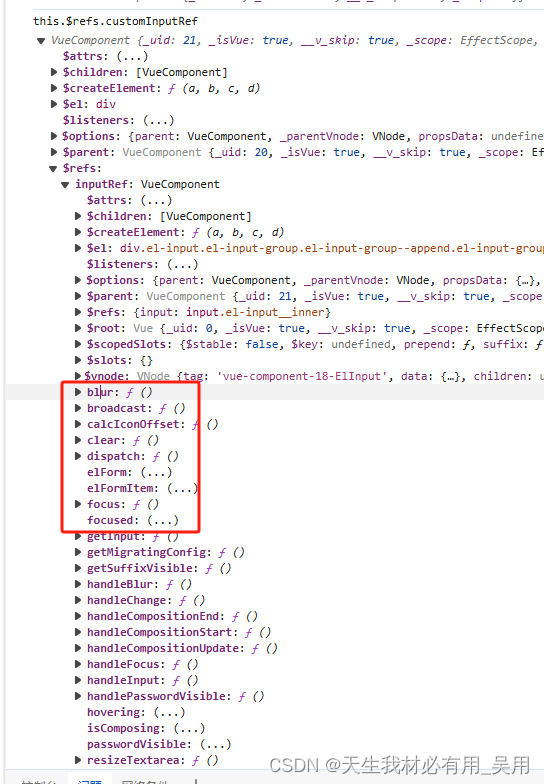
打印this.$refs.inputRef,可以看出一些el-input自带的属性方法都在$refs.inputRef中
主要代码:
<template>
  <div>
    <el-input v-bind="$attrs" v-on="$listeners" ref="inputRef">
      <template v-for="(_, slotName) in $slots" v-slot:[slotName]>
        <slot :name="slotName"></slot>
      </template>
    </el-input>
  </div>
</template>

<script>
export default {
  name: "hsk-input",
  mounted() {
    this.$nextTick(() => {
      // 在 mounted 钩子中通过遍历绑定 el-input 的实例方法到 CustomInput 上

      const inputRef = this.$refs.inputRef;
      console.log(
        "$slots",inputRef
      );
      const methodsToBind = Object.getOwnPropertyNames(
        Object.getPrototypeOf(inputRef)
      );

      // 遍历子组件中用到的了el-input的所有方法施礼道customInput上面去
      methodsToBind.forEach((method) => {
        if (typeof inputRef[method] === "function") {
          this[method] = inputRef[method].bind(inputRef);
        }
      });

      // 如果需要添加自定义方法,可以在这里定义
      this.customMethod = () => {
        console.log("This is a custom method in CustomInput component");
      };
    });
  },
  created() {},
  methods: {},
};
</script>
父组件使用,并通过 @focus="handleFocus"调用子组件中elementui自带的focus方法的方法
<template>
  <div>
    <hsk-input
      v-model="inputValue"
      placeholder="请输入"
      ref="customInputRef"
      @focus="handleFocus"
      type="text"
      clearable
    >
    </hsk-input>
  </div>
</template>

<script>
import HskInput from "../package/hsk-input/index.vue";
export default {
  components: {
    HskInput,
  },
  data() {
    return {
      inputValue: "",
    };
  },
  methods: {
    handleButtonClick() {
      console.log("handleButtonClick");
    },
    handleFocus() {
      console.log("我是获取焦点");
    },
  },
};
</script>
代码解释
const inputRef = this.$refs.inputRef;其中this.$refs是一个对象,保存着模板中使用ref属性定义的引用信息。这里通过inputRef获取到了el-input组件的DOM引用。
const methodsToBind = Object.getOwnPropertyNames(Object.getPrototypeOf(inputRef));这段代码用来获取inputRef(即el-input组件实例)的所有可枚举属性名,包括原型链上的方法。这样做是为了之后遍历并绑定这些方法到当前组件实例上。
methodsToBind.forEach((method) => { ... })遍历从inputRef获取到的所有方法名称,对于每个方法,检查是否为函数类型。如果是函数,则通过bind(inputRef)将其绑定到当前组件实例(this)上。这意味着你可以在自定义组件实例上调用这些原本属于el-input的方法,而不需要直接操作DOM或引用el-input的实例,提高了代码的抽象层次和可维护性。
自定义方法的添加
customMethod:除了透传和绑定原有方法外,我们还可以在封装组件中添加自定义功能,进一步增强组件的能力。这展示了组件封装不仅仅是简单的“转发”,更是对原始功能的拓展和创新。
this.customMethod = () => { ... }定义了一个新的方法customMethod作为自定义组件的扩展。这个方法简单地打印一条消息到控制台,演示了如何在封装组件时添加额外的业务逻辑或功能。
mounted() {
    this.$nextTick(() => {
		...
		...
		...
      // 如果需要添加自定义方法,可以在这里定义
      this.customMethod = () => {
        console.log("This is a custom method in CustomInput component");
      };
    });
  },
实践意义
通过这样的封装,HSK-Input组件不仅继承了el-input的所有特性,还提供了额外的便利性和可扩展性。开发者在使用这个组件时,不仅可以像使用原生el-input那样配置和交互,还能享受到自定义方法带来的便利,以及通过插槽灵活插入内容的能力,大大提升了开发体验和维护性。
结语
组件封装是Vue开发中的一个重要实践,它要求开发者不仅要熟悉Vue的基础知识,还要具备良好的设计思维,以实现组件的高复用性和易用性。本文通过HSK-Input组件的实例,展示了如何通过属性透传、事件绑定、插槽使用以及方法扩展等技术点,高效且优雅地完成组件的封装与升级。希望这一实践能为你的Vue项目开发带来新的启示和帮助。
所有代码
子组件所有代码:
<template>
  <div>
    <el-input v-bind="$attrs" v-on="$listeners" ref="inputRef">
      <template v-for="(_, slotName) in $slots" v-slot:[slotName]>
        <slot :name="slotName"></slot>
      </template>
    </el-input>
  </div>
</template>

<script>
export default {
  name: "hsk-input",
  mounted() {
    this.$nextTick(() => {
      // 在 mounted 钩子中通过遍历绑定 el-input 的实例方法到 CustomInput 上

      const inputRef = this.$refs.inputRef;
      console.log(
        "$slots",inputRef
      );
      const methodsToBind = Object.getOwnPropertyNames(
        Object.getPrototypeOf(inputRef)
      );

      // 遍历子组件中用到的了el-input的所有方法施礼道customInput上面去
      methodsToBind.forEach((method) => {
        if (typeof inputRef[method] === "function") {
          this[method] = inputRef[method].bind(inputRef);
        }
      });

      // 如果需要添加自定义方法,可以在这里定义
      this.customMethod = () => {
        console.log("This is a custom method in CustomInput component");
      };
    });
  },
  created() {},
  methods: {},
};
</script>
父组件所有代码
<template>
  <div>
    <hsk-input
      v-model="inputValue"
      placeholder="请输入"
      ref="customInputRef"
      @focus="handleFocus"
      type="text"
      clearable
    >
      <template v-slot:prepend
        ><span>http://</span></template
      >
      <template v-slot:suffix>
        <i class="el-input__icon el-icon-date"></i>
      </template>
      <template v-slot:append>
        <el-button @click="handleButtonClick">Submit</el-button>
      </template>
    </hsk-input>
  </div>
</template>

<script>
import HskInput from "../package/hsk-input/index.vue";
export default {
  components: {
    HskInput,
  },
  data() {
    return {
      inputValue: "",
    };
  },
  mounted() {
    this.$nextTick(() => {
      console.log("this.$refs.customInputRef", this.$refs.customInputRef);
    });
  },
  methods: {
    handleButtonClick() {
      console.log("handleButtonClick");
    },
    handleFocus() {
      console.log("我是获取焦点");
    },
  },
};
</script>

<style>
</style>
最终效果:


 2051
2051

 被折叠的 条评论
为什么被折叠?
被折叠的 条评论
为什么被折叠?
 到【灌水乐园】发言


