


在上篇jni开发(一):https://blog.csdn.net/qq_42748190/article/details/115608686 中,
我们用的是jni静态注册的方式,本篇将采用jni动态注册的方式。
基于上篇的示例项目,我们接着改造
1.结构目录如下:红框为新增文件

native-lib3.cpp代码如下:
#include <jni.h>
#include <string>
#include "../mylog.h"


//定义类名
static const char *className = "com/myso/test2";

//定义对应Java native方法的 C++ 函数,函数名可以随意命名
static jstring sayHello(JNIEnv *env, jobject) {
    LOGI("hello, this is native log.");
    const char *hello = "Hello from C++.  我是动态注册的";
    return env->NewStringUTF(hello);
}

static jstring saySorry(JNIEnv *env, jobject, jstring j_str) {
    const char *c_str = NULL;
    char buff[128] = {0};
    c_str = env->GetStringUTFChars(j_str, NULL);
    if (c_str == NULL) {
        LOGI("out of memory.\n");
        return NULL;
    }
    LOGI("from java str:%s", c_str);
    sprintf(buff, "Sorry c++: %s", c_str);
    env->ReleaseStringUTFChars(j_str, c_str);
    return env->NewStringUTF(buff);
}

static jint adddddddddNum(JNIEnv *env, jclass , jint j_num, jint j_num1) {
    return j_num + j_num1;
}

/*
 * 定义函数映射表(是一个数组,可以同时定义多个函数的映射)
 * 参数1:Java 方法名
 * 参数2:方法描述符,也就是签名
 * 参数3:C++定义对应 Java native方法的函数名
 */
static JNINativeMethod jni_Methods_table[] = {
        {"stringFromJNI2", "()Ljava/lang/String;",                   (void *) sayHello},
        {"stringFromJNI2", "(Ljava/lang/String;)Ljava/lang/String;", (void *) saySorry},
        {"addNum",         "(II)I",                                  (void *) adddddddddNum},
};

//根据函数映射表注册函数
static int registerNativeMethods(JNIEnv *env, const char *className, const JNINativeMethod *gMethods, int numMethods) {
    jclass clazz;
    LOGI("Registering %s natives\n", className);
    clazz = env->FindClass(className);
    if (clazz == NULL) {
        LOGE("Native registration unable to find class '%s'\n", className);
        return JNI_ERR;
    }
    if (env->RegisterNatives(clazz, gMethods, numMethods) < 0) {
        LOGE("Register natives failed for '%s'\n", className);
        return JNI_ERR;
    }
    //删除本地引用
    env->DeleteLocalRef(clazz);
    return JNI_OK;
}

jint JNI_OnLoad(JavaVM *vm, void *reserved) {
    LOGI("call JNI_OnLoad");
    JNIEnv *env = NULL;
    if (vm->GetEnv((void **) &env, JNI_VERSION_1_4) != JNI_OK) {  //判断 JNI 版本是否为JNI_VERSION_1_4
        return JNI_EVERSION;
    }
    registerNativeMethods(env, className, jni_Methods_table, sizeof(jni_Methods_table) / sizeof(JNINativeMethod));
    return JNI_VERSION_1_4;
}
test2.java代码如下:
package com.myso;

/*
动态注册
 */
public class test2 {
    static {
        System.loadLibrary("native-three");
    }

    public native String stringFromJNI2();  //看见红色不用慌张,不用管他,因为我们是动态注册的。

    public native String stringFromJNI2(String str);

    public static native int addNum(int num, int num2);


}
MainActivity.java代码如下:
public class MainActivity extends AppCompatActivity {

    @SuppressLint("SetTextI18n")
    @Override
    protected void onCreate(Bundle savedInstanceState) {
        super.onCreate(savedInstanceState);
        setContentView(R.layout.activity_main);

        // Example of a call to a native method
        TextView tv = findViewById(R.id.sample_text);

        /*
       静态注册
         */
//        tv.setText(test1.stringFromJNI());
//        tv.setText(test1.stringFromJNI("87654321"));
//        tv.setText(test1.stringFromJNI("",""));
//        tv.setText(test1.stringFromJNI("","",""));

        /*
        动态注册
         */
//        tv.setText(new test2().stringFromJNI2());
//        tv.setText(new test2().stringFromJNI2("5201314"));
        tv.setText(test2.addNum(333, 222)+"");

    }

}
2.点击build->make project,会产生新so

3.测试安装,不出意外,你将看到 555
扩展
1.我们用ida打开 32位的libnative-three.so,在左侧函数框中找到jni_onload,F5进行反汇编

2.双击进入jni_Methods_table
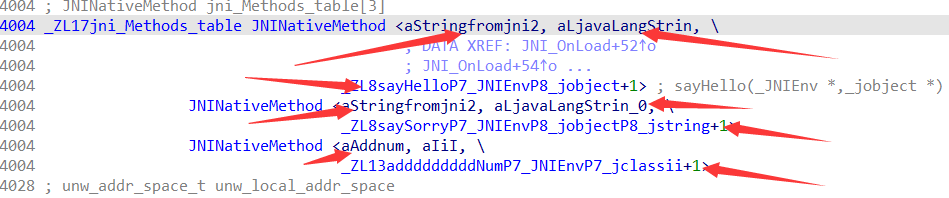
3.每个箭头所指的都可以双击进入


 2091
2091


 被折叠的 条评论
为什么被折叠?
被折叠的 条评论
为什么被折叠?
 到【灌水乐园】发言


