


1. SpringSecurity Oauth2 授权服务器搭建
导入 SpringSecurity Oauth2 依赖 :
<!--引入Springsecurity-->
<dependency>
    <groupId>org.springframework.boot</groupId>
    <artifactId>spring-boot-starter-security</artifactId>
</dependency>

<!--引入SpringSecurity oauth2 授权服务器依赖-->
<dependency>
    <groupId>org.springframework.cloud</groupId>
    <artifactId>spring-cloud-starter-oauth2</artifactId>
    <version>2.2.4.RELEASE</version>
</dependency>
1. 授权服务器 - 支持授权码模式
SpringSecurity 配置类 :
@Configuration
public class WebSecurityConfigurer extends WebSecurityConfigurerAdapter {

    @Bean
    public PasswordEncoder passwordEncoder(){
        return new BCryptPasswordEncoder();
    }

    @Bean
    public UserDetailsService userDetailsService() {
        InMemoryUserDetailsManager inMemoryUserDetailsManager = new InMemoryUserDetailsManager();
        inMemoryUserDetailsManager.createUser(User.withUsername("root").password(passwordEncoder().encode("123")).roles("ADMIN").build());
         return inMemoryUserDetailsManager;
    }

    @Override
    protected void configure(AuthenticationManagerBuilder auth) throws Exception {
        auth.userDetailsService(userDetailsService());
    }

    @Override
    protected void configure(HttpSecurity http) throws Exception {
        http.authorizeRequests().anyRequest().authenticated()
                .and().formLogin()
                .and().csrf().disable();
    }
}
自定义授权服务器配置:
// 自定义授权服务器配置,指定当前应用为授权服务器
@Configuration
@EnableAuthorizationServer
public class AuthenticationServerConfig extends AuthorizationServerConfigurerAdapter {

    @Autowired
    private PasswordEncoder passwordEncoder;

    /**
     * 用来配置授权服务器可以为哪些客户端授权,使用哪种授权模式
     */
    @Override
    public void configure(ClientDetailsServiceConfigurer clients) throws Exception {
        clients.inMemory()
                .withClient("client")
                .secret(passwordEncoder.encode("secret"))
                .redirectUris("http://www.baidu.com")
                // 授权模式支持授权码模式,同时支持令牌刷新模式
                .authorizedGrantTypes("authorization_code","refresh_token")
                // 令牌允许获取的资源权限
                .scopes("read:user");
    }
}
授权码模式:
- 请求用户是否授权,获取授权码code:/oauth/authorize
- 授权之后根据获取的授权码获取令牌access_token:/oauth/token ,授权类型:authorization_code
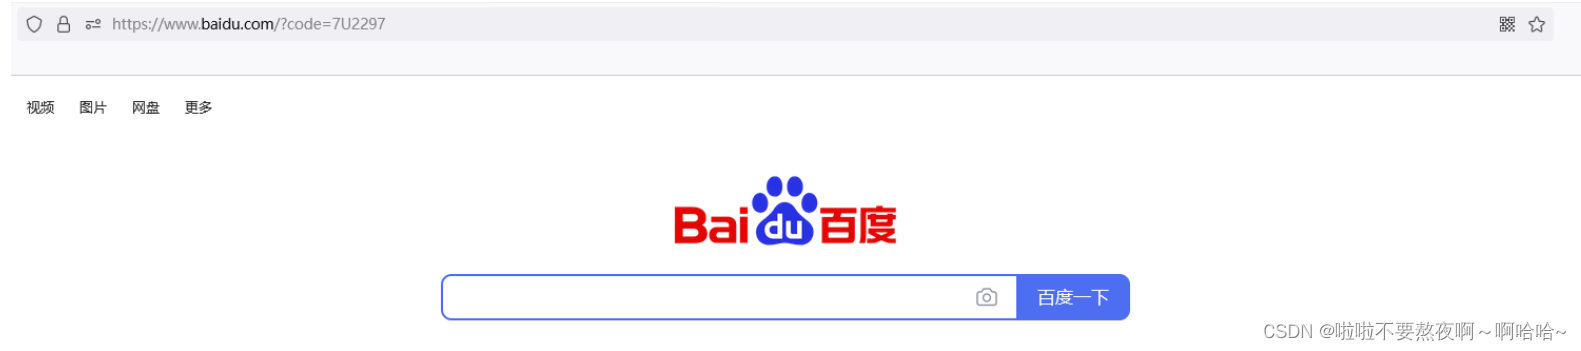
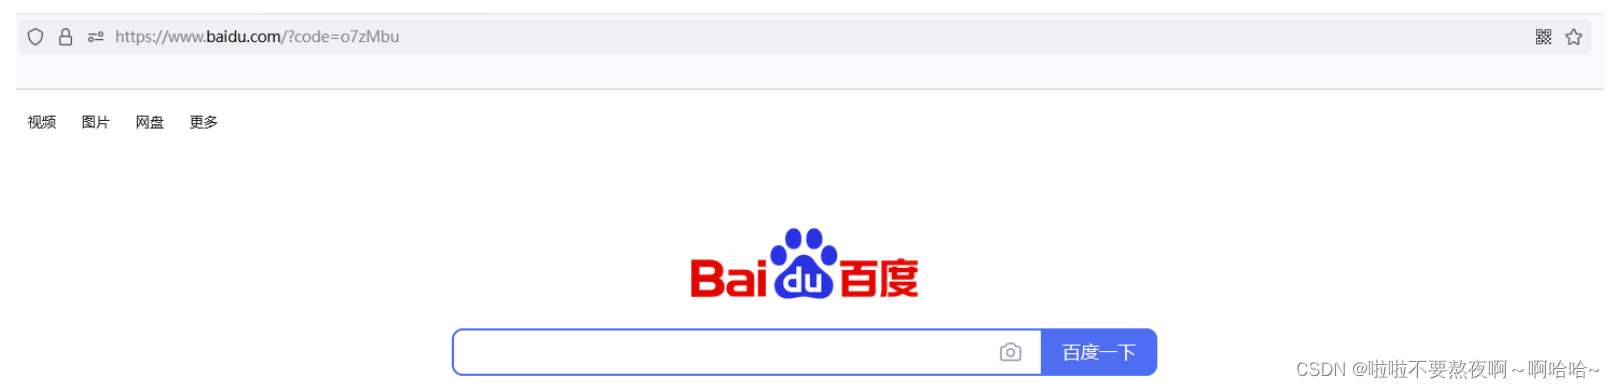
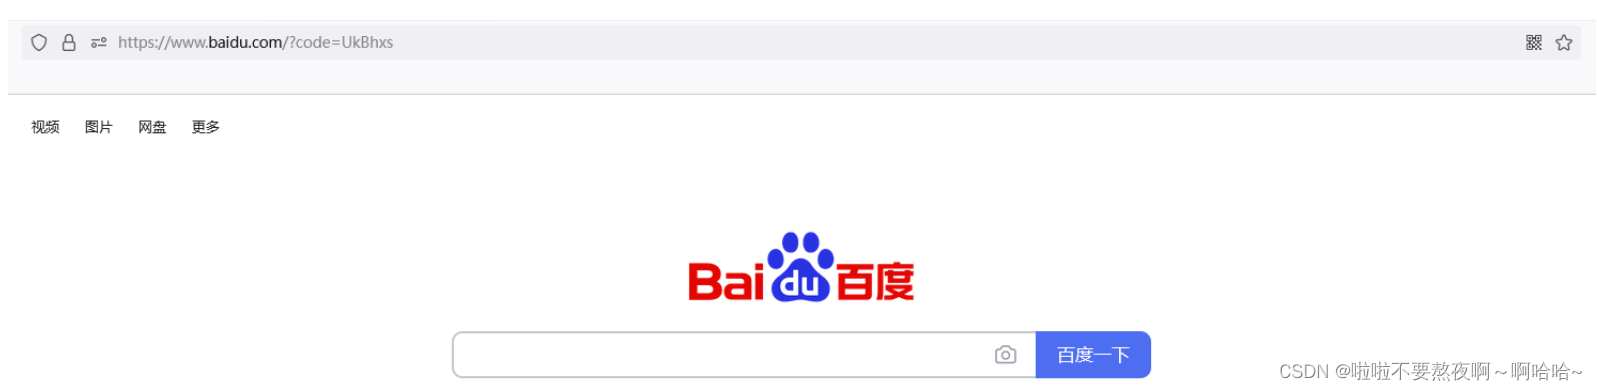
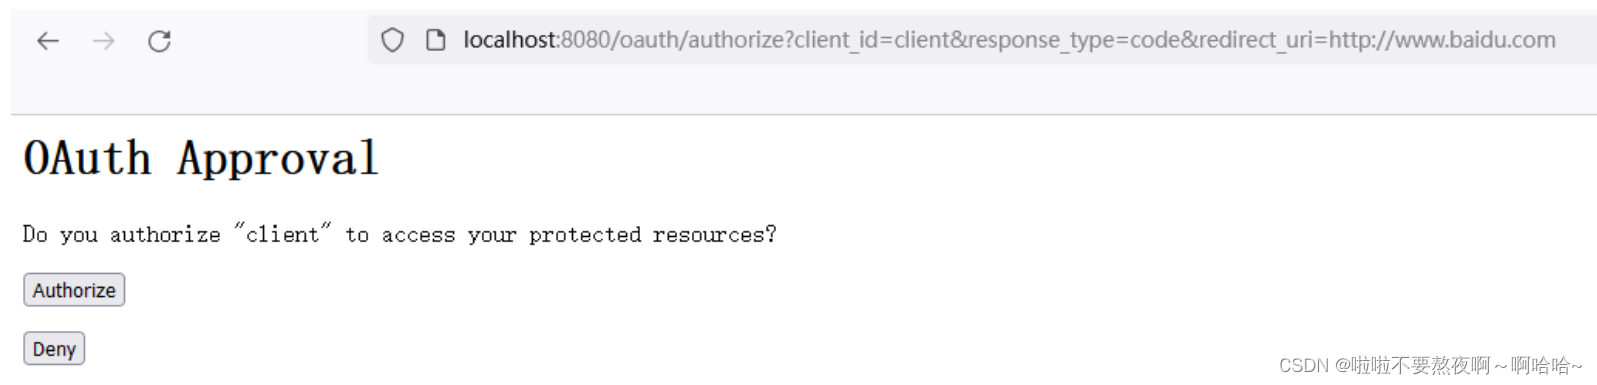
① 请求用户是否授权,获取授权码code,浏览器访问完整路径:http://localhost:8080/oauth/authorize?client_id=client&response_type=code&redirect_uri=http://www.baidu.com

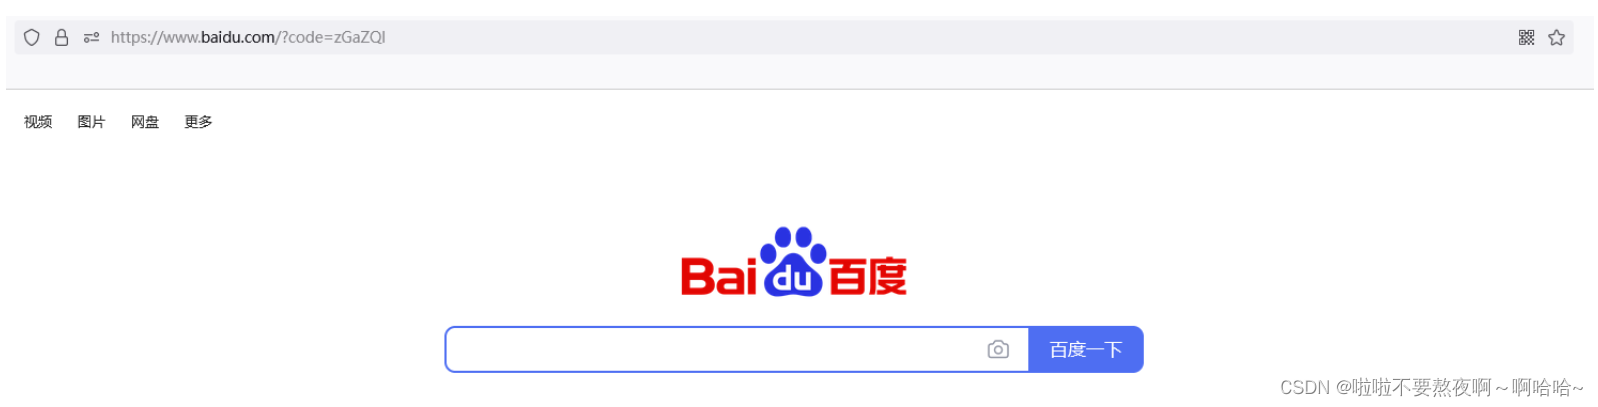
点击Authorize按钮就会跳转到百度网站,并返回一个授权码 code
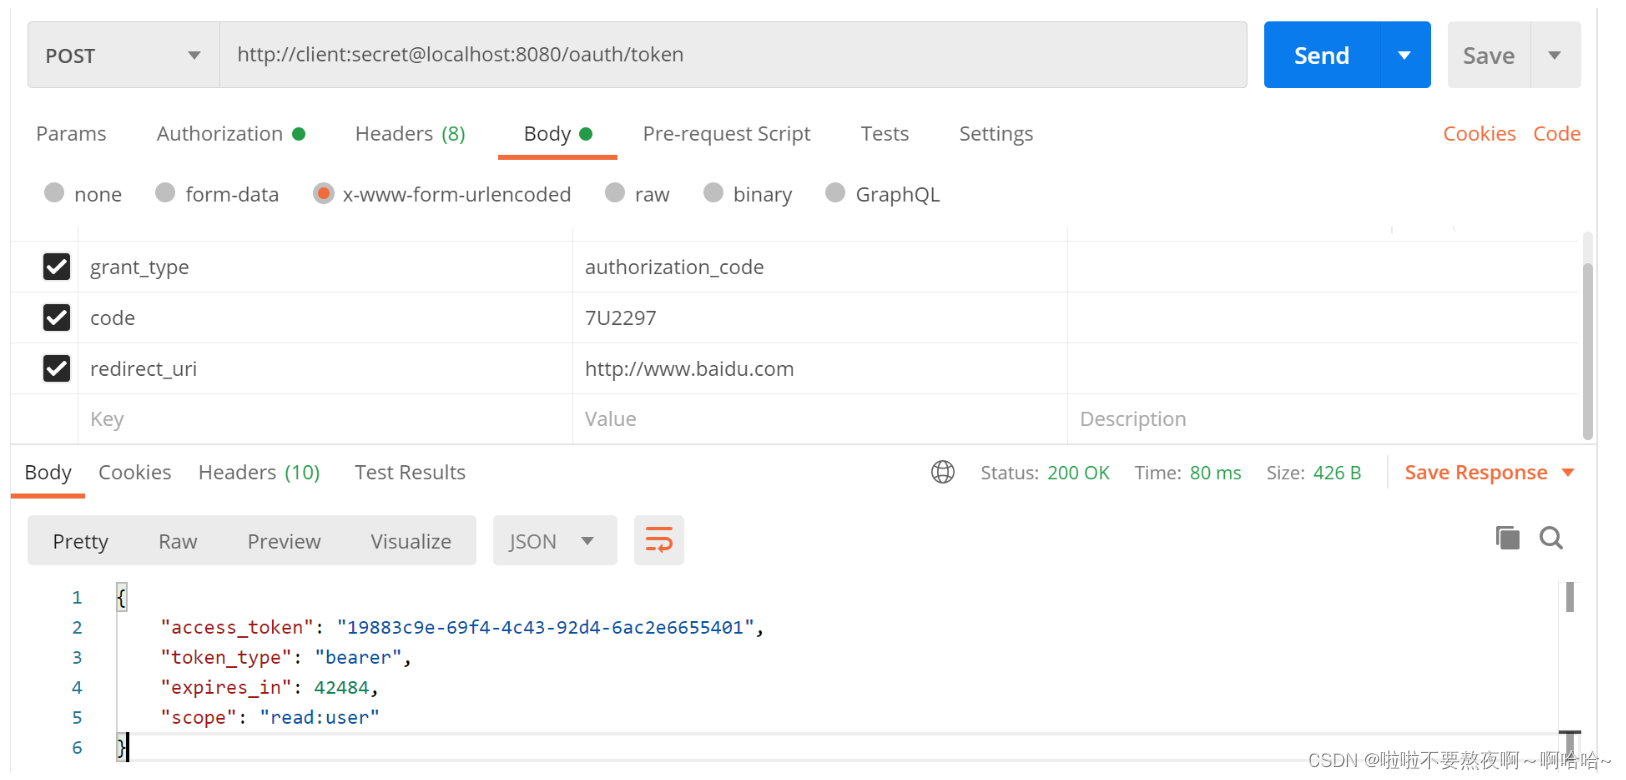
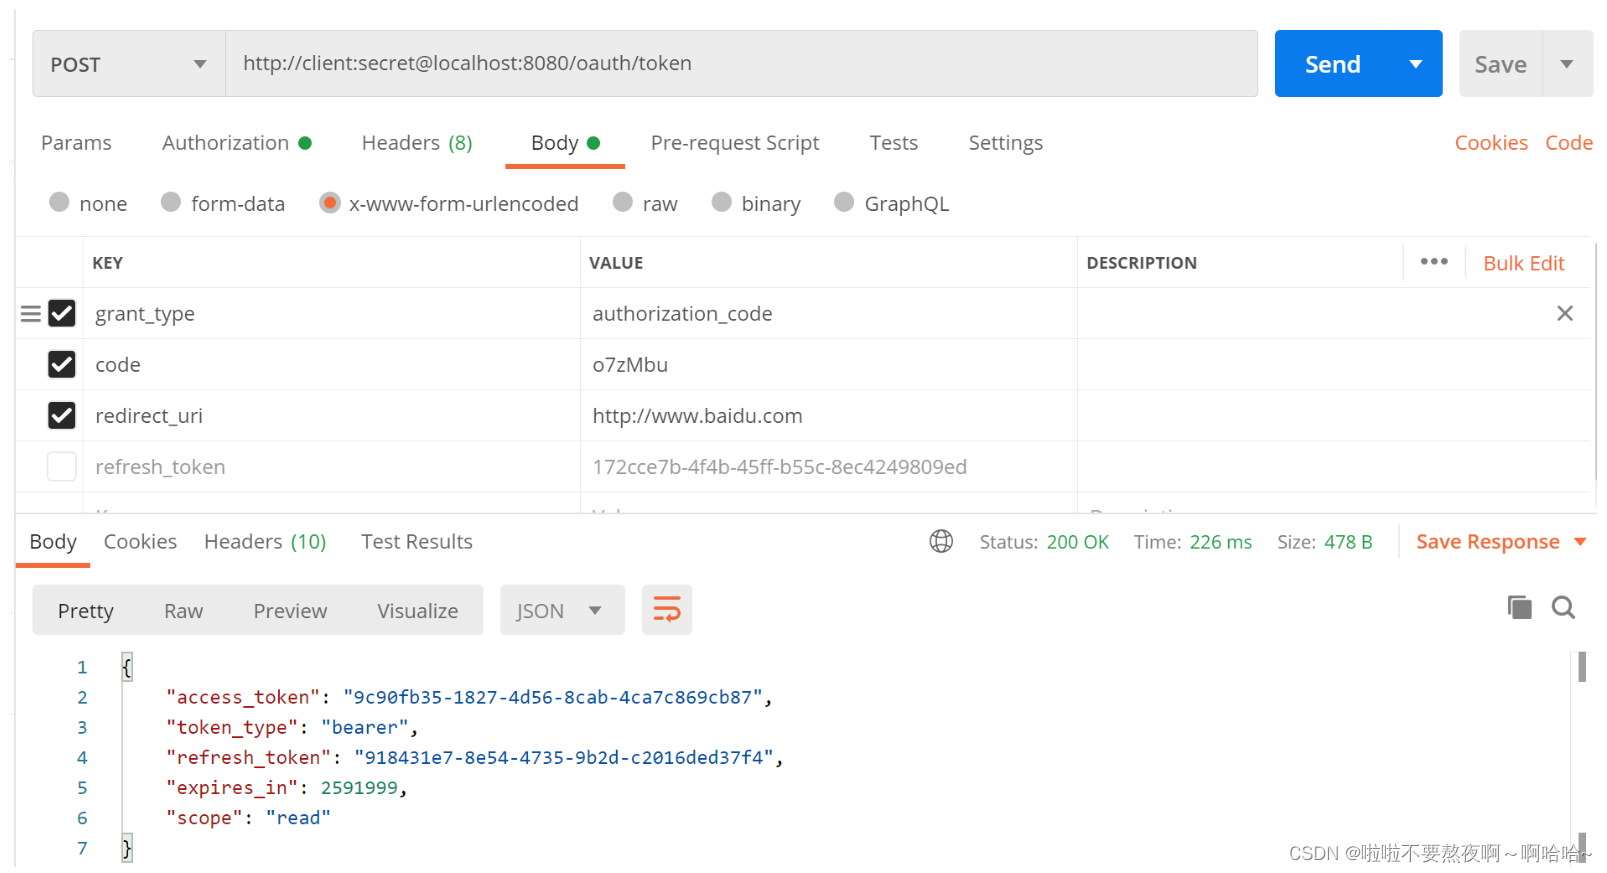
② 授权之后根据返回的授权码 code 获取访问令牌 access_token :
2. 授权服务器 - 支持授权码模式同时支持刷新令牌
在access_token即将过期的时候,我们希望支持刷新令牌
授权码模式:
- 请求用户是否授权,获取授权码 code:/oauth/authorize
- 授权之后根据获取的授权码 code 获取令牌 access_token 和 refresh_token:/oauth/token, 授权类型需要为authorization_code
- 令牌刷新:/oauth/token, 授权类型需要为 refresh_token
/**
 * 自定义授权服务器配置,指定当前应用为授权服务器
 */
@Configuration
@EnableAuthorizationServer
public class AuthenticationServerConfig extends AuthorizationServerConfigurerAdapter {

    @Autowired
    private PasswordEncoder passwordEncoder;

    @Autowired
    private UserDetailsService userDetailsService;

    /**
     * 用来配置授权服务器可以为哪些客户端授权,使用哪种授权模式
     */
    @Override
    public void configure(ClientDetailsServiceConfigurer clients) throws Exception {
        clients.inMemory()
                .withClient("client")
                .secret(passwordEncoder.encode("secret"))
                .redirectUris("http://www.baidu.com")
                // 授权模式支持授权码模式,同时支持令牌刷新模式
                .authorizedGrantTypes("authorization_code","refresh_token")
                // 令牌允许获取的资源权限
                .scopes("read:user");
    }

    /**
     * 刷新令牌必须配置userDetailsService,用来刷新令牌时的认证
     */
    @Override
    public void configure(AuthorizationServerEndpointsConfigurer endpoints) throws Exception {
        endpoints.userDetailsService(userDetailsService);
    }
}
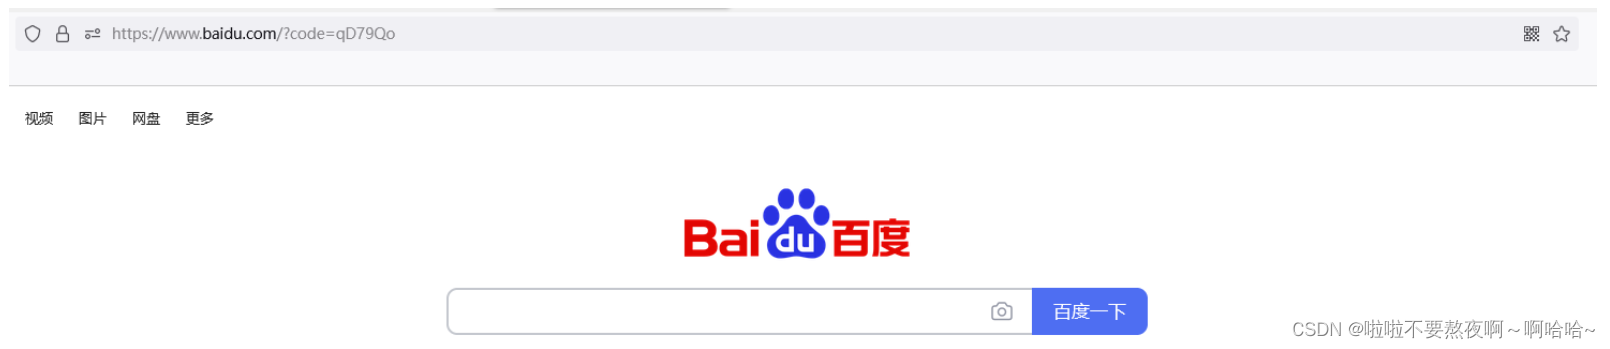
① 请求用户是否授权,获取授权码code,浏览器访问完整路径:http://localhost:8080/oauth/authorize?client_id=client&response_type=code&redirect_uri=http://www.baidu.com
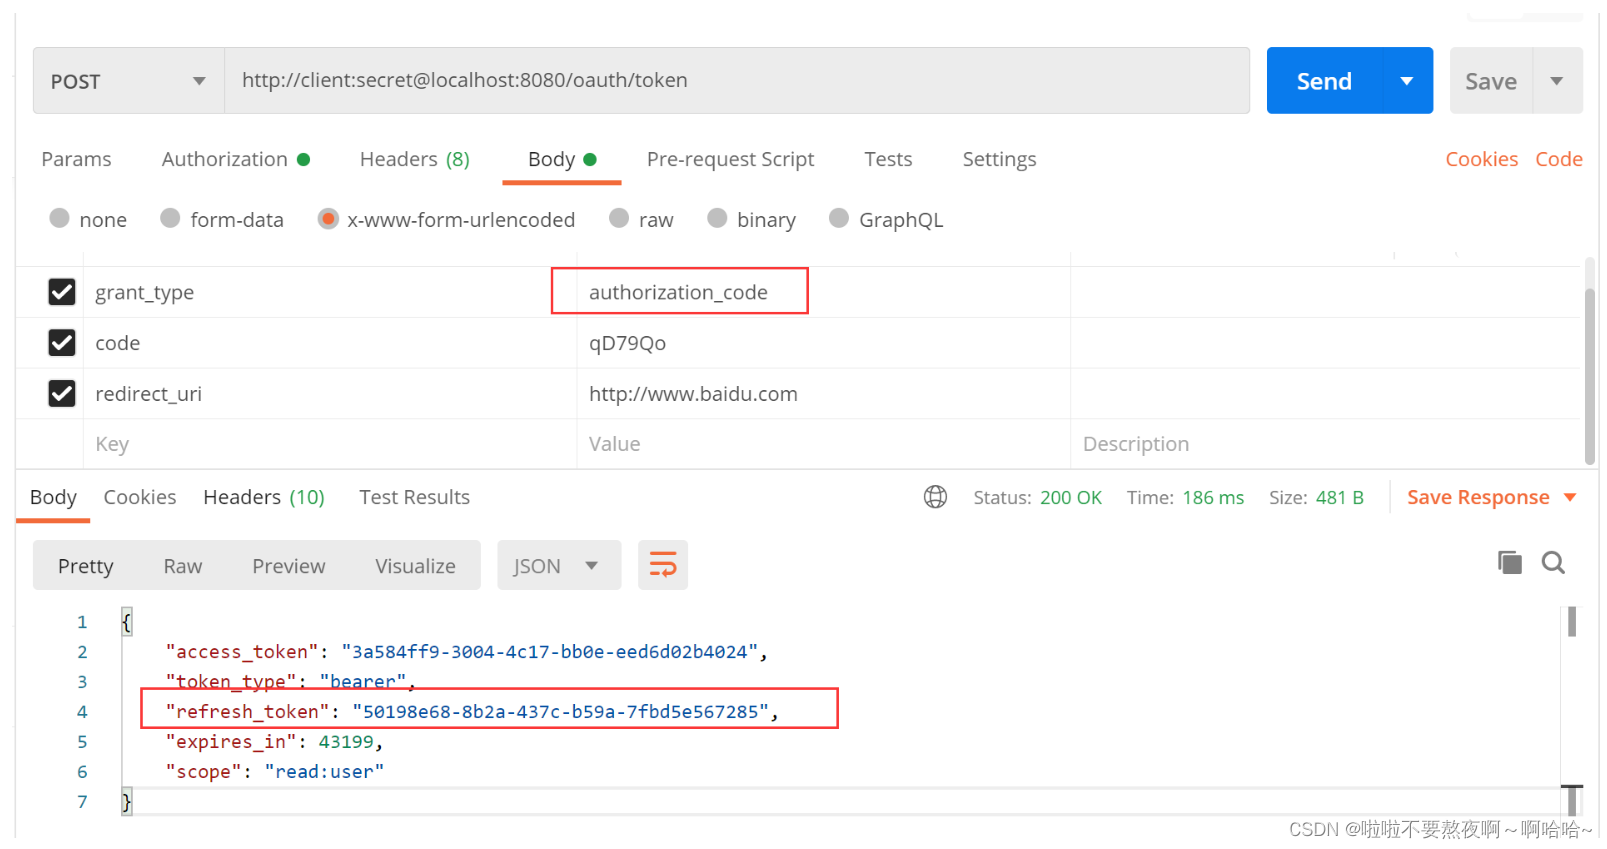
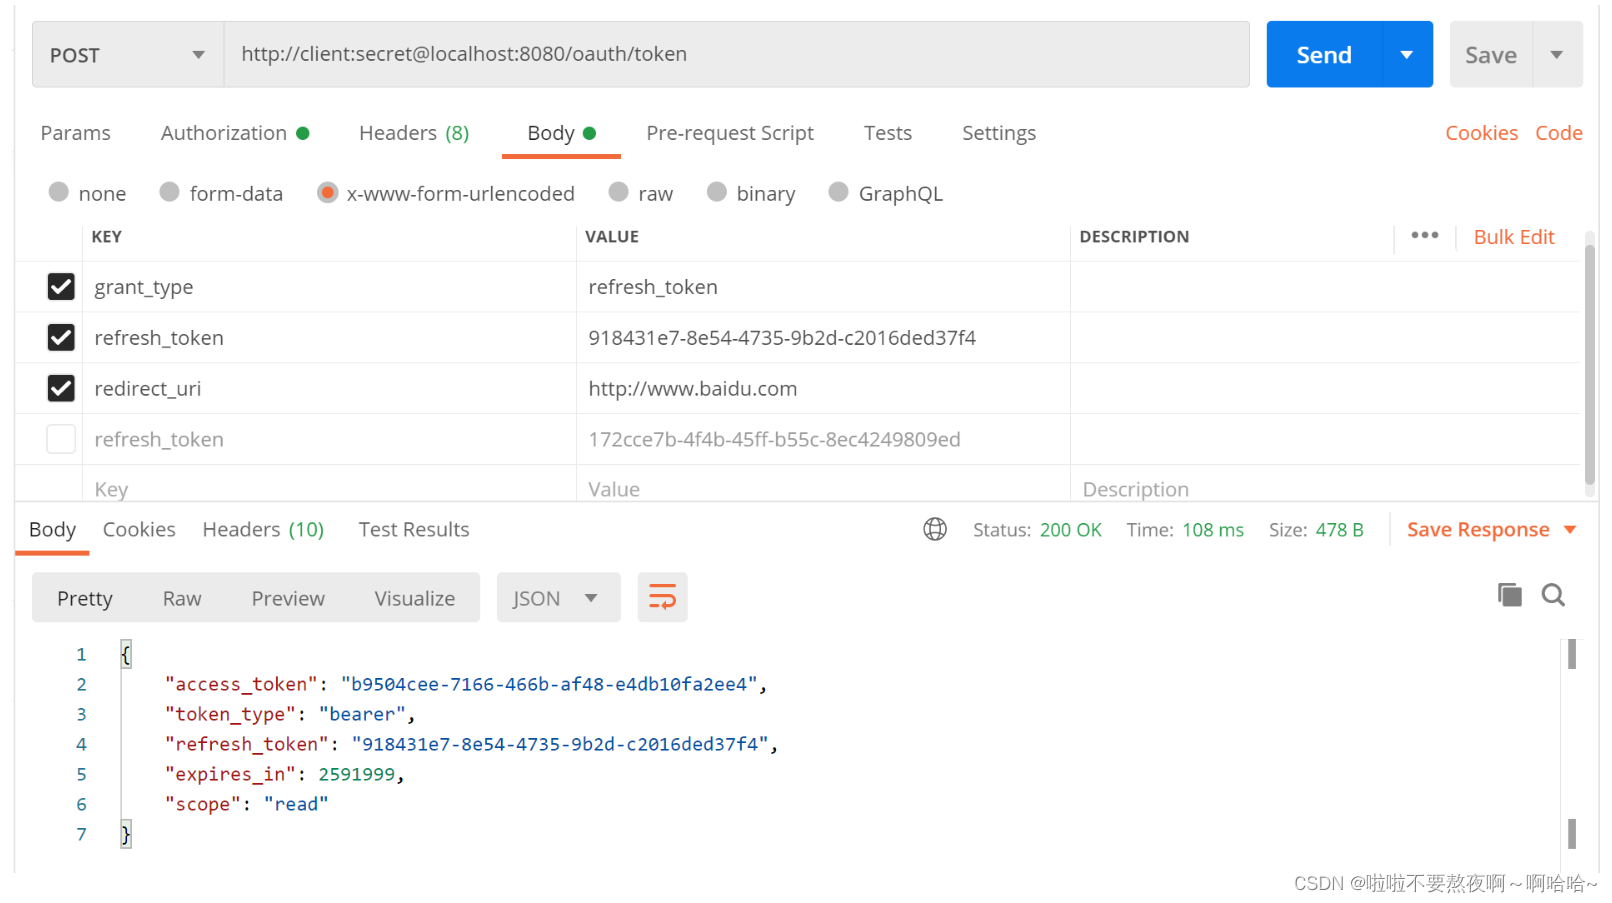
② 授权之后根据返回的授权码 code 获取访问令牌 access_token 和 刷新令牌 refresh_token
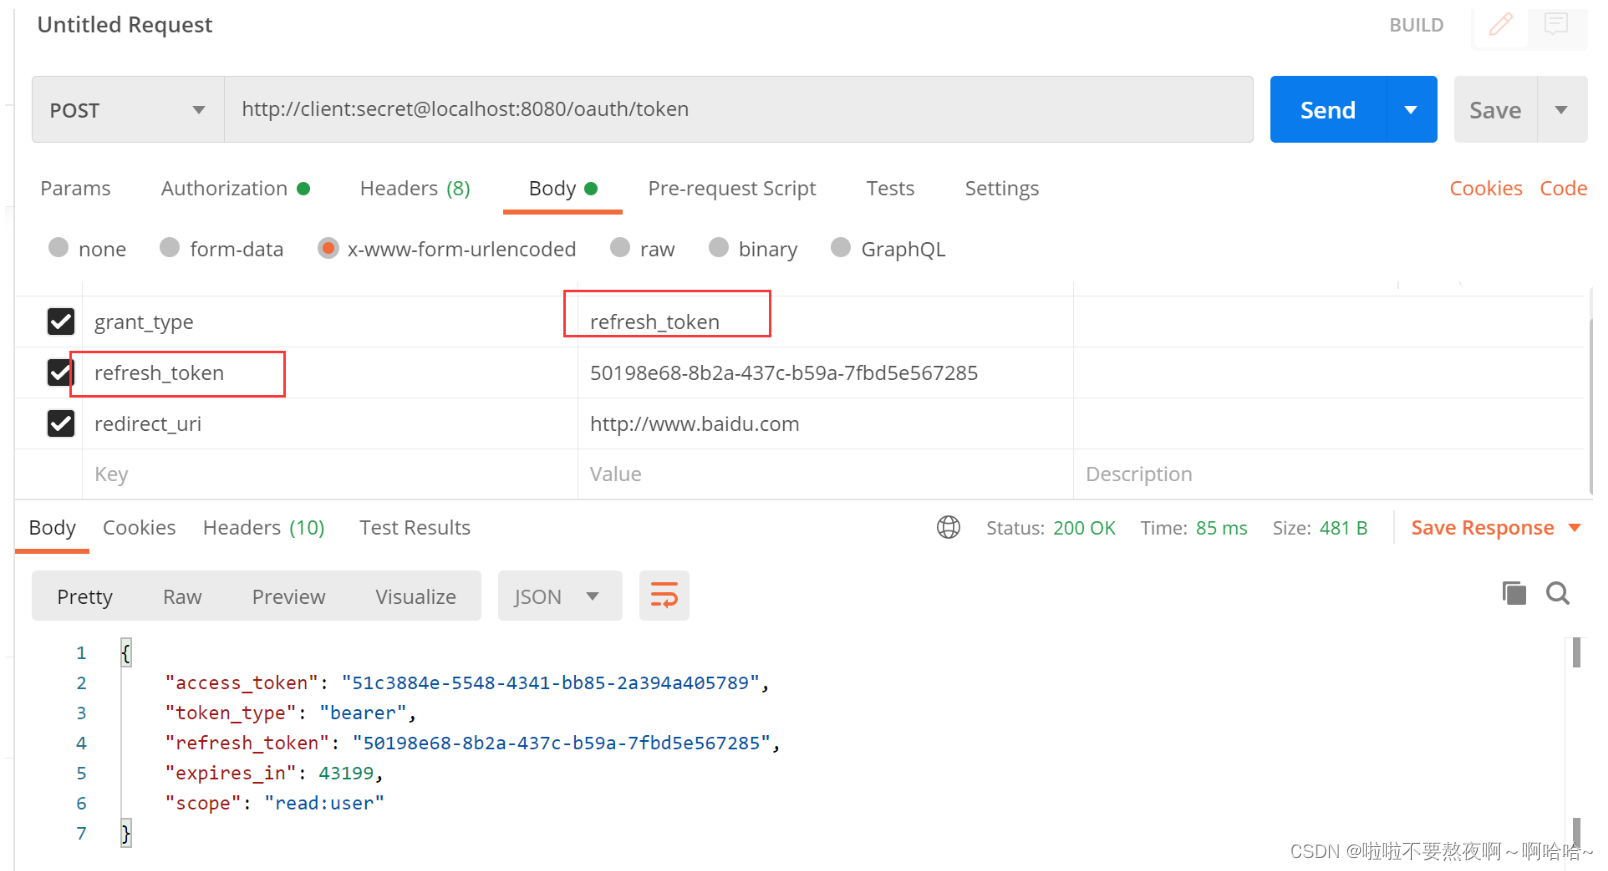
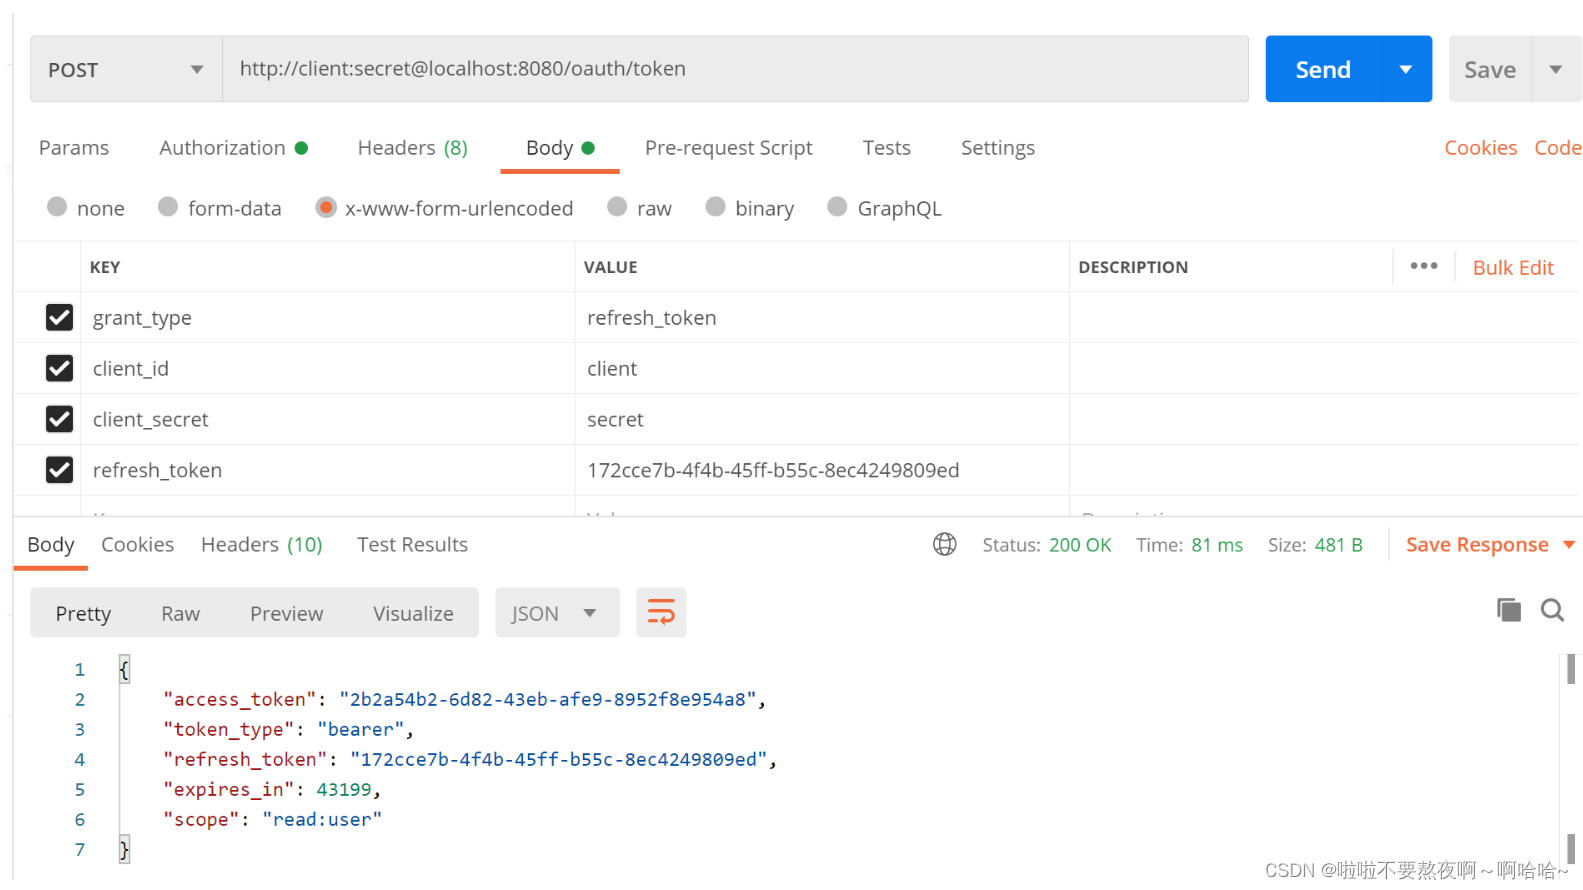
③ 根据 refresh_token 刷新令牌:
3. 授权服务器 - 支持密码模式
@Configuration
public class WebSecurityConfigurer extends WebSecurityConfigurerAdapter {

    @Bean
    public PasswordEncoder passwordEncoder(){
        return new BCryptPasswordEncoder();
    }

    @Bean
    public UserDetailsService userDetailsService() {
        InMemoryUserDetailsManager inMemoryUserDetailsManager = new InMemoryUserDetailsManager();
        inMemoryUserDetailsManager.createUser(User.withUsername("root").password(passwordEncoder().encode("123")).roles("ADMIN").build());
         return inMemoryUserDetailsManager;
    }

    @Override
    protected void configure(AuthenticationManagerBuilder auth) throws Exception {
        auth.userDetailsService(userDetailsService());
    }

    // 暴露 authenticationManager
    @Bean
    public AuthenticationManager authenticationManagerBean() throws Exception {
        return super.authenticationManagerBean();
    }

    @Override
    protected void configure(HttpSecurity http) throws Exception {
        http.authorizeRequests().anyRequest().authenticated()
                .and().formLogin()
                .and().csrf().disable();
    }
}
/**
 * 自定义授权服务器配置,指定当前应用为授权服务器
 */
@Configuration
@EnableAuthorizationServer
public class AuthenticationServerConfig extends AuthorizationServerConfigurerAdapter {

    @Autowired
    private PasswordEncoder passwordEncoder;

    @Autowired
    private UserDetailsService userDetailsService;

    @Autowired
    private AuthenticationManager authenticationManager;

    /**
     * 用来配置授权服务器可以为哪些客户端授权,使用哪种授权模式
     */
    @Override
    public void configure(ClientDetailsServiceConfigurer clients) throws Exception {
        clients.inMemory()
                .withClient("client")
                .secret(passwordEncoder.encode("secret"))
                .redirectUris("http://www.baidu.com")
                // 授权模式支持密码模式,同时支持令牌刷新模式
                .authorizedGrantTypes("password","refresh_token")
                // 令牌允许获取的资源权限
                .scopes("read:user");
    }

    /**
     * 刷新令牌必须配置userDetailsService,用来刷新令牌时的认证
     */
    @Override
    public void configure(AuthorizationServerEndpointsConfigurer endpoints) throws Exception {
        endpoints.userDetailsService(userDetailsService);
        endpoints.authenticationManager(authenticationManager);
    }
}
http://client:secret@localhost:8080/oauth/token
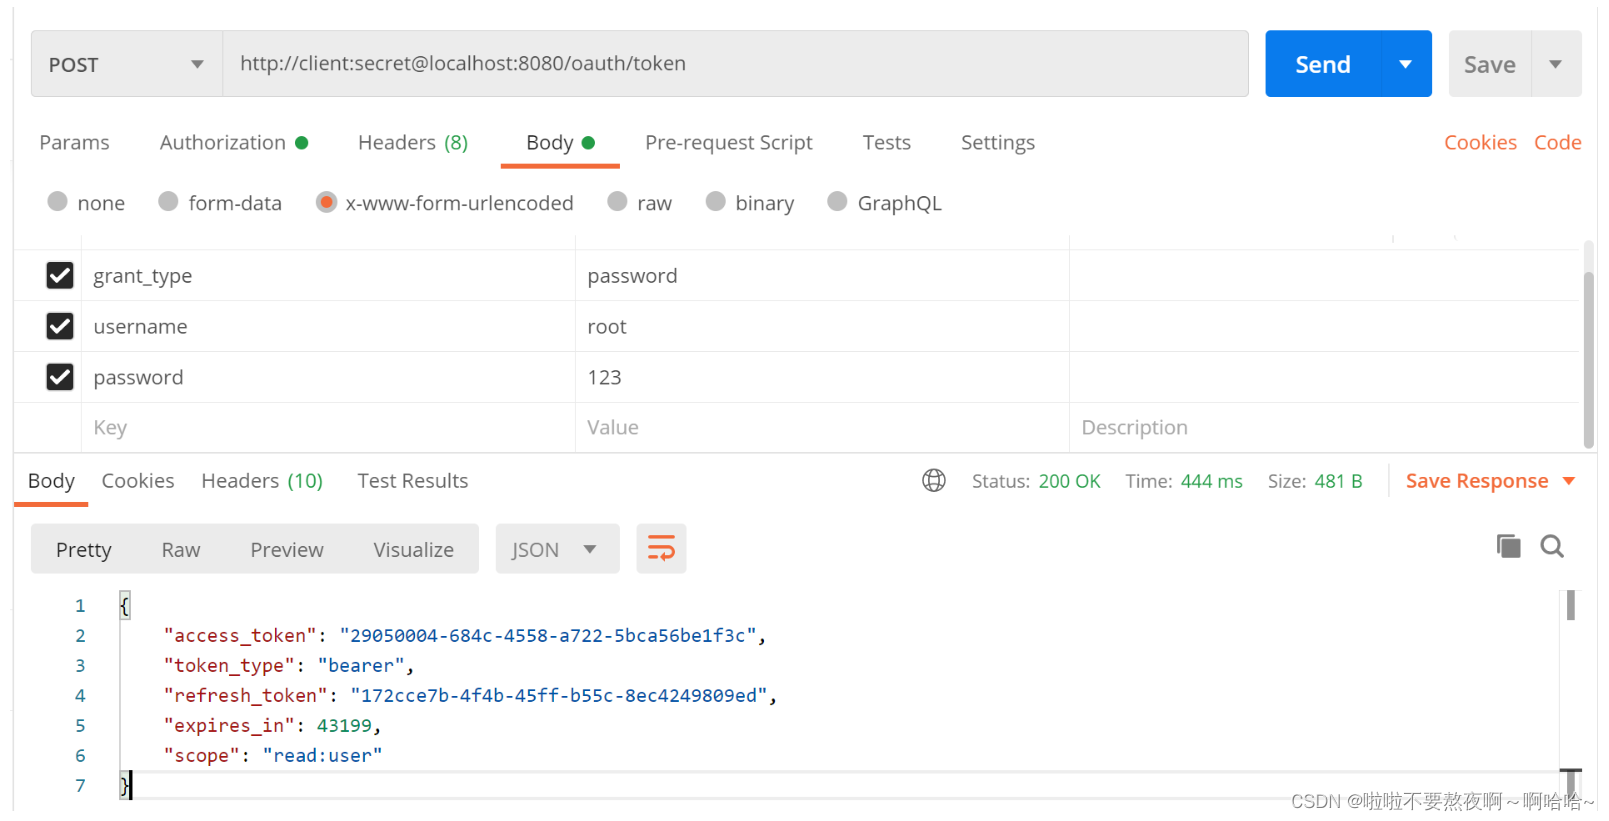
刷新令牌:
4. 授权服务器 - 支持客户端模式
@Configuration
public class WebSecurityConfigurer extends WebSecurityConfigurerAdapter {

    @Bean
    public PasswordEncoder passwordEncoder(){
        return new BCryptPasswordEncoder();
    }

    @Bean
    public UserDetailsService userDetailsService() {
        InMemoryUserDetailsManager inMemoryUserDetailsManager = new InMemoryUserDetailsManager();
        inMemoryUserDetailsManager.createUser(User.withUsername("root").password(passwordEncoder().encode("123")).roles("ADMIN").build());
         return inMemoryUserDetailsManager;
    }

    @Override
    protected void configure(AuthenticationManagerBuilder auth) throws Exception {
        auth.userDetailsService(userDetailsService());
    }

    // 暴露 authenticationManager
    @Bean
    public AuthenticationManager authenticationManagerBean() throws Exception {
        return super.authenticationManagerBean();
    }

    @Override
    protected void configure(HttpSecurity http) throws Exception {
        http.authorizeRequests().anyRequest().authenticated()
                .and().formLogin()
                .and().csrf().disable();
    }
}
/**
* 自定义授权服务器配置,指定当前应用为授权服务器
*/
@Configuration
@EnableAuthorizationServer
public class AuthenticationServerConfig extends AuthorizationServerConfigurerAdapter {
@Autowired
private PasswordEncoder passwordEncoder;
@Autowired
private UserDetailsService userDetailsService;
@Autowired
private AuthenticationManager authenticationManager;
/**
* 用来配置授权服务器可以为哪些客户端授权,使用哪种授权模式
*/
@Override
public void configure(ClientDetailsServiceConfigurer clients) throws Exception {
clients.inMemory()
.withClient("client")
.secret(passwordEncoder.encode("secret"))
.redirectUris("http://www.baidu.com")
// 授权模式支持授权码模式,同时支持令牌刷新模式
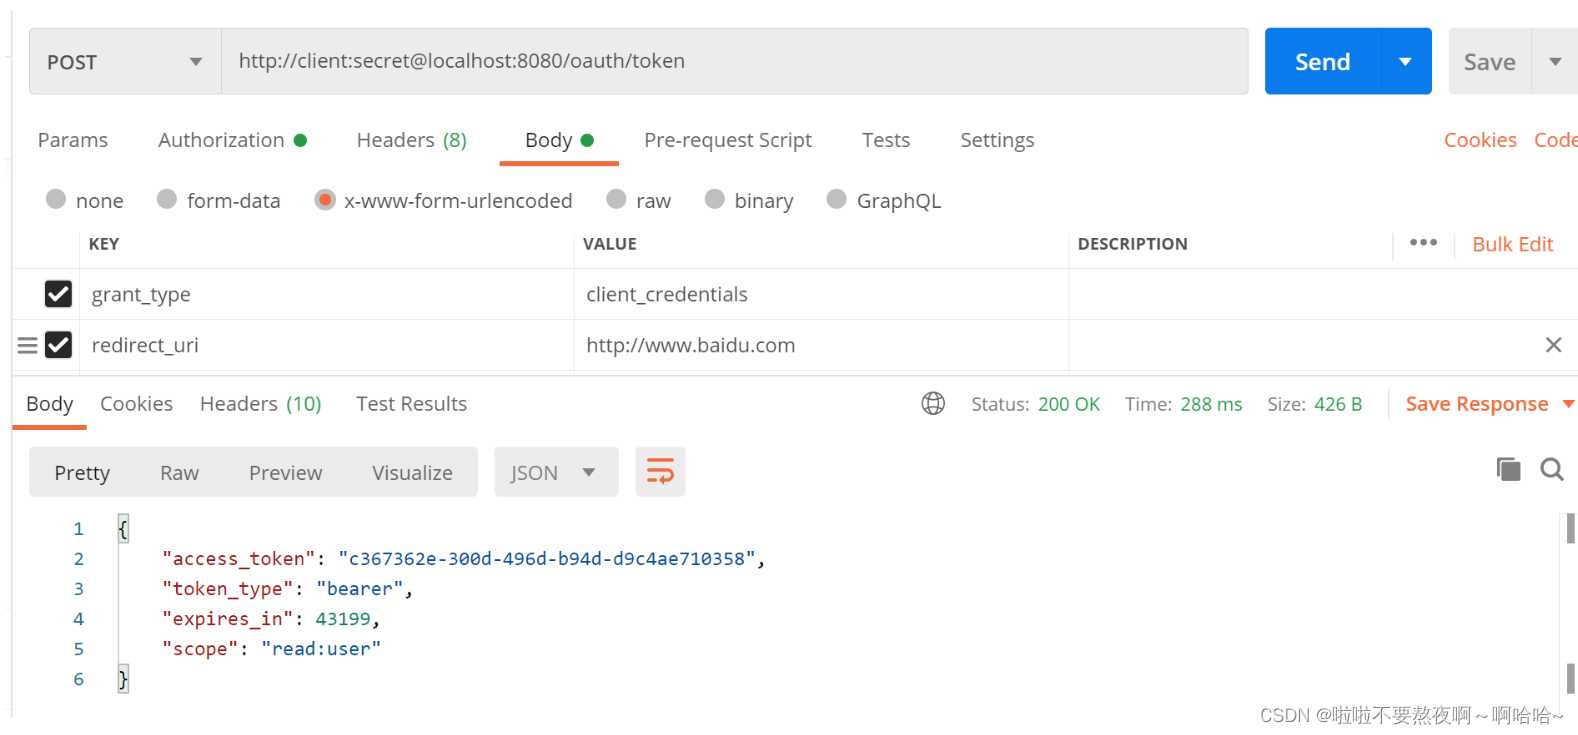
.authorizedGrantTypes("client_credentials","refresh_token")
// 令牌允许获取的资源权限
.scopes("read:user");
}
/**
* 刷新令牌必须配置userDetailsService,用来刷新令牌时的认证
*/
@Override
public void configure(AuthorizationServerEndpointsConfigurer endpoints) throws Exception {
endpoints.userDetailsService(userDetailsService);
endpoints.authenticationManager(authenticationManager);
}
}
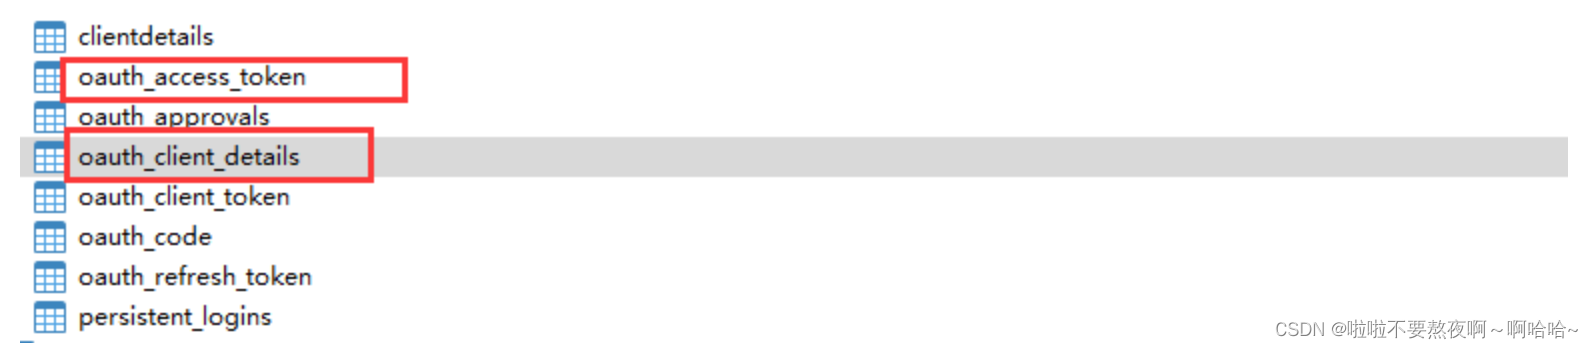
5. 授权服务器 - 基于数据库客户端和令牌存储
在上面的案例中,TokenStore 的默认实现为 InMemoryTokenStore 即内存存储,对于Client 信息,ClientDetailsService 接口负责从存储仓库中读取数据,在上面的案例中默认使用的也是 InMemoryClientDetailsService 实现类。如果要想使用数据库存储,只要提供这些接口的实现类即可,而框架已经为我们写好JdbcTokenStore 和 JdbcClientDetailsService
1. SpringBoot 依赖和配置
<dependency>
    <groupId>org.springframework.boot</groupId>
    <artifactId>spring-boot-starter-security</artifactId>
</dependency>
<dependency>
    <groupId>org.springframework.boot</groupId>
    <artifactId>spring-boot-starter-web</artifactId>
</dependency>


<!-- 引入授权服务器依赖 -->
<dependency>
    <groupId>org.springframework.cloud</groupId>
    <artifactId>spring-cloud-starter-oauth2</artifactId>
    <version>2.2.5.RELEASE</version>
</dependency>


<!--引入 jdbc 依赖-->
<dependency>
    <groupId>mysql</groupId>
    <artifactId>mysql-connector-java</artifactId>
    <scope>runtime</scope>
</dependency>
<dependency>
    <groupId>org.springframework.boot</groupId>
    <artifactId>spring-boot-starter-jdbc</artifactId>
</dependency>
spring.application.name=spring-security-19authorization-server
server.port=8080
spring.datasource.driver-class-name=com.mysql.jdbc.Driver
spring.datasource.url=jdbc:mysql://localhost:3306/test?characterEncoding=UTF-8&serverTimezone=Hongkong
spring.datasource.username=root
spring.datasource.password=root
2. 建数据库表
https://github.com/spring-projects/spring-security-oauth/blob/master/spring-security-oauth2/src/test/resources/schema.sql
用 BLOB 替换语句中的 LONGVARBINARY 类型
-- used in tests that use HSQL
create table oauth_client_details (
  client_id VARCHAR(256) PRIMARY KEY,
  resource_ids VARCHAR(256),
  client_secret VARCHAR(256),
  scope VARCHAR(256),
  authorized_grant_types VARCHAR(256),
  web_server_redirect_uri VARCHAR(256),
  authorities VARCHAR(256),
  access_token_validity INTEGER,
  refresh_token_validity INTEGER,
  additional_information VARCHAR(4096),
  autoapprove VARCHAR(256)
);

create table oauth_client_token (
  token_id VARCHAR(256),
  token BLOB,
  authentication_id VARCHAR(256) PRIMARY KEY,
  user_name VARCHAR(256),
  client_id VARCHAR(256)
);

create table oauth_access_token (
  token_id VARCHAR(256),
  token BLOB,
  authentication_id VARCHAR(256) PRIMARY KEY,
  user_name VARCHAR(256),
  client_id VARCHAR(256),
  authentication BLOB,
  refresh_token VARCHAR(256)
);

create table oauth_refresh_token (
  token_id VARCHAR(256),
  token BLOB,
  authentication BLOB
);

create table oauth_code (
  code VARCHAR(256),
  authentication BLOB
);

create table oauth_approvals (
	userId VARCHAR(256),
	clientId VARCHAR(256),
	scope VARCHAR(256),
	status VARCHAR(10),
	expiresAt TIMESTAMP,
	lastModifiedAt TIMESTAMP
);


-- customized oauth_client_details table
create table ClientDetails (
  appId VARCHAR(256) PRIMARY KEY,
  resourceIds VARCHAR(256),
  appSecret VARCHAR(256),
  scope VARCHAR(256),
  grantTypes VARCHAR(256),
  redirectUrl VARCHAR(256),
  authorities VARCHAR(256),
  access_token_validity INTEGER,
  refresh_token_validity INTEGER,
  additionalInformation VARCHAR(4096),
  autoApproveScopes VARCHAR(256)
);
// 写入客户端信息
INSERT INTO `oauth_client_details` VALUES (
    'client',
     NULL,
	'$2a$10$QCsINtuRfP8kM112xRVdvuI58MrefLlEP2mM0kzB5KZCPhnOf4392',
	'read',
    'authorization_code,refresh_token',
	'http://www.baidu.com',
    NULL, NULL, NULL, NULL, NULL);

3. SpringSecurity 配置类
//自定义 security 配置类
@Configuration
public class SecurityConfig extends WebSecurityConfigurerAdapter {

    @Bean
    public PasswordEncoder passwordEncoder(){
        return new BCryptPasswordEncoder();
    }

    @Bean
    public UserDetailsService userDetailsService(){
        InMemoryUserDetailsManager inMemoryUserDetailsManager = new InMemoryUserDetailsManager();
        inMemoryUserDetailsManager.createUser(User.withUsername("root").password(passwordEncoder().encode("123")).roles("ADMIN").build());
        return inMemoryUserDetailsManager;
    }

    @Override
    @Bean  //将内部 authorizationManager 暴露
    public AuthenticationManager authenticationManagerBean() throws Exception {
        return super.authenticationManagerBean();
    }

    @Override
    protected void configure(AuthenticationManagerBuilder auth) throws Exception {
        auth.userDetailsService(userDetailsService());
    }

    @Override
    protected void configure(HttpSecurity http) throws Exception {
        http.authorizeRequests().anyRequest().authenticated()
                .and().formLogin()
                .and().csrf().disable();
    }
}
4. 授权服务器配置
@Configuration
@EnableAuthorizationServer
public class JdbcAuthorizationServerConfig extends AuthorizationServerConfigurerAdapter {

    private final DataSource dataSource;
    private final PasswordEncoder passwordEncoder;
    private final AuthenticationManager authenticationManager;

    @Autowired
    public JdbcAuthorizationServerConfig(DataSource dataSource, PasswordEncoder passwordEncoder, AuthenticationManager authenticationManager) {
        this.dataSource = dataSource;
        this.passwordEncoder = passwordEncoder;
        this.authenticationManager = authenticationManager;
    }

    /**
     * 配置数据源
     */
    @Bean
    public ClientDetailsService clientDetails(){
        JdbcClientDetailsService jdbcClientDetailsService = new JdbcClientDetailsService(dataSource);
        jdbcClientDetailsService.setPasswordEncoder(passwordEncoder);
        return jdbcClientDetailsService;
    }

    /**
     * 配置客户端信息
     */
    @Override
    public void configure(ClientDetailsServiceConfigurer clients) throws Exception {
        clients.withClientDetails(clientDetails());
    }


    /**
     * 配置令牌存储
     */
    @Bean
    public TokenStore tokenStore(){
        return new JdbcTokenStore(dataSource);
    }


    @Override
    public void configure(AuthorizationServerEndpointsConfigurer endpoints) throws Exception {
        //认证管理器
        endpoints.authenticationManager(authenticationManager);
        //配置令牌存储为数据库存储
        endpoints.tokenStore(tokenStore());

        // 配置TokenServices参数
        // 修改默认令牌生成服务
        DefaultTokenServices tokenServices = new DefaultTokenServices();
        // 基于数据库令牌生成
        tokenServices.setTokenStore(endpoints.getTokenStore());
        // 是否支持刷新令牌
        tokenServices.setSupportRefreshToken(true);
        // 是否重复使用刷新令牌(直到过期)
        tokenServices.setReuseRefreshToken(true);

        // 设置客户端信息
        tokenServices.setClientDetailsService(endpoints.getClientDetailsService());
        // 用来控制令牌存储增强策略
        tokenServices.setTokenEnhancer(endpoints.getTokenEnhancer());
        // 访问令牌的默认有效期(以秒为单位)。过期的令牌为零或负数。30天
        tokenServices.setAccessTokenValiditySeconds((int) TimeUnit.DAYS.toSeconds(30));
        // 刷新令牌的有效性(以秒为单位)。如果小于或等于零,则令牌将不会过期,3天
        tokenServices.setRefreshTokenValiditySeconds((int) TimeUnit.DAYS.toSeconds(3));
        // 使用配置令牌服务
        endpoints.tokenServices(tokenServices);
    }
}
启动测试
① 获取授权码code:http://localhost:8080/oauth/authorize?client_id=client&response_type=code&redirect_uri=http://www.baidu.com

② 根据code获取访问令牌access_token和刷新令牌refresh_token:
令牌已经存储在数据库中:

③ 根据refresh_token刷新令牌:

2. SpringSecurity Oauth2 资源服务器搭建
1. SpringBoot 依赖和配置
<dependency>
    <groupId>org.springframework.boot</groupId>
    <artifactId>spring-boot-starter-security</artifactId>
</dependency>
<dependency>
    <groupId>org.springframework.boot</groupId>
    <artifactId>spring-boot-starter-web</artifactId>
</dependency>

<dependency>
    <groupId>org.springframework.cloud</groupId>
    <artifactId>spring-cloud-starter-oauth2</artifactId>
</dependency>

<dependency>
    <groupId>org.springframework.security</groupId>
    <artifactId>spring-security-oauth2-resource-server</artifactId>
</dependency>


<dependency>
    <groupId>mysql</groupId>
    <artifactId>mysql-connector-java</artifactId>
    <scope>runtime</scope>
</dependency>
<dependency>
    <groupId>org.springframework.boot</groupId>
    <artifactId>spring-boot-starter-jdbc</artifactId>
</dependency>
spring.application.name=spring-security-20resource-server
server.port=8081
spring.datasource.driver-class-name=com.mysql.jdbc.Driver
spring.datasource.url=jdbc:mysql://localhost:3306/test?characterEncoding=UTF-8&serverTimezone=Hongkong
spring.datasource.username=root
spring.datasource.password=root
2. 请求资源
@RestController
public class HelloController {

    @GetMapping("/hello")
    public String hello(){
        String hello = "hello resource service";
        System.out.println(hello);
        return hello;
    }
}
3. 资源服务器配置
//开启 oauth 资源服务器
@Configuration
@EnableResourceServer
public class ResourceServerConfig extends ResourceServerConfigurerAdapter {

    private final DataSource dataSource;

    @Autowired
    public ResourceServerConfig(DataSource dataSource) {
        this.dataSource = dataSource;
    }

    @Override
    public void configure(ResourceServerSecurityConfigurer resources) throws Exception {
        resources.tokenStore(tokenStore());
    }

    @Bean
    public TokenStore tokenStore() {
        return new JdbcTokenStore(dataSource);
    }
}
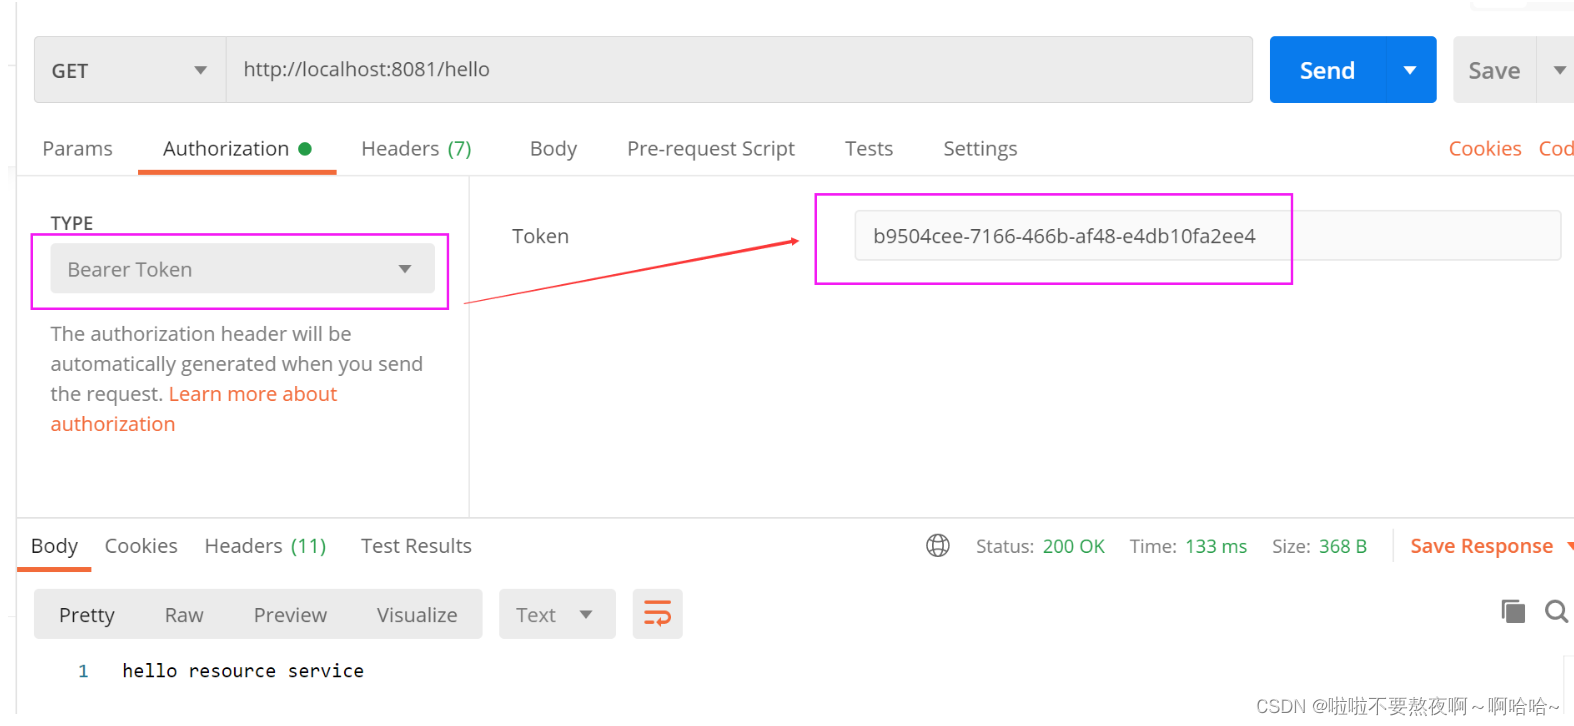
启动测试,生成令牌之后带有令牌访问:
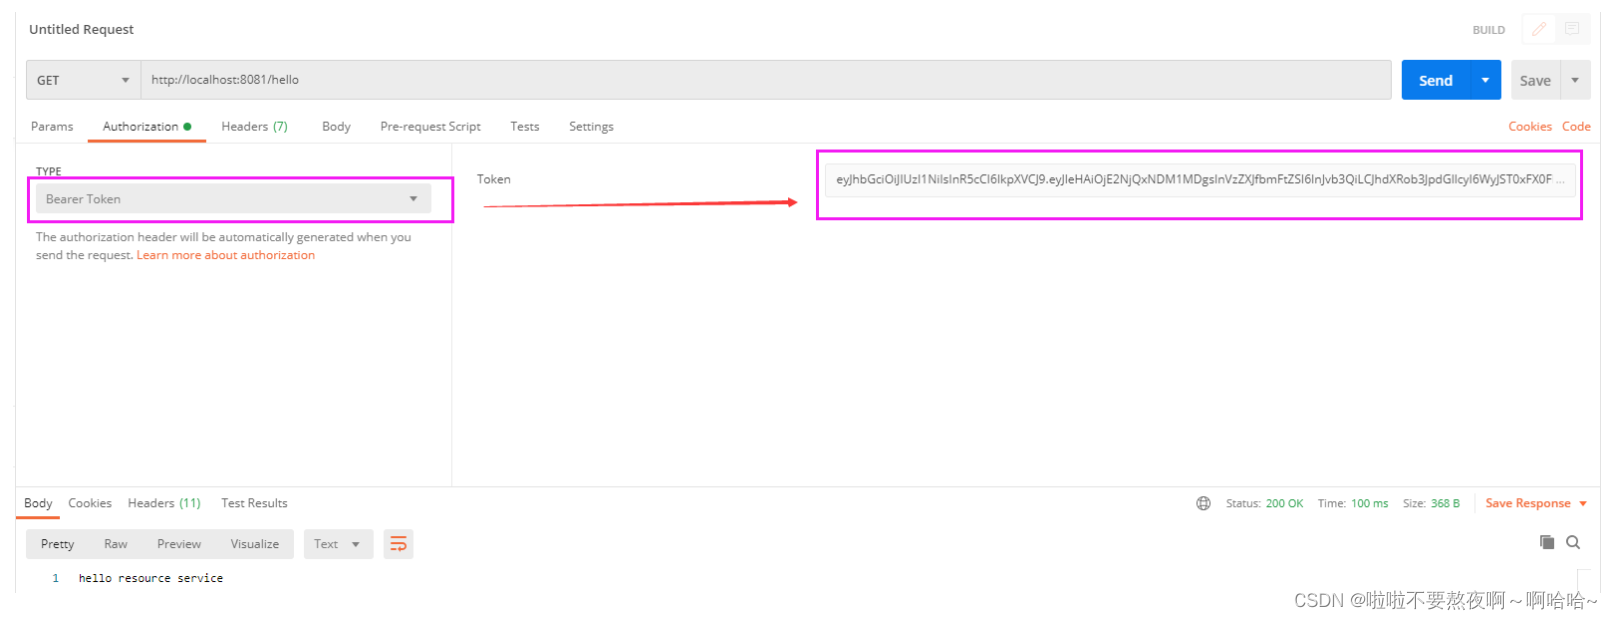
curl -H “Authorization:Bearer dffa62d2-1078-457e-8a2b-4bd46fae0f47” http://localhost:8081/hello
① 访问授权服务器,获取授权码code:http://localhost:8080/oauth/authorize?client_id=client&response_type=code&redirect_uri=http://www.baidu.com
② 通过code获取访问令牌access_token :

③ 拿着授权服务器获取的访问令牌,访问资源服务器:
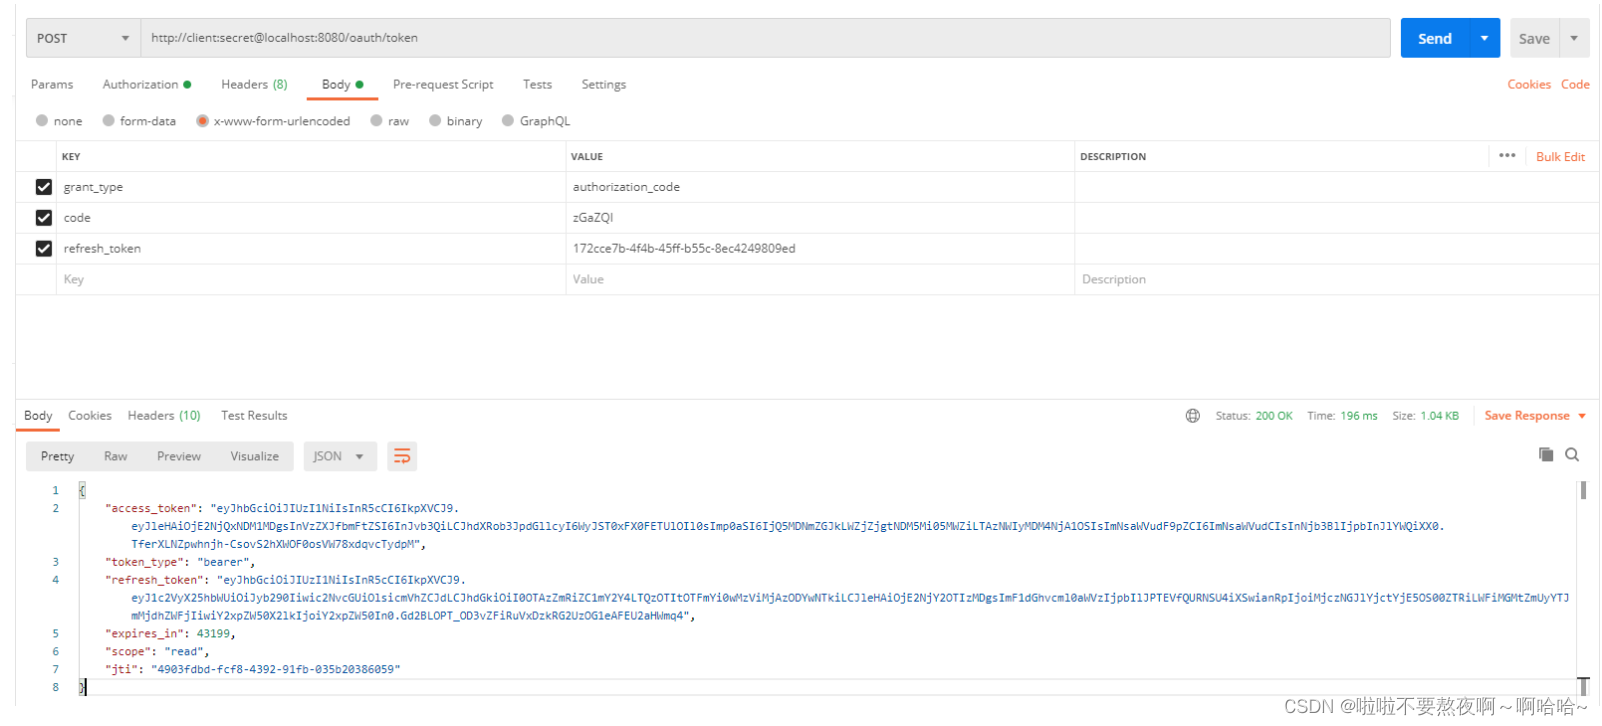
3. 使用 JWT 令牌
1. 授权服务器颁发 JWT 令牌
@Configuration
@EnableAuthorizationServer
public class JdbcAuthorizationServerConfig extends AuthorizationServerConfigurerAdapter {

    private final DataSource dataSource;
    private final PasswordEncoder passwordEncoder;
    private final AuthenticationManager authenticationManager;

    @Autowired
    public JdbcAuthorizationServerConfig(DataSource dataSource, PasswordEncoder passwordEncoder, AuthenticationManager authenticationManager) {
        this.dataSource = dataSource;
        this.passwordEncoder = passwordEncoder;
        this.authenticationManager = authenticationManager;
    }

    /**
     * 配置数据源
     */
    @Bean
    public ClientDetailsService clientDetails(){
        JdbcClientDetailsService jdbcClientDetailsService = new JdbcClientDetailsService(dataSource);
        jdbcClientDetailsService.setPasswordEncoder(passwordEncoder);
        return jdbcClientDetailsService;
    }

    /**
     * 配置客户端信息
     */
    @Override
    public void configure(ClientDetailsServiceConfigurer clients) throws Exception {
        clients.withClientDetails(clientDetails());
    }

    /**
     * 使用同一个秘钥来编码 JWT 中的 oauth2 令牌
     */
    @Bean
    public JwtAccessTokenConverter jwtAccessTokenConverter(){
        JwtAccessTokenConverter converter = new JwtAccessTokenConverter();
        converter.setSigningKey("123");
        return converter;
    }

    /**
     * 配置令牌存储
     */
    @Bean
    public TokenStore tokenStore(){
        return new JwtTokenStore(jwtAccessTokenConverter());
    }

    @Override
    public void configure(AuthorizationServerEndpointsConfigurer endpoints) throws Exception {
        //认证管理器
        endpoints.authenticationManager(authenticationManager);
        //配置jwt令牌存储
        endpoints.tokenStore(tokenStore());
        endpoints.accessTokenConverter(jwtAccessTokenConverter());
    }
}
2. 资源服务器配置
//开启 oauth 资源服务器
@Configuration
@EnableResourceServer
public class ResourceServerConfig extends ResourceServerConfigurerAdapter {

    @Override
    public void configure(ResourceServerSecurityConfigurer resources) throws Exception {
        resources.tokenStore(tokenStore());
    }

    @Bean
    public TokenStore tokenStore() {
        return new JwtTokenStore(jwtAccessTokenConverter());
    }

    @Bean
    public JwtAccessTokenConverter jwtAccessTokenConverter(){
        JwtAccessTokenConverter jwtAccessTokenConverter = new JwtAccessTokenConverter();
        jwtAccessTokenConverter.setSigningKey("123");
        return jwtAccessTokenConverter;
    }
}
@RestController
public class HelloController {

    @GetMapping("/hello")
    public String hello(){
        String hello = "hello resource service";
        System.out.println(hello);
        return hello;
    }
}
3. 启动测试
① 访问授权服务器,获取授权码code:http://localhost:8080/oauth/authorize?client_id=client&response_type=code&redirect_uri=http://www.baidu.com
② 通过code获取访问令牌access_token :
③ 拿着授权服务器获取的访问令牌access_token,访问资源服务器:


 1901
1901


 被折叠的 条评论
为什么被折叠?
被折叠的 条评论
为什么被折叠?
 到【灌水乐园】发言


