


第一讲
1、反相器

代码
//反相器设计;
`timescale 1ns/10ps
module inv(
								A,
								Y
								);
input						A;
output					Y;

assign 					Y=~A;

endmodule

//----testbench of inv-------
module inv_tb;
reg         aa;
wire 				yy;
inv         inv(
								.A(aa),
								.Y(yy)
								);

initial begin
				     aa<=0;
				#10  aa<=1;
				#10  aa<=0;
				#10  aa<=1;
				#10  $stop;

end

endmodule
2、8位反相器

3、与非门

代码:
//与非门;
`timescale 1ns/10ps
module nand_gate(
							A,
							B,
							Y
							);
input					A;
input					B;
output				Y;

assign				Y = ~(A & B);
endmodule

//-------testbench of nand_gate-----
module nand_gate_tb;
reg						aa,bb;
wire					yy;
nand_gate nand_gate(
							.A(aa),
							.B(bb),
							.Y(yy)
							);

initial begin
						  	  aa<=0; bb<=0;
						#10 	aa<=0; bb<=1;
						#10 	aa<=1; bb<=0;
						#10 	aa<=1; bb<=1;
						#10 	$stop;

end

endmodule
4、4位与非门
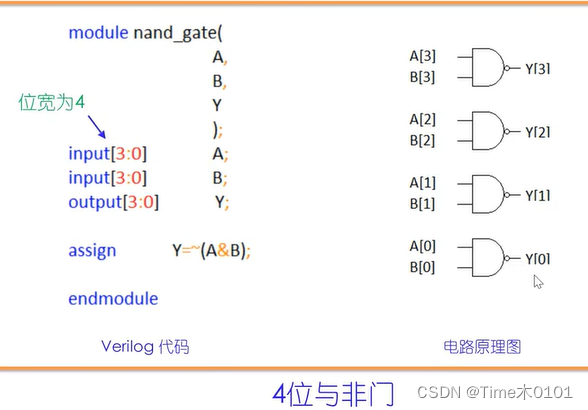
代码:
//与非门;
`timescale 1ns/10ps
module nand_gate_4bits(
										A,
										B,
										Y
										);
input[3:0]					A;
input[3:0]					B;
output[3:0]				  Y;

assign							Y = ~(A & B);
endmodule

//-------testbench of nand_gate-----
module nand_gate_4bits_tb;
reg[3:0]										aa,bb;
wire[3:0]										yy;
nand_gate nand_4bits_gate(
														.A(aa),
														.B(bb),
														.Y(yy)
														);

initial begin
						  	  aa<=4'b0000; bb<=4'b1111;
						#10 	aa<=4'b0010; bb<=4'b0110;
						#10 	aa<=4'b0111; bb<=4'b0100;
						#10 	aa<=4'b0000; bb<=4'b1110;
						#10 	$stop;

end

endmodule
1、testbench 没有端口,所以没括号
2、testbench 输入端 之后要变动 所以定义为reg
3、#10 :过10个时间单位 ;’timescale 1ns/10ps 即 1ns 的时间单位 10ps的时间精度
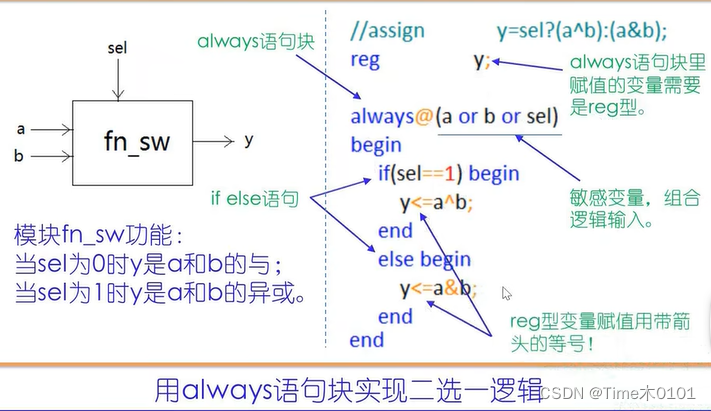
4、reg 型变量赋值的时候 用带箭头的等号“<=”,
第二讲
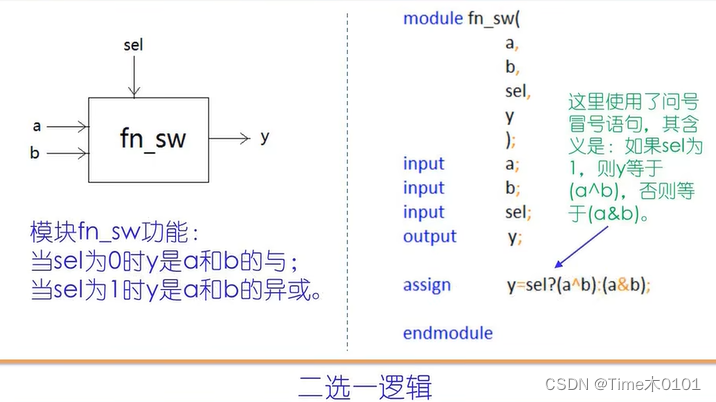
1、二选一逻辑
//二选一逻辑设计
`timescale 1ns/10ps
module fn_sw(
									a,
									b,
									sel,
									y
									);
input							a;
input					   	b;
input							sel;
output						y;

//assign 						y = sel?(a^b):(a&b);

//用always 语句块实现组合逻辑
reg 							y;
always@(a or b or sel) begin
	if(sel==1)begin
		y = a^b;
	end
	else begin
		y = a&b;
  end
end
endmodule

//---------testbench of fn_sw------------
module fn_sw_tb;

reg               a, b, sel;
wire							y;

fn_sw fn_sw(
									.a(a),
									.b(b),
									.sel(sel),
									.y(y)
									);

initial begin
									a<=0;b<=0;sel<=0;
						#10   a<=0;b<=0;sel<=1;
						#10   a<=0;b<=1;sel<=0;
						#10   a<=0;b<=1;sel<=1;
						#10   a<=1;b<=0;sel<=0;
						#10   a<=1;b<=0;sel<=1;
						#10   a<=1;b<=1;sel<=0;
						#10   a<=1;b<=1;sel<=1;
						#10   $stop;
end

endmodule
3、用case语句实现多路选择逻辑

代码:
//四选一逻辑
`timescale 1ns/1ps
module fn_sw_4(
										a,
										b,
										sel,
										y
										);
input 							a;
input 							b;
input[1:0]					sel;
output 							y;

reg 								y;
always@(a or b or sel)begin
	case(sel)
		2'b00:begin y <= a&b;end
		2'b01:begin y <= a|b;end
		2'b10:begin y <= a^b;end
		2'b11:begin y <= ~(a^b);end
	endcase
end

endmodule

//-------testbench of fn_sw_4----------
module fn_sw_4_tb;
reg[3:0]						absel;
fn_sw_4 fn_sw_4(
										.a(absel[0]),
										.b(absel[1]),
										.sel(absel[3:2]),
										.y(y)
										);

initial begin
							  absel<=0;   //先赋初始值
					#200  $stop;
end

always #10 absel<=absel+1;   //每过10ns,absel加一,这样经过16次加一,可以取完四位寄存器所有可能,并观察y的取值
endmodule
仿真结果:

小结:

1、always@(a or b or sel) 中的a, b, c是敏感变量,输入。有几个输入写几个输入
2、在always 里面赋值饿变量需要是reg型。
3、$stop 系统任务
4、多路选择器
第三讲
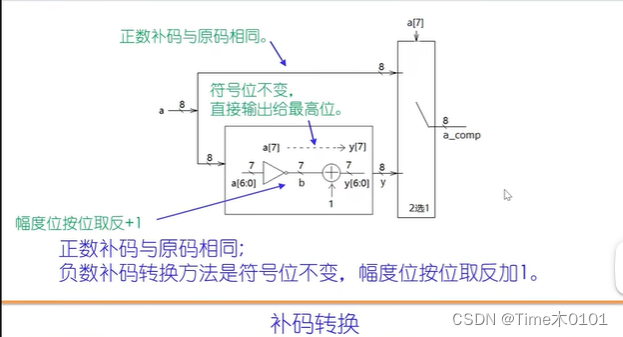
1、补码转换
代码:
//补码转换逻辑
`timescale 1ns/10ps
module comp_conv(
											 a,
											 a_comp
											 );

input[7:0]             a;
output[7:0]            a_comp;

wire[6:0]              b;//按位取反的幅度位
wire[7:0]              y;//负数的补码

assign                 b=~a[6:0];
assign                 y[6:0]=b+1;//按位取反+1
assign                 y[7]=a[7];//符号位不变

assign                 a_comp=a[7]==1?y:a;//二选一
//assign               a_comp=a[7]?{a[7],~a[6:0]+1}:a;//可替换上面的wire和assign语句
endmodule

//----------testbench of comp_conv--------
module comp_conv_tb;
reg[7:0]               a_in;
wire[7:0]              y_out;
comp_conv comp_conv(
											 .a(a_in),
											 .a_comp(y_out)
											 );
initial begin
												a_in<=0;
							#3000     $stop;
end

always#10 a_in=a_in+1;
endmodule

2、7段数码管译码器

代码:
//七段码译码器
`timescale 1ns/10ps
module seg_dec(
														num,
														a_g
														);
input[3:0]                 num;
output[6:0]                a_g;//a_g-->{a,b,c,d,e,f,g}

reg[6:0]                   a_g;
always@(num)begin
	case(num)
		4'd0: a_g<=7'b111_1110;
		4'd1: a_g<=7'b011_0000;
		4'd2: a_g<=7'b110_1101;
		4'd3: a_g<=7'b111_1100;
		4'd4: a_g<=7'b011_0011;
		4'd5: a_g<=7'b101_1011;
		4'd6: a_g<=7'b101_1111;
		4'd7: a_g<=7'b111_0000;
		4'd8: a_g<=7'b111_1111;
		4'd9: a_g<=7'b111_1011;
		default: a_g<=7'b000_0001;  //中杠
	endcase

end

endmodule

//--------test bench of seg_dec---------
module seg_dec_tb;
reg[3:0]                    num_in;
wire[6:0]                   a_g_out;
seg_dec seg_dec(
														.num(num_in),
														.a_g(a_g_out)
														);
initial begin
														num_in<=0;
								#100        $stop;
end

always #10 num_in<=num_in+1;
endmodule
如图:输入3,应该是111_1110,根据波形图是正确的。

小结:


 344
344


 被折叠的 条评论
为什么被折叠?
被折叠的 条评论
为什么被折叠?
 到【灌水乐园】发言


