


一、springDataJpa的概述
Spring Data JPA 是 Spring 基于 ORM 框架、JPA 规范的基础上封装的一套JPA应用框架,可使开发者用极简的代码即可实现对数据库的访问和操作。它提供了包括增删改查等在内的常用功能,且易于扩展!学习并使用 Spring Data JPA 可以极大提高开发效率!
Spring Data JPA 让我们解脱了DAO层的操作,基本上所有CRUD都可以依赖于它来实现,在实际的工作工程中,推荐使用Spring Data JPA + ORM(如:hibernate)完成操作,这样在切换不同的ORM框架时提供了极大的方便,同时也使数据库层操作更加简单,方便解耦
springDataJpa、jpa、hibernate关系
JPA是一套规范,内部是有接口和抽象类组成的。hibernate是一套成熟的ORM框架,而且Hibernate实现了JPA规范,所以也可以称hibernate为JPA的一种实现方式,我们使用JPA的API编程,意味着站在更高的角度上看待问题(面向接口编程)
Spring Data JPA是Spring提供的一套对JPA操作更加高级的封装,是在JPA规范下的专门用来进行数据持久化的解决方案。
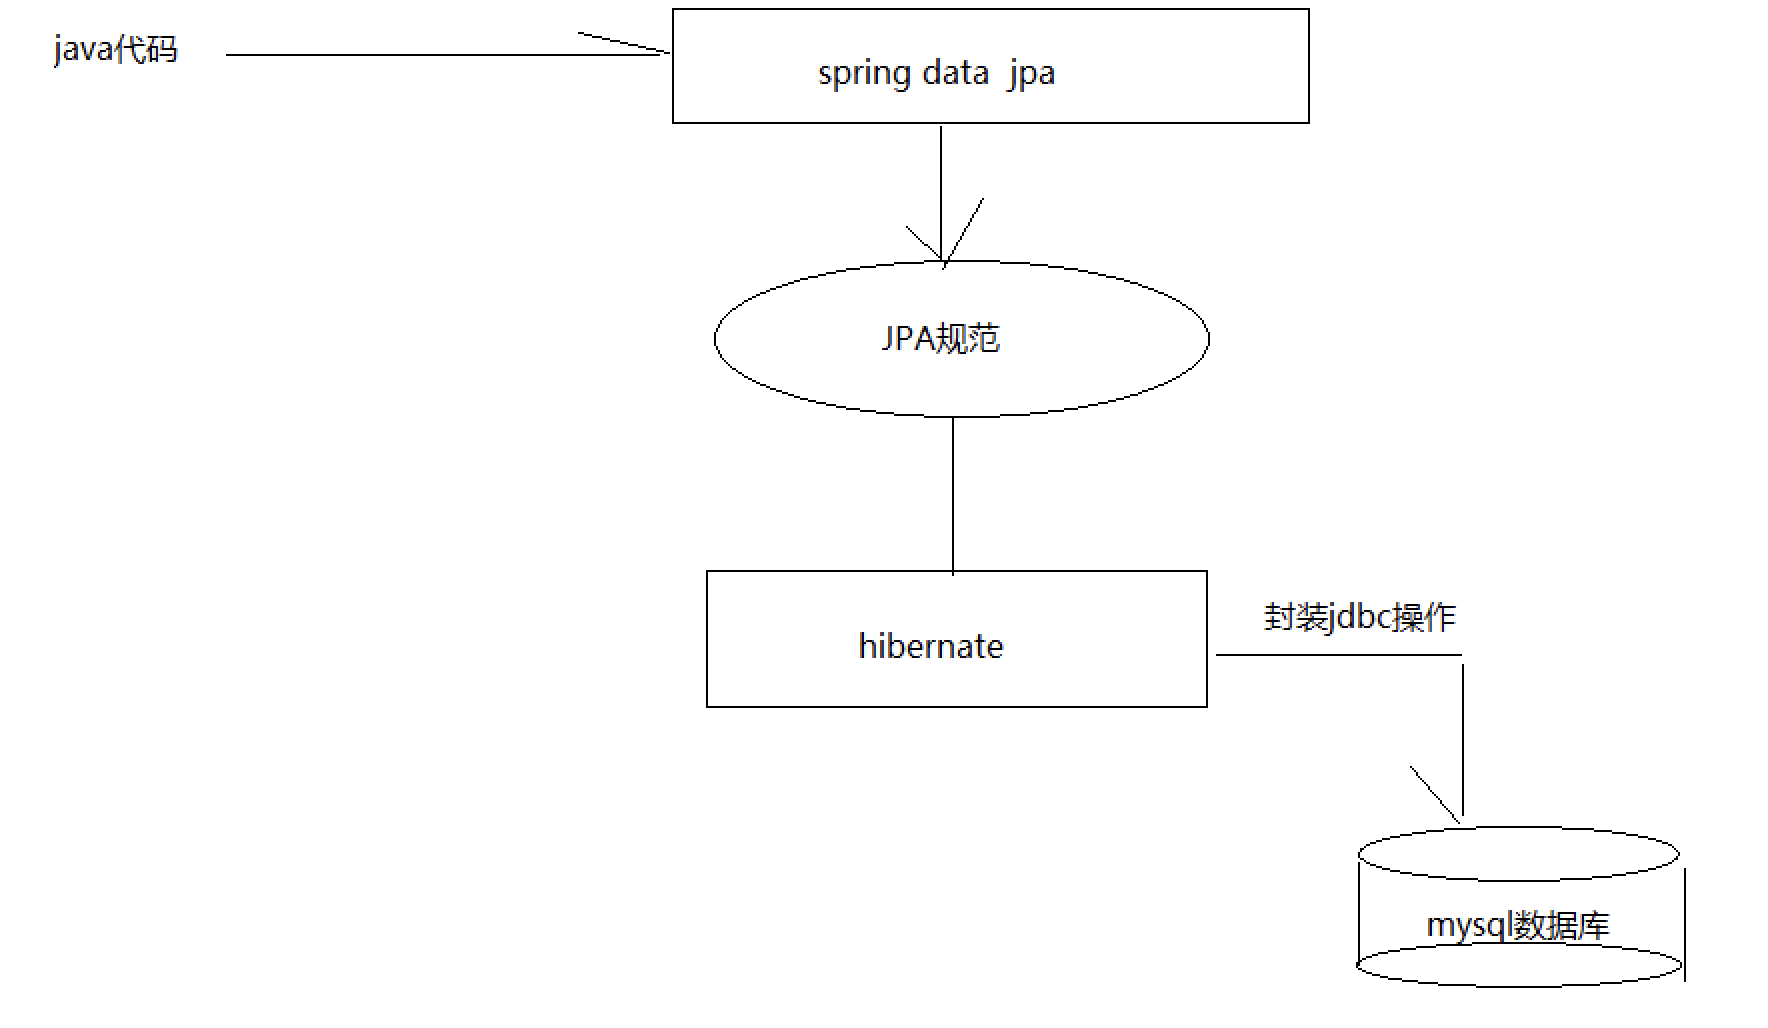
SpringData Jpa 极大简化了数据库访问层代码。 如何简化的呢? 使用了SpringDataJpa,我们的dao层中只需要写接口,就自动具有了增删改查、分页查询等方法。
二、springDataJpa的入门操作
1、导入坐标
<?xml version="1.0" encoding="UTF-8"?>
<project xmlns="http://maven.apache.org/POM/4.0.0"
         xmlns:xsi="http://www.w3.org/2001/XMLSchema-instance"
         xsi:schemaLocation="http://maven.apache.org/POM/4.0.0 http://maven.apache.org/xsd/maven-4.0.0.xsd">
    <modelVersion>4.0.0</modelVersion>

    <groupId>cn.itcast</groupId>
    <artifactId>jpa-day2</artifactId>
    <version>1.0-SNAPSHOT</version>

    <properties>
        <spring.version>5.0.2.RELEASE</spring.version>
        <hibernate.version>5.0.7.Final</hibernate.version>
        <slf4j.version>1.6.6</slf4j.version>
        <log4j.version>1.2.12</log4j.version>
        <c3p0.version>0.9.1.2</c3p0.version>
        <mysql.version>8.0.28</mysql.version>
    </properties>

    <dependencies>
        <!-- junit单元测试 -->
        <dependency>
            <groupId>junit</groupId>
            <artifactId>junit</artifactId>
            <version>4.12</version>
            <scope>test</scope>
        </dependency>

        <!-- spring beg -->
        <dependency>
            <groupId>org.aspectj</groupId>
            <artifactId>aspectjweaver</artifactId>
            <version>1.6.8</version>
        </dependency>

        <dependency>
            <groupId>org.springframework</groupId>
            <artifactId>spring-aop</artifactId>
            <version>${spring.version}</version>
        </dependency>

        <dependency>
            <groupId>org.springframework</groupId>
            <artifactId>spring-context</artifactId>
            <version>${spring.version}</version>
        </dependency>

        <dependency>
            <groupId>org.springframework</groupId>
            <artifactId>spring-context-support</artifactId>
            <version>${spring.version}</version>
        </dependency>

        <!-- spring对orm框架的支持包-->
        <dependency>
            <groupId>org.springframework</groupId>
            <artifactId>spring-orm</artifactId>
            <version>${spring.version}</version>
        </dependency>

        <dependency>
            <groupId>org.springframework</groupId>
            <artifactId>spring-beans</artifactId>
            <version>${spring.version}</version>
        </dependency>

        <dependency>
            <groupId>org.springframework</groupId>
            <artifactId>spring-core</artifactId>
            <version>${spring.version}</version>
        </dependency>

        <!-- spring end -->

        <!-- hibernate beg -->
        <dependency>
            <groupId>org.hibernate</groupId>
            <artifactId>hibernate-core</artifactId>
            <version>${hibernate.version}</version>
        </dependency>
        <dependency>
            <groupId>org.hibernate</groupId>
            <artifactId>hibernate-entitymanager</artifactId>
            <version>${hibernate.version}</version>
        </dependency>
        <dependency>
            <groupId>org.hibernate</groupId>
            <artifactId>hibernate-validator</artifactId>
            <version>5.2.1.Final</version>
        </dependency>
        <!-- hibernate end -->

        <!-- c3p0 beg -->
        <dependency>
            <groupId>c3p0</groupId>
            <artifactId>c3p0</artifactId>
            <version>${c3p0.version}</version>
        </dependency>
        <!-- c3p0 end -->

        <!-- log end -->
        <dependency>
            <groupId>log4j</groupId>
            <artifactId>log4j</artifactId>
            <version>${log4j.version}</version>
        </dependency>

        <dependency>
            <groupId>org.slf4j</groupId>
            <artifactId>slf4j-api</artifactId>
            <version>${slf4j.version}</version>
        </dependency>

        <dependency>
            <groupId>org.slf4j</groupId>
            <artifactId>slf4j-log4j12</artifactId>
            <version>${slf4j.version}</version>
        </dependency>
        <!-- log end -->


        <dependency>
            <groupId>mysql</groupId>
            <artifactId>mysql-connector-java</artifactId>
            <version>${mysql.version}</version>
        </dependency>

        <!-- spring data jpa 的坐标-->
        <dependency>
            <groupId>org.springframework.data</groupId>
            <artifactId>spring-data-jpa</artifactId>
            <version>1.9.0.RELEASE</version>
        </dependency>

        <dependency>
            <groupId>org.springframework</groupId>
            <artifactId>spring-test</artifactId>
            <version>${spring.version}</version>
        </dependency>

        <!-- el beg 使用spring data jpa 必须引入 -->
        <dependency>
            <groupId>javax.el</groupId>
            <artifactId>javax.el-api</artifactId>
            <version>2.2.4</version>
        </dependency>

        <dependency>
            <groupId>org.glassfish.web</groupId>
            <artifactId>javax.el</artifactId>
            <version>2.2.4</version>
        </dependency>
        <!-- el end -->

        <dependency>
            <groupId>org.projectlombok</groupId>
            <artifactId>lombok</artifactId>
            <version>1.18.22</version>
            <scope>provided</scope>
        </dependency>
        <dependency>
            <groupId>org.projectlombok</groupId>
            <artifactId>lombok</artifactId>
            <version>RELEASE</version>
            <scope>compile</scope>
        </dependency>
    </dependencies>

</project>
2、配置文件
<?xml version="1.0" encoding="UTF-8"?>
<beans xmlns="http://www.springframework.org/schema/beans"
       xmlns:xsi="http://www.w3.org/2001/XMLSchema-instance" xmlns:aop="http://www.springframework.org/schema/aop"
       xmlns:context="http://www.springframework.org/schema/context"
       xmlns:jdbc="http://www.springframework.org/schema/jdbc" xmlns:tx="http://www.springframework.org/schema/tx"
       xmlns:jpa="http://www.springframework.org/schema/data/jpa" xmlns:task="http://www.springframework.org/schema/task"
       xsi:schemaLocation="
		http://www.springframework.org/schema/beans http://www.springframework.org/schema/beans/spring-beans.xsd
		http://www.springframework.org/schema/aop http://www.springframework.org/schema/aop/spring-aop.xsd
		http://www.springframework.org/schema/context http://www.springframework.org/schema/context/spring-context.xsd
		http://www.springframework.org/schema/jdbc http://www.springframework.org/schema/jdbc/spring-jdbc.xsd
		http://www.springframework.org/schema/tx http://www.springframework.org/schema/tx/spring-tx.xsd
		http://www.springframework.org/schema/data/jpa
		http://www.springframework.org/schema/data/jpa/spring-jpa.xsd">

    <!--spring 和 spring data jpa的配置-->

    <!-- 1.创建entityManagerFactory对象交给spring容器管理-->
    <bean id="entityManagerFactoty" class="org.springframework.orm.jpa.LocalContainerEntityManagerFactoryBean">
        <property name="dataSource" ref="dataSource" />
        <!--配置的扫描的包(实体类所在的包) -->
        <property name="packagesToScan" value="cn.itcast.domain" />
        <!-- jpa的实现厂家 -->
        <property name="persistenceProvider">
            <bean class="org.hibernate.jpa.HibernatePersistenceProvider"/>
        </property>

        <!--jpa的供应商适配器 -->
        <property name="jpaVendorAdapter">
            <bean class="org.springframework.orm.jpa.vendor.HibernateJpaVendorAdapter">
                <!--配置是否自动创建数据库表 -->
                <property name="generateDdl" value="false" />
                <!--指定数据库类型 -->
                <property name="database" value="MYSQL" />
                <!--数据库方言:支持的特有语法 -->
                <property name="databasePlatform" value="org.hibernate.dialect.MySQLDialect" />
                <!--是否显示sql -->
                <property name="showSql" value="true" />
            </bean>
        </property>

        <!--jpa的方言 :高级的特性 -->
        <property name="jpaDialect" >
            <bean class="org.springframework.orm.jpa.vendor.HibernateJpaDialect" />
        </property>

    </bean>

    <!--2.创建数据库连接池 -->
    <bean id="dataSource" class="com.mchange.v2.c3p0.ComboPooledDataSource">
        <property name="user" value="root"></property>
        <property name="password" value="root"></property>
        <property name="jdbcUrl" value="jdbc:mysql://localhost:3306/JPATest" ></property>
        <property name="driverClass" value="com.mysql.cj.jdbc.Driver"></property>
    </bean>

    <!--3.整合spring dataJpa-->
    <jpa:repositories base-package="cn.itcast.dao" transaction-manager-ref="transactionManager"
                      entity-manager-factory-ref="entityManagerFactoty" ></jpa:repositories>

    <!--4.配置事务管理器 -->
    <bean id="transactionManager" class="org.springframework.orm.jpa.JpaTransactionManager">
        <property name="entityManagerFactory" ref="entityManagerFactoty"></property>
    </bean>

    <!-- 4.txAdvice-->
    <tx:advice id="txAdvice" transaction-manager="transactionManager">
        <tx:attributes>
            <tx:method name="save*" propagation="REQUIRED"/>
            <tx:method name="insert*" propagation="REQUIRED"/>
            <tx:method name="update*" propagation="REQUIRED"/>
            <tx:method name="delete*" propagation="REQUIRED"/>
            <tx:method name="get*" read-only="true"/>
            <tx:method name="find*" read-only="true"/>
            <tx:method name="*" propagation="REQUIRED"/>
        </tx:attributes>
    </tx:advice>

    <!-- 5.aop-->
    <aop:config>
        <aop:pointcut id="pointcut" expression="execution(* cn.itcast.service.*.*(..))" />
        <aop:advisor advice-ref="txAdvice" pointcut-ref="pointcut" />
    </aop:config>


    <!--5.声明式事务 -->

    <!-- 6. 配置包扫描-->
    <context:component-scan base-package="cn.itcast" ></context:component-scan>
</beans>
3、实体类建立映射关系
package cn.itcast.domain;

import lombok.Data;

import javax.persistence.*;

/**
 * 实体类和表的映射关系
 * @Entity
 * @Table
 */
@Entity
@Table(name = "cst_customer")
@Data//提供类的get,set,equals,toString,hashCode方法
public class Customer {
    @Id
    @GeneratedValue(strategy = GenerationType.IDENTITY)
    @Column(name = "cust_id")
    private Long custId;

    @Column(name ="cust_address")
    private String custAddress;

    @Column(name ="cust_industry")
    private String custIndustry;

    @Column(name ="cust_level")
    private String custLevel;

    @Column(name ="cust_name")
    private String custName;

    @Column(name ="cust_phone")
    private String custPhone;

    @Column(name ="cust_source")
    private String custSource;
}
4、定义Dao接口
创建一个Dao层接口,并实现JpaRepository和JpaSpecificationExecutor
package cn.itcast.dao;

import cn.itcast.domain.Customer;
import org.springframework.data.jpa.repository.JpaRepository;
import org.springframework.data.jpa.repository.JpaSpecificationExecutor;
import org.springframework.data.jpa.repository.Modifying;
import org.springframework.data.jpa.repository.Query;
import org.springframework.stereotype.Repository;

import java.util.List;

/**
 * 符合SpringDataJpa的dao层接口规范
 *      JpaRepository<操作的实体类型,实体类中主键属性的类型>
 *          封装了基本的CRUD操作
 *      JpaSpecificationExecutor<操作的实体类型>
 *          封装了复杂查询(分页)
 */
public interface CustomerDao extends JpaRepository<Customer,Long> ,JpaSpecificationExecutor<Customer> {

    //根据客户名和客户行业查找客户
    @Query(value = "from Customer where custName=?1 and custIndustry=?2")
    Customer findByNameAndIndustry(String name,String industry);

    //根据id更改客户行业
    @Query(value = "update Customer set custName=?2 where custId=?1")
    @Modifying
    void updateCustomerById(Long id,String name);

    //使用sql语句进行查询客户全部,nativeQuery:使用本地sql的方式存储
    @Query(value = "select * from cst_customer",nativeQuery = true)
    List<Customer> findAll();


}
5、测试
package cn.itcast.dao;

import cn.itcast.domain.Customer;
import org.junit.Test;
import org.junit.runner.RunWith;
import org.springframework.beans.factory.annotation.Autowired;
import org.springframework.test.context.ContextConfiguration;
import org.springframework.test.context.junit4.SpringJUnit4ClassRunner;


@RunWith(SpringJUnit4ClassRunner.class) //声明spring提供的单元测试环境
@ContextConfiguration(locations = "classpath:applicationContext.xml")//指定spring容器的配置信息
public class CustomerDaoTest {

  @Autowired
  private CustomerDao customerDao;

  @Test
  public void testFindOne() {
    Customer customer = customerDao.findOne(3l);
    System.out.println(customer);
  }

  @Test
  public void testSave(){
    Customer customer=new Customer();
    customer.setCustName("hahaha");
    customer.setCustIndustry("互联网");
    customerDao.save(customer);
  }
}
三、springDataJpa的运行过程和原理剖析
CustomerDao接口,真正发挥作用的是接口的实现类。在程序执行的过程中,自动的帮助我们动态的生成了接口的实现类对象。
如何动态的生成实现类对象?
动态代理(生成基于接口的实现类对象)
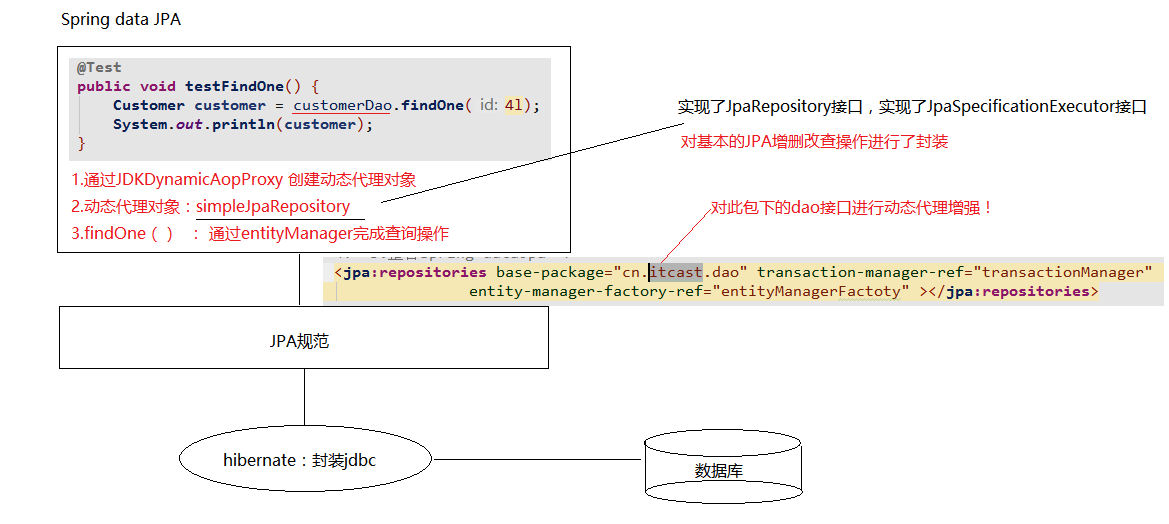
1.通过JdkDynamicAopProxy的invoke方法创建了一个动态代理对象
2.SimpleJpaRepository当中封装了JPA的操作(借助JPA的api完成数据库的CRUD)
3.通过hibernate完成数据库操作(封装了jdbc)
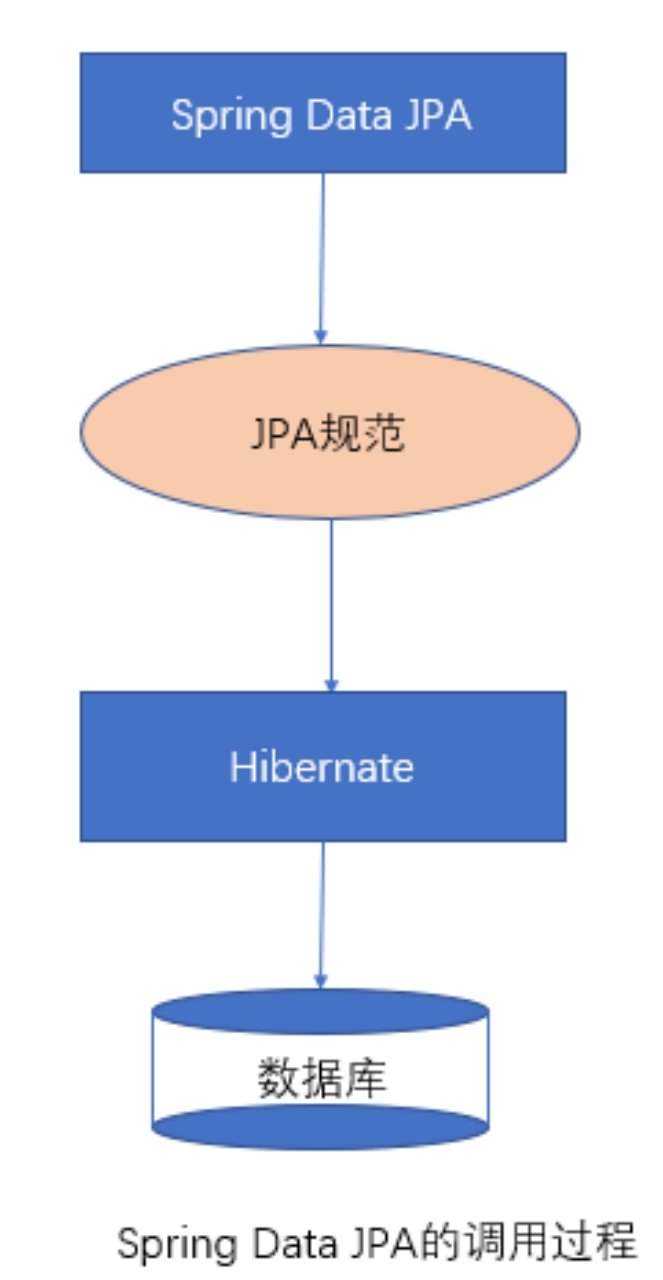
SpringDataJPA完整的调用过程
四、复杂查询
统计查询,查询客户的总数量
直接使用count方法
/**
     * 根据id查询
     */
    @Test
    public void testFindOne() {
        Customer customer = customerDao.findOne(4l);
        System.out.println(customer);
    }

    /**
     * save : 保存或者更新
     *      根据传递的对象是否存在主键id,
     *      如果没有id主键属性:保存
     *      存在id主键属性,根据id查询数据,更新数据
     */
    @Test
    public void testSave() {
        Customer customer  = new Customer();
        customer.setCustName("黑马程序员");
        customer.setCustLevel("vip");
        customer.setCustIndustry("it教育");
        customerDao.save(customer);
    }

    @Test
    public void testUpdate() {
        Customer customer  = new Customer();
        customer.setCustId(4l);
        customer.setCustName("黑马程序员很厉害");
        customerDao.save(customer);
    }

    @Test
    public void testDelete () {
        customerDao.delete(3l);
    }


    /**
     * 查询所有
     */
    @Test
    public void testFindAll() {
        List<Customer> list = customerDao.findAll();
        for(Customer customer : list) {
            System.out.println(customer);
        }
    }


/**
     * 测试统计查询:查询客户的总数量
     *      count:统计总条数
     */
    @Test
    public void testCount() {
        long count = customerDao.count();//查询全部的客户数量
        System.out.println(count);
    }

    /**
     * 测试:判断id为4的客户是否存在
     *      1. 可以查询以下id为4的客户
     *          如果值为空,代表不存在,如果不为空,代表存在
     *      2. 判断数据库中id为4的客户的数量
     *          如果数量为0,代表不存在,如果大于0,代表存在
     */
    @Test
    public void  testExists() {
        boolean exists = customerDao.exists(4l);
        System.out.println("id为4的客户 是否存在:"+exists);
    }


    /**
     * 根据id从数据库查询
     *      @Transactional : 保证getOne正常运行
     *
     *  findOne:
     *      em.find()           :立即加载
     *  getOne:
     *      em.getReference     :延迟加载
     *      * 返回的是一个客户的动态代理对象
     *      * 什么时候用,什么时候查询
     */
    @Test
    @Transactional
    public void  testGetOne() {
        Customer customer = customerDao.getOne(4l);
        System.out.println(customer);
    }
SpringDataJPA中接口定义的方法进行查询
1、在DAO进行方法定义,并进行相关语句的书写
//根据客户名和客户行业查找客户
@Query(value = "from Customer where custName=?1 and custIndustry=?2")
Customer findByNameAndIndustry(String name,String industry);
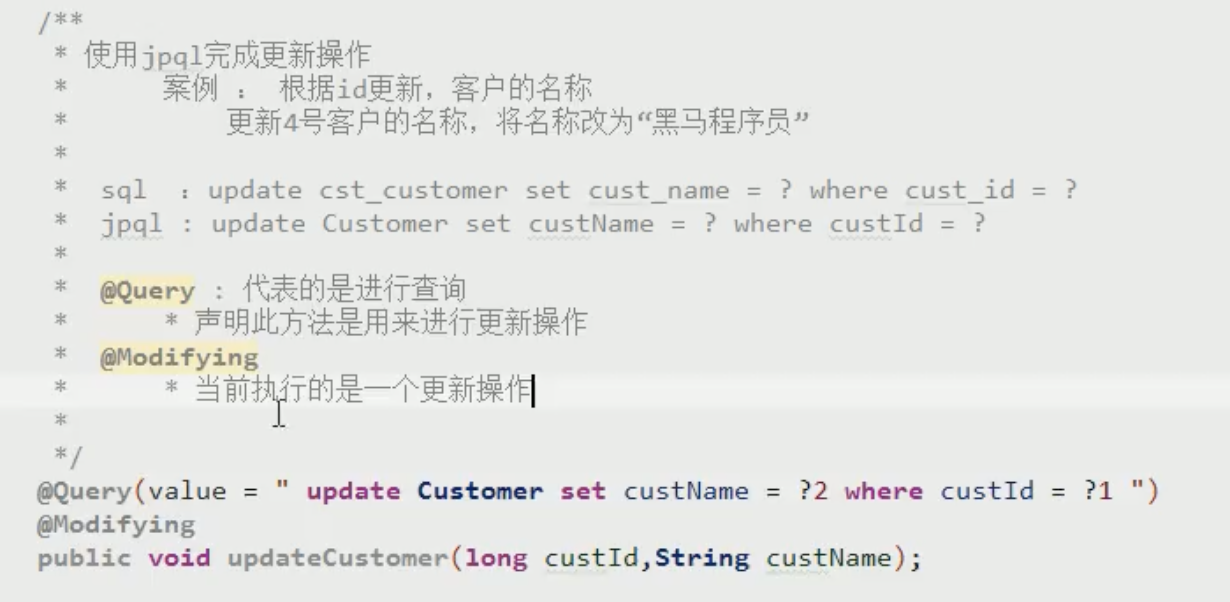
//根据id更改客户行业
@Query(value = "update Customer set custName=?2 where custId=?1")
@Modifying
void updateCustomerById(Long id,String name);
//使用sql语句进行查询客户全部,nativeQuery:使用本地sql的方式存储
@Query(value = "select * from cst_customer",nativeQuery = true)
List<Customer> findAll();
⚠️注意:
可以使用jpql进行书写也可以进行sql语句进行书写。使用sql语句的时候要进行相关的说明nativeQuery = true
	i.借助接口中的定义好的方法完成查询
		findOne(id):根据id查询
	ii.jpql的查询方式
		jpql : jpa query language  (jpq查询语言)
		特点:语法或关键字和sql语句类似
			查询的是类和类中的属性

	* 需要将JPQL语句配置到接口方法上
		1.特有的查询:需要在dao接口上配置方法
		2.在新添加的方法上,使用注解的形式配置jpql查询语句
		3.注解 : @Query

iii.sql语句的查询
		1.特有的查询:需要在dao接口上配置方法
		2.在新添加的方法上,使用注解的形式配置sql查询语句
		3.注解 : @Query
			value :jpql语句 | sql语句
			nativeQuery :false(使用jpql查询) | true(使用本地查询:sql查询)
				是否使用本地查询
自定义方法后,不要忘记进行相关测试,测试方法是否正确
注意⚠️:
- 对于多个占位符参数赋值的时候,默认情况下,占位符的位置需要和方法参数中的位置保持一致
- 可以指定占位符参数的位置,?索引的方式指定此占位的取值来源
//根据客户名和客户行业查找客户
@Query(value = "from Customer where custName=?1 and custIndustry=?2")
Customer findByNameAndIndustry(String name,String industry);
@Query:代表的是进行查询,声明此方法用来进行查询操作
@Modifying:当前执行的是一个更新操作
测试
@Test
  @Transactional
  @Rollback(value = false)
  public void testupdateCustomerById() {
    customerDao.updateCustomerById(4l,"互联网");
  }
注意⚠️
进行更新操作的时候,再进行测试的时候,需要加上事务的注解,不然会报错,同时加上事务之后还要加上@RollBack注解,设置不自动回滚,否则在数据库中看不到我们数据的更新
使用SQL语句查询
//使用sql语句进行查询客户全部,nativeQuery:使用本地sql的方式存储
    @Query(value = "select * from cst_customer",nativeQuery = true)
    List<Customer> findAll();
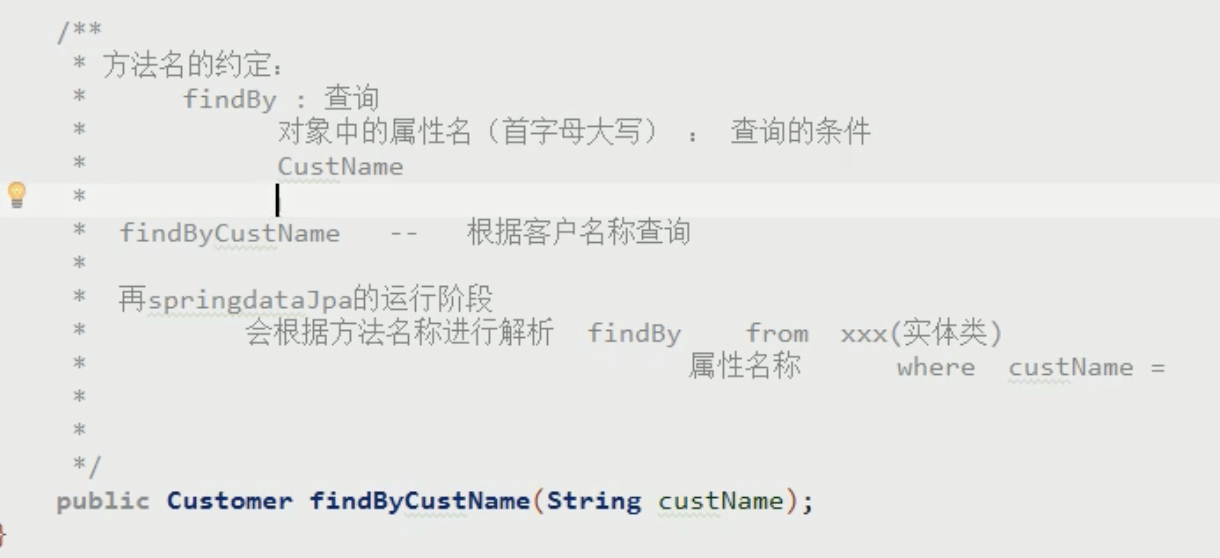
方法名称规则查询
顾名思义,方法命名规则查询就是根据方法的名字,就能创建查询。只需要按照Spring Data JPA提供的方法命名规则定义方法的名称,就可以完成查询工作。Spring Data JPA在程序执行的时候会根据方法名称进行解析,并自动生成查询语句进行查询
按照Spring Data JPA 定义的规则,查询方法以findBy开头,涉及条件查询时,条件的属性用条件关键字连接,要注意的是:条件属性首字母需大写。框架在进行方法名解析时,会先把方法名多余的前缀截取掉,然后对剩下部分进行解析。
findBy开头:代表查询
- 需要对象中的属性的名称(首字母大写)
这样我们不用写sql或者jpql语句,只需按照SpringDataJpa提供的方法名称规则定义方法,即可完成查询。
例如:findByCustName
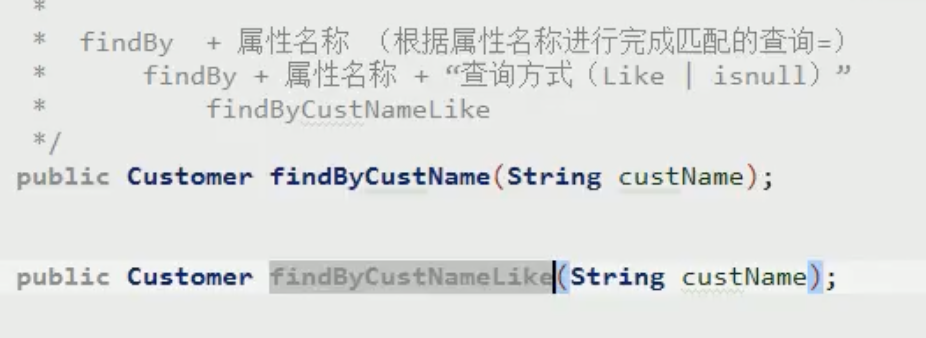
模糊查询
默认情况下是精确匹配,但是需要用到模糊查询的时候,只需要添加like或者isnull关键字即可。例如:findByCustNameLike
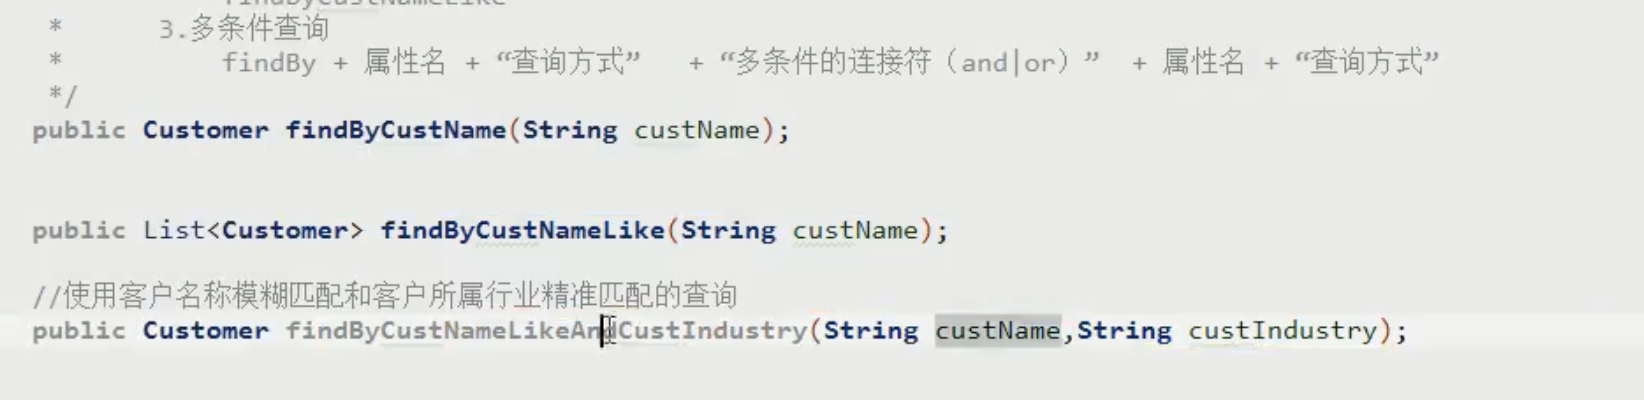
多条件查询
使用and或者or关键字进行实体类属性连接即可。
注意⚠️:参数的顺序要和多条件查询的顺序保持一致,不能搞反了,因为没有占位符了
具体的关键字,使用方法合生产成SQL如下所示:
| Keyword | Sample | JPQL | ||
| And | findByLastnameAndFirstname | … where x.lastname = ?1 and x.firstname = ?2 | ||
| Or | findByLastnameOrFirstname | … where x.lastname = ?1 or x.firstname = ?2 | ||
| Is,Equals | findByFirstnameIs,findByFirstnameEquals | … where x.firstname = ?1 | ||
| Between | findByStartDateBetween | … where x.startDate between ?1 and ?2 | ||
| LessThan | findByAgeLessThan | … where x.age < ?1 | ||
| LessThanEqual | findByAgeLessThanEqual | … where x.age ⇐ ?1 | ||
| GreaterThan | findByAgeGreaterThan | … where x.age > ?1 | ||
| GreaterThanEqual | findByAgeGreaterThanEqual | … where x.age >= ?1 | ||
| After | findByStartDateAfter | … where x.startDate > ?1 | ||
| Before | findByStartDateBefore | … where x.startDate < ?1 | ||
| IsNull | findByAgeIsNull | … where x.age is null | ||
| IsNotNull,NotNull | findByAge(Is)NotNull | … where x.age not null | ||
| Like | findByFirstnameLike | … where x.firstname like ?1 | ||
| NotLike | findByFirstnameNotLike | … where x.firstname not like ?1 | ||
| StartingWith | findByFirstnameStartingWith | … where x.firstname like ?1 (parameter bound with appended %) | ||
| EndingWith | findByFirstnameEndingWith | … where x.firstname like ?1 (parameter bound with prepended %) | ||
| Containing | findByFirstnameContaining | … where x.firstname like ?1 (parameter bound wrapped in %) | ||
| OrderBy | findByAgeOrderByLastnameDesc | … where x.age = ?1 order by x.lastname desc | ||
| Not | findByLastnameNot | … where x.lastname <> ?1 | ||
| In | findByAgeIn(Collection ages) | … where x.age in ?1 | ||
| NotIn | findByAgeNotIn(Collection age) | … where x.age not in ?1 | ||
| TRUE | findByActiveTrue() | … where x.active = true | ||
| FALSE | findByActiveFalse() | … where x.active = false | ||
| IgnoreCase | findByFirstnameIgnoreCase | … where UPPER(x.firstame) = UPPER(?1) |


 2万+
2万+


 被折叠的 条评论
为什么被折叠?
被折叠的 条评论
为什么被折叠?
 到【灌水乐园】发言


