


文章概述
学习b站这位up主的视频总结一下Thymeleaf的简单用法。
视频地址:https://www.bilibili.com/video/BV1Pb4y1b74D
文章介绍了Springboot集成以及一些简单的用法
SpringBoot集成Thymeleaf
- 添加Thymeleaf依赖
   <dependency>
            <groupId>org.springframework.boot</groupId>
            <artifactId>spring-boot-starter-thymeleaf</artifactId>
        </dependency>
- 在resources目录下创建templates文件夹。
- 添加一些必要的配置信息
spring:
  thymeleaf:
    prefix: classpath:/templates/
    suffix: .html
- 创建html文件并加入命名空间
命名空间是提示作用
<html lang="en" xmlns:th="http://www.thymeleaf.org">
然后就可以正常使用了!如果有问题可以参考我的另一个问题总结的文章:
https://blog.csdn.net/qq_43472612/article/details/125874508
- 热部署
进行如下设置可以实现静态资源的热部署。
添加如下代码可以实现java代码的热部署(测试了很多次,删了这段不能热部署了)
        <dependency>
            <groupId>org.springframework.boot</groupId>
            <artifactId>spring-boot-devtools</artifactId>
            <optional>true</optional>  <!-- 这里很重要-->
        </dependency>
参考文章:https://blog.csdn.net/cm_pq/article/details/120074997
https://blog.csdn.net/weixin_44678104/article/details/124984842
Thymeleaf语法
标签
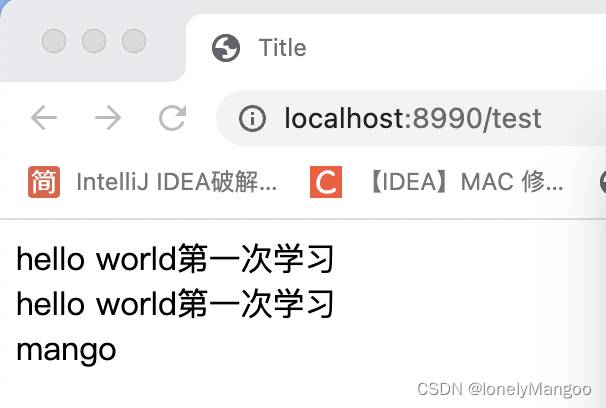
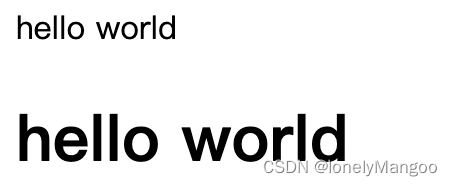
- th:text
th:text 文本 ,内容用${}包裹,
<div th:text="${msg}+ 第一次学习"></div>
<div th:text="|${msg}第一次学习|"></div>
两种方式实现拼接
对象的话也是存入model中,就能直接用.方法
效果:
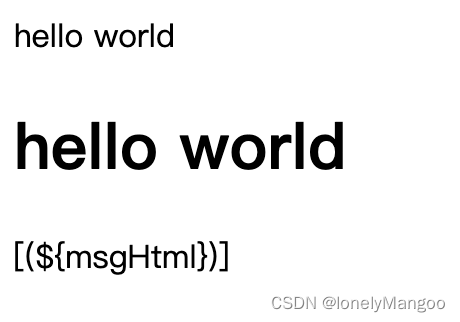
- utext
想要显示html内容,要用utext标签
<div th:utext="${msgHtml}"></div>

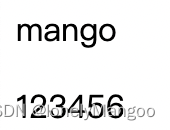
- th:object
<div th:object="${user}">
    <p th:text="*{name}"></p>
    <p th:text="*{password}"></p>
</div>
可以直接获取用属性值不用写对象
效果:
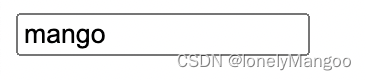
- th:value
用于表单属性
<input th:value="${user.getName()}">
效果:
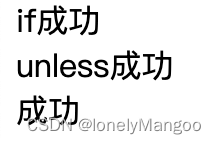
- th:if,th:unless
用于判断
<div th:if="${true}"> if成功</div>
<div th:unless="${false}"> unless成功</div>
<div th:if="${user.getName().equals('mango')}">成功</div>
if是判断成功,unless是判断失败
效果:
6. th:switch
用于比较值
<div th:switch="${user.id}">
    <p th:case="1">可见</p>
    <p th:case="1">可见</p>
    <p th:case="2">隐藏</p>
</div>
需要注意的是,只要有一个匹配成功,下面的就不会比较了,只会显示一个
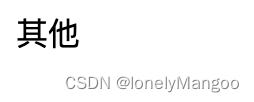
还有其他可以用一个星号,但是只能放在最下面(是一个通配符,永远能匹配
<div th:switch="${user.id}">
    <p th:case="5">可见</p>
    <p th:case="4">可见</p>
    <p th:case="2">隐藏</p>
    <p th:case="*">其他</p>
</div>
- th:each
用于遍历
<div th:each="user:${users}">
    <span th:text="${user.getName()}"></span>
</div>
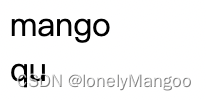
同时还包括一个状态变量,有数组下标、元素大小奇偶行等等
<div th:each="user,iterStat : ${users}" >
    <span th:text="${user.getName()}"></span>
    <span th:text="${iterStat.index}"></span>
    <span th:text="${iterStat.odd}"></span>
</div>
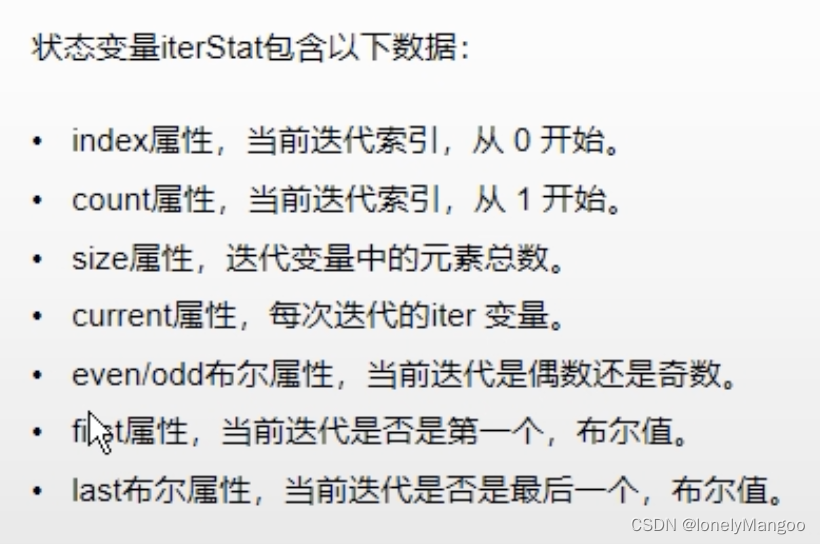
(该图截图自链接的视频)
- th:href
<a th:href="@{www.baidu.com/index(id=1)}" th:text="${user.name}"></a>

<a th:href="@{http://www.baidu.com/index(id=1)}" th:text="${user.name}"></a>

不加http默认是当前域的。
要加@,可以加参数。
内联表达式
<div>[[${msg}]]</div> ~~text
<div>[(${msgHtml})]</div>~~ utext
小括号不会转译,直接显示html代码
和标签效果一样。
<div th:inline="none">[(${msgHtml})]</div>
可以关闭内联表达式
同时也可以在javascript中显示
<script th:inline = "javascript">
    const user = /*[[${user}]]*/{}
    const user = [[${user}]]
    console.log(user)
</script>
用注释也可以,这样的话直接运行html不会报错
基本对象
● ctx上下文对象
model传过来的都是上下文对象,也可以通过#获取
<div th:text="${#ctx.msg}"></div>
ctx也可以获得request、response、session、servletContext等
● param
用来获取请求参数,实际上是存在上下文当中的
<div th:text="${param.id}"></div>
    <div th:text="${param.name}">
</div>
在controller上加上相关参数就可以获取
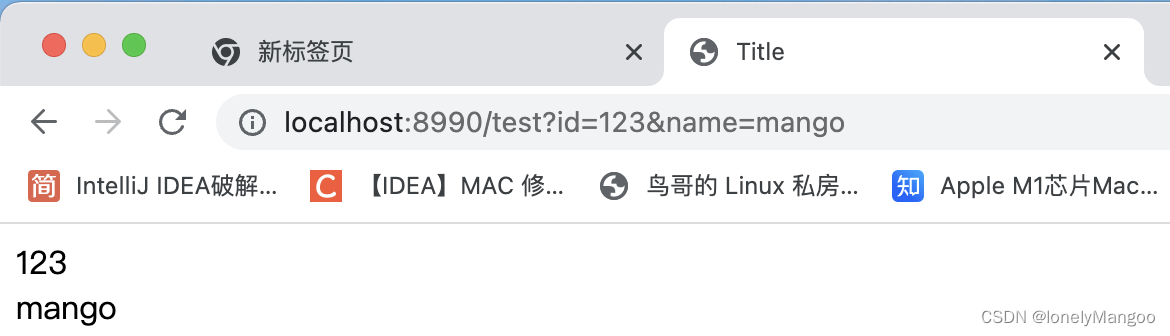
其他方法:
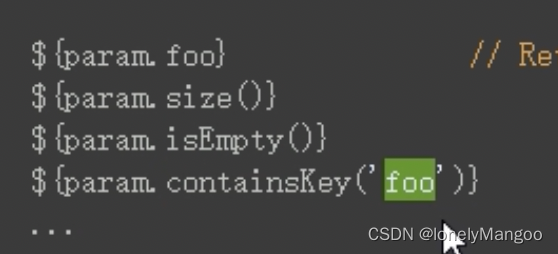
(该图截图自链接的视频)
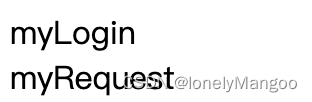
● session、request
获得session
<div th:text="${session.myLogin}"></div>
<div th:text="${#request.getAttribute('myRequest')}"></div>

● 其他
还有一些字符串格式化、日期格式化、数字格式化。
下面是参考文档
https://www.thymeleaf.org/doc/tutorials/3.0/usingthymeleaf.html#strings
代码
下面是我的测试代码
controller:
    @RequestMapping("/test")
    public String test(Model model, String id, String name, HttpServletRequest request){
        HttpSession session = request.getSession();
        session.setAttribute("myLogin","myLogin");
        session.setAttribute("myLogin666","myLogin555");
        request.setAttribute("myRequest","myRequest");
        model.addAttribute("msg","hello world");
        AdminUser user = userService.getById(1);
        System.out.println(id);
        System.out.println(name);
        List<AdminUser> allUsers = userService.getAllUsers();
        model.addAttribute("users",allUsers);
        model.addAttribute("user",user);
        model.addAttribute("msgHtml","<h1>hello world</h1>");
        return "login";
    }
我这里是从数据库获取的,写死也是一样。
html:
<!DOCTYPE html>
<html lang="en" xmlns:th="http://www.thymeleaf.org">
<head>
    <meta charset="UTF-8">
    <title>Title</title>
    <link rel="stylesheet" href="../static/index.css">
</head>
<body>
<div th:text="${param.id}"></div>
<div th:text="${param.name}">
</div>
<div th:text="${msg}+ 第一次学习"></div>
<div th:text="|${msg}第一次学习|"></div>
<div th:text="|${user.name}|"></div>
<div th:utext="${msgHtml}"></div>
<div th:object="${user}">
    <p th:text="*{name}"></p>
    <p th:text="*{password}"></p>
</div>
<label>
    <input th:value="${user.getName()}">
</label>
<br>
<div th:if="${true}"> if成功</div>
<div th:unless="${false}"> unless成功</div>
<div th:if="${user.getName().equals('mango')}">成功</div>

<div th:switch="${user.id}">
    <p th:case="*">其他</p>
    <p th:case="1">可见</p>
    <p th:case="4">可见</p>
    <p th:case="2">隐藏</p>
</div>

<!--th:class="${iterStat.last}?'odd':null"-->
<div th:each="user,iterStat : ${users}" >
    <span th:text="${user.getName()}"></span>
    <span th:text="${iterStat.index}"></span>
    <span th:text="${iterStat.odd}"></span>
</div>

<a th:href="@{http://www.baidu.com/index(id=1)}" th:text="${user.name}"></a>
<hr>
<div>[[${msg}]]</div>
<div>[(${msgHtml})]</div>
<div th:inline="none">[(${msgHtml})]</div>
<hr>

<div th:text="${#ctx.msg}"></div>
<div th:text="${#ctx.msgHtml}"></div>

<hr>
<div th:text="${param.id}"></div>
    <div th:text="${param.name}">
</div>

<div th:text="${session.myLogin}"></div>
<div th:text="${#request.getAttribute('myRequest')}"></div>
<hr>
<div th:text="${session.myLogin}"></div>
<div th:text="${session.myLogin666}"></div>
<div th:text="${session.myLogin666}"></div>
<!--<div th:text="${session.my}"></div>-->
<!--<div th:text="${session.my}"></div>-->
<!--<div th:text="${#request.getAttribute('myRequest')}"></div>-->
<div th:text="${#request.getAttribute('myRequest')}"></div>
</body>
</html>
<script th:inline = "javascript">
    const user = /*[[${user}]]*/{}
    const user = [[${user}]]
    console.log(user)
</script>
总结
了解了Thymeleaf基本标签的使用,接下来准备用Thymeleaf和mybatis实现了一个简单的登录功能。


 7033
7033


 被折叠的 条评论
为什么被折叠?
被折叠的 条评论
为什么被折叠?
 到【灌水乐园】发言


