


1、简介
Spring Cloud Ribbon是基于Netflix Ribbon实现的一套客户端负载均衡的工具,也就是存在于我们的客户端,而不像Nginx一样在服务端
简单的说,
Ribbon是Netflix发布的开源项目,主要功能是提供客户端的软件负载均衡算法和服务调用。Ribbon客户端组件提供一系列完善的配置项如连接超时,重试等。简单的说,就是在配置文件中列出Load Balancer(简称LB)后面所有的机器,Ribbon会自动的帮助你基于某种规则(如简单轮询,随机连接等)去连接这些机器。我们很容易使用Ribbon实现自定义的负载均衡算法。
很遗憾,
Ribbon也进入维护了,但是部分领域还在大规模部署,暂时没有完全替代。
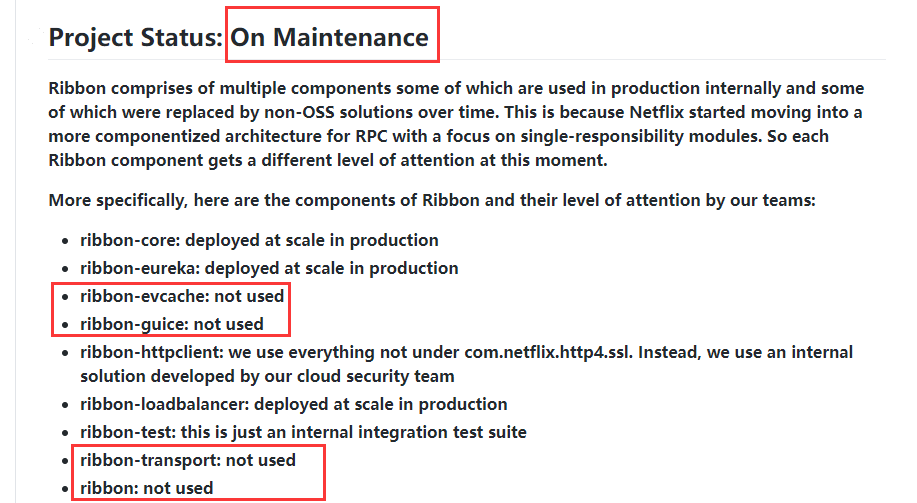
正是以为
Netflix公司对其停更后,Spring Cloud官方社区开发了LoadBalancer想要把他替换掉,但是至少目前还不行,毕竟Ribbon十分的优秀,但有一说一,以后的趋势是LoadBalancer的,这一点毋庸置疑。
2、能干嘛
①、LB负载均衡
简单的说就是将用户的请求平摊的分配到多个服务上,从而达到系统的
HA(高可用)常见的负载均衡有软件Nginx,LVS,硬件F5等。
Ⅰ、集中式LB
即在服务的消费方和提供方之间使用的独立的
LB设施(可以是硬件,如F5,也可以是软件,如nginx),由该设施负责把访问请求通过某种策略转发至服务的提供方;
Ⅱ、进程内LB
将
LB逻辑继承到消费方,消费者从服务注册中心获知哪些地址可用,然后自己再从这些地址中选择出一个合适的服务器。
Ribbon就属于进程内LB,它只是一个类库,集成于消费方进程,消费方通过它获取服务提供方的地址
②、Ribbon和Nginx区别
- Ribbon本地负载均衡客户端
VSNginx服务端负载均衡
Nginx是服务器负载均衡,客户端所有请求都会交给Nginx,然后由Nginx实现转发请求。即负载均衡是由服务端实现的。
Ribbon本地负载均衡,在调用微服务接口时候,会在注册中心上获取注册信息服务列表之后缓存到JVM本地,从而在本地实现RPC远程服务调用技术。
3、Ribbon相关概念
①、架构演示
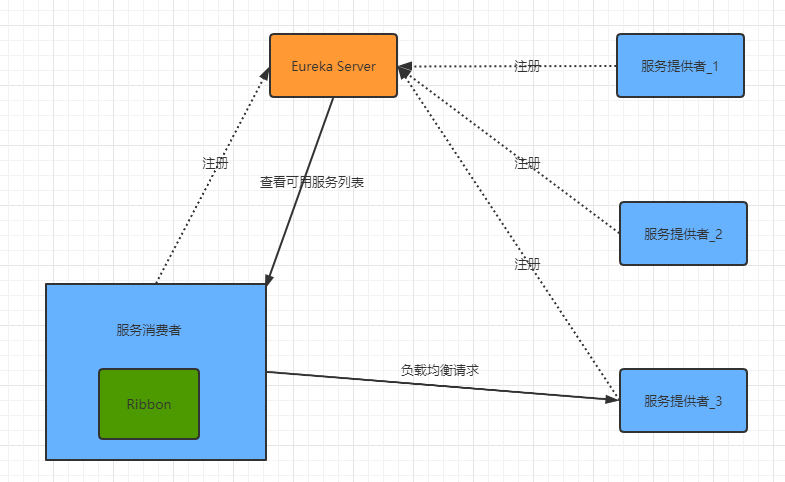
Ribbon在工作时分为两步
- 第一步先选择
EurekaServer,它优先选择在同一个区域内负载较少的server - 第二部再根据用户指定的策略,在从
server取到的服务注册列表中选择一个地址 - 其中
Ribbon提供多种策略:比如轮询、随机、和根据响应时间加权
②、POM
- 我们在搭建Eureka集群的时候发现一个问题,我们没有手动导入
Ribbon坐标,但是也完成了负载均衡的功能,这到底是为什么呢?SpringCloud之服务注册中心(Eureka)
查查就知道了
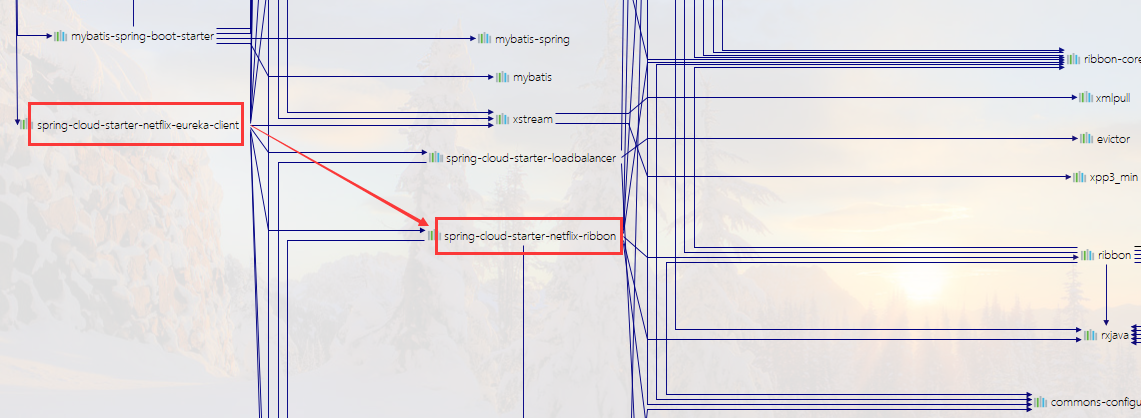
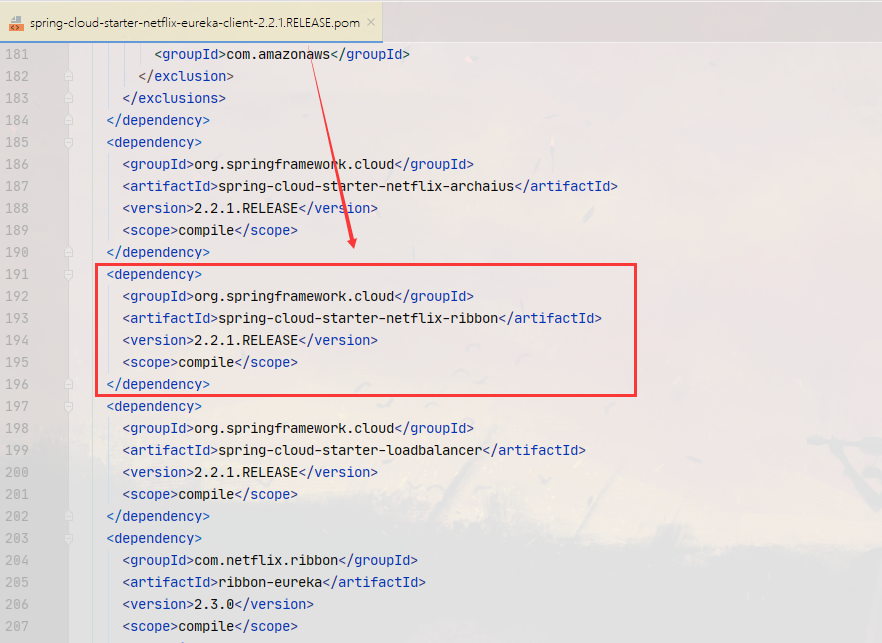
原来是导入
Eureka的Starter自动集成了Ribbon。所以就不用导包了哈,小提示:使用2020.0版本的小伙伴(大佬)应该知道,导入的Eureka starter依赖找不到Ribbon了,因为新版的Cloud已经移除了除Eureka的所有Netflix组件。
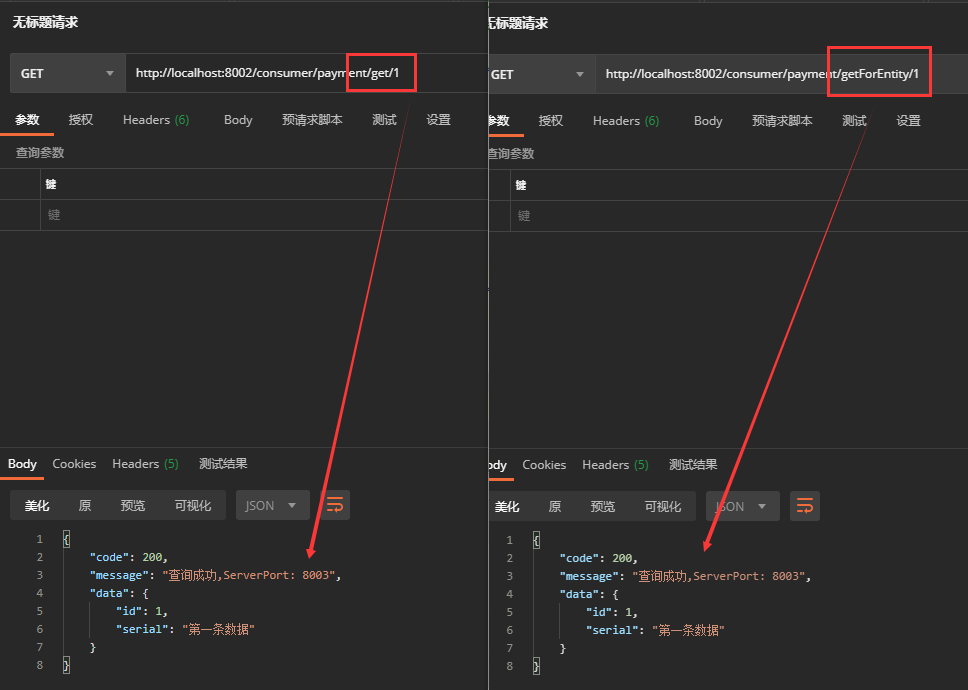
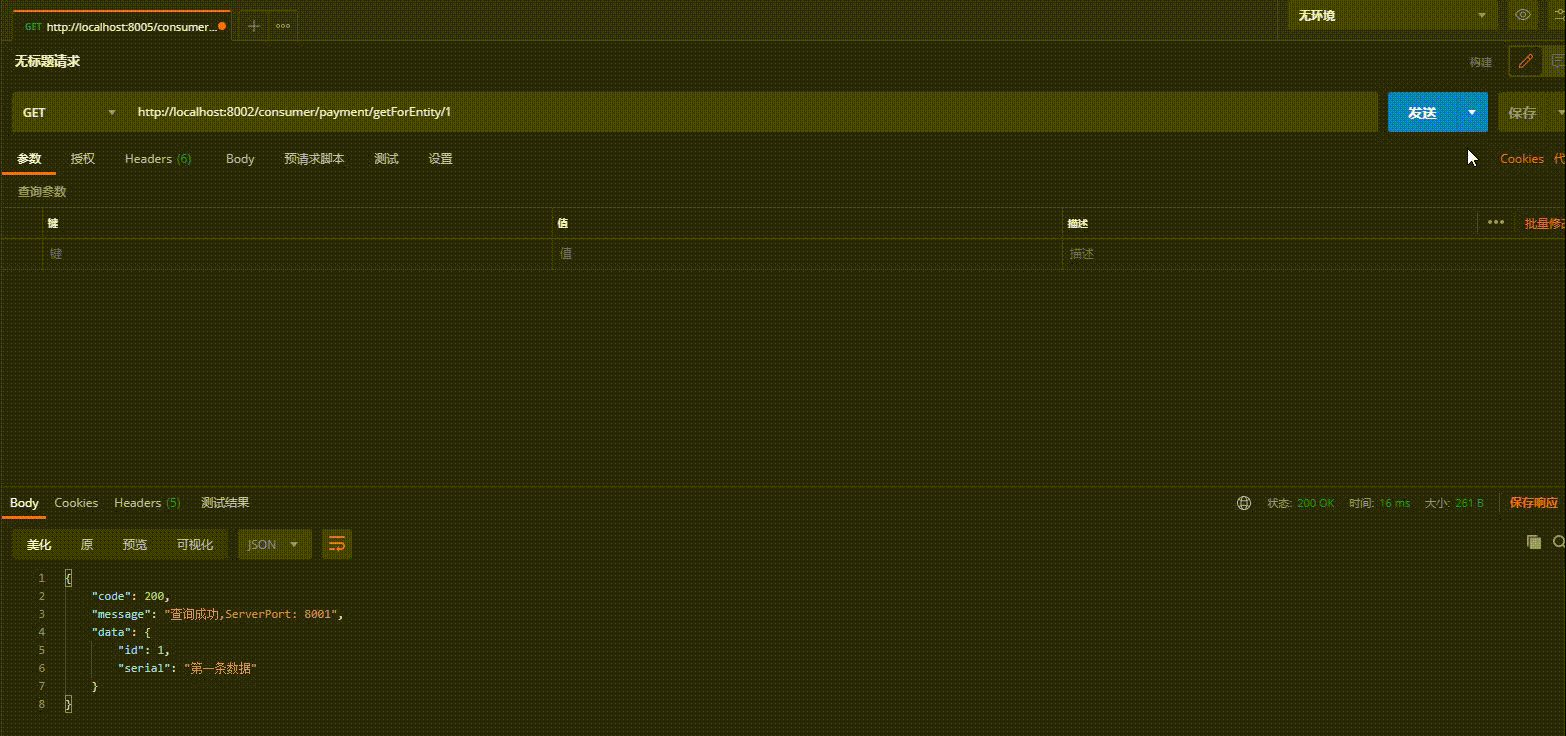
③、getForObject和getForEntity区别
前者返回对象为响应体中数据转化对象,可以理解为
JSON,而后者返回对象为ResponseEntity对象,包含了响应中的一些重要信息,比如响应头,响应状态码,响应体等。
@GetMapping(value = "/consumer/payment/get/{id}")
public CommonResult getPaymentById(@PathVariable("id") Long id) {
    return restTemplate.getForObject(PAYMENT_URL + "/payment/get/" + id, CommonResult.class);
}
@GetMapping(value = "/consumer/payment/getForEntity/{id}")
public CommonResult getPaymentByIdForEntity(@PathVariable("id") Long id) {
    ResponseEntity<CommonResult> responseEntity = restTemplate.getForEntity(PAYMENT_URL + "/payment/get/" + id, CommonResult.class);
    if (responseEntity.getStatusCode().is2xxSuccessful()) {
        //一系列额外的信息
        log.info(responseEntity.getStatusCode() + "");
        log.info(responseEntity.getHeaders() + "");
        return responseEntity.getBody();
    } else {
        return new CommonResult<>(444, "查询失败");
    }
}
@GetMapping(value = "/consumer/payment/insertForEntity")
public CommonResult insert(Payment payment) {
    //唯一区别在于还要获取一下body
    return restTemplate.postForEntity(PAYMENT_URL + "/payment/insert", payment, CommonResult.class).getBody();
}
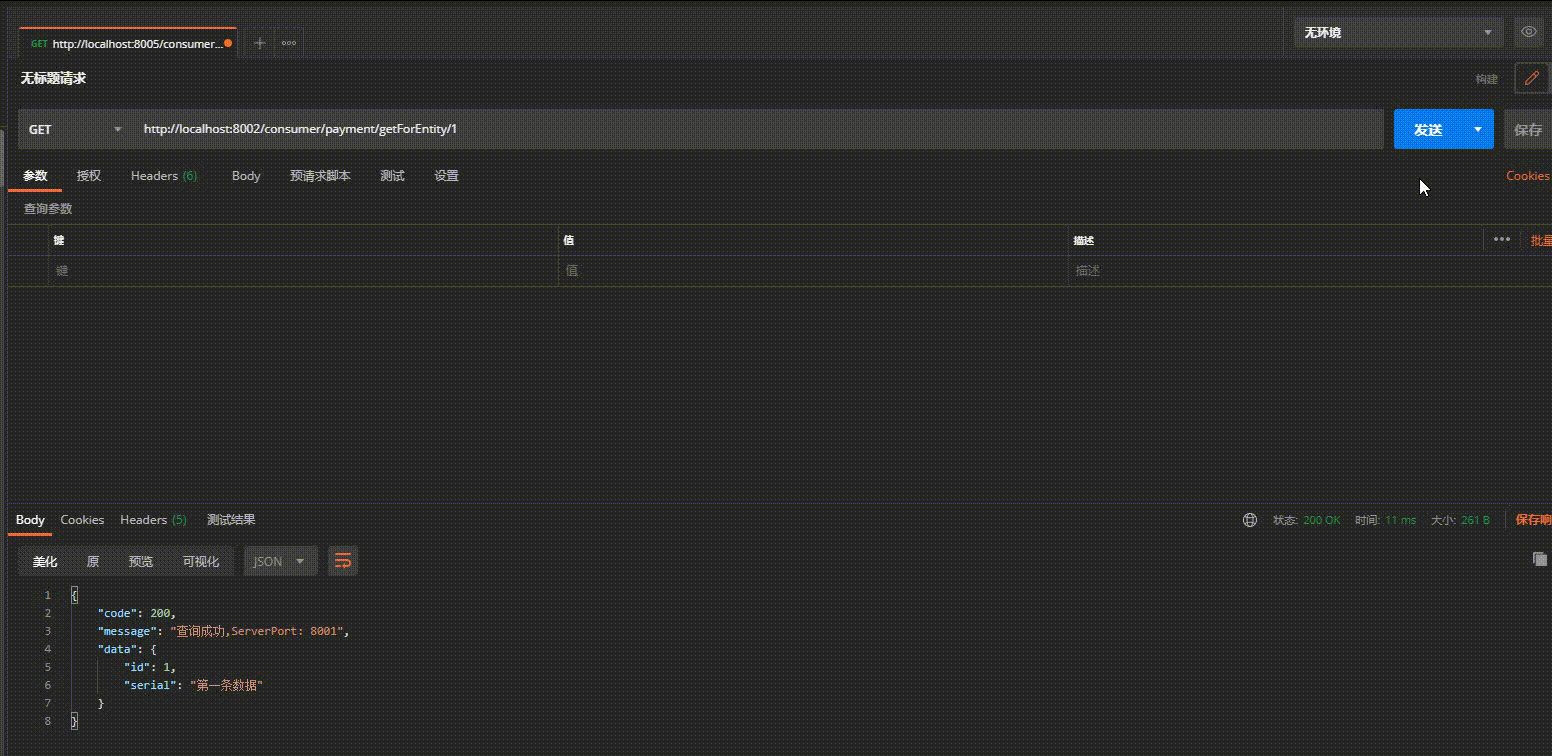
④、测试
4、核心组件IRule
根据特定算法从服务列表选择一个要访问的服务
①、IRule的主要实现类
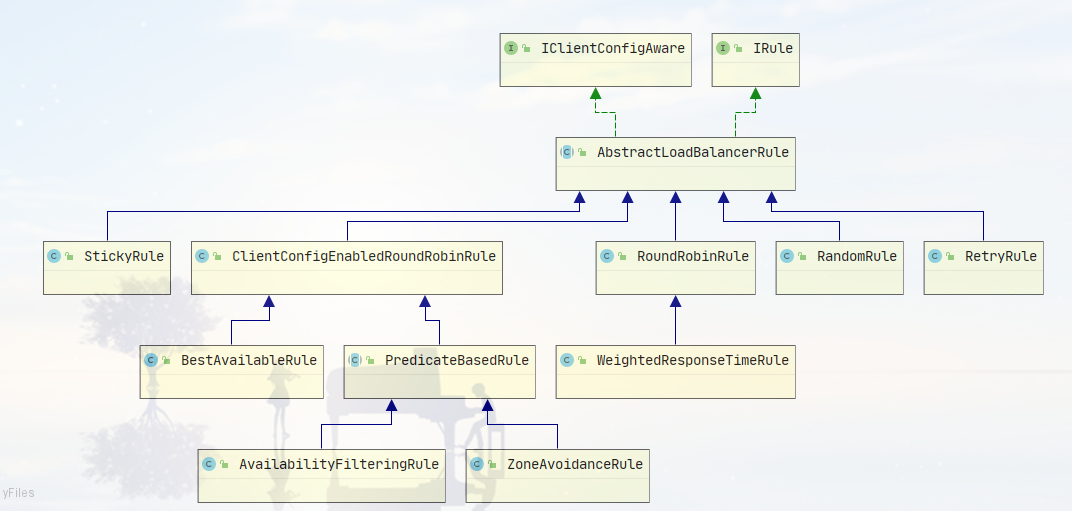
Ⅰ、RoundRobinRule
默认规则,轮询
Ⅱ、RandomRule
随机
Ⅲ、RetryRule
先按照
RoundRobinRule的策略获取服务,如果获取服务失败则再指定时间内重试,获取可用服务
Ⅳ、WeightResponseTimeRule
对
RoundRobinRule的扩展,响应速度越快的实例选择权重越大
Ⅴ、BestAvailableRule
会先过滤掉由于多次访问故障而处于断路器跳闸状态的服务,然后选择一个并发量最小的服务
Ⅵ、AvailabilityFilterRule
先过滤掉故障实例,再选择并发较小的实例
Ⅶ、ZoneAvoidanceRule
复合判断
server所在区域的性能和server的可用性选择服务器
②、如何替换?
官方文档明确给出了警告:
这个自定义配置类不能放在
@Componentscan所扫描的当前包下以及子包下,否则我们自定义的这个配置类就会被所有的Ribbon客户端所共享,达不到特殊化定制的目的了。(官方文档一般不说人话,大白话就是不能被SpringBoot主启动类扫描到,也就是层级比他高)
Ⅰ、新建MySelfRule规则类

/**
 * @author PengHuAnZhi
 * @createTime 2021/2/9 13:31
 * @projectName SpringCloudDemo
 * @className MySelfRule.java
 * @description TODO
 */
@Configuration
public class MySelfRule {
    @Bean
    public IRule myRule(){
        return new RandomRule();//定义为随机
    }
}
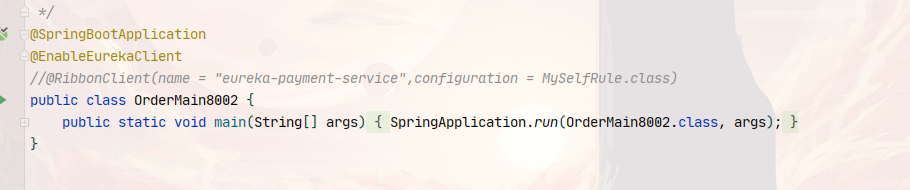
Ⅱ、主启动类添加规则
@RibbonClient声明指定的服务负载均衡的算法为自定义rule
/**
 * @author PengHuAnZhi
 * @createTime 2021/2/1 20:05
 * @projectName SpringCloudDemo
 * @className OrderMain80.java
 * @description TODO
 */
@SpringBootApplication
@EnableEurekaClient
@RibbonClient(name = "eureka-payment-service",configuration = MySelfRule.class)
public class OrderMain8002 {
    public static void main(String[] args) {
        SpringApplication.run(OrderMain8002.class, args);
    }
}
Ⅲ、测试
5、轮询算法原理
负载均衡算法:
rest接口第几次请求数 % 服务器集群总数量 = 实际调用服务器位置下标,每次服务重启动后rest接口计数从1开始.
1 % 2 = 1 =》 index = 1 list.get(index)
2 % 2 = 0 =》 index = 0 list.get(index)
3 % 2 = 1 =》 index = 1 list.get(index)
还记的
DiscoveryClient类吗?
List<ServiceInstance> instances = discoveryClient.getInstances("eureka-payment-service");
如:
List[0] instances = 127.0.0.1:8001
List[1] instances = 127.0.0.1:8002
- 8001 + 8002组合为一个集群,共计两台机器,按照轮询算法原理:
- 当总请求数为1时:
1 % 2 = 1对应下标位置为1,则获得服务地址为127.0.0.1:8001 - 当总请求数位2时:
2 % 2 = 0对应下标位置为0,则获得服务地址为127.0.0.1:8002 - 当总请求数位3时:
3 % 2 = 1对应下标位置为1,则获得服务地址为127.0.0.1:8001 - 当总请求数位4时:
4 % 2 = 0对应下标位置为0,则获得服务地址为127.0.0.1:8002
- 当总请求数为1时:
以此类推。。。
取消自定义rule配置后,测试:
6、轮询算法的源码
首先贴上IRule接口的源码
//
// Source code recreated from a .class file by IntelliJ IDEA
// (powered by Fernflower decompiler)
//

package com.netflix.loadbalancer;

public interface IRule {
    Server choose(Object var1);

    void setLoadBalancer(ILoadBalancer var1);

    ILoadBalancer getLoadBalancer();
}
可以看到有三个方法需要实现,再看看轮询算法类
RoundRobinRule类的源码
//
// Source code recreated from a .class file by IntelliJ IDEA
// (powered by Fernflower decompiler)
//

package com.netflix.loadbalancer;

import com.netflix.client.config.IClientConfig;
import java.util.List;
import java.util.concurrent.atomic.AtomicInteger;
import org.slf4j.Logger;
import org.slf4j.LoggerFactory;
//AbstractLoadBalancerRule类为IRule接口的实现类,而轮询算法RoundRobinRule又继承自AbstractLoadBalancerRule,这条线就通了
public class RoundRobinRule extends AbstractLoadBalancerRule {
    //原子整形类
    private AtomicInteger nextServerCyclicCounter;
    private static final boolean AVAILABLE_ONLY_SERVERS = true;
    private static final boolean ALL_SERVERS = false;
    private static Logger log = LoggerFactory.getLogger(RoundRobinRule.class);

    public RoundRobinRule() {
        this.nextServerCyclicCounter = new AtomicInteger(0);
    }

    public RoundRobinRule(ILoadBalancer lb) {
        this();
        this.setLoadBalancer(lb);
    }

    public Server choose(ILoadBalancer lb, Object key) {
        if (lb == null) {
            //如果没有添加负载均衡,则返回空
            log.warn("no load balancer");
            return null;
        } else {
            Server server = null;
            int count = 0;

            while(true) {
                if (server == null && count++ < 10) {
                    //获取活着的,健康的服务列表
                    List<Server> reachableServers = lb.getReachableServers();
                    //获取所有的服务列表
                    List<Server> allServers = lb.getAllServers();
                    int upCount = reachableServers.size();
                    int serverCount = allServers.size();
                    //如果可达的服务不为0,则才能对其轮询
                    if (upCount != 0 && serverCount != 0) {
                        //增加并获得下标,此方法被单独提取,在下面
                        int nextServerIndex = this.incrementAndGetModulo(serverCount);
                        //获取对应下标的服务
                        server = (Server)allServers.get(nextServerIndex);
                        if (server == null) {
                            Thread.yield();
                        } else {
                            if (server.isAlive() && server.isReadyToServe()) {
                                return server;
                            }

                            server = null;
                        }
                        continue;
                    }

                    log.warn("No up servers available from load balancer: " + lb);
                    return null;
                }

                if (count >= 10) {
                    log.warn("No available alive servers after 10 tries from load balancer: " + lb);
                }

                return server;
            }
        }
    }

    private int incrementAndGetModulo(int modulo) {
        int current;
        int next;
        do {
            //nextServerCyclicCounter为原子整形,初始设置了为0
            current = this.nextServerCyclicCounter.get();
            //取余算法
            next = (current + 1) % modulo;
            //compareAndSet为CAS和自旋锁的原理实现,当期望值与我们实际值相同,才会执行
        } while(!this.nextServerCyclicCounter.compareAndSet(current, next));

        return next;
    }

    public Server choose(Object key) {
        return this.choose(this.getLoadBalancer(), key);
    }

    public void initWithNiwsConfig(IClientConfig clientConfig) {
    }
}
7、手写一个负载均衡算法
①、注释@LoadBalanced
/**
 * @author PengHuAnZhi
 * @createTime 2021/2/1 20:14
 * @projectName SpringCloudDemo
 * @className ApplicationContextConfig.java
 * @description TODO
 */
@Configuration
public class ApplicationContextConfig {
    @Bean
//    @LoadBalanced//赋予了RestTemplate负载均衡的能力
    public RestTemplate getRestTemplate() {
        return new RestTemplate();
    }
}
②、定义CustomLoadBalanced接口
/**
 * @author PengHuAnZhi
 * @createTime 2021/2/9 20:50
 * @projectName SpringCloudDemo
 * @className CustomLoadBalanced.java
 * @description TODO
 */
public interface CustomLoadBalanced {
    ServiceInstance instances(List<ServiceInstance> serviceInstances);

}
③、实现CustomLoadBalancedImpl类
/**
* @author PengHuAnZhi
* @createTime 2021/2/9 20:52
* @projectName SpringCloudDemo
* @className CustomLoadBalancedImpl.java
* @description TODO
*/
@Component
public class CustomLoadBalancedImpl implements CustomLoadBalanced {
private AtomicInteger atomicInteger = new AtomicInteger(0);
public final int getAndIncrement() {
int current;
int next;
do {
current = this.atomicInteger.get();
next = current >= 2147483647 ? 0 : current + 1;
} while (!this.atomicInteger.compareAndSet(current, next));
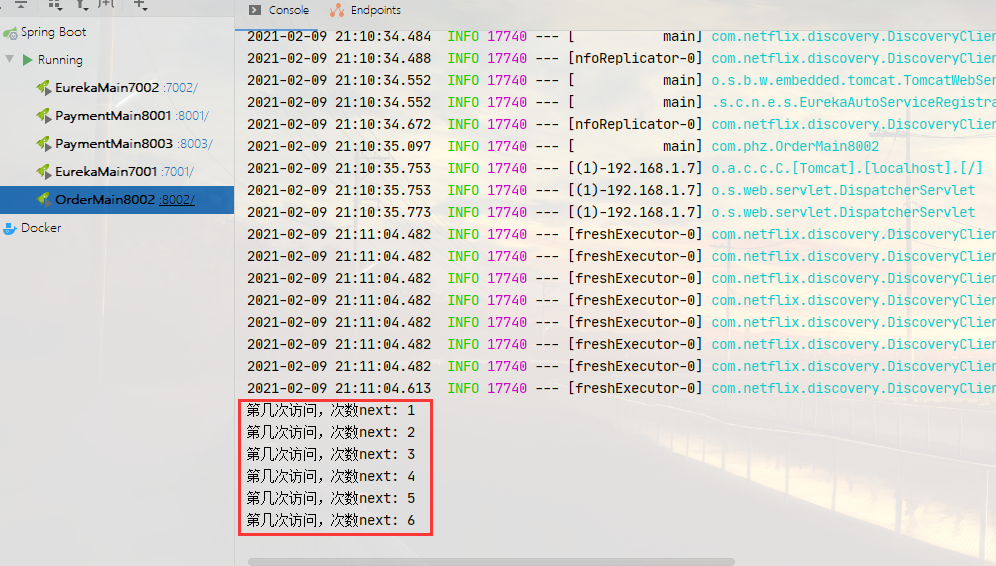
System.out.println("第几次访问,次数next: " + next);
return next;
}
@Override
public ServiceInstance instances(List<ServiceInstance> serviceInstances) {
int index = getAndIncrement() % serviceInstances.size();
return serviceInstances.get(index);
}
}
④、创建测试Controller
服务提供者新增一个方法
@GetMapping(value = "/payment/getServerPort")
public String getServerPort() {
    return serverPort;
}
服务消费者
/**
* @author PengHuAnZhi
* @createTime 2021/2/1 20:11
* @projectName SpringCloudDemo
* @className OrderController.java
* @description TODO
*/
@RestController
@Slf4j
public class OrderController {
private static final String PAYMENT_URL = "http://eureka-payment-service";
@Resource
RestTemplate restTemplate;
@Resource
private CustomLoadBalancedImpl customLoadBalanced;
@Resource
DiscoveryClient discoveryClient;
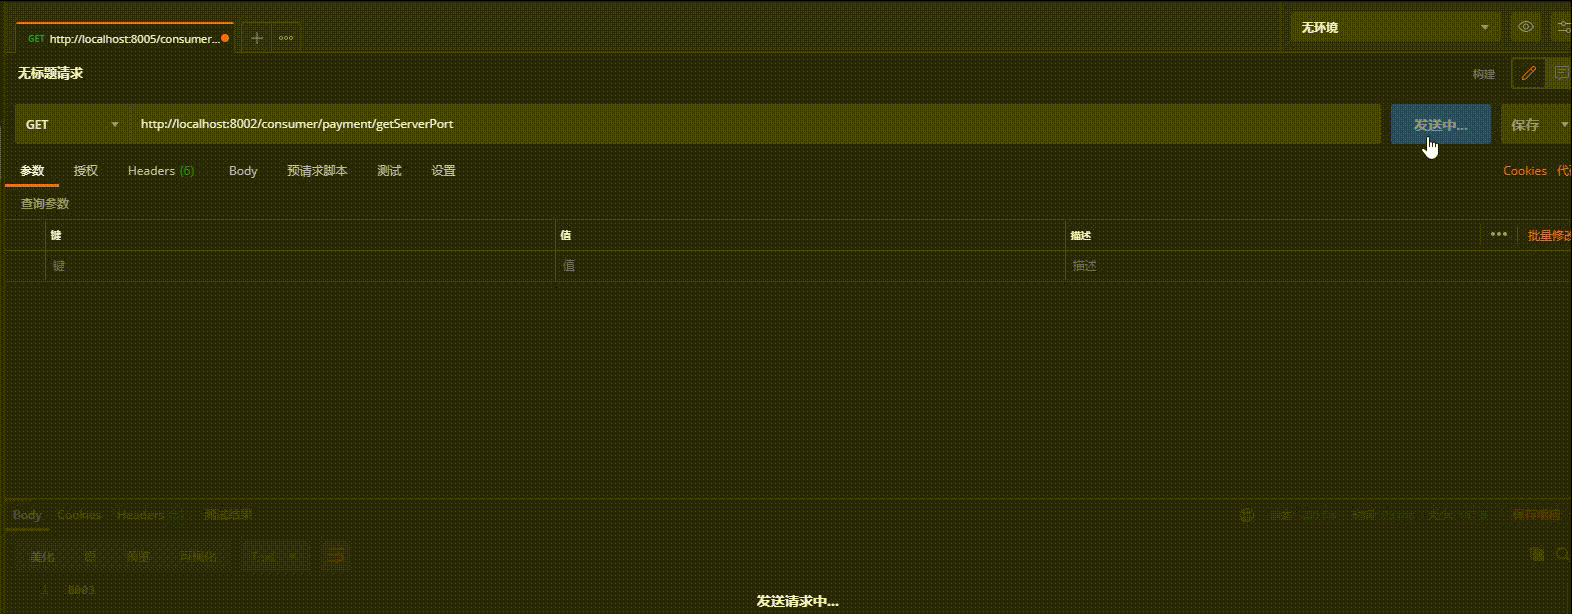
@GetMapping(value = "/consumer/payment/getServerPort")
public String getServerPort() {
List<ServiceInstance> instances = discoveryClient.getInstances("eureka-payment-service");
if (instances == null || instances.size() <= 0) {
return null;
}
ServiceInstance serviceInstance = customLoadBalanced.instances(instances);
URI uri = serviceInstance.getUri();
return restTemplate.getForObject(uri+"/payment/getServerPort", String.class);
}
}
⑤、测试


 1249
1249


 被折叠的 条评论
为什么被折叠?
被折叠的 条评论
为什么被折叠?
 到【灌水乐园】发言


