


第一章、Flink 安装部署与快速入门(xxbj)
一、flink概述
1、为什么选用flink?
不仅仅是一个高吞吐、低延迟的计算引擎,同时还提供很多高级的功能。:有状态的计算、支持强一致性语义以及至此基于Event Time的WaterMark对延迟或者乱序的数据进行处理
2、flink组件
- 物理部署层
- 本地、独立集群、yarn管理集群上、云上
- runtime核心层
- 该层为上层不同接口提供基础服务;也是flink分布式计算框架的核心实现层支持分布式stream作业的执行、jobgraph到executiongraph的映射转换、任务调度等。将datasteam和dataset转换成统一的可执行的task operator
- api&libraries层
- Flink 首先支持了 Scala 和 Java 的 API,Python 也正在测试中;
- DataStream、DataSet、Table、SQL API,作为分布式数据处理框架,Flink同时提供了支撑
流计算和批计算的接口,两者都提供给用户丰富的数据处理高级API
- 扩展库
- Flink 还包括用于复杂事件处理的CEP、机器学习库FlinkML、图处理库Gelly等。
3、flink四大基石
- checkpoint:检查点
- 基于chandy-lamport算法实现了一个分布式的一致性的快照,从而提供一致性的快照,从而提供了一致性的语义;
- 状态
- startapi:valuestate、liststate、mapstate,近期添加了broadcaststate
- Time
- 实现了watermark的机制,能够支持基于时间的时间处理,能够容忍迟到、乱序的数据
- window
- 滑动窗口、滚动窗口、会话窗口以及灵活的自定义的窗口
4.Event-driven Applications(什么是状态)
事件驱动型应用是一类具有状态的应用,它**从一个或者多个事件流提取数据,并根据到来的事件触发计算、状态更新或其他外部动作。**事件驱动型应用是基于状态化流处理来完成,数据和计算不会分离,应用只需要访问本地(内存或磁盘)即可获取数据。
5.Data Analytics Applications
数据分析任务需要从原始数据中提取有价值的信息和指标。
- batch analytics可以理解为周期性查询
- Batch Analytics 就是传统意义上使用类似于Map Reduce、Hive、Spark Batch 等,
对作业进行分析、处理、生成离线报表 - 比如Flink应用凌晨从Recorded Events中读取昨天的数据,然后做周期查询运算,最后
将数据写入Database或者HDFS,或者直接将数据生成报表供公司上层领导决策使用。
- Batch Analytics 就是传统意义上使用类似于Map Reduce、Hive、Spark Batch 等,
- Streaming analytics可以理解为连续性查询
- 比如实时展示双十一天猫销售GMV(Gross Merchandise Volume成交总额)
6.Data Pipeline Applications
- 什么是数据管道?
提取-转换-加载(ETL)是一种在存储系统之间进行数据转换和迁移的常用方法。
ETL 作业通常会周期性地触发,将数据从事务型数据库拷贝到分析型数据库或数据仓库。
数据管道是以持续流模式运行。数据管道支持从一个不断生成数据的源头读取记录,并将它们以低延迟移动到终点。
Data Pipeline 的核心场景类似于数据搬运并在搬运的过程中进行部分数据清洗或者处理,
7.支持事件时间(Event Time)
在流式计算领域中,窗口计算的重要,大多框架窗口计算采用的都是系统时间(Process Time),也就是时间传输到计算框架处理时,系统主机的当前时间。
解决问题:及时乱序到达延迟到达,避免网络传输或者系统的影响
7、支持有状态计算
状态:流式计算过程中将算子的中间结果保存在内存或则文件系统中,等下一个时间进入算子后可以从之前的状态中获取中间结果,计算当前的结果,从而无需每次都基于全部的原始数据来统计结果,状态以为着应用可以维护随时间推移已经产生的数据聚合。
8、支持高度灵活的窗口(window)操作
Flink 将窗口划分为基于 Time 、Count 、Session、以及Data-Driven等类型的窗口操作,
窗口可以用灵活的触发条件定制化来达到对复杂的流传输模式的支持,用户可以定义不同的窗口
触发机制来满足不同的需求;
9、流计算、批处理主要区别是:
- 流计算:立即计算、数据持续流动、计算完后就丢弃
- 批量计算是维护一张表,对表进行实施各种计算逻辑。流式计算相反。必须定义好计算逻辑,提交到流式计算系统,这个计算作业逻辑在整个运行期间是不可更改的
- 计算结果上,批量计算对全部数据进行计算后传输结果,流式计算是每次小批量计算后,结果可以立即实时话展现
10、flink实现流计算批处理
在执行引擎这一层,流处理系统与批处理系统最大不同在于节点间的数据传输方式:
1、对于一个流处理系统,其节点间数据传输的标准模型是:当一个数据被处理完成后,序列化到缓存中,然后立即通过网络传输到下一个节点,由下一个节点继续处理;
2、批处理:当一个数据被处理完成后,序列化到缓存中,并不会立即通过网络传输到下一个节点,当缓存写满,就持续化到本地磁盘上,当所有数据都处理完成后,才开始将处理后的数据通过网络传输到下一个节点;
11、flink如何实现流批一体
flink以固定的缓存块为单位进行网络数据传输,可以通过设置缓存块超时值指定缓存块的传输时机。
-
缓存块的超时值:0,则flink的数传输方式(当一条数据被处理完成后,序列化到缓存中,然后立刻通过网络传输到下一个节点,由下一个节点继续处理),此时系统可以获得最低的处理延迟;
-
缓存块的超时值为无限大、-1,(当一条数据被处理完成后,序列化到缓存中,并不会立刻通过网络传输到下一个节点,当缓存写满,就持久化到本地硬盘上,当所有数据都被处理完成后,才开始将处理后的数据通过网络传输到下一个节点)此时系统可以获得最高的吞吐量
-
超时值的为任意值,缓存块的超时阈值越小,flink流处理执行引擎的数据处理延迟越低,吞吐量会降低
二、flink安装部署
2.1、Flink支持多种安装模式
-
Local:本地单机模式,学习测试时使用
-
Standalone:独立集群模式,Flink 自带集群,开发测试环境使用
-
Standalone HA:独立集群高可用模式,Flink自带集群,开发测试及生产环境使用
-
On yarn:计算资源统一由hadoop yarn管理,生产环境使用
2.2、应用运行框架
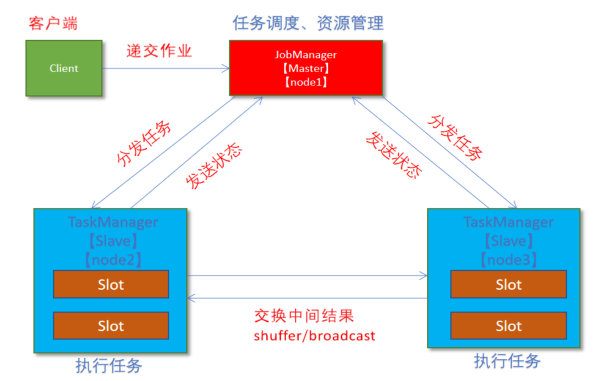
Flink应用程序运行时,应用提交、资源申请与任务分配、任务执行
- FlinkClink:提交job的客户端,可以是运行在任何机器上(与jobmanager环境连接即可)。提交job后,client可以结束进程(streaming的任务),也可以不结束并等待结果返回。(MapReduce Clinet:yarn jar hadoop-mapreduce.jar WordCount input out)
- jobManager:只要负责调度job并协调Task做checkpoint。从Client处接收到job和jar包等资源后,会生成优化后执行计划,并以Task为单元调度到各个TaskManager执行。(ResourceManager和ApplicationMaster或jobTracker)
- TaskManager:在启动的时候已经设置好槽位数(Slot),每个slot能启动一个Task,Task为线程。从jobManager处接收需要部署的Task,部署启动后,与自己的上游建立连接并收数据处理
附录:MapReduce 1.0架构组成
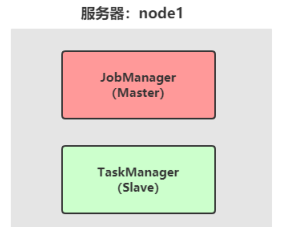
2.3Local Cluster本地集群
Flink应用运行LocalCluster本地集群环境,于hadoop框架伪分布式环境类似,所有进程process运行在一台机器上,针对Flink框架来说,进程分为jobManager(主节点,管理者)和TaskManager(从节点,干活)
https://ci.apache.org/projects/flink/flink-docs-release-1.10/ops/deployment/cluster_setup.html#requirements
2.3.1原理
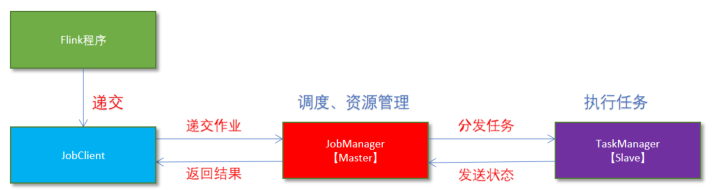
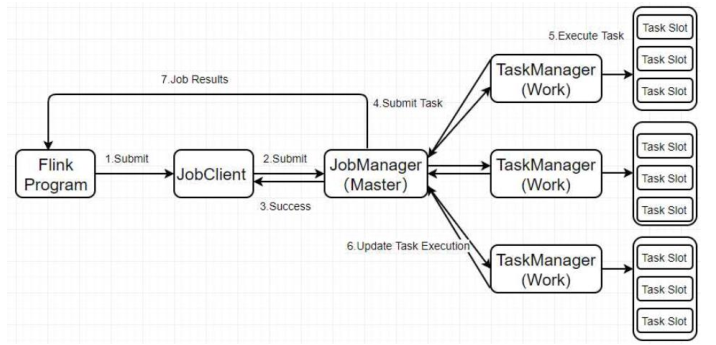
1.Flink程序有JobClient进行提交
2.jobClinet将作业提交给JobManager
3.jobManager负责协调资源分配和作业执行。资源分配完成后,任务将提交给响应的TaskManager
4.TaskManager启动一个线程以开始执行。TaskManager会向jobManager报告状态更改,如何开始执行,正在进行或者已完成。
5.作业执行完成后结果将发送回客户端(jobClient)
2.3.2操作
1.下载安装包
https://archive.apache.org/dist/flink/flink-1.10.0/
2.上传flink-1.10.0-bin-scala_2.11.tgz到node1的指定目录
3.解压
tar -zxvf flink-1.10.0-bin-scala_2.11.tgz
chown -R root:root /export/server/flink-1.10.0/
4.创建软连接
ln -s flink-1.10.0 flink
2.3.3测试
1)、批处理:Scala-shell
1、启动shell交互式窗口
/export/server/flink/bin/start-scala-shell.sh local
2.准备文件/root/words.txt
vim /root/words.txt
flink flink spark spark flink hadoop
flink spark spark
flink hadoop flink
flink spark flink
3.执行如下命令
benv.readTextFile("/root/words.txt").flatMap(_.split("//s+")).map((_,1)).groupBy(0).sum(1).print()
4.退出shell
:quit
2)、本地集群启动与停止
1、启动Flink本地集群
/export/server/flink/bin/start-cluster.sh
2.使用jps可以查看到下边两个进程
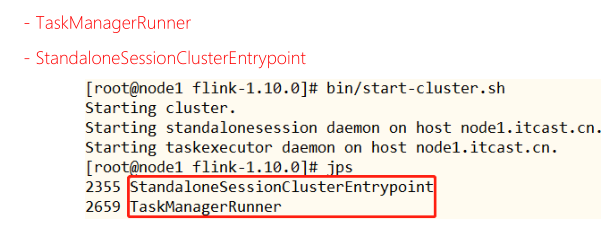
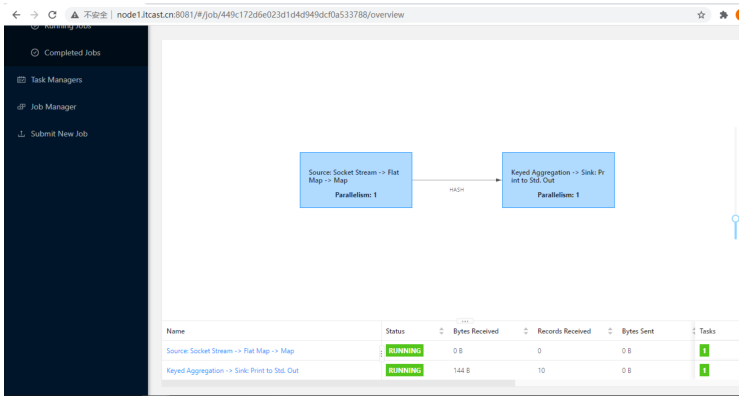
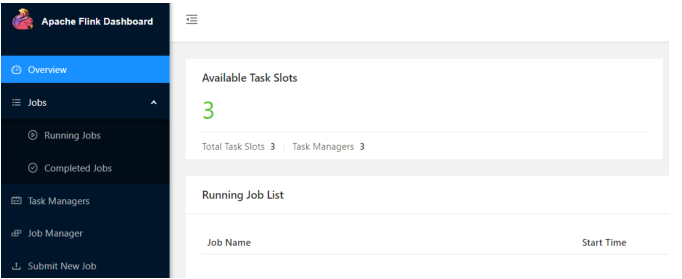
3.访问Flink的Web UI: http://node1.itcast.cn:8081/#/overview
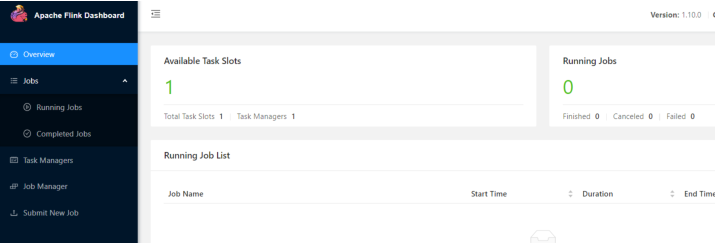
slot在Flink里面可以认为是资源组,Flink是通过将任务(Task)分成子任务(subTask)并且将这些子任务分配到slot来并行执行程序
3.停止Flink
/export/server/flink/bin/stop-cluster.sh
3)、批处理:WordCount
词频统计WordCount、打印控制台
/export/server/flink/bin/flink run /export/server/flink/examples/batch/WordCount.jar --input /root/words.txt
打印输出文件:
/export/server/flink/bin/flink run /export/server/flink/examples/batch/WordCount.jar --input /root/words.txt --output /root/out.txt
4)、流处理:WordCount
运行流式计算程序,从TCP Socket 读取数据,进行词频统计(类似StructuredStreaming)
# 开启终端
nc -lk 9999

# 上传jar包至/export/server/flink目录
cd /export/server/flink
rz

# 开启终端,运行流式应用
bin/flink run --class cn.itcast.flink.StreamWordCount /export/server/flink/StreamWordCount.jar --host node1.itcast.cn --port 9999
监控页面查看日志信息数据
2.4Standalone独立集群
Standalone集群类似Hadoop YARN集群,管理集群资源和分配资源给Flink 应用运行任务Task
2.4.1原理
1.client客户端提交任务给jobmanager
2.jobmanager 负责申请任务运行所需要资源并管理任务和资源
3.jobmanager分发任务给TaskManager执行
4.TaskManager定期向jobManager汇报状态
2.4.2操作
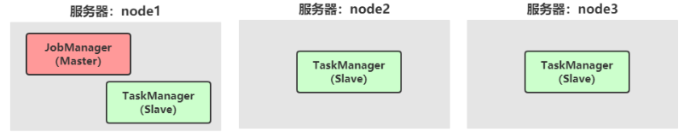
1.集群规划:
-服务器:node1(master+slave):JobManager+TaskManager
-服务器:node2(slave):TaskManager
-服务器:node3(slave):TaskManager

2.修改flink-conf.yaml
vim /export/server/flink/conf/flink-conf.yaml
jobmanager.rpc.address:node1.itcast.cn
3.修改masters
vim /export/server/flink/conf/masters
node1.itcast.cn:8081
4.修改slaves
vim /export/server/flink/conf/slaves
node1:itcast.cn
node2:itcast.cn
node3:itcast.cn
5.添加HADOOP_CONF_DIR环境变量(集群所有机器)
vim /etc/proflie
export HADOOP_CONF_DIR=/export/server/hadoop/etc/hadoop
source /etc/proflie
6.将flink依赖Hadoop框架jar包上传至FLINK_HOME/bin目录

7.分发
scp -r /export/server/flink root@node2:itcast.cn:/export/server
scp -r /export/server/flink root@node2:itcast.cn:/export/server
2.4.3测试
1.启动HDFS集群,在node1上执行如下命令
hadoop-daemon.sh start namenode
hadoop-daemons.sh start datanode
2.启动集群,在node1上执行如下命令
/export/server/flink/bin/start-cluster.sh
或则单独启动
/export/server/flink/bin/jobmanager.sh ((start|start-foreground) cluster)|stop|stop-all
/export/server/flink/bin/taskmanager.sh start|start-foreground|stop|stop-all
3.访问Flink UI 界面或使用jps 查看
http://node1.itcast.cn:8081/#/overview
TaskManager界面:可以查看到当前Flink集群中有多少个TaskManager,每个TaskManager的slots、内存、cpu core是多少
4.执行官方测试案例
hdfs dfs -mkdir -p /wordcount/input
hdfs dfs -put /root/words.txt /wordcount/input

/export/server/flink/bin/flink run /export/server/flink/examples/batch/WordCount.jar \
--input hdfs://node1.itcast.cn:8020/wordcount/input/words.txt

/export/server/flink/bin/flink run /export/server/flink/examples/batch/WordCount.jar \
--input hdfs://node1.itcast.cn:8020/wordcount/input/words.txt \
--output hdfs://node1.itcast.cn:8020/wordcount/output/result.txt \
--parallelism 2
web ui 截图
2.5 Standalone HA 高可用集群
搭建flinl的HA模式;
(如果是部署在YARN上,部署YARN的HA),演示如何搭建Standalone HA模式
2.5.1原理
1.client客户端提交job到jobmanager
2.jobmanager为job分配资源将任务分给TaskManager
3.zookeeper 监控jobmanager;taskmanager执行task并行jobmanager汇报状态
在zookeeper的协助下,一个standalone的flink集群会同时有多个活着的jobmanager,其中只有一个处于Active工作状态,其他处于standby状态。当工作中的JobManager 失去连接(宕机、crash),zookeeper会从standby中中选一个jobmanager来接管fink集群
2.5.2操作
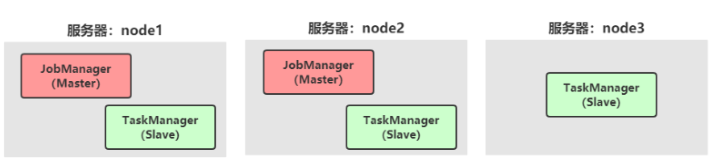
1.集群规划
-服务器:node1(Master+Slave):JobManager+TaskManager
-服务器:node2(Master+Slave):JobManager+TaskManager
-服务器:node3(Slave):TaskManager
2.启动zookeeper
zookeeper-daemons.sh start
3.启动HDFS
hadoop-daemon.sh start namenode
hadoop-daemons.sh start datanode
4.停止集群
/export/server/flink/bin/stop-cluster.sh
5.修改flink-conf.yaml
vim /export/server/flink/conf/flink-conf.yaml
增加如下内容:
state.backend: filesystem
state.backend.fs.checkpointdir: hdfs://node1.itcast.cn:8020/flink-checkpoints
state.savepoints.dir: hdfs://node1.itcast.cn:8020/flink-savepoints
high-availability: zookeeper
high-availability.storageDir: hdfs://node1.itcast.cn:8020/flink-ha/
high-availability.zookeeper.quorum: node1.itcast.cn:2181.itcast.cn,node2:2181,node3.itcast.cn:2181
配置解释如下:
#开启HA,使用文件系统作为快照存储
state.backend: filesystem
#启用检查点,可以将快照保存到HDFS
state.backend.fs.checkpointdir: hdfs://node1.itcast.cn:8020/flink-checkpoints
#使用zookeeper搭建高可用
high-availability: zookeeper
# 存储JobManager的元数据到HDFS
high-availability.storageDir: hdfs://node1.itcast.cn:8020/flink-ha/
# 配置ZK集群地址
high-availability.zookeeper.quorum: node1.itcast.cn:2181,node2.itcast.cn:2181,node3.itcast.cn:2181
6.修改masters
vim /export/server/flink/conf/masters
node1.itcast.cn:8081
node2.itcast.cn:8081
7.同步配置文件
scp -r /export/server/flink/conf/flink-conf.yaml node2.itcast.cn:/export/server/flink/conf/
scp -r /export/server/flink/conf/flink-conf.yaml node3.itcast.cn:/export/server/flink/conf/
scp -r /export/server/flink/conf/masters node2.itcast.cn:/export/server/flink/conf/
scp -r /export/server/flink/conf/masters node3.itcast.cn:/export/server/flink/conf/
8.修改node2上的flink-conf.yaml
vim /export/server/flink/conf/flink-conf.yaml

jobmanager.rpc.address:node2.itcast.cn
9.重新启动Flink集群,node1上执行
/export/server/flink/bin/start-cluster.sh
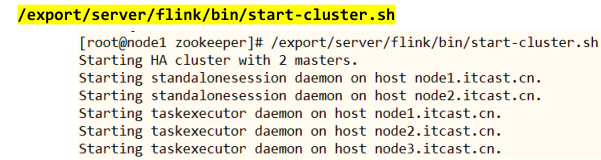
10.使用jps命令查看
发现没有flink相关进程被启动

11.下载jar包并在flink的lib目录下放入该jar包并分发使flink能够支持对hadoop的操作因为在flink1.8版本后,link官方提供的安装包里没有整合hdfs的jar
https://flink.apache.org/downloads.html
https://repo.maven.apache.org/maven2/org/apache/flink/flink-shaded-hadoop-2-
uber/2.7.5-10.0/flink-shaded-hadoop-2-uber-2.7.5-10.0.jar
2.5.3测试
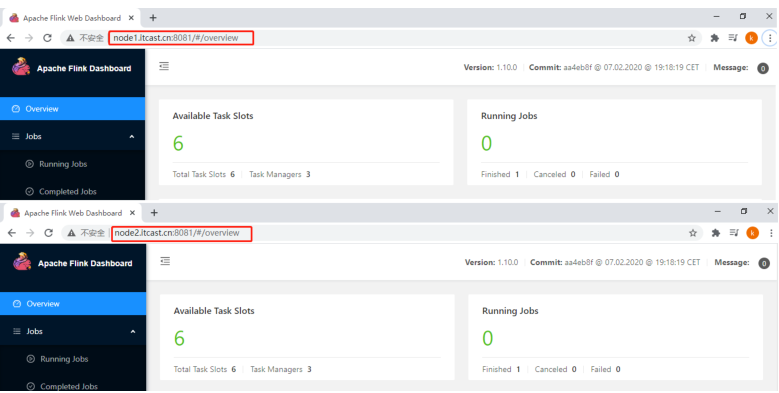
1.访问webUI:
http://node1:itcast.cn:8081/#/overview
http://node2:itcast.cn:8081/#/overview
执行wc
/export/server/flink/bin/flink run /export/server/flink/examples/batch/WordCount.jar \
--input hdfs://node1.itcast.cn:8020/wordcount/input/words.txt
3.kill掉其中一个master
4.重新执行wc,还是可以正常执行
/export/server/flink/bin/flink run /export/server/flink/examples/batch/WordCount.jar \
--input hdfs://node1.itcast.cn:8020/wordcount/input/words.txt
2.6flink on yarn
为了最大化的利用集群资源,一般都会在一个集群中同时运行多种类型的Workload,因此 Flink 也支持在 Yarn 集群运行。flink on yarn前提:HDFS、YARN均启动。
2.6.1原理
1)为什么使用flink on yarn?
:
-1yarn的资源可以按照需使用,提高集群的资源利用率
-2yarn的任务有优先级,根据优先级运行作业
-3基于yarn调度系统,能自动化的处理各个角色的failover(容错)
当flink on yarn运行时,特点:
jobmanager进程和TaskManager进程都由yarn nodemanager监控
如果jobmanager进程异常退出,则yarn resurcemanager会从新调用jobmanager到其他机器;
如果taskmanager进程异常退出,jobmanager会收到消息并重新向yarn resourcemanager申请资源,重新启动taskmanager
2)、flink如何与yarn进行交互?
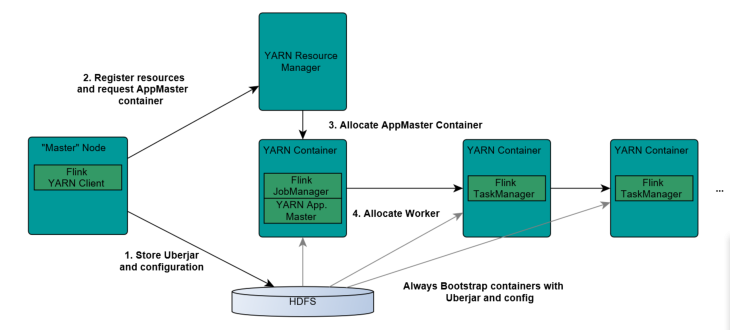
1.client上传jar包和配置文件到hdfs集群上
2.client向yarn resourcemanager提交任务并申请资源
3.resourcemanager分配container资源并启动applicationmaster,然后appmaster加载flink的jar包和配置构建环境,启动jobmanager
- jobmanager和applicationmaster运行在同一个container上;
- 一旦他们被成功启动appmaster就知道jobmanager的地址(am它自己所在的机器
- )
- 它就会为TaskManager生成一个新的Flink配置文件(他们就可以连接到JobManager);这
个配置文件也被上传到HDFS上; - 此外,AppMaster容器也提供了Flink的web服务接口;
- YARN所分配的所有端口都是临时端口,这允许用户并行执行多个Flink
4.ApplicationMaster向ResourceManager申请工作资源,NodeManager加载Flink的Jar包和配置
构建环境并启动TaskManage
5.TaskManager启动后向JobManager发送心跳包,并等待JobManager向其分配任务
2.6.2两种方式
1)、Session 会话模式
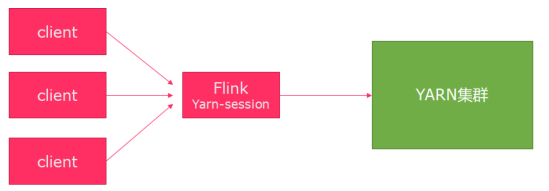
特点:需要事先申请资源,启动jobmanager和taskmanager
优点:不需要每次申请资源,而是使用已经申请好的资源,从而提高执行效率
缺点:作业执行完成以后,资源不会被释放,一直会占用系统资源
应用场景:适合作业提交比较频繁的场景,小作业比较多的场景
2)、job分离模式
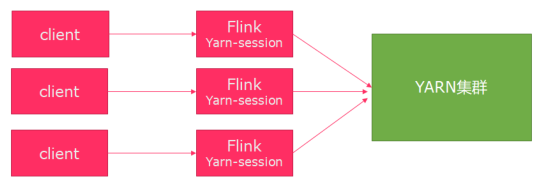
特点:每次提交作业都需要申请一次资源
优点:作业运行完成,资源会立刻被释放,不会一直占用系统资源
缺点:每次提交作业都需要申请资源,会影响执行效率,因为申请资源需要耗费时间
应该场景:适合作业比较少的场景、大作业的场景
2.6.3操作
1、关闭yarn的内存检测
vim /export/server/hadoop/etc/hadoop/yarn-site.xml
添加:
<!-- 关闭yarn内存检查 -->
<property>
	<name>yarn.nodemanager.pmem-check-enabled</name>
	<value>false</value>
</property>
<property>
	<name>yarn.nodemanager.vmem-check-enabled</name>
	<value>false</value>
</property>
- 是否启动一个线程检查每个人物正在使用虚拟内存量,如果任务超出分配值,则直接将其杀掉,默认为true
- 此处需要关闭,因为对于flink使用yarn模式下,很容易内存超标,这个时候yarn会自动杀掉job
2.同步
cd /export/server/hadoop/etc/hadoop
scp -r yarn-site.xml root@node2.itcast.cn:$PWD
scp -r yarn-site.xml root@node3.itcast.cn:$PWD
3.重启YARN
/export/server/hadoop/sbin/stop-yarn.sh
/export/server/hadoop/sbin/start-yarn.sh
2.6.4测试
1)、session会话模式
yarn-session.sh(开辟资源)+flink run(提交任务)
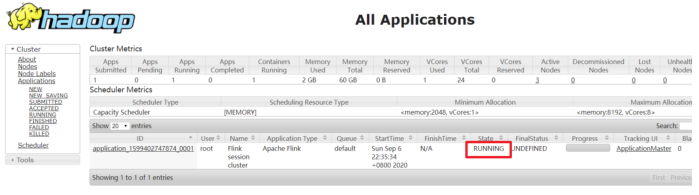
1、在yarn上启动一个Flink会话,node1上执行以下命令
/export/server/flink/bin/yarn-session.sh -d -jm 1024 -tm 1024 -s 2
说明:
# -tm :每个taskmanager的内存大小
# -s :每个taskmanager的slots数量
# -d :表示以后台程序方式运行
附录:yarn-session 命令使用帮助
[root@node1 ~]# /export/server/flink/bin/yarn-session.sh --help
Usage:
Optional
-at,--applicationType <arg> Set a custom application type for the application on YARN
-D <property=value> use value for given property
-d,--detached If present, runs the job in detached mode
-h,--help Help for the Yarn session CLI.
-id,--applicationId <arg> Attach to running YARN session
-j,--jar <arg> Path to Flink jar file
-jm,--jobManagerMemory <arg> Memory for JobManager Container with optional unit (default: MB)
-m,--jobmanager <arg> Address of the JobManager (master) to which to connect. Use this flag to
connect to a different JobManager than the one specified in the configuration.
-nl,--nodeLabel <arg> Specify YARN node label for the YARN application
-nm,--name <arg> Set a custom name for the application on YARN
-q,--query Display available YARN resources (memory, cores)
-qu,--queue <arg> Specify YARN queue.
-s,--slots <arg> Number of slots per TaskManager
-t,--ship <arg> Ship files in the specified directory (t for transfer)
-tm,--taskManagerMemory <arg> Memory per TaskManager Container with optional unit (default: MB)
-yd,--yarndetached If present, runs the job in detached mode (deprecated; use non-YARN specific
option instead)
-z,--zookeeperNamespace <arg> Namespace to create the Zookeeper sub-paths for high availability mode
2.查看ui界面
http://node1.itcast.cn:8088/cluster
3.使用flink run提交任务:
/export/server/flink/bin/flink run /export/server/flink/examples/batch/WordCount.jar \
--input hdfs://node1.itcast.cn:8020/wordcount/input
运行完之后可以继续运行其他的小任务
/export/server/flink/bin/flink run /export/server/flink/examples/batch/WordCount.jar
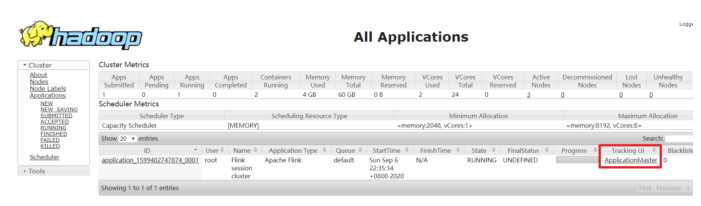
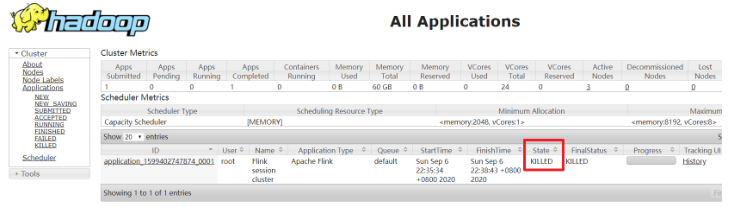
4.通过上方的Applicationmaster可以进入flink的管理界面
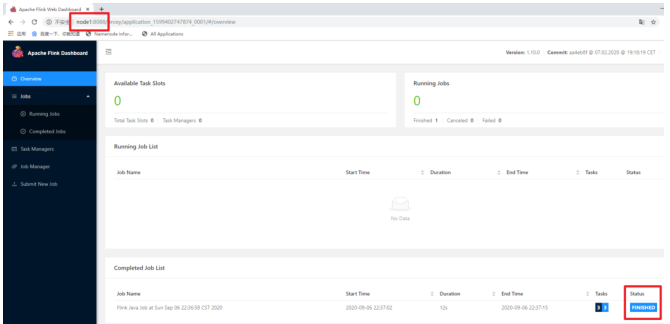
5.关闭yarn-session:
yarn application -kill application_1599402747874_0001
删除运行临时文件
rm -rf /tmp/.yarn-properties -root
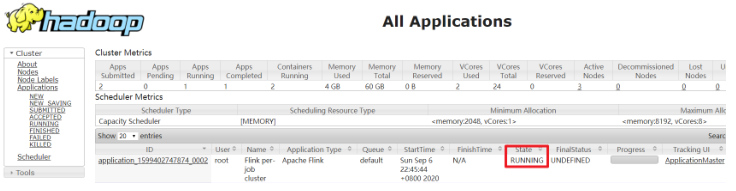
2)、job 分离模式
1、直接提交job
/export/server/flink/bin/flink run -m yarn-cluster -yjm 1024 -ytm 1024 /export/server/flink/examples/batch/WordCount.jar
# -m jobmanager的地址
# -yjm 1024 指定jobmanager的内存信息
# -ytm 1024 指定taskmanager的内存信息
2.查看UI界面
http://node1.itcast.cn:8088/cluster
3.注意
在之前版本中如果使用的是flink on yarn方式,想切换回standalone模式的话,如果报错需要
删除:【/tmp/.yarn-properties-root】
rm -rf /tmp/.yarn-properties-root
因为默认查找当前yarn集群中已有的yarn-session信息中的jobmanage
2.5.5 参数总结
[root@node1 bin]# flink --help
./flink [OPTIONS] [ARGUMENTS]
The following actions are available:
Action “run” compiles and runs a program.
Syntax: run [OPTIONS]
“run” action options:
-c,–class Class with the program entry point
(“main()” method). Only needed if the
JAR file does not specify the class in
its manifest.
-C,–classpath Adds a URL to each user code
classloader on all nodes in the
cluster. The paths must specify aprotocol (e.g. file://) and be
accessible on all nodes (e.g. by means
of a NFS share). You can use this
option multiple times for specifying
more than one URL. The protocol must
be supported by the {@link
java.net.URLClassLoader}.
-d,–detached If present, runs the job in detached
mode
-n,–allowNonRestoredState Allow to skip savepoint state that
cannot be restored. You need to allow
this if you removed an operator from
your program that was part of the
program when the savepoint was
triggered.
-p,–parallelism The parallelism with which to run the
program. Optional flag to override the
default value specified in the
configuration.
-py,–python Python script with the program entry
point. The dependent resources can be
configured with the--pyFiles
option.
-pyarch,–pyArchives Add python archive files for job. The
archive files will be extracted to the
working directory of python UDF
worker. Currently only zip-format is
supported. For each archive file, a
target directory be specified. If the
target directory name is specified,
the archive file will be extracted to
a name can directory with the
specified name. Otherwise, the archive
file will be extracted to a directory
with the same name of the archive
file. The files uploaded via this
option are accessible via relative
path. ‘#’ could be used as the
separator of the archive file path and
the target directory name. Comma (’,’)
could be used as the separator to
specify multiple archive files. This
option can be used to upload the
virtual environment, the data files
used in Python UDF (e.g.: --pyArchives
file:///tmp/py37.zip,file:///tmp/data.
zip#data --pyExecutable
py37.zip/py37/bin/python). The data
files could be accessed in Python UDF,
e.g.: f = open(‘data/data.txt’, ‘r’).
-pyexec,–pyExecutable Specify the path of the python
interpreter used to execute the python
UDF worker (e.g.: --pyExecutable
/usr/local/bin/python3). The python
UDF worker depends on Python 3.5+,
Apache Beam (version == 2.15.0), Pip(version >= 7.1.0) and SetupTools
(version >= 37.0.0). Please ensure
that the specified environment meets
the above requirements.
-pyfs,–pyFiles Attach custom python files for job.
These files will be added to the
PYTHONPATH of both the local client
and the remote python UDF worker. The
standard python resource file suffixes
such as .py/.egg/.zip or directory are
all supported. Comma (’,’) could be
used as the separator to specify
multiple files (e.g.: --pyFiles
file:///tmp/myresource.zip,hdfs:///$na
menode_address/myresource2.zip).
-pym,–pyModule Python module with the program entry
point. This option must be used in
conjunction with--pyFiles.
-pyreq,–pyRequirements Specify a requirements.txt file which
defines the third-party dependencies.
These dependencies will be installed
and added to the PYTHONPATH of the
python UDF worker. A directory which
contains the installation packages of
these dependencies could be specified
optionally. Use ‘#’ as the separator
if the optional parameter exists
(e.g.: --pyRequirements
file:///tmp/requirements.txt#file:///t
mp/cached_dir).
-s,–fromSavepoint Path to a savepoint to restore the job
from (for example
hdfs:///flink/savepoint-1537).
-sae,–shutdownOnAttachedExit If the job is submitted in attached
mode, perform a best-effort cluster
shutdown when the CLI is terminated
abruptly, e.g., in response to a user
interrupt, such as typing Ctrl + C.
Options for yarn-cluster mode:
-d,–detached If present, runs the job in detached
mode
-m,–jobmanager Address of the JobManager (master) to
which to connect. Use this flag to
connect to a different JobManager than
the one specified in the
configuration.
-yat,–yarnapplicationType Set a custom application type for the
application on YARN
-yD <property=value> use value for given property
-yd,–yarndetached If present, runs the job in detached
mode (deprecated; use non-YARN
specific option instead)
-yh,–yarnhelp Help for the Yarn session CLI.
-yid,–yarnapplicationId Attach to running YARN session
-yj,–yarnjar Path to Flink jar file
-yjm,–yarnjobManagerMemory Memory for JobManager Container withoptional unit (default: MB)
-ynl,–yarnnodeLabel Specify YARN node label for the YARN
application
-ynm,–yarnname Set a custom name for the application
on YARN
-yq,–yarnquery Display available YARN resources
(memory, cores)
-yqu,–yarnqueue Specify YARN queue.
-ys,–yarnslots Number of slots per TaskManager
-yt,–yarnship Ship files in the specified directory
(t for transfer)
-ytm,–yarntaskManagerMemory Memory per TaskManager Container with
optional unit (default: MB)
-yz,–yarnzookeeperNamespace Namespace to create the Zookeeper
sub-paths for high availability mode
-z,–zookeeperNamespace Namespace to create the Zookeeper
sub-paths for high availability mode
Options for executor mode:
-D <property=value> Generic configuration options for
execution/deployment and for the configured executor.
The available options can be found at
https://ci.apache.org/projects/flink/flink-docs-stabl
e/ops/config.html
-e,–executor The name of the executor to be used for executing the
given job, which is equivalent to the
“execution.target” config option. The currently
available executors are: “remote”, “local”,
“kubernetes-session”, “yarn-per-job”, “yarn-session”.
Options for default mode:
-m,–jobmanager Address of the JobManager (master) to which
to connect. Use this flag to connect to a
different JobManager than the one specified
in the configuration.
-z,–zookeeperNamespace Namespace to create the Zookeeper sub-paths
for high availability mode
Action “info” shows the optimized execution plan of the program (JSON).
Syntax: info [OPTIONS]
“info” action options:
-c,–class Class with the program entry point
(“main()” method). Only needed if the JAR
file does not specify the class in its
manifest.
-p,–parallelism The parallelism with which to run the
program. Optional flag to override the
default value specified in the
configuration.
Action “list” lists running and scheduled programs.Syntax: list [OPTIONS]
“list” action options:
-a,–all Show all programs and their JobIDs
-r,–running Show only running programs and their JobIDs
-s,–scheduled Show only scheduled programs and their JobIDs
Options for yarn-cluster mode:
-m,–jobmanager Address of the JobManager (master) to
which to connect. Use this flag to connect
to a different JobManager than the one
specified in the configuration.
-yid,–yarnapplicationId Attach to running YARN session
-z,–zookeeperNamespace Namespace to create the Zookeeper
sub-paths for high availability mode
Options for executor mode:
-D <property=value> Generic configuration options for
execution/deployment and for the configured executor.
The available options can be found at
https://ci.apache.org/projects/flink/flink-docs-stabl
e/ops/config.html
-e,–executor The name of the executor to be used for executing the
given job, which is equivalent to the
“execution.target” config option. The currently
available executors are: “remote”, “local”,
“kubernetes-session”, “yarn-per-job”, “yarn-session”.
Options for default mode:
-m,–jobmanager Address of the JobManager (master) to which
to connect. Use this flag to connect to a
different JobManager than the one specified
in the configuration.
-z,–zookeeperNamespace Namespace to create the Zookeeper sub-paths
for high availability mode
Action “stop” stops a running program with a savepoint (streaming jobs only).
Syntax: stop [OPTIONS]
“stop” action options:
-d,–drain Send MAX_WATERMARK before taking the
savepoint and stopping the pipelne.
-p,–savepointPath Path to the savepoint (for example
hdfs:///flink/savepoint-1537). If no
directory is specified, the configured
default will be used
(“state.savepoints.dir”).
Options for yarn-cluster mode:
-m,–jobmanager Address of the JobManager (master) to
which to connect. Use this flag to connect
to a different JobManager than the one
specified in the configuration.
-yid,–yarnapplicationId Attach to running YARN session
-z,–zookeeperNamespace Namespace to create the Zookeeper
sub-paths for high availability modeOptions for executor mode:
-D <property=value> Generic configuration options for
execution/deployment and for the configured executor.
The available options can be found at
https://ci.apache.org/projects/flink/flink-docs-stabl
e/ops/config.html
-e,–executor The name of the executor to be used for executing the
given job, which is equivalent to the
“execution.target” config option. The currently
available executors are: “remote”, “local”,
“kubernetes-session”, “yarn-per-job”, “yarn-session”.
Options for default mode:
-m,–jobmanager Address of the JobManager (master) to which
to connect. Use this flag to connect to a
different JobManager than the one specified
in the configuration.
-z,–zookeeperNamespace Namespace to create the Zookeeper sub-paths
for high availability mode
Action “cancel” cancels a running program.
Syntax: cancel [OPTIONS]
“cancel” action options:
-s,–withSavepoint DEPRECATION WARNING: Cancelling
a job with savepoint is deprecated.
Use “stop” instead.
Trigger savepoint and cancel job.
The target directory is optional. If
no directory is specified, the
configured default directory
(state.savepoints.dir) is used.
Options for yarn-cluster mode:
-m,–jobmanager Address of the JobManager (master) to
which to connect. Use this flag to connect
to a different JobManager than the one
specified in the configuration.
-yid,–yarnapplicationId Attach to running YARN session
-z,–zookeeperNamespace Namespace to create the Zookeeper
sub-paths for high availability mode
Options for executor mode:
-D <property=value> Generic configuration options for
execution/deployment and for the configured executor.
The available options can be found at
https://ci.apache.org/projects/flink/flink-docs-stabl
e/ops/config.html
-e,–executor The name of the executor to be used for executing the
given job, which is equivalent to the
“execution.target” config option. The currently
available executors are: “remote”, “local”,
“kubernetes-session”, “yarn-per-job”, “yarn-session”.
Options for default mode:-m,–jobmanager Address of the JobManager (master) to which
to connect. Use this flag to connect to a
different JobManager than the one specified
in the configuration.
-z,–zookeeperNamespace Namespace to create the Zookeeper sub-paths
for high availability mode
Action “savepoint” triggers savepoints for a running job or disposes existing ones.
Syntax: savepoint [OPTIONS] []
“savepoint” action options:
-d,–dispose Path of savepoint to dispose.
-j,–jarfile Flink program JAR file.
Options for yarn-cluster mode:
-m,–jobmanager Address of the JobManager (master) to
which to connect. Use this flag to connect
to a different JobManager than the one
specified in the configuration.
-yid,–yarnapplicationId Attach to running YARN session
-z,–zookeeperNamespace Namespace to create the Zookeeper
sub-paths for high availability mode
Options for executor mode:
-D <property=value> Generic configuration options for
execution/deployment and for the configured executor.
The available options can be found at
https://ci.apache.org/projects/flink/flink-docs-stabl
e/ops/config.html
-e,–executor The name of the executor to be used for executing the
given job, which is equivalent to the
“execution.target” config option. The currently
available executors are: “remote”, “local”,
“kubernetes-session”, “yarn-per-job”, “yarn-session”.
Options for default mode:
-m,–jobmanager Address of the JobManager (master) to which
to connect. Use this flag to connect to a
different JobManager than the one specified
in the configuration.
-z,–zookeeperNamespace Namespace to create the Zookeeper sub-paths
for high availability mode
2.7Flink 角色分工
在实际生产中,Flink都是以集群在运行,在运行的过程中包含了两类进程
-
jobmanager:
扮演的是集群的管理者的角色,负责调度任务、协调checkpoints、协调故障恢复、收集job的状态信息,并管理flink集群中的从节点Taskmanager
-
taskmanager:
实际负责执行计算的worker,在器上执行flink job的一组task;taskmanager还是所在节点的管理员,负责把该节点上的服务器信息比如内存、磁盘、任务运行情况等向jobmanager汇报
-
client
用户在提交编写好Flink应用程序时,会先创建一个客户端再进行提交,这个客户端就是
Client
三、Flink入门案例
基于flink计算引擎,分别用批处理(Batch processing)和流处理(streaming process)中实现经典程序:词频统计wordcount,具体开发环境准备个编程实现:
3.1api和编程模型
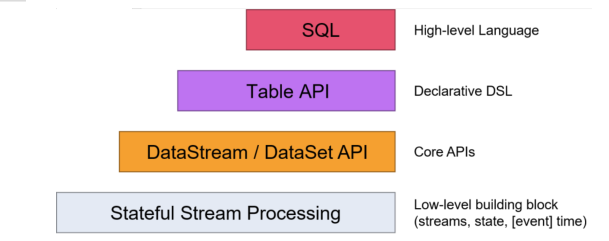
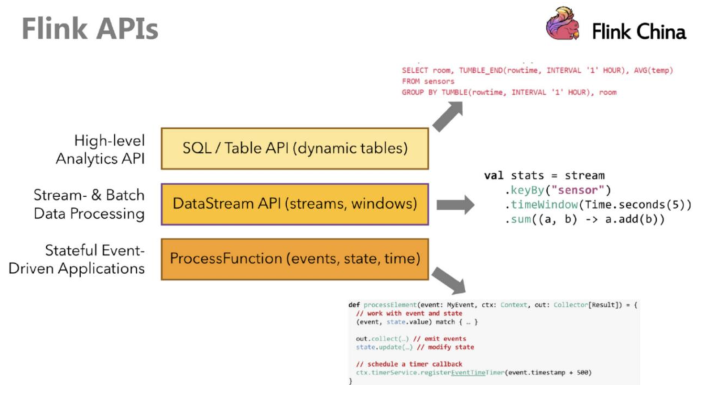
Flink提供了多个层次的API供开发者使用,越往上抽象程度越高,使用起来越方便;越往下越
底层,使用起来难度越大。
-
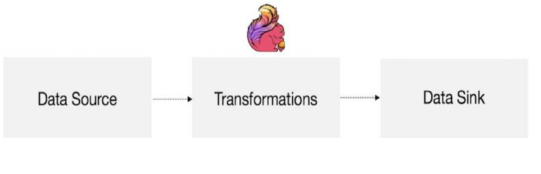
编程模型
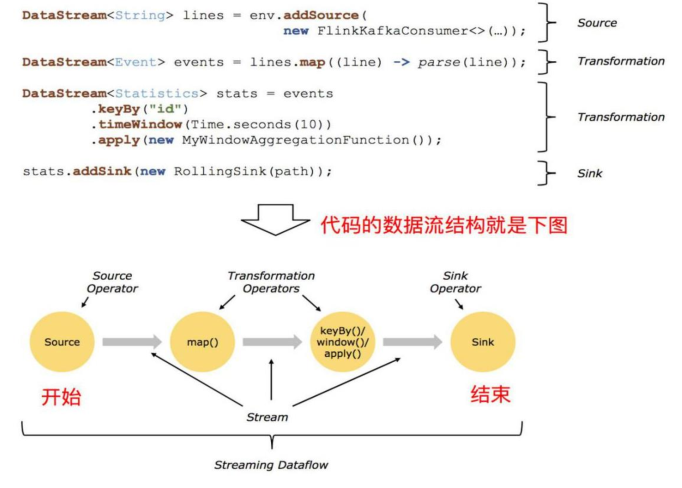
flink应用程序结构主要包含三部分:source、transformation、sink:如下图所示:
-
第一步:从数据源datasource获取数据
-
第二步:对数据进行转换处理
-
第三步:结果数据输出datasink
3.2准备工程
3.2.1pom文件
<repositories>
<repository>
<id>apache.snapshots</id>
<name>Apache Development Snapshot Repository</name>
<url>https://repository.apache.org/content/repositories/snapshots/</url>
<releases>
<enabled>false</enabled>
</releases>
<snapshots>
<enabled>true</enabled>
</snapshots>
</repository>
</repositories>

<properties>
<project.build.sourceEncoding>UTF-8</project.build.sourceEncoding>
<java.version>1.8</java.version>
<maven.compiler.source>${java.version}</maven.compiler.source>
<maven.compiler.target>${java.version}</maven.compiler.target>
<flink.version>1.10.0</flink.version>
<scala.version>2.11</scala.version>
<scala.binary.version>2.11</scala.binary.version>
</properties>
<dependencies>
<!-- Apache Flink 的依赖, 这些依赖项,不应该打包到JAR文件中. -->
<dependency>
<groupId>org.apache.flink</groupId>
<artifactId>flink-java</artifactId>
<version>${flink.version}</version>
</dependency>
<dependency>
<groupId>org.apache.flink</groupId>
<artifactId>flink-streaming-java_${scala.binary.version}</artifactId>
<version>${flink.version}</version>
</dependency>
<dependency>
<groupId>org.apache.flink</groupId>
<artifactId>flink-runtime-web_${scala.binary.version}</artifactId>
<version>${flink.version}</version>
</dependency>
<!-- flink操作hdfs,所需要导入该包-->
<dependency>
<groupId>org.apache.flink</groupId>
<artifactId>flink-shaded-hadoop-2-uber</artifactId>
<version>2.7.5-10.0</version>
</dependency>
<!-- 添加logging框架, 在IDE中运行时生成控制台输出. -->
<dependency>
<groupId>org.slf4j</groupId>
<artifactId>slf4j-log4j12</artifactId>
<version>1.7.7</version>
<scope>runtime</scope>
</dependency>
<dependency>
<groupId>log4j</groupId>
<artifactId>log4j</artifactId>
<version>1.2.17</version>
<scope>runtime</scope>
</dependency>
</dependencies>
<build>
    <sourceDirectory>src/main/java</sourceDirectory>
<testSourceDirectory>src/test/java</testSourceDirectory>
<plugins>
<!-- 编译插件 -->
<plugin>
<groupId>org.apache.maven.plugins</groupId>
<artifactId>maven-compiler-plugin</artifactId>
<version>3.5.1</version>
<configuration>
<source>1.8</source>
<target>1.8</target>
<!--<encoding>${project.build.sourceEncoding}</encoding>-->
</configuration>
</plugin>
<plugin>
<groupId>org.apache.maven.plugins</groupId>
<artifactId>maven-surefire-plugin</artifactId>
<version>2.18.1</version>
<configuration>
<useFile>false</useFile>
<disableXmlReport>true</disableXmlReport>
<includes>
<include>**/*Test.*</include>
<include>**/*Suite.*</include>
</includes>
</configuration>
</plugin>
<!-- 打jar包插件(会包含所有依赖) -->
<plugin>
<groupId>org.apache.maven.plugins</groupId>
<artifactId>maven-shade-plugin</artifactId>
<version>2.3</version>
<executions>
<execution>
<phase>package</phase>
<goals>
<goal>shade</goal>
</goals>
<configuration>
<filters>
<filter>
<artifact>*:*</artifact>
<excludes>
<!--
zip -d learn_spark.jar META-INF/*.RSA META-INF/*.DSA META-INF/*.SF -->
<exclude>META-INF/*.SF</exclude>
<exclude>META-INF/*.DSA</exclude>
<exclude>META-INF/*.RSA</exclude>
</excludes>
</filter>
</filters>
<transformers>

<transformer
implementation="org.apache.maven.plugins.shade.resource.ManifestResourceTransformer">
<!-- 可以设置jar包的入口类(可选) -->
<!--<mainClass>cn.itcast.flink.StreamWordCount</mainClass>-->
</transformer>
</transformers>
</configuration>
</execution>
</executions>
</plugin>
</plugins>
</build>
3.2.2 log4j.properties
# This affects logging for both user code and Flink
log4j.rootLogger=INFO, console
# Uncomment this if you want to _only_ change Flink's logging
#log4j.logger.org.apache.flink=INFO
# The following lines keep the log level of common libraries/connectors on
# log level INFO. The root logger does not override this. You have to manually
# change the log levels here.
log4j.logger.akka=INFO
log4j.logger.org.apache.kafka=INFO
log4j.logger.org.apache.hadoop=INFO
log4j.logger.org.apache.zookeeper=INFO
# Log all infos to the console
log4j.appender.console=org.apache.log4j.ConsoleAppender
log4j.appender.console.layout=org.apache.log4j.PatternLayout
log4j.appender.console.layout.ConversionPattern=%d{yyyy-MM-dd HH:mm:ss,SSS} %-5p %-60c %x - %m%n
# Suppress the irrelevant (wrong) warnings from the Netty channel handler
log4j.logger.org.apache.flink.shaded.akka.org.jboss.netty.channel.DefaultChannelPipeline=ERROR, console
3.3 Flink 体验
-
编码步骤
1.准备环境-env
2.准备数据-source
3.处理数据-transformation
4.输出结果-sink
5.触发执行-execute
3.3.1 批处理:WordCount
基于Flink 分析引擎,编程实现批处理词频统计WordCount,从本地系统读取文本数据,分
析处理后,将结果打印控制台。
package cn.itcast.flink.batch;
import org.apache.flink.api.common.functions.FlatMapFunction;
import org.apache.flink.api.common.functions.MapFunction;
import org.apache.flink.api.java.ExecutionEnvironment;
import org.apache.flink.api.java.operators.AggregateOperator;
import org.apache.flink.api.java.operators.DataSource;
import org.apache.flink.api.java.operators.FlatMapOperator;
import org.apache.flink.api.java.operators.MapOperator;
import org.apache.flink.api.java.tuple.Tuple2;
import org.apache.flink.util.Collector;
/**
* 使用Flink计算引擎实现离线批处理:词频统计WordCount
* 1.准备环境-env
* 2.准备数据-source
* 3.处理数据-transformation
* 4.输出结果-sink
* 5.触发执行-execute
*/
public class FlinkBatchWordCount {
public static void main(String[] args) throws Exception {
// 1. 准备环境-env:创建ExecutionEnvironment实例对象
ExecutionEnvironment env = ExecutionEnvironment.getExecutionEnvironment() ;
// 2. 准备数据-source:从本地文件系统读取文本数据
DataSource<String> inputDataSet = env.readTextFile("datas/wordcount.data");
// 3. 处理数据-transformation:调用DataSet中转换函数,处理分析数据
// 3.1 将每行数据按照分隔符进行分割
FlatMapOperator<String, String> wordDataSet = inputDataSet.flatMap(new FlatMapFunction<String, String>() {
@Override
public void flatMap(String line, Collector<String> out) throws Exception {
String[] words = line.trim().split("\\s+");
for(String word: words){
out.collect(word); // 输出操作
}
}
});
// 3.2 将每个单词转换为二元组,表示每个单词出现一次
MapOperator<String, Tuple2<String, Integer>> tupleDataSet = wordDataSet.map(new MapFunction<String, Tuple2<S
tring, Integer>>() {
@Override
public Tuple2<String, Integer> map(String word) throws Exception {
return Tuple2.of(word, 1);
}
});
// 3.3 对元组类型数据,按照单词分组和组内聚合统计
AggregateOperator<Tuple2<String, Integer>> resultDataSet = tupleDataSet
.groupBy(0) // 按照单词分组,索引下标为0
.sum(1);// 次数累加,索引下标为1
// 4. 数据输出-sink:将结果数据打印控制台
resultDataSet.print();
// 5. 触发执行-execute:触发计算,将结果打印控制台
env.execute(FlinkBatchWordCount.class.getSimpleName());
}
}
3.3.2 流处理:WordCount
编写Flink程序,接收TCP Socket的单词数据,并以空格进行单词拆分打印。
package cn.itcast.flink.stream;
import org.apache.flink.api.common.functions.FlatMapFunction;
import org.apache.flink.api.common.functions.MapFunction;
import org.apache.flink.api.java.tuple.Tuple2;
import org.apache.flink.streaming.api.datastream.DataStreamSource;
import org.apache.flink.streaming.api.datastream.SingleOutputStreamOperator;
import org.apache.flink.streaming.api.environment.StreamExecutionEnvironment;
import org.apache.flink.util.Collector;
/**
* 使用Flink 计算引擎实现流式数据处理:从Socket接收数据,实时进行词频统计WordCount
北京市昌平区建材城西路金燕龙办公楼一层 电话:400-618-9090
*/
public class FlinkStreamWordCount {
public static void main(String[] args) throws Exception {
// 1.准备环境-env:获取流处理运行环境
StreamExecutionEnvironment env = StreamExecutionEnvironment.getExecutionEnvironment() ;
// 2.准备数据-source:从Socket实时接收流式数据,指定IP地址和端口号
DataStreamSource<String> inputDataStream = env.socketTextStream("node1.itcast.cn", 9999);
// 3.处理数据-transformation:调用DataStream中转换函数处理分析数据
// 3.1 对每行数据按照符分割
SingleOutputStreamOperator<String> wordDataStream = inputDataStream.flatMap(
new FlatMapFunction<String, String>() {
@Override
public void flatMap(String line, Collector<String> out) throws Exception {
for(String word: line.trim().split("\\s+")){
out.collect(word);
}
}
}
);
// 3.2 将每个单词转换为二元组,表示每个单词出现一次
SingleOutputStreamOperator<Tuple2<String, Integer>> tupleDataStream = wordDataStream.map(
new MapFunction<String, Tuple2<String, Integer>>() {
@Override
public Tuple2<String, Integer> map(String word) throws Exception {
return Tuple2.of(word, 1);
}
}
);
// 3.3 对元组数据,按照单词分组和组内聚合统计
SingleOutputStreamOperator<Tuple2<String, Integer>> resultDataStream = tupleDataStream
.keyBy(0) // 单词分组,索引下标为:0
.sum(1);// 次数累加,索引下标为:1
// 4.输出结果-sink:将结果数据打印控制台
resultDataStream.print();
// 5.触发执行-execute:启动流式应用
env.execute(FlinkStreamWordCount.class.getSimpleName()) ;
}
}
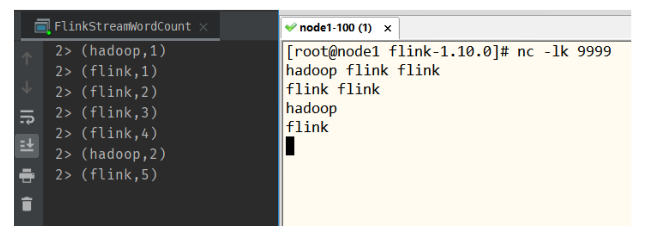
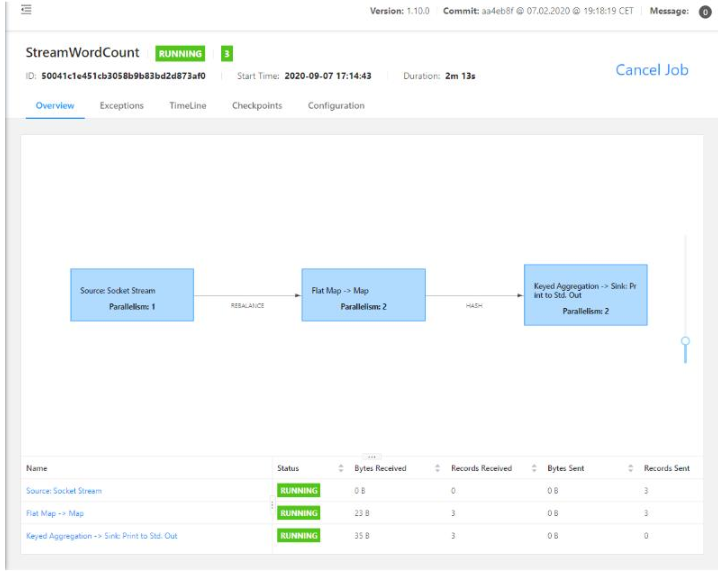
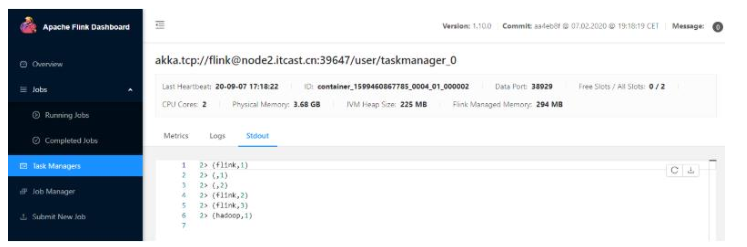
启动NetCat终端,命令如下:nc -lk,再运行Flunk程序,运行结果截图如下:
附录:使用Java 8中提供Lambda表达式和Stream流式编程,实现Flink 计算引擎中流式数据处
理,具体代码如下:
package cn.itcast.flink.stream;
import org.apache.flink.api.common.typeinfo.Types;
import org.apache.flink.api.java.tuple.Tuple2;
import org.apache.flink.streaming.api.datastream.DataStreamSource;
import org.apache.flink.streaming.api.datastream.SingleOutputStreamOperator;
import org.apache.flink.streaming.api.environment.StreamExecutionEnvironment;
import org.apache.flink.util.Collector;
import java.util.Arrays;
/**
* 使用Flink 计算引擎实现流式数据处理:从Socket接收数据,实时进行词频统计WordCount
*/
public class LambdaStreamWordCount{
public static void main(String[] args) throws Exception {
// 1.准备环境-env:获取流处理运行环境
StreamExecutionEnvironment env = StreamExecutionEnvironment.getExecutionEnvironment();
// 2.准备数据-source:从Socket实时接收流式数据,指定IP地址和端口号
DataStreamSource<String> inputDataStream = env.socketTextStream("node1.itcast.cn", 9999);
// 3.处理数据-transformation:调用DataStream中转换函数处理分析数据
// 3.1 对每行数据按照符分割
SingleOutputStreamOperator<String> wordDataStream = inputDataStream.flatMap(
(String line, Collector<String> out) -> Arrays.stream(line.trim().split("\\s+")).forEach(out::collect)
).returns(Types.STRING);
// 3.2 将每个单词转换为二元组,表示每个单词出现一次
SingleOutputStreamOperator<Tuple2<String, Integer>> tupleDataStream = wordDataStream.map(
(String word) -> Tuple2.of(word, 1)
).returns(Types.TUPLE(Types.STRING, Types.INT));

// 3.3 对元组数据,按照单词分组和组内聚合统计
SingleOutputStreamOperator<Tuple2<String, Integer>> resultDataStream = tupleDataStream
.keyBy(0)
.sum(1);
// 4.输出结果-sink:将结果数据打印控制台
resultDataStream.print();
// 5.触发执行-execute:启动流式应用
env.execute(LambdaStreamWordCount.class.getSimpleName()) ;
}
}
3.4 应用提交部署
Flink程序提交运行方式有两种:
- 方式一:以命令的方式提交
- 方式二:以ui的方式提交
将开发应用程序编译打包:flink-day01-1.0.0.jar,不包含其他依赖jar包,删除log4j配置文件。
运行使用Flink 开发流式应用程序,从Socket实时消费数据,进行词频统计,输出控制台。
注意:写入HDFS如果存在权限问题,进行如下设置:
hadoop fs -chmod -R 777 /
并在代码中添加:
System.setProperty(“HADOOP_USER_NAME”, “root”)
3.4.1 修改流式程序
修改流式程序,从应用程序传递参数:host和port,使用Flink中工具类:ParameterTool,解
析参数,代码如下所示:
package cn.itcast.flink.submit;
import org.apache.flink.api.common.functions.FlatMapFunction;
import org.apache.flink.api.common.functions.MapFunction;

import org.apache.flink.api.java.tuple.Tuple2;
import org.apache.flink.api.java.utils.ParameterTool;
import org.apache.flink.streaming.api.datastream.DataStreamSource;
import org.apache.flink.streaming.api.datastream.SingleOutputStreamOperator;
import org.apache.flink.streaming.api.environment.StreamExecutionEnvironment;
import org.apache.flink.util.Collector;
/**
* 使用Flink 计算引擎实现流式数据处理:从Socket接收数据,实时进行词频统计WordCount
*/
public class SubmitStreamWordCount {
public static void main(String[] args) throws Exception {
// TODO: 从应用程序接收传递参数
final ParameterTool params = ParameterTool.fromArgs(args);
if(params.getNumberOfParameters() != 2){
System.err.println("Usage: SubmitStreamWordCount --host <host> --port <port>");
return;
}
final String hostname = params.get("host");
final int port = params.getInt("port");
// 1.准备环境-env:获取流处理运行环境
StreamExecutionEnvironment env = StreamExecutionEnvironment.getExecutionEnvironment();
// 2.准备数据-source:从Socket实时接收流式数据,指定IP地址和端口号
DataStreamSource<String> inputDataStream = env.socketTextStream(hostname, port);
// 3.处理数据-transformation:调用DataStream中转换函数处理分析数据
// 3.1 对每行数据按照符分割
SingleOutputStreamOperator<String> wordDataStream = inputDataStream.flatMap(
new FlatMapFunction<String, String>() {
@Override
public void flatMap(String line, Collector<String> out) throws Exception {
String[] words = line.split("\\s+");
for (String word : words) {
out.collect(word);
}
}
}
);
// 3.2 将每个单词转换为二元组,表示每个单词出现一次
SingleOutputStreamOperator<Tuple2<String, Integer>> tupleDataStream = wordDataStream.map(
new MapFunction<String, Tuple2<String, Integer>>() {
@Override
public Tuple2<String, Integer> map(String word) throws Exception {
return Tuple2.of(word, 1);
}
}
);
// 3.3 对元组数据,按照单词分组和组内聚合统计

SingleOutputStreamOperator<Tuple2<String, Integer>> resultDataStream = tupleDataStream
.keyBy(0) // 单词分组,下标索引为0
.sum(1);// 次数累加,下标索引为1
// 4.输出结果-sink:将结果数据打印控制台
resultDataStream.print();
// 5.触发执行-execute:启动流式应用
env.execute(SubmitStreamWordCount.class.getSimpleName()) ;
}
}
3.4.2命令方式提交
此方式提交Flink应用可以运行至Standalone集群和YARN集群(Session会话模式和Job分离模
式),以运行YARN的Job分离模式为例演示提交Flink应用程序。
-
第一步、上传作业jar包到linux服务器
[root@node1 ~]# cd /export/server/flink/
[root@node1 ~]# rz -
第二步、提交运行
[root@node1 ~]# cd /export/server/flink/
[root@node1 flink]# bin/flink run -c cn.itcast.flink.submit.SubmitStreamWordCount -m yarn-cluster
-yjm 1024 -ytm 1024 flink-day01-1.0.0.jar --host node1.itcast.cn --port 9999
- 第三步、查看任务运行概述
3.4.3 UI 方式提交
此种方式提交应用,仅仅在Flink Standalone集群和YARN Session会话模式下,此处以YARN
Session为例演示。
- 第一步、启动HDFS集群和YARN集群
# 在node1.itcast.cn上启动服务
hadoop-daemon.sh start namenode
hadoop-daemons.sh start datanode
yarn-daemon.sh start resourcemanager
yarn-daemons.sh start nodemanager
- 第二步、启动YARN Session
[root@node1 ~]# cd /export/server/flink/
[root@node1 flink]# bin/yarn-session.sh -n 2 -tm 1024 -jm 1024-s 1 -d
......................................
JobManager Web Interface: http://node3.itcast.cn:33619
- 第三步、上传作业jar包及指定相关参数
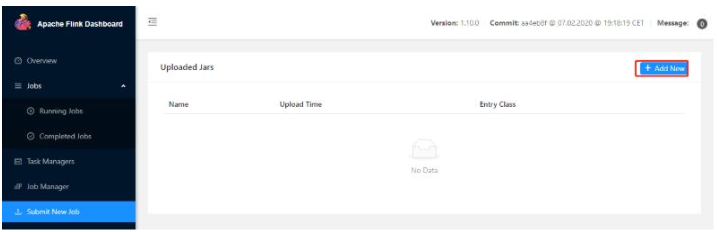
选择打成jar包,然后填写参数值,截图如下:
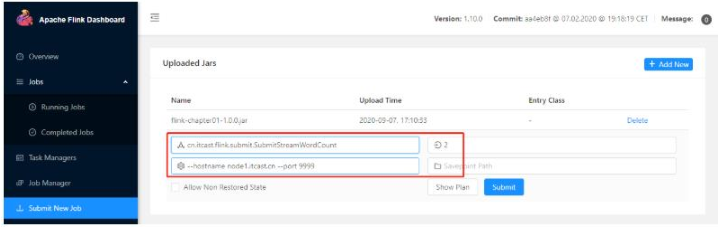
参数内容:
Entry Class:cn.itcast.flink.submit.SubmitStreamWordCount
Parallelism:2
Program Arguments:–host node1.itcast.cn --port 9999
点击显示计划【Show Plan】:

点击提交按钮【Submit】,运行Flink应用
-
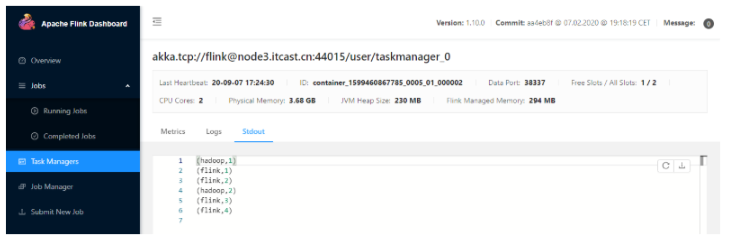
第四步、查看任务运行概述
-
第五步、查看任务运行结果
四、 Flink 原理初探
4.1 Flink 执行流程
Flink是新的stream计算引擎,用java实现。既可以处理stream data也可以处理batch data,
可以同时兼顾Spark以及Spark streaming的功能,与Spark不同的是,Flink本质上只有stream的概
念,batch被认为是special stream。
https://blog.csdn.net/sxiaobei/article/details/80861070
https://blog.csdn.net/super_wj0820/article/details/90726768
https://ci.apache.org/projects/flink/flink-docs-release-1.11/ops/deployment/yarn_setup.html
4.1.1 Flink Standalone
4.1.2 Flink On YARN
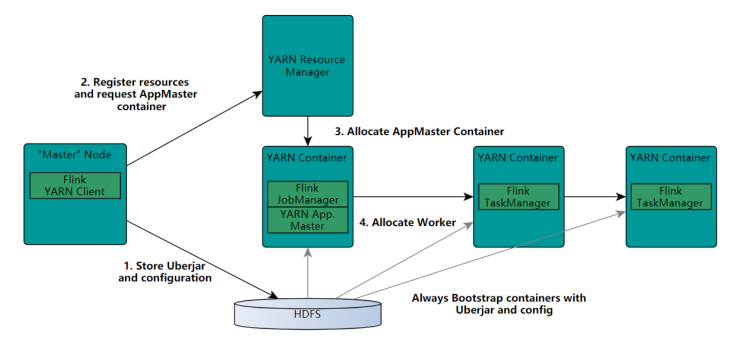
1.Client向HDFS上传Flink的Jar包和配置
2.Client向Yarn ResourceManager提交任务并申请资源
3.ResourceManager分配Container资源并启动ApplicationMaster,然后AppMaster加载Flink的
Jar包和配置构建环境,启动JobManager
4.ApplicationMaster向ResourceManager申请工作资源,NodeManager加载Flink的Jar包和配置
构建环境并启动TaskManager
5.TaskManager启动后向JobManager发送心跳包,并等待JobManager向其分配任务
4.2 Flink Streaming Dataflow
官网关于Flink的词汇表:https://ci.apache.org/projects/flink/flink-docs-release-1.11/concepts/glossary.html#glossary
4.2.1 概念名词解释
- Dataflow:Flink程序在执行的时候会被映射成一个数据流模型
- Operator:数据流模型中的每一个操作被称作Operator,Operator分为:Source/Transform/Sink;
- Partition:数据流模型是分布式的和并行的,执行中会形成1~n个分区;
- Subtask:多个分区任务并行,每一个都是独立运行在一个线程中,也就是一个Subtask子任
务; - Parallelism:并行度就是可以同时真正执行的子任务数/分区数;
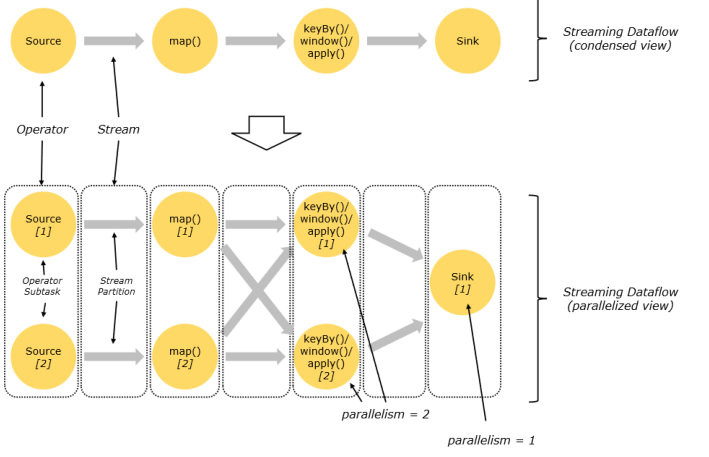
4.2.2 Operator传递模式
数据在两个operator(算子)之间传递的时候有两种模式:
1.One to One模式:
两个operator用此模式传递的时候,会保持数据的分区数和数据的排序;如上图中的Source1
到Map1,它就保留的Source的分区特性,以及分区元素处理的有序性。–类似于Spark中的窄依
赖
2.Redistributing 模式:
这种模式会改变数据的分区数,每个一个operator subtask会根据选择transformation把数据
发送到不同的目标subtasks,比如keyBy()会通过hashcode重新分区,broadcast()和rebalance()方
法会随机重新分区。–类似于Spark中的宽依赖
4.2.3 Operator Chain
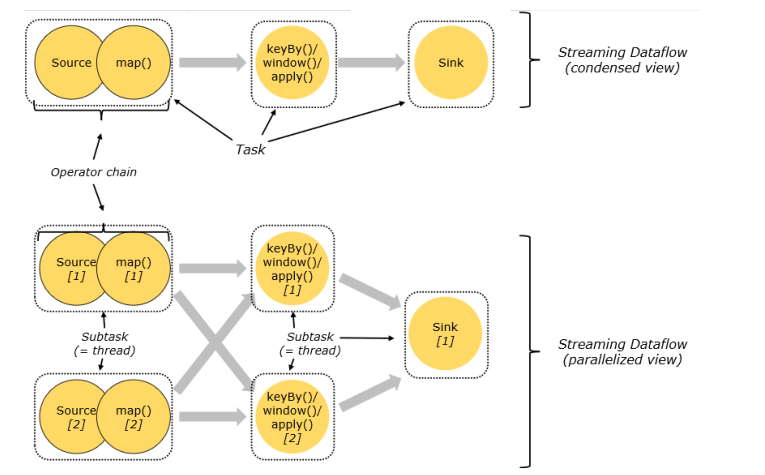
客户端在提交任务的时候会对Operator进行优化操作,能进行合并的Operator会被合并为一
个Operator,合并后的Operator称为Operator chain,实际上就是一个执行链,每个执行链会在
TaskManager上一个独立的线程中执行–就是SubTask。
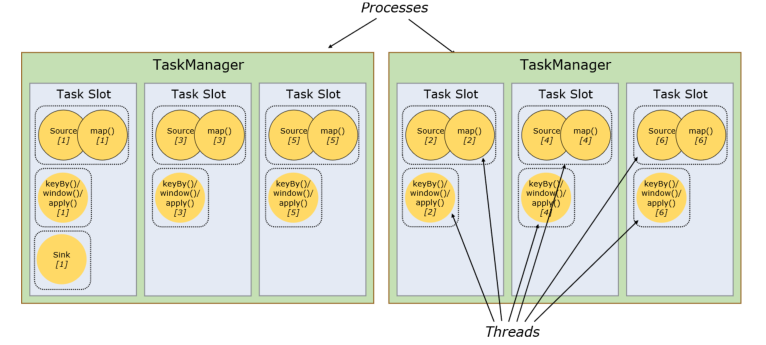
4.2.4 TaskSlot And Slot Sharing
- 任务槽(TaskSlot)
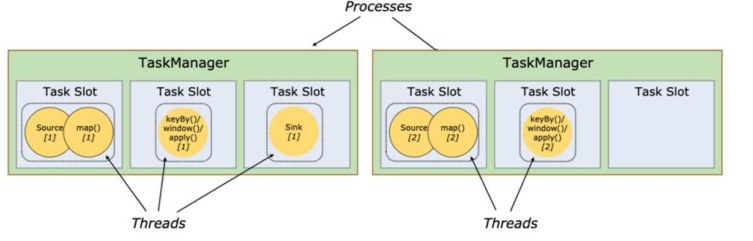
每个TaskManager是一个JVM的进程, 为了控制一个TaskManager(worker)能接收多少个
task,Flink通过Task Slot来进行控制。TaskSlot数量是用来限制一个TaskManager工作进程中可以
同时运行多少个工作线程,TaskSlot 是一个 TaskManager 中的最小资源分配单位,一个
TaskManager 中有多少个 TaskSlot 就意味着能支持多少并发的Task处理。
-TaskManager最多能同时并发执行的子任务数是可以通过TaskSolt数量来控制的
-TaskSolt有独占的内存空间,在一个TaskManager中运行多个不同的作业,作业之间不受影响。
- 槽共享(Slot Sharing)
Flink允许子任务共享插槽,即使它们是不同任务(阶段)的子任务(subTask),只要它们来自同
一个作业。比如图左下角中的map和keyBy和sink 在一个 TaskSlot 里执行以达到资源共享的目
的。
允许插槽共享有两个主要好处:
- 资源分配更加公平,如果有比较空闲的slot可以将更多的任务分配给它。
- 有了任务槽共享,可以提高资源的利用率。
注意:slot是静态的概念,是指taskmanager具有的并发执行能力;parallelism是动态的概念,是
指程序运行时实际使用的并发能力。
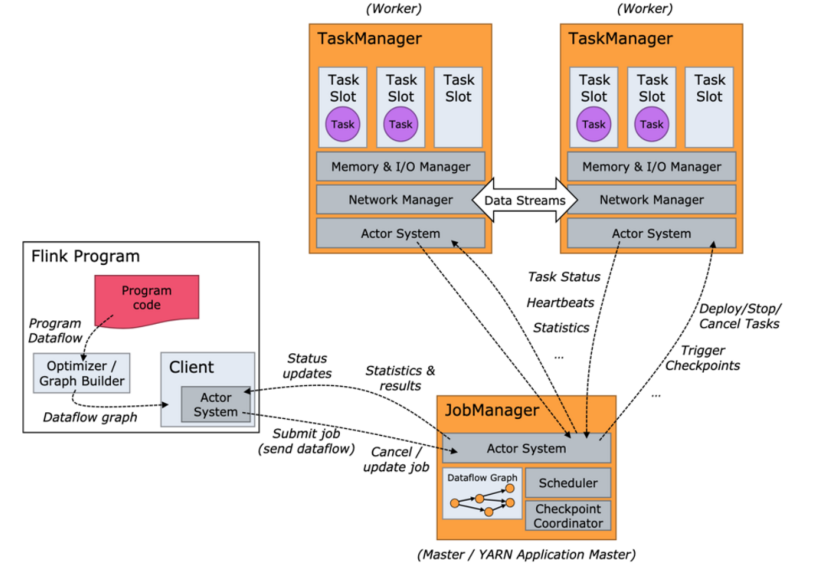
4.3 Flink运行时组件

Flink运行时架构主要包括四个不同的组件,它们会在运行流处理应用程序时协同工作:
作业管理器(JobManager):分配任务、调度checkpoint做快照
任务管理器(TaskManager):主要干活的
资源管理器(ResourceManager):管理分配资源
分发器(Dispatcher):方便递交任务的接口,WebUI
因为Flink是用Java和Scala实现,所以所有组件都会运行在Java虚拟机上。每个组件的职责如下:
1.作业管理器(JobManager)
- 控制一个应用程序执行的主进程,也就是说,每个应用程序都会被一个不同的JobManager 所控制执行。
- JobManager 会先接收到要执行的应用程序,这个应用程序会包括:作业图(JobGraph)、逻辑数据流图(logical dataflow graph)和打包了所有的类、库和其它资源的JAR包。
- JobManager 会把JobGraph转换成一个物理层面的数据流图,这个图被叫做“执行图”(ExecutionGraph),包含了所有可以并发执行的任务。
- JobManager 会向资源管理器(ResourceManager)请求执行任务必要的资源,也就是
任务管理器(TaskManager)上的插槽(slot)。一旦它获取到了足够的资源,就会将执
行图分发到真正运行它们的TaskManager上。而在运行过程中,JobManager会负责所有
需要中央协调的操作,比如说检查点(checkpoints)的协调。
2.任务管理器(TaskManager)
- Flink中的工作进程。通常在Flink中会有多个TaskManager运行,每一个TaskManager都
包含了一定数量的插槽(slots)。插槽的数量限制了TaskManager能够执行的任务数
量。 - 在执行过程中,一个TaskManager可以跟其它运行同一应用程序的TaskManager交换数
据。
3.资源管理器(ResourceManager)
- 主要负责管理任务管理器(TaskManager)的插槽(slot),TaskManger 插槽是Flink中
定义的处理资源单元。 - Flink为不同的环境和资源管理工具提供了不同资源管理器,比如YARN、Mesos、K8s,
以及standalone部署。 - 当JobManager申请插槽资源时,ResourceManager会将有空闲插槽的TaskManager分
配给JobManager。如果ResourceManager没有足够的插槽来满足JobManager的请求,
它还可以向资源提供平台发起会话,以提供启动TaskManager进程的容器。
4.分发器(Dispatcher)
- 可以跨作业运行,它为应用提交提供了REST接口。
- 当一个应用被提交执行时,分发器就会启动并将应用移交给一个jobmanager
- dispatcher也会动一个web ui,用来方便的展示和监控作业执行的信息
- dispatcher在框架中可能并不是必须的,这取决于应用提交运行的方式。
4.4Flink执行图(ExecutionGraph)
由flink程序直接映射成的数据流图是StreamGraph,也被称为逻辑流图,因为它们表示的是计算逻辑的高级视图。为了执行一个流处理程序,flink需要将逻辑流图转换为物流数据流图(也叫执行图)详细说明程序的执行方式。
flink中的执行图可以分成四层:StreamGraph -> JobGraph -> ExecutionGraph -> 物理执行图。
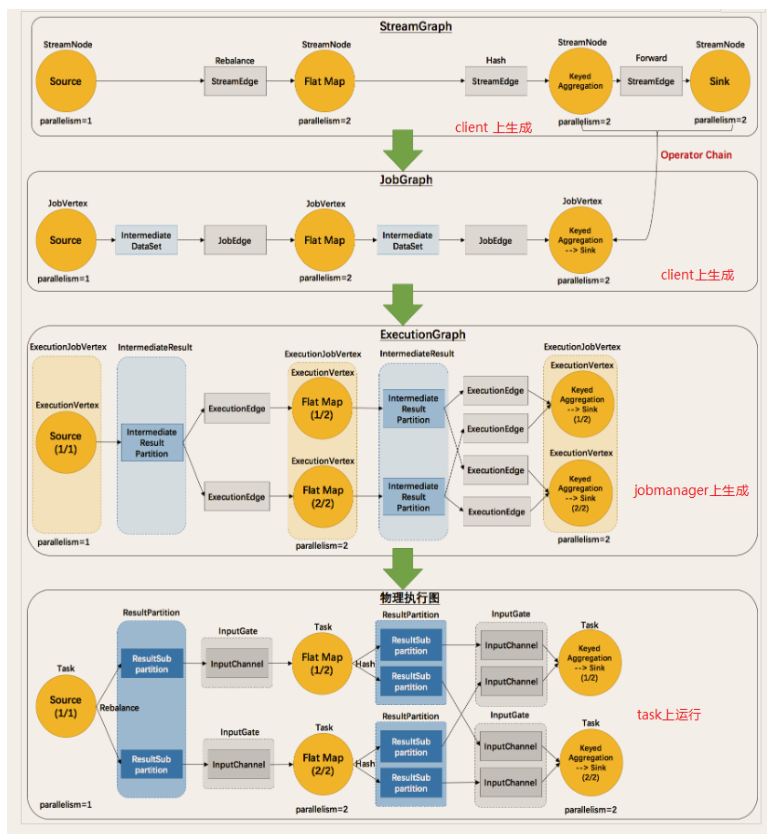
-
原理介绍
- flink执行executor会自动根据程序代码生成DAG数据流图
- flink中的执行图可以分成四层:StreamGraph -> JobGraph -> ExecutionGraph -> 物
理执行图。- StreamGraph:是根据用户通过 Stream API 编写的代码生成的最初的图。表示程序的拓扑结构。
- JobGraph:StreamGraph经过优化后生成了 JobGraph,提交给 JobManager 的数据结构。主要优化为,将多个符合条件的节点 chain 在一起作为一个节点,这样可以减少数据在节点之间流动所需要的序列化/反序列化/传输消耗。
- ExecutionGraph:JobManager 根据 JobGraph 生成ExecutionGraph。ExecutionGraph是JobGraph的并行化版本,是调度层最核心的数据结构。
- 物理执行图:JobManager 根据 ExecutionGraph 对 Job 进行调度后,在各个TaskManager 上部署 Task 后形成的“图”,并不是一个具体的数据结构。
-
简单理解:
- StreamGraph:最初的程序执行逻辑流程,也就是算子之间的前后顺序(全部都是
Subtask) - JobGraph:将部分可以合并的Subtask合并成一个Task
- ExecutionGraph:为Task赋予并行度
- 物理执行图:将Task赋予并行度后的执行流程,落实到具体的TaskManager上,将具体
的Task落实到具体的Slot内进行运行。
- StreamGraph:最初的程序执行逻辑流程,也就是算子之间的前后顺序(全部都是


 9047
9047


 被折叠的 条评论
为什么被折叠?
被折叠的 条评论
为什么被折叠?
 到【灌水乐园】发言


