


Spring_AOP
代理模式
什么是代理模式
代理模式是 Java 常见的设计模式之一。所谓代理模式是指客户端并不直接调用实际的对象,而是通过调用代理对象,来间接的调用实际的对象。也就是说,代理模式在客户端和对象之间充当着中介的角色。
为什么使用代理模式
有两点:隔离作用和开闭原则
隔离作用:有些时候,一个客户类不想直接或者不可以直接去引用一个委托对象,代理类对象可以在客户类和委托对象之间建立联系。
开闭原则:通过代理类还可以增加额外的功能来扩展委托类的功能,只修改代理类不修改委托类,符合代码设计的开闭原则。
实现代理模式
静态代理和动态代理的优缺点以及详细讲解的好文:
文章跳转链接
静态代理的实现
静态代理模式由三个部分组成:
一个公共的接口
一个被代理的角色
一个代理角色
创建公共的接口
其实这里可以不写这个公共接口。它的作用只是体现了面向接口编程
/**
 * 公共的接口
 *
 */
public interface Rent {
    void renting();
    void end();
}
创建被代理的角色
即真正的业务类
/**
 * 被代理的角色
 */
public class Oldlu implements Rent {
    @Override
    public void renting() {
        System.out.println("Oldlu 有房出租");
    }

    @Override
    public void end() {
        System.out.println("房屋出租完毕");
    }
}
创建代理角色
持有委托类对象。
package com.bjsxt.staticproxy;
/**
 * 代理类
 * 实现中介效果
 */

public class StaticProxyRent implements Rent {

    private Rent rent;
    //获取到房东的房源对象
    public StaticProxyRent(Rent rent){
        this.rent = rent;
    }
    @Override
    public void renting() {
        System.out.println("向房客出租房屋");
        rent.renting();
    }

    @Override
    public void end() {
        System.out.println("开始结束房屋的出租流程");
        rent.end();
    }
}
创建测试类
public class StaticProxyTest {
    public static void main(String[] args) {
/*    不使用接口的话,这里创建对象
      Oldlu oldlu = new Oldlu();
        StaticProxyRent staticProxyRent = new StaticProxyRent(oldlu);
        staticProxyRent.renting();
        staticProxyRent.end();*/

        /** 使用接口,可以使用多态
         *StaticProxyRent staticProxyRent = new StaticProxyRent(rent);
         */
        //Oldlu继承了Reat接口,相当于房主发出了房源信息
        Rent rent = new Oldlu();
        //创建中介对象,获取到房源信息
        StaticProxyRent staticProxyRent = new StaticProxyRent(rent);
        staticProxyRent.renting();
        staticProxyRent.end();
    }
}

动态代理的实现
实现方式有两种:
- 使用 JDK 的 Proxy 类实现动态代理;
- 使用 CGLIB 实现动态代理
使用 JDK 的 Proxy 类实现动态代理
创建业务接口
public interface JdkProxyRent {
    void renting();
}
创建业务接口实现类
public class JdkProxyOldlu implements JdkProxyRent {
    @Override
    public void renting() {
        System.out.println("Oldlu 有房出租");
    }
}
创建生成代理对象的工厂
public class JdkProxyFactory {

    /**
     * 动态生成代理对象
     */
    public static Object getProxyBean(Object target){
        Class clazz = target.getClass();
        MyAspect myAspect = new MyAspect();
        //在JDK中动态生成代理对象的方法
        return Proxy.newProxyInstance(clazz.getClassLoader(), clazz.getInterfaces(), new InvocationHandler() {
            /**
             * 动态生成代理对象中的方法。
             * @param proxy 动态生成的代理对象
             * @param method 目标方法的方法对象
             * @param args 传递到目标方法中的参数列表
             * @return
             * @throws Throwable
             */
            @Override
            public Object invoke(Object proxy, Method method, Object[] args) throws Throwable {
                myAspect.before();
                Object obj =  method.invoke(target,args);
                myAspect.after();
                return obj;
            }
        });
    }
}
创建切面对象
public class MyAspect {
    public void before(){
        System.out.println("带房客看房之后开始签租房协议");
    }
    public void  after(){
        System.out.println("租房结束");
    }
}
创建测试类
public class JdkProxyTest {
    public static void main(String[] args) {
        JdkProxyRent jdkProxyRent = new JdkProxyOldlu();
        JdkProxyRent jdkProxyRent1 = (JdkProxyRent) JdkProxyFactory.getProxyBean(jdkProxyRent);
        jdkProxyRent1.renting();
    }
}

使用 CGLIB 实现动态代理
什么是CGLIB
是一个高性能开源的代码生成包,它被许多框架所使 用,其底层是通过使用一个小而快的字节码处理框架 ASM(Java 字节码操控框架)转换字 节码并生成新的类。因此 CGLIB 要依赖于 ASM 的包。
为什么要使用CGLIB
JDK 的动态代理机制只能代理实现了接口的类,而对于没有实现接口的类就不能使用 JDK 的 Proxy 类生成代理对象,cglib 是针对类来实现代理的,他的原理是对指定的目标类生 成一个子类并通过回调的方式来实现增强,但因为采用的是继承,所以不能对 final 修饰的 类进行代理。
CGLIB的性能要比JDK类的Proxy类要高一些
实例
添加 jar 包
这两个jar包来源于myabatis框架 
创建业务接口
public interface CglibProxyRent {
    void renting();
}
创建接口实现类
public class CglibProxyOldlu implements CglibProxyRent {
    @Override
    public void renting() {
        System.out.println("Oldlu 有房出租");
    }

}
创建切面
public class CglibMyAspect {
    public void before(){
        System.out.println("带领客户看房,签订租房协议");
    }

    public void after(){
        System.out.println("售后服务");
    }
}
创建生成代理对象的工厂
import net.sf.cglib.proxy.Enhancer;
import net.sf.cglib.proxy.MethodInterceptor;
import net.sf.cglib.proxy.MethodProxy;

import java.lang.reflect.Method;

public class CglibProxyBeanFactory {
    public static Object getProxyBean(CglibProxyRent rent){
        CglibMyAspect myAspect = new CglibMyAspect();
        Enhancer enhancer = new Enhancer();
        enhancer.setSuperclass(rent.getClass());
        enhancer.setCallback(new MethodInterceptor() {
            /**
             *
             * @param o 代理对象的引用
             * @param method 目标对象的方法对象
             * @param objects 目标方法的参数列表
             * @param methodProxy 目标方法的方法对象的代理对象
             * @return
             * @throws Throwable
             */
            @Override
            public Object intercept(Object o, Method method, Object[] objects, MethodProxy methodProxy) throws Throwable {
                myAspect.before();
                Object obj = method.invoke(rent,objects);
                myAspect.after();
                return obj;
            }
        });
        return enhancer.create();
    }
}
创建测试类
public class Test {
    public static void main(String[] args) {
        CglibProxyRent rent = new CglibProxyOldlu();
        CglibProxyRent rent1 = (CglibProxyRent) CglibProxyBeanFactory.getProxyBean(rent);
        rent1.renting();
    }
}

Spring_AOP
什么是AOP
AOP也就是面向切面编程,它将业务逻辑的各个部 分进行隔离,使开发人员在编写业务逻辑时可以专心于核心业务,从而提高了开发效率。
AOP 采取横向抽取机制,取代了传统纵向继承体系的重复性代码,其应用主要体现在 事务处理、日志管理、权限控制、异常处理等方面。
主流的AOP技术有两个,分别为Spring框架的AOP和AspectJ框架。
什么是面向切面编程
切面 = 切入点 + 额外功能。
每个切面影响业务的一种功能, 切面的目的就是为了功能增强,将需要增强的方法做成切面,实现对业务的增强,就是面向 切面编程。
AOP的目的
将与业务本身无关,却被业务模块所共同调用的功能代码封装成 切面,以减少系统的重复代码,降低耦合,提高可扩展性。

AOP专业术语讲解
对AOP的通俗讲解,本文也是受到了这篇文章的启发。


Spring AOP 模块

springAOP模块的使用
我们创建一个新的项目,同时在使用 Spring 框架的 AOP 模块开发 AOP 时,添加核心容器的 jar 包以及 aop 的 jar 包

创建切面
package com.bjsxt.aop;

import org.aopalliance.intercept.MethodInterceptor;
import org.aopalliance.intercept.MethodInvocation;
import org.springframework.aop.AfterReturningAdvice;
import org.springframework.aop.MethodBeforeAdvice;
import org.springframework.aop.ThrowsAdvice;

import java.lang.reflect.Method;

public class MyAspect implements MethodBeforeAdvice, AfterReturningAdvice, MethodInterceptor, ThrowsAdvice {
    /**
     * 前置通知 -- 调用目标方法之前会被执行
     * 三个参数的含义:
     * @param method 目标方法对象
     * @param objects 目标方法的参数列表
     * @param o 目标对象
     * @throws Throwable
     */
    @Override
    public void before(Method method, Object[] objects, Object o) throws Throwable {
        //获取到目标方法的方法名
        System.out.println("Before...."+method.getName());
    }

    /**
     * 后置通知 -- 调用目标方法之后会被执行
     * 四个参数的含义:
     * @param o 目标方法的返回值
     * @param method 目标方法对象
     * @param objects 目标方法的参数列表
     * @param o1 目标对象
     * @throws Throwable
     */
    @Override
    public void afterReturning(Object o, Method method, Object[] objects, Object o1) throws Throwable {
        System.out.println("After...."+method.getName());
    }

    /**
     * 环绕通知 -- 在调用目标方法之前和之后都会执行
     * 需要一个参数:
     * @param methodInvocation 目标方法对象
     * @return
     * @throws Throwable
     */
    @Override
    public Object invoke(MethodInvocation methodInvocation) throws Throwable {
        System.out.println("Around .....Before----"+methodInvocation.getMethod().getName());
        //执行目标方法
        Object obj =  methodInvocation.proceed();
        System.out.println("Around.....After----"+methodInvocation.getMethod().getName());
        return obj;
    }

    /**
     * 异常通知
     * @param ex
     */
    public void afterThrowing(Exception ex){
        //Exception对象就是在目标方法执行过程中抛出的那个异常对象
        System.out.println(ex+" Exception");
    }
}
配置切面
我们的切面,都是对业务层的代码进行增强的,因为切面的作用就是用来辅助业务层代码的
Spring 的 AOP 模块实现 AOP 编程的方式:
使用 org.springframework.aop.framework.ProxyFactoryBean 工厂对象创建代理对象。
创建目标对象(也就是创建业务层对象):
package com.bjsxt.service;

public interface UsersService {
    void addUsers();
}
package com.bjsxt.service.impl;

import com.bjsxt.service.UsersService;

public class UsersServiceImpl implements UsersService {
    @Override
    public void addUsers() {
        String str = null;
        str.length();
        System.out.println("addUsers.....");
    }

}
修改 Spring 配置文件:
<?xml version="1.0" encoding="UTF-8"?>
<beans xmlns="http://www.springframework.org/schema/beans"
       xmlns:xsi="http://www.w3.org/2001/XMLSchema-instance"
       xsi:schemaLocation="http://www.springframework.org/schema/beans http://www.springframework.org/schema/beans/spring-beans.xsd">

    <!--配置目标对象-->
    <bean id="usersService" class="com.bjsxt.service.impl.UsersServiceImpl"/>

    <!--配置切面对象-->
    <bean id="myAspect" class="com.bjsxt.aop.MyAspect"/>

    <!--配置切面-->
    <bean id="usersServiceProxy" class="org.springframework.aop.framework.ProxyFactoryBean">
        <!--  配置目标对象所实现的接口-->
        <property name="proxyInterfaces" value="com.bjsxt.service.UsersService"/>
        <!-- 配置目标对象  因为目标对象在spring的ioc容器内,所以这里使用ref属性-->
        <property name="target" ref="usersService"/>
        <!--配置切面对象
            先在上方配置好切面对象,在property内将每一个切面对象配置到list的每一个value内就可以了
            切面执行的先后顺序就是value配置的上下顺序
        -->
        <property name="interceptorNames">
            <list>
                <value>myAspect</value>
            </list>
        </property>

        <!--如何生成代理对象 true:使用CGLIB,false使用JDK的Proxy-->
        <property name="proxyTargetClass" value="true"/>
    </bean>
</beans>
创建测试类:
package com.bjsxt.test;

import com.bjsxt.service.UsersService;
import org.springframework.context.ApplicationContext;
import org.springframework.context.support.ClassPathXmlApplicationContext;

public class Test {
    public static void main(String[] args) {
        //先启动spring的ioc容器
        ApplicationContext applicationContext = new ClassPathXmlApplicationContext("applicationContext.xml");
        //不可以直接获取业务层的对象,应该获取生成的代理对象,这样才可以使用到配置好的切面
        UsersService usersService = (UsersService) applicationContext.getBean("usersServiceProxy");
        usersService.addUsers();
    }
}

为了查看发生异常时报出的错误

我们人为的创造一个空指针异常

再次运行时,控制台报出异常

我们发现,使用spring的AOP模块去开发AOP 时有一个缺点,因为我们是使用ProxyFactoryBean对象去生成代理对象的,但这个ProxyFactoryBean一次只可以为一个目标对象去执行一个动态的代理对象的生成,如果未来我们有多个目标对象都需要配置切面,那么我们的ProxyFactoryBean对象就需要配置多个,配置文件的代码重复率过高,不方便。 所以我们开发过程内,使用的更多的还是Spring AOP去直接开发。
Spring AOP 模块的使用案例
需求:要求在业务层的 updateUsers 方法执行之前,将 UserName 参数转换大写。
修改业务层:
public interface UsersService {
    void addUsers();
    //增加一个抽象方法
    void updateUsers(String username);
}
    @Override
    public void updateUsers(String username) {
        System.out.println("UpdateUsers "+username);
    }
创建切面:
package com.bjsxt.aop;

import org.aopalliance.intercept.MethodInterceptor;
import org.aopalliance.intercept.MethodInvocation;

public class ToUppercaseAspect implements MethodInterceptor {
    /**
     * 环绕通知 -- 在调用目标方法之前和之后都会执行
     * 需要一个参数:
     * @param methodInvocation 目标方法对象
     * @return
     * @throws Throwable
     */
    @Override
    public Object invoke(MethodInvocation methodInvocation) throws Throwable {
        /** 将username转换大写  */
        //获取到目标方法的参数列表
        Object[] args = methodInvocation.getArguments();
        //将转换完成以后生成的新的字符串放到数组下标为0的位置上
        args[0] = ((String)args[0]).toUpperCase();
        //调用目标方法
        Object obj =  methodInvocation.proceed();
        return obj;
    }
}
配置切面:

修改测试类:
public class Test {
    public static void main(String[] args) {
        //先启动spring的ioc容器
        ApplicationContext applicationContext = new ClassPathXmlApplicationContext("applicationContext.xml");
        //不可以直接获取业务层的对象,应该获取生成的代理对象,这样才可以使用到配置好的切面
        UsersService usersService = (UsersService) applicationContext.getBean("usersServiceProxy");
        usersService.updateUsers("oldliu");
    }
}

AspectJ 框架
什么是AspectJ 框架
AspectJ 是一个基于 Java 语言的 AOP 框架。在 Spring 2.0 以后,新增了对 AspectJ 框 架的支持。在 Spring 框架中建议使用 AspectJ 框架开发 AOP。
通知的类型

Spring 整合 AspectJ 框架所依赖的 Jar 包

AspectJ 框架配置 AOP 方式
通过XML文件配置AOP
- 通过AspectJ 配置方式
- 通过Spring的 Schema_based 方式
通过注解配置 AOP
AspectJ 框架的使用
在 AspectJ 框架中使用 xml 文件中配置 AOP 的方式:
通过AspectJ 配置方式
AspectJ 配置方式是指使用 AspectJ 框架的配置方式来配置切面。在使用 AspectJ 配置切 面时,切面不需要实现一些特定的接口。
我们先创建一个新的项目,名为aspectjxmlDemo,配置好tomcat,导入整合AspectJ框架需要的Jar包,创建好spring配置文件的头。

spring配置文件的头:
<?xml version="1.0" encoding="UTF-8"?>
<beans xmlns="http://www.springframework.org/schema/beans"
       xmlns:xsi="http://www.w3.org/2001/XMLSchema-instance"
       xsi:schemaLocation="http://www.springframework.org/schema/beans http://www.springframework.org/schema/beans/spring-beans.xsd">

</beans>
创建切面:
创建一个com.bjsxt.aspectj.aop的包,创建切面文件MyAspect.java
package com.bjsxt.aspectj.aop;

import org.aspectj.lang.JoinPoint;
import org.aspectj.lang.ProceedingJoinPoint;

public class MyAspect {
    /**
     * 前置通知
     * @param joinPoint 对目标对象的封装
     */
    public void myBefore(JoinPoint joinPoint){
//        joinPoint.getTarget();  //获取目标对象
//        joinPoint.getSignature().getName(); //获取目标方法名
//        joinPoint.getArgs();    //获取目标方法参数列表
//        joinPoint.getThis();    //获取代理对象
        System.out.println("Before "+joinPoint.getSignature().getName());
    }

    /**
     * 后置通知
     * @param joinPoint
     */
    public void myAfterReturning(JoinPoint joinPoint){
        System.out.println("After "+joinPoint.getSignature().getName());
    }

    /**
     * 环绕通知
     * @param proceedingJoinPoint
     * @return
     * @throws Throwable
     */
    public Object myAround(ProceedingJoinPoint proceedingJoinPoint) throws Throwable {
        System.out.println("Around Before "+proceedingJoinPoint.getSignature().getName());
        Object obj = proceedingJoinPoint.proceed();
        System.out.println("Around After "+proceedingJoinPoint.getSignature().getName()); return obj;
    }
    /**
     * 异常通知类型
     * @param e
     */
    public void myAfterThrowing(Exception e){
        System.out.println("Exception "+e);
    }

    public void myAfter(){
        System.out.println("最终通知");
    }
}
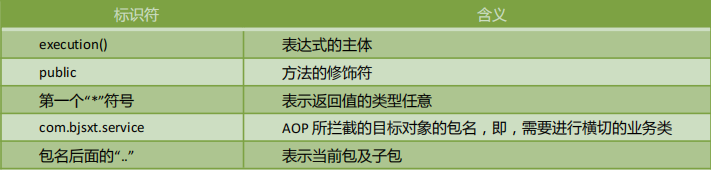
什么是Execution 表达式:
Execution 是 AspectJ 框架中的一种表达式,用于配置切点。

基本语法格式为:
	execution(<修饰符模式>?<返回类型模式><方法名模式>(<参数模式>)<异常模式>?)

其中<修饰符模式>与<异常模式>为可选。

execution(public * com.bjsxt.service..*.*(..))

示例 1:
 execution(public * com.bjsxt.service.impl.Student.test())
 切点是 com.bjsxt.service.impl 包中 Student 类中所有 public 修饰的无参数的 test 方法。

 示例 2: execution(* com.bjsxt.service.impl.Student.test(String,int))
 切点是 com.bjsxt.service.impl 包中 Student 类中参数类型是 String,int 类型的 test 方法。

 示例 3: execution(* com.bjsxt.service.impl.Student.test(..))
 切点是 com.bjsxt.service.impl 包中 Student 类中任意参数的 test 方法。

 示例 4 execution(* com.bjsxt.service.*.*(..))
 切点是 com.bjsxt.service 包中所有接口中任意参数的所有方法。
1. 使用 AspectJ 方式配置切面:
在业务层内创建目标对象
package com.bjsxt.aspectj.service;

public interface UsersService {
    void addUsers(String username);
}
package com.bjsxt.aspectj.service.impl;

import com.bjsxt.aspectj.service.UsersService;

public class UsersServiceImpl implements UsersService {
    @Override
    public void addUsers(String username) {
        System.out.println("AddUsers "+username);
    }
}
开启 aop 命名空间
xmlns:aop="http://www.springframework.org/schema/aop"
http://www.springframework.org/schema/aop
http://www.springframework.org/schema/aop/spring-aop.xsd

在 applicationContextAspectj.xml 内配置切面
<?xml version="1.0" encoding="UTF-8"?>
<beans xmlns="http://www.springframework.org/schema/beans"
       xmlns:xsi="http://www.w3.org/2001/XMLSchema-instance"
       xmlns:aop="http://www.springframework.org/schema/aop"
       xsi:schemaLocation="http://www.springframework.org/schema/beans http://www.springframework.org/schema/beans/spring-beans.xsd
       http://www.springframework.org/schema/aop http://www.springframework.org/schema/aop/spring-aop.xsd">
    <!--配置目标对象-->
    <bean id="usersService" class="com.bjsxt.aspectj.service.impl.UsersServiceImpl"/>
    <!--配置切面对象-->
    <bean id="myAspect" class="com.bjsxt.aspectj.aop.MyAspect"/>
    <!-- 配置切面-->
    <aop:config>
        <aop:aspect ref="myAspect">
            <!--配置切点-->
            <aop:pointcut id="myPointcut" expression="execution(* com.bjsxt.aspectj.service.*.*(..))"/>
            <!--前置通知-->
            <aop:before method="myBefore" pointcut-ref="myPointcut"/>
            <!--后置通知-->
            <aop:after-returning method="myAfterReturning" pointcut-ref="myPointcut"/>
            <!--环绕通知-->
            <aop:around method="myAround" pointcut-ref="myPointcut"/>
            <!--配置异常通知-->
            <aop:after-throwing method="myAfterThrowing" pointcut-ref="myPointcut" throwing="e"/>
            <!--最终通知-->
            <aop:after method="myAfter" pointcut-ref="myPointcut"/>
        </aop:aspect>
    </aop:config>
</beans>
创建测试类
package com.bjsxt.aspectj.test;

import com.bjsxt.aspectj.service.UsersService;
import org.springframework.context.ApplicationContext;
import org.springframework.context.support.ClassPathXmlApplicationContext;

public class Test {
    public static void main(String[] args) {
        ApplicationContext applicationContext = new ClassPathXmlApplicationContext("applicationContextAspectj.xml");
        UsersService usersService = (UsersService) applicationContext.getBean("usersService");
        usersService.addUsers("oldlu");
    }
}
测试结果:

我们人为制造一个空指针异常:

再次运行测试类,我们观察“最终通知”出现的位置:

2. 多切面以及切面执行顺序的配置
在 AspectJ 配置方式中,可以添加多个< aop:aspect>标签实现多切面配置。在< aop:aspect> 标签中包含 order 属性用于配置执行切面的执行顺序。
创建切面:
package com.bjsxt.aspectj.aop;

import org.aspectj.lang.JoinPoint;

public class MyAspect2 {
    public void myAspectBefore(JoinPoint joinPoint){
        System.out.println("MyAspect2 Before "+joinPoint.getSignature().getName());
    }
}
配置多切面:
<?xml version="1.0" encoding="UTF-8"?>
<beans xmlns="http://www.springframework.org/schema/beans"
       xmlns:xsi="http://www.w3.org/2001/XMLSchema-instance"
       xmlns:aop="http://www.springframework.org/schema/aop"
       xsi:schemaLocation="http://www.springframework.org/schema/beans http://www.springframework.org/schema/beans/spring-beans.xsd
       http://www.springframework.org/schema/aop http://www.springframework.org/schema/aop/spring-aop.xsd">
    <!--配置目标对象-->
    <bean id="usersService" class="com.bjsxt.aspectj.service.impl.UsersServiceImpl"/>
    <!--配置切面对象-->
    <bean id="myAspect" class="com.bjsxt.aspectj.aop.MyAspect"/>
    <!--配置切面对象2-->
    <bean id="myAspect2" class="com.bjsxt.aspectj.aop.MyAspect2"/>
    <!-- 配置切面-->
    <aop:config>
        <aop:aspect id="my1" ref="myAspect" order="1">
            <!--配置切点-->
            <aop:pointcut id="myPointcut" expression="execution(* com.bjsxt.aspectj.service.*.*(..))"/>
            <!--前置通知-->
            <aop:before method="myBefore" pointcut-ref="myPointcut"/>
            <!--后置通知-->
            <aop:after-returning method="myAfterReturning" pointcut-ref="myPointcut"/>
            <!--环绕通知-->
            <aop:around method="myAround" pointcut-ref="myPointcut"/>
            <!--配置异常通知-->
            <aop:after-throwing method="myAfterThrowing" pointcut-ref="myPointcut" throwing="e"/>
            <!--最终通知-->
            <aop:after method="myAfter" pointcut-ref="myPointcut"/>
        </aop:aspect>
        <!--配置第二个切面-->
        <aop:aspect id="my2" ref="myAspect2" order="2">
            <!--只测试一下前置通知-->
            <aop:pointcut id="myPointcut2" expression="execution(* com.bjsxt.aspectj.service.*.*(..))"/>
            <aop:before method="myAspectBefore" pointcut-ref="myPointcut2"/>
        </aop:aspect>
    </aop:config>
</beans>
运行结果:

我们可以看出,先运行第一个切面的before,再运行第二个切面的before,之后才是第一个切面的其他通知方式。

这里的order的属性值,决定了是先执行第二个切面还是第一个切面,但并不是执行完一个切面再执行下一个切面。
Schema_based 配置方式
Schema_based(基础模式)配置方式是指使用 Spring AOP 模块来定义切面并在 AspectJ 框架中对该切面进行配置。要求切面在定义通知类型时,需要实现特定接口。
创建切面:
package com.bjsxt.schema.based.aop;

import org.aopalliance.intercept.MethodInterceptor;
import org.aopalliance.intercept.MethodInvocation;
import org.springframework.aop.AfterReturningAdvice;
import org.springframework.aop.MethodBeforeAdvice;
import org.springframework.aop.ThrowsAdvice;

import java.lang.reflect.Method;

/**
 * 继承前置通知、后置通知、环绕通知、异常通知这几种类型
 */
public class BasedMyAspect implements MethodBeforeAdvice, AfterReturningAdvice, MethodInterceptor, ThrowsAdvice {
    /**
     * 环绕通知
     */
    @Override
    public Object invoke(MethodInvocation methodInvocation) throws Throwable {
        System.out.println("Around Before");
        Object obj = methodInvocation.proceed();
        System.out.println("Around After");
        return obj;
    }

    /**
     * 后置通知
     */
    @Override
    public void afterReturning(Object o, Method method, Object[] objects, Object o1) throws Throwable {
        System.out.println("After.");
    }

    /**
     * 前置通知
     */
    @Override
    public void before(Method method, Object[] objects, Object o) throws Throwable {
        System.out.println("Before.");
    }

    /**
     * 异常通知
     */
    public void afterThrowing(Exception ex){
        System.out.println("Exception:"+ex);
    }
}
使用 Schema_based 配置方式配置切面:
创建目标对象
也就是创建业务层的接口和实现类
package com.bjsxt.schema.based.service;

public interface BasedUsersService {
    void addUsers(String username);
}
package com.bjsxt.schema.based.service.impl;

import com.bjsxt.schema.based.service.BasedUsersService;

public class BasedUsersServiceImpl implements BasedUsersService {
    @Override
    public void addUsers(String username) {
        System.out.println("AddUsers.."+username);
    }
}
开启 aop 命名空间
xmlns:aop="http://www.springframework.org/schema/aop"
http://www.springframework.org/schema/aop
http://www.springframework.org/schema/aop/spring-aop.xsd
配置切面
<?xml version="1.0" encoding="UTF-8"?>
<beans xmlns="http://www.springframework.org/schema/beans"
       xmlns:xsi="http://www.w3.org/2001/XMLSchema-instance"
       xmlns:aop="http://www.springframework.org/schema/aop"

       xsi:schemaLocation="http://www.springframework.org/schema/beans
       http://www.springframework.org/schema/beans/spring-beans.xsd
       http://www.springframework.org/schema/aop
       http://www.springframework.org/schema/aop/spring-aop.xsd">

    <!--配置目标对象-->
    <bean id="basedUsersService" class="com.bjsxt.schema.based.service.impl.BasedUsersServiceImpl"/>

    <!--配置切面对象-->
    <bean id="basedMyAspect" class="com.bjsxt.schema.based.aop.BasedMyAspect"/>
    <!--配置切面-->
    <aop:config>
        <!--配置切点-->
        <aop:pointcut id="baseMyPointcut" expression="execution(* com.bjsxt.schema.based.service.*.*(..))"/>
        <!--配置切面-->
        <aop:advisor advice-ref="basedMyAspect" pointcut-ref="baseMyPointcut"/>
    </aop:config>
</beans>
创建测试类
package com.bjsxt.schema.based.Test;


import com.bjsxt.schema.based.service.BasedUsersService;
import org.springframework.context.ApplicationContext;
import org.springframework.context.support.ClassPathXmlApplicationContext;

public class Test {
    public static void main(String[] args){
        ApplicationContext applicationContext = new ClassPathXmlApplicationContext("applicationContextBased.xml");
        BasedUsersService basedUsersService = (BasedUsersService) applicationContext.getBean("basedUsersService");
        basedUsersService.addUsers("oldliu");
    }
}
测试结果:

多切面以及切面执行顺序的配置
在 Schema_based 配置方式中,可以添加多个< aop:advisor>标签实现多切面配置。在 < aop:advisor>标签中包含 order 属性用于配置执行切面的执行顺序。
创建切面:
package com.bjsxt.schema.based.aop;

import org.springframework.aop.MethodBeforeAdvice;

import java.lang.reflect.Method;

public class BasedMyAspect2 implements MethodBeforeAdvice {
    @Override
    public void before(Method method, Object[] objects, Object o) throws Throwable {
        System.out.println("BasedMyAspect2...Before");
    }
}
配置多切面:
    <!--配置目标对象-->
    <bean id="basedUsersService" class="com.bjsxt.schema.based.service.impl.BasedUsersServiceImpl"/>

    <!--配置切面对象-->
    <bean id="basedMyAspect" class="com.bjsxt.schema.based.aop.BasedMyAspect"/>
    <bean id="basedMyAspect2" class="com.bjsxt.schema.based.aop.BasedMyAspect2"/>
    <!--配置切面-->
    <aop:config>
        <!--配置切点-->
        <aop:pointcut id="baseMyPointcut" expression="execution(* com.bjsxt.schema.based.service.*.*(..))"/>
        <!--配置切面 使用order来决定哪个aop先被执行-->
        <aop:advisor id="my1" advice-ref="basedMyAspect" pointcut-ref="baseMyPointcut" order="2"/>
        <aop:advisor id="my2" advice-ref="basedMyAspect2" pointcut-ref="baseMyPointcut" order="1"/>

    </aop:config>
执行结果:

当我们调整aop内的order属性
<aop:advisor id="my1" advice-ref="basedMyAspect" pointcut-ref="baseMyPointcut" order="1"/>
<aop:advisor id="my2" advice-ref="basedMyAspect2" pointcut-ref="baseMyPointcut" order="2"/>
执行结果:

注解配置方式
AspectJ 框架允许使用注解定义切面、切入点和增强处理,而 Spring 框架则可以识别并根据这些注解生成 AOP 代理。
常用的注解

创建切面
我们需要注意,使用注解进行开发时使用的jar包和之前使用aspectj直接开发lib使用的jar包,两者并没有什么区别。

package www.bjsxt.aop;

import org.aspectj.lang.JoinPoint;
import org.aspectj.lang.ProceedingJoinPoint;
import org.aspectj.lang.annotation.*;

@Aspect //指定当前对象为切面对象
public class MyAspect {

    /**
     * 配置切点
     */
    @Pointcut("execution(* www.bjsxt.service.*.*(..))")
    public void myPointcut(){

    }

    /**
     * 前置通知
     * @param joinPoint
     */
    //@Before("execution(* www.bjsxt.service.*.*(..))")
    @Before("myPointcut()")
    public void myBefore(JoinPoint joinPoint){
        System.out.println("Before...."+joinPoint.getSignature().getName());
    }

    /**
     * 后置通知
     * @param joinPoint
     */
    //@AfterReturning("execution(* www.bjsxt.service.*.*(..))")
    @AfterReturning("myPointcut()")
    public void myAfterRetuning(JoinPoint joinPoint){
        System.out.println("AfterRetuning "+joinPoint.getSignature().getName());
    }

    /**
     * 环绕通知
     * @param proceedingJoinPoint
     * @return
     * @throws Throwable
     */
    //@Around("execution(* www.bjsxt.service.*.*(..))")
    @Around("myPointcut()")
    public Object myAround(ProceedingJoinPoint proceedingJoinPoint)throws Throwable{
        System.out.println("Around Before ");
        Object proceed = proceedingJoinPoint.proceed();
        System.out.println("Around After");
        return proceed;
    }

    /**
     * 最终通知
     */
    // @After("execution(* www.bjsxt.service.*.*(..))")
    @After("myPointcut()")
    public void myAfter(){
        System.out.println("最终通知");
    }

    /**
     * 异常通知
     * @param e
     */
    //@AfterThrowing(value = "execution(* www.bjsxt.service.*.*(..))",throwing = "e")
    @AfterThrowing(value = "myPointcut()",throwing = "e")
    public void myAfterThrowing(Exception e){
        System.out.println("Exception: "+e);
    }
}
配置注解切面
创建目标对象
目标对象也就是业务层
package www.bjsxt.service;

public interface UsersService {
    void addUsers(String username);
}
package www.bjsxt.service.impl;

import www.bjsxt.service.UsersService;

public class UsersServiceImpl implements UsersService {
    @Override
    public void addUsers(String username) {
        System.out.println("AddUsers "+username);
    }
}
开启 aop 命名空间

配置切面
<?xml version="1.0" encoding="UTF-8"?>
<beans xmlns="http://www.springframework.org/schema/beans"
       xmlns:xsi="http://www.w3.org/2001/XMLSchema-instance"
       xmlns:aop="http://www.springframework.org/schema/aop"
       xsi:schemaLocation="http://www.springframework.org/schema/beans http://www.springframework.org/schema/beans/spring-beans.xsd
       http://www.springframework.org/schema/aop http://www.springframework.org/schema/aop/spring-aop.xsd">

    <!--配置目标对象-->
    <bean id="usersService" class="www.bjsxt.service.impl.UsersServiceImpl"/>

    <!--配置切面对象-->
    <bean id="myAspect" class="www.bjsxt.aop.MyAspect"/>

    <!--在 AspectJ 框架中开启注解处理。声明自动为 IOC 容器的那些配置了@AspectJ 的切面的 bean 对象创建代理,织入切面。-->
    <!--proxy-target-class的属性值默认为 false;
    false:使用 JDK 的 Proxy 对象创建代理对象。
    true:使用 CGLIB 创建代理对象。

    如果目标对象实现了接口会使用Proxy,如果目标对象没有实现接口则自动使用 CGLIB 创建代理对象。-->
    <aop:aspectj-autoproxy proxy-target-class="false"/>
</beans>
创建测试类
package www.bjsxt.test;

import www.bjsxt.service.UsersService;
import org.springframework.context.ApplicationContext;
import org.springframework.context.support.ClassPathXmlApplicationContext;

public class Test {
    public static void main(String[] args){
        //启动spring
        ApplicationContext applicationContext = new ClassPathXmlApplicationContext("applicationContext.xml");
        UsersService usersService= (UsersService) applicationContext.getBean("usersService");
        usersService.addUsers("Oldlu");
    }
}
多切面以及切面执行顺序的配置
创建切面
我们在Myspect的基础上,对输出的文字添加一个“2”作为区别
为了设定一个执行的先后顺序,我们使用Order进行设定
package www.bjsxt.aop;

import org.aspectj.lang.JoinPoint;
import org.aspectj.lang.ProceedingJoinPoint;
import org.aspectj.lang.annotation.*;
import org.springframework.core.annotation.Order;

@Aspect //指定当前对象为切面对象
@Order(2)
public class MyAspect2  {

    /**
     * 配置切点
     */
    @Pointcut("execution(* www.bjsxt.service.*.*(..))")
    public void myPointcut2(){

    }

    /**
     * 前置通知
     * @param joinPoint
     */
    //@Before("execution(* www.bjsxt.service.*.*(..))")
    @Before("myPointcut2()")
    public void myBefore(JoinPoint joinPoint){
        System.out.println("Before2...."+joinPoint.getSignature().getName());
    }

    /**
     * 后置通知
     * @param joinPoint
     */
    //@AfterReturning("execution(* www.bjsxt.service.*.*(..))")
    @AfterReturning("myPointcut2()")
    public void myAfterRetuning(JoinPoint joinPoint){
        System.out.println("AfterRetuning2 "+joinPoint.getSignature().getName());
    }

    /**
     * 环绕通知
     * @param proceedingJoinPoint
     * @return
     * @throws Throwable
     */
    //@Around("execution(* www.bjsxt.service.*.*(..))")
    @Around("myPointcut2()")
    public Object myAround(ProceedingJoinPoint proceedingJoinPoint)throws Throwable{
        System.out.println("Around2 Before ");
        Object proceed = proceedingJoinPoint.proceed();
        System.out.println("Around2 After");
        return proceed;
    }

    /**
     * 最终通知
     */
    // @After("execution(* www.bjsxt.service.*.*(..))")
    @After("myPointcut2()")
    public void myAfter(){
        System.out.println("最终通知2");
    }

    /**
     * 异常通知
     * @param e
     */
    //@AfterThrowing(value = "execution(* www.bjsxt.service.*.*(..))",throwing = "e")
    @AfterThrowing(value = "myPointcut2()",throwing = "e")
    public void myAfterThrowing(Exception e){
        System.out.println("Exception2: "+e);
    }
}
配置多切面

再次执行测试类

我们可以看出,先执行了第一个切面的环绕通知和前置通知,然后执行了第二个切面的环绕通知和前置通知。最后先执行了切面2的后置通知和最终通知,最后才是切面1的后置通知和最终通知。


 689
689


 被折叠的 条评论
为什么被折叠?
被折叠的 条评论
为什么被折叠?
 到【灌水乐园】发言


