


1.二值图像的腐蚀
腐蚀模板算子,中心和周围8个点,如果周围有像素点为0,则中心点为0。全255,才为255
核函数:
template<int nthreads>
__global__ void compute_kernel(int height, int width, const PtrStepb img, PtrStepb dst) {

	//	1.图像二值化
	const int ix = blockIdx.x * blockDim.x + threadIdx.x;
	const int iy = blockIdx.y * blockDim.y + threadIdx.y;
	const uchar* src_yy = (const uchar*)(img + iy * img.step);
	uchar* dst_yy = (uchar*)(dst + iy * dst.step);

	if (ix < width && iy < height) {
		if (src_yy[ix] >= 130)
			dst_yy[ix] = 255;
		else
			dst_yy[ix] = 0;
	}

	//利用二值图实现图像膨胀
	const uchar* src_y = (const uchar*)(img);
	uchar* dst_y = (uchar*)dst;

	int ix_1 = max(0, ix - 1);
	int ix1 = min(width - 1, ix + 1);
	int iy_1 = max(0,iy - 1);
	int iy1 = min(height - 1, iy + 1);

	//确定ix+1,ix-1.iy+1.iy-1的线程

	if (ix < width && iy < height) {
		if (
			src_y[iy_1 * img.step + ix_1] == 0 ||         //(x-1.y-1)
			src_y[iy_1 * img.step + ix] == 0 ||			  //(x,y-1)
			src_y[iy_1 * img.step + ix1] == 0 ||		  //(x+1,y-1)
			src_y[iy * img.step + ix_1] == 0 ||			  //(x-1,y)
			src_y[iy * img.step + ix] == 0 ||			  //(x,y)
			src_y[iy1 * img.step + ix_1] == 0 ||		  //(x-1.y+1)
			src_y[iy1 * img.step + ix] == 0 ||			  //(x,y+1)
			src_y[iy * img.step + ix1] == 0				  //(x+1,y)
			) {
			dst[iy * img.step + ix] = 0;
		}
	}
}
首先对输入的灰度图像二值化,设定自己的阈值,这里设定为130.将图像变成二值图像。
后进行腐蚀。二者的索引方式本质上是相同的,但为了对四周像素值及逆行索引,将ix,iy转成ix-1,ix+1,iy-1,iy+1。其中利用max,min的值,设定前面4个索引不会超出图像边界。
比如第一个像素(0,0)处只有3个相邻的,(x+1,y)(x+1,y+1),(x,y+1),其他5个都是自己本身,其余类推。
2.二值图像的膨胀
膨胀模板算子,中心和周围8个点,如果周围有像素点为255,则中心点为255。全0,才为0。
核函数:
template<int nthreads>
__global__ void compute_kernel(int height, int width, const PtrStepb img, PtrStepb dst) {

	//	1.图像二值化
	const int ix = blockIdx.x * blockDim.x + threadIdx.x;
	const int iy = blockIdx.y * blockDim.y + threadIdx.y;
	const uchar* src_yy = (const uchar*)(img + iy * img.step);
	uchar* dst_yy = (uchar*)(dst + iy * dst.step);

	if (ix < width && iy < height) {
		if (src_yy[ix] >= 130)
			dst_yy[ix] = 255;
		else
			dst_yy[ix] = 0;
	}

	//利用二值图实现图像膨胀
	const uchar* src_y = (const uchar*)(img);
	uchar* dst_y = (uchar*)dst;

	int ix_1 = max(0, ix - 1);
	int ix1 = min(width - 1, ix + 1);
	int iy_1 = max(0,iy - 1);
	int iy1 = min(height - 1, iy + 1);

	//确定ix+1,ix-1.iy+1.iy-1的线程

	if (ix < width && iy < height) {
		if (
			src_y[iy_1 * img.step + ix_1] == 255 ||         //(x-1.y-1)
			src_y[iy_1 * img.step + ix] == 255 ||			  //(x,y-1)
			src_y[iy_1 * img.step + ix1] == 255 ||		  //(x+1,y-1)
			src_y[iy * img.step + ix_1] == 255 ||			  //(x-1,y)
			src_y[iy * img.step + ix] == 255 ||			  //(x,y)
			src_y[iy1 * img.step + ix_1] == 255 ||		  //(x-1.y+1)
			src_y[iy1 * img.step + ix] == 255 ||			  //(x,y+1)
			src_y[iy * img.step + ix1] == 255				  //(x+1,y)
			) {
			dst[iy * img.step + ix] = 255;
		}
	}
}
同理,可以到的膨胀,只不过在判断条件和最后操作上变为255。
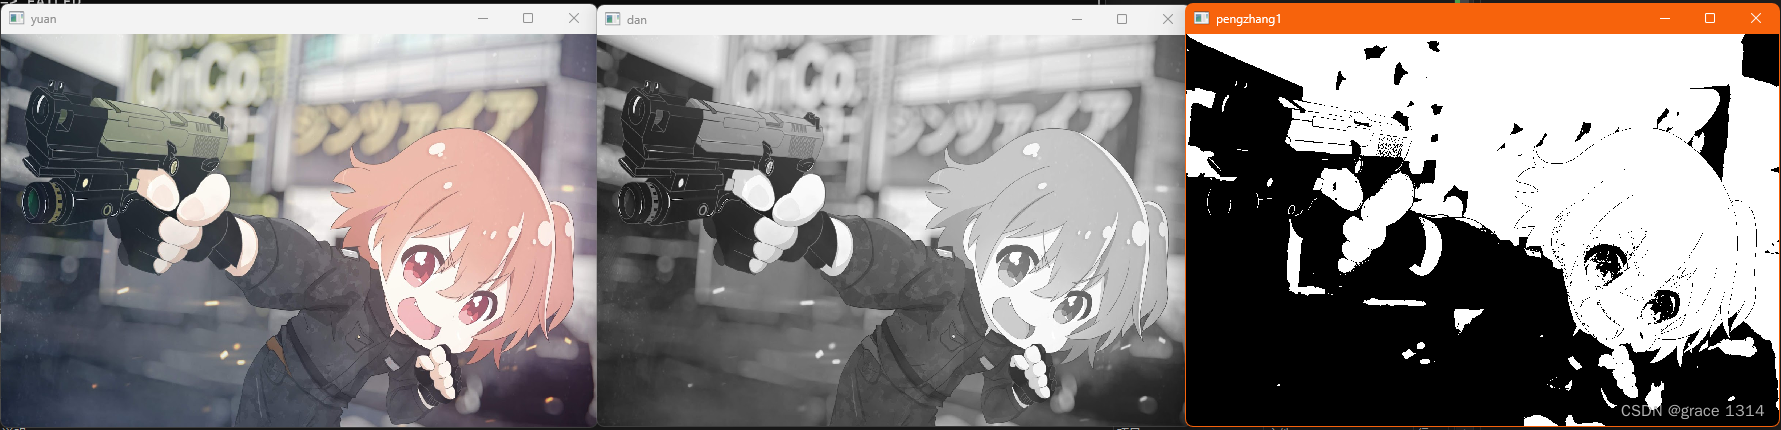
看看结果:
1.腐蚀:

2.膨胀
3.灰度图像的腐蚀
灰度图像的腐蚀则是将周围像素值的最小值赋给中心。
核函数:
template<int nthreads>
__global__ void compute_kernel(int height, int width, const PtrStepb img, PtrStepb dst) {
const int ix = blockIdx.x * blockDim.x + threadIdx.x;
const int iy = blockIdx.y * blockDim.y + threadIdx.y;
const uchar* src_y = (const uchar*)(img);
uchar* dst_y = (uchar*)dst;
int ix_1 = max(0, ix - 1);
int ix1 = min(width - 1, ix + 1);
int iy_1 = max(0,iy - 1);
int iy1 = min(height - 1, iy + 1);
//确定ix+1,ix-1.iy+1.iy-1的线程
if (ix < width && iy < height) {
if (src_y[iy * img.step + ix] > src_y[iy_1 * img.step + ix_1]) //(x-1,y-1)
dst_y[iy * img.step + ix] = src_y[iy_1 * img.step + ix_1];
if (src_y[iy * img.step + ix] > src_y[iy_1 * img.step + ix]) //(x.y-1)
dst_y[iy * img.step + ix] = src_y[iy_1 * img.step + ix];
if (src_y[iy * img.step + ix] > src_y[iy_1 * img.step + ix1]) //(x+1.y-1)
dst_y[iy * img.step + ix] = src_y[iy_1 * img.step + ix1];
if (src_y[iy * img.step + ix] > src_y[iy * img.step + ix_1])//(x-1,y)
dst_y[iy * img.step + ix] = src_y[iy * img.step + ix_1];
if (src_y[iy * img.step + ix] > src_y[iy * img.step + ix1])//(x+1,y)
dst_y[iy * img.step + ix] = src_y[iy * img.step + ix1];
if (src_y[iy * img.step + ix] > src_y[iy1 * img.step + ix_1]) //(x-1,y+1)
dst_y[iy * img.step + ix] = src_y[iy1 * img.step + ix_1];
if (src_y[iy * img.step + ix] > src_y[iy1 * img.step + ix]) //(x,y+1)
dst_y[iy * img.step + ix] = src_y[iy1 * img.step + ix];
if (src_y[iy * img.step + ix] > src_y[iy1 * img.step + ix1]) //(x+1,y+1)
dst_y[iy * img.step + ix] = src_y[iy1 * img.step + ix1];
}
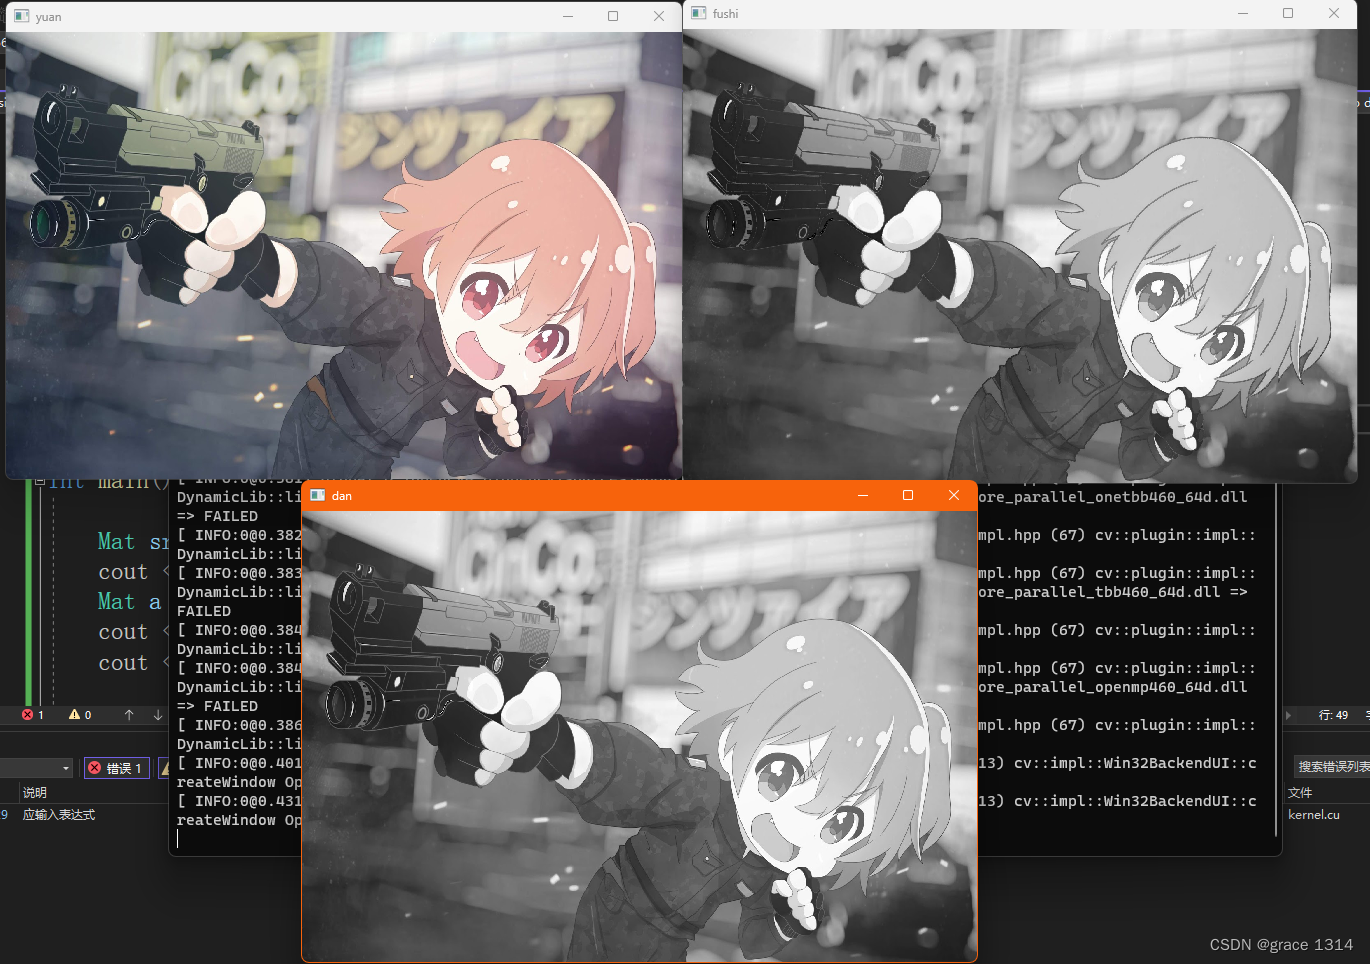
}结果
4.灰度图像的膨胀
与腐蚀相反,找出最大值,赋给中心位置
核函数:
template<int nthreads>
__global__ void compute_kernel(int height, int width, const PtrStepb img, PtrStepb dst) {

	const int ix = blockIdx.x * blockDim.x + threadIdx.x;
	const int iy = blockIdx.y * blockDim.y + threadIdx.y;

	const uchar* src_y = (const uchar*)(img);
	uchar* dst_y = (uchar*)dst;

	int ix_1 = max(0, ix - 1);
	int ix1 = min(width - 1, ix + 1);
	int iy_1 = max(0,iy - 1);
	int iy1 = min(height - 1, iy + 1);

	//确定ix+1,ix-1.iy+1.iy-1的线程

	if (ix < width && iy < height) {
		if (src_y[iy * img.step + ix] <= src_y[iy_1 * img.step + ix_1]) //(x-1,y-1)
			dst_y[iy * img.step + ix] = src_y[iy_1 * img.step + ix_1];
		if (src_y[iy * img.step + ix] <= src_y[iy_1 * img.step + ix]) //(x.y-1)
			dst_y[iy * img.step + ix] = src_y[iy_1 * img.step + ix];
		if (src_y[iy * img.step + ix] <= src_y[iy_1 * img.step + ix1]) //(x+1.y-1)
			dst_y[iy * img.step + ix] = src_y[iy_1 * img.step + ix1];
		if (src_y[iy * img.step + ix] <= src_y[iy * img.step + ix_1])//(x-1,y)
			dst_y[iy * img.step + ix] = src_y[iy * img.step + ix_1];
		if (src_y[iy * img.step + ix] <= src_y[iy * img.step + ix1])//(x+1,y)
			dst_y[iy * img.step + ix] = src_y[iy * img.step + ix1];
		if (src_y[iy * img.step + ix] <= src_y[iy1 * img.step + ix_1]) //(x-1,y+1)
			dst_y[iy * img.step + ix] = src_y[iy1 * img.step + ix_1];
		if (src_y[iy * img.step + ix] <= src_y[iy1 * img.step + ix]) //(x,y+1)
			dst_y[iy * img.step + ix] = src_y[iy1 * img.step + ix];
		if (src_y[iy * img.step + ix] <= src_y[iy1 * img.step + ix1]) //(x+1,y+1)
			dst_y[iy * img.step + ix] = src_y[iy1 * img.step + ix1];
	}
}
结果:

可以看到腐蚀让线条轮廓更细,而膨胀则使得线条轮廓边缘更润滑。
最后给一下,完整代码,只需要替换核函数即可。
#include "cuda_runtime.h"
#include "device_launch_parameters.h"
#include<cuda.h>
#include<cuda_device_runtime_api.h>
#include <opencv2/core/cuda.hpp>
#include<opencv2/opencv.hpp>
#include<opencv.hpp>
#include <stdio.h>
#include<iostream>

using namespace std;
using namespace cv;
using namespace cuda;

template<int nthreads>
__global__ void compute_kernel(int height, int width, const PtrStepb img, PtrStepb dst) {

	const int ix = blockIdx.x * blockDim.x + threadIdx.x;
	const int iy = blockIdx.y * blockDim.y + threadIdx.y;

	const uchar* src_y = (const uchar*)(img);
	uchar* dst_y = (uchar*)dst;

	int ix_1 = max(0, ix - 1);
	int ix1 = min(width - 1, ix + 1);
	int iy_1 = max(0,iy - 1);
	int iy1 = min(height - 1, iy + 1);

	//确定ix+1,ix-1.iy+1.iy-1的线程

	if (ix < width && iy < height) {
		if (src_y[iy * img.step + ix] <= src_y[iy_1 * img.step + ix_1]) //(x-1,y-1)
			dst_y[iy * img.step + ix] = src_y[iy_1 * img.step + ix_1];
		if (src_y[iy * img.step + ix] <= src_y[iy_1 * img.step + ix]) //(x.y-1)
			dst_y[iy * img.step + ix] = src_y[iy_1 * img.step + ix];
		if (src_y[iy * img.step + ix] <= src_y[iy_1 * img.step + ix1]) //(x+1.y-1)
			dst_y[iy * img.step + ix] = src_y[iy_1 * img.step + ix1];
		if (src_y[iy * img.step + ix] <= src_y[iy * img.step + ix_1])//(x-1,y)
			dst_y[iy * img.step + ix] = src_y[iy * img.step + ix_1];
		if (src_y[iy * img.step + ix] <= src_y[iy * img.step + ix1])//(x+1,y)
			dst_y[iy * img.step + ix] = src_y[iy * img.step + ix1];
		if (src_y[iy * img.step + ix] <= src_y[iy1 * img.step + ix_1]) //(x-1,y+1)
			dst_y[iy * img.step + ix] = src_y[iy1 * img.step + ix_1];
		if (src_y[iy * img.step + ix] <= src_y[iy1 * img.step + ix]) //(x,y+1)
			dst_y[iy * img.step + ix] = src_y[iy1 * img.step + ix];
		if (src_y[iy * img.step + ix] <= src_y[iy1 * img.step + ix1]) //(x+1,y+1)
			dst_y[iy * img.step + ix] = src_y[iy1 * img.step + ix1];
	}
}

int main() {

	Mat src = imread("C:/Users/1/Pictures/Camera Roll/手枪小姬.jpg");
	cout << " src通道: " << src.channels() << endl;
	Mat a = imread("C:/Users/1/Pictures/Camera Roll/手枪小姬.jpg", 0);
	cout << " a通道: " << a.channels() << endl;
	cout << "a.size():" << a.size() << endl;

	GpuMat d_a(a);
	GpuMat d_dst(a);
	int width = a.size().width;
	int height = a.size().height;

	const int nthreads = 256;
	dim3 bdim(nthreads, 1);
	dim3 gdim(divUp(width, bdim.x), divUp(height, bdim.y));
	compute_kernel<nthreads> << <gdim,bdim >> >(height,width,d_a,d_dst) ;

	Mat dst(d_dst);
	namedWindow("yuan", WINDOW_NORMAL);
	imshow("yuan", src);
	namedWindow("dan", WINDOW_NORMAL);
	imshow("dan", a);
	namedWindow("pengzhang1", WINDOW_NORMAL);
	imshow("pengzhang1", dst);

	waitKey();
	return 0;
}


 572
572


 被折叠的 条评论
为什么被折叠?
被折叠的 条评论
为什么被折叠?
 到【灌水乐园】发言


