


项目场景:
上位机发送字符串(总共7个字符),单片机进行解析,然后进行开灯等操作`
问题描述
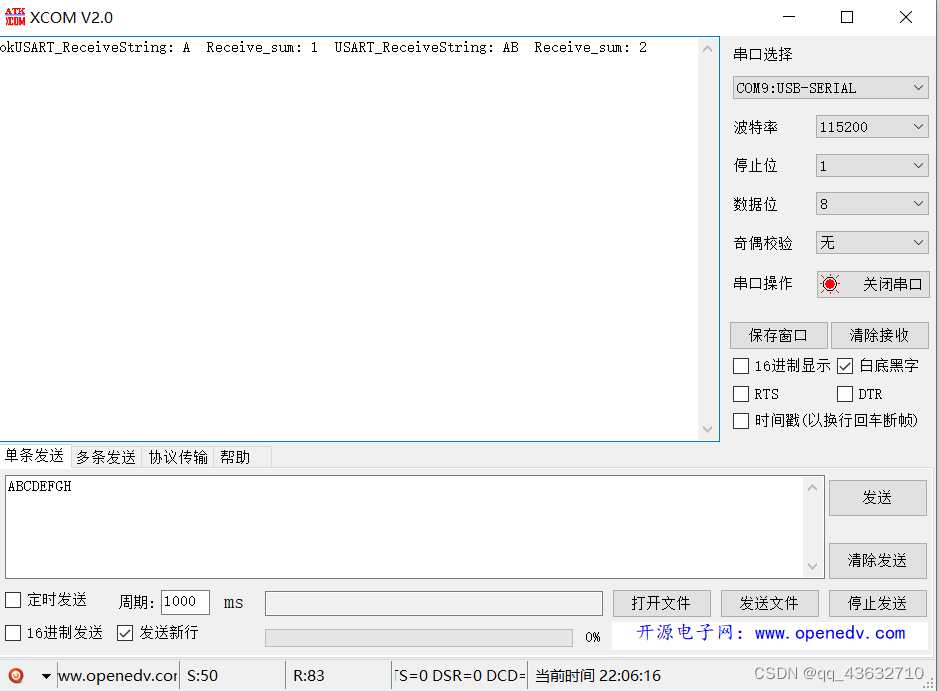
`上位机发送了总共7个字符,比如 ABCDEFG 但是用正点的代码修改后,只能接收到AB两个字符:
void USART1_Init(u32 bound)
{
//GPIO端口设置
GPIO_InitTypeDef GPIO_InitStructure;
USART_InitTypeDef USART_InitStructure;
NVIC_InitTypeDef NVIC_InitStructure;
RCC_APB2PeriphClockCmd(RCC_APB2Periph_GPIOA,ENABLE);
RCC_APB2PeriphClockCmd(RCC_APB2Periph_USART1,ENABLE);
/* 配置GPIO的模式和IO口 */
GPIO_InitStructure.GPIO_Pin=GPIO_Pin_9;//TX //串口输出PA9
GPIO_InitStructure.GPIO_Speed=GPIO_Speed_50MHz;
GPIO_InitStructure.GPIO_Mode=GPIO_Mode_AF_PP; //复用推挽输出
GPIO_Init(GPIOA,&GPIO_InitStructure); /* 初始化串口输入IO */
GPIO_InitStructure.GPIO_Pin=GPIO_Pin_10;//RX //串口输入PA10
GPIO_InitStructure.GPIO_Mode=GPIO_Mode_IN_FLOATING; //模拟输入
GPIO_Init(GPIOA,&GPIO_InitStructure); /* 初始化GPIO */
//USART1 初始化设置
USART_InitStructure.USART_BaudRate = bound;//波特率设置
USART_InitStructure.USART_WordLength = USART_WordLength_8b;//字长为8位数据格式
USART_InitStructure.USART_StopBits = USART_StopBits_1;//一个停止位
USART_InitStructure.USART_Parity = USART_Parity_No;//无奇偶校验位
USART_InitStructure.USART_HardwareFlowControl = USART_HardwareFlowControl_None;//无硬件数据流控制
USART_InitStructure.USART_Mode = USART_Mode_Rx | USART_Mode_Tx; //收发模式
USART_Init(USART1, &USART_InitStructure); //初始化串口1
USART_Cmd(USART1, ENABLE); //使能串口1
USART_ClearFlag(USART1, USART_FLAG_TC);
USART_ITConfig(USART1, USART_IT_RXNE, ENABLE);//开启相关中断
//Usart1 NVIC 配置
NVIC_InitStructure.NVIC_IRQChannel = USART1_IRQn;//串口1中断通道
NVIC_InitStructure.NVIC_IRQChannelPreemptionPriority=3;//抢占优先级3
NVIC_InitStructure.NVIC_IRQChannelSubPriority =3; //子优先级3
NVIC_InitStructure.NVIC_IRQChannelCmd = ENABLE; //IRQ通道使能
NVIC_Init(&NVIC_InitStructure); //根据指定的参数初始化VIC寄存器、
}
/*******************************************************************************
* 函 数 名 : USART1_IRQHandler
* 函数功能 : USART1中断函数
* 输 入 : 无
* 输 出 : 无
*******************************************************************************/
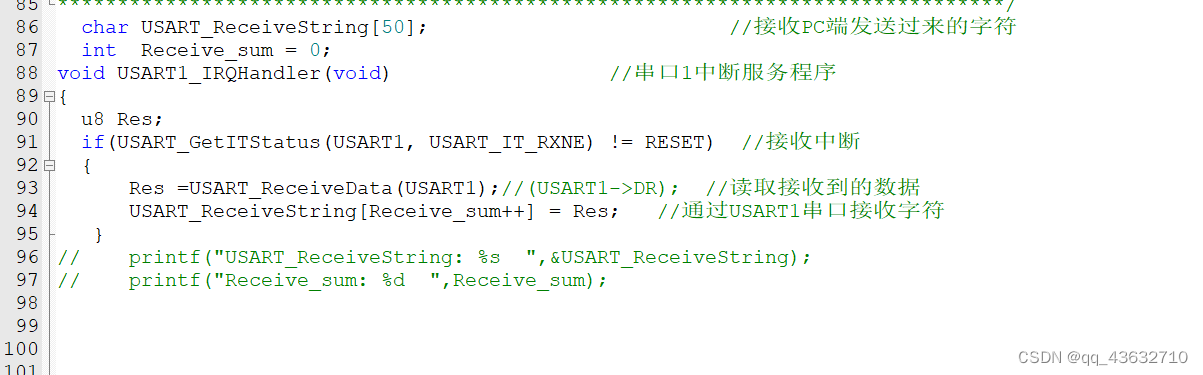
void USART1_IRQHandler(void) //串口1中断服务程序
{
char USART_ReceiveString[50]; //接收PC端发送过来的字符
int Receive_sum = 0;
u8 Res;
if(USART_GetITStatus(USART1, USART_IT_RXNE) != RESET) //接收中断
{
Res =USART_ReceiveData(USART1);//(USART1->DR); //读取接收到的数据
USART_ReceiveString[Receive_sum++] = Res; //通过USART1串口接收字符
}
printf("USART_ReceiveString: %s ",&USART_ReceiveString); //串口打印出接收到的字符串
printf("Receive_sum: %d ",Receive_sum);
---结果:
# 解决过程:
> 提示:刚开始按照其他博客的,**不要有中断嵌套**:把中断分级改为 1和0:
> 
> 结果:和之前一样
然后继续参考其他博客,发现大家写的中断接收字符串函数都是这样的,但他们没有问题,,,,
然后,突然想到**printf()**, 这个是后来自己加的,(且之前有项目里面也是因为在中断里加了这个导致延迟),所以:
**在中断注释掉,改放入main函数中去:**
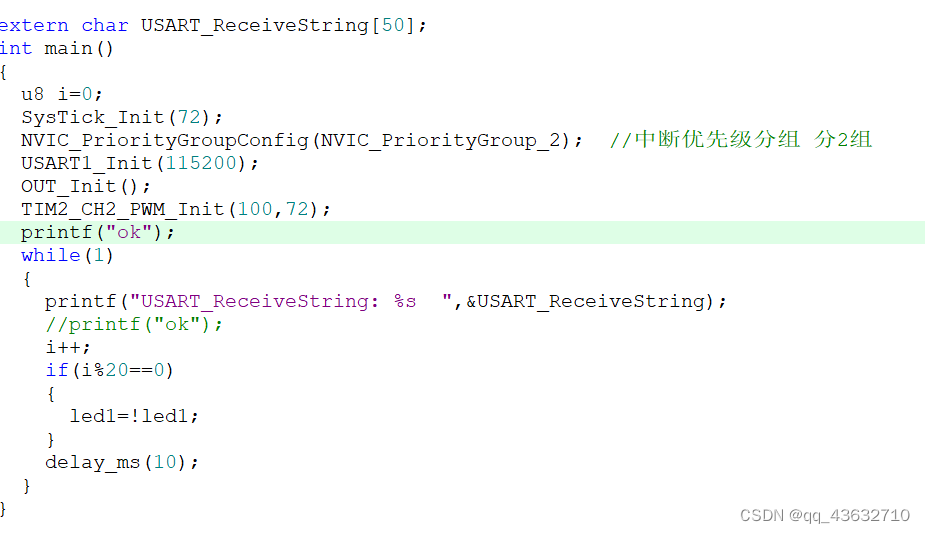
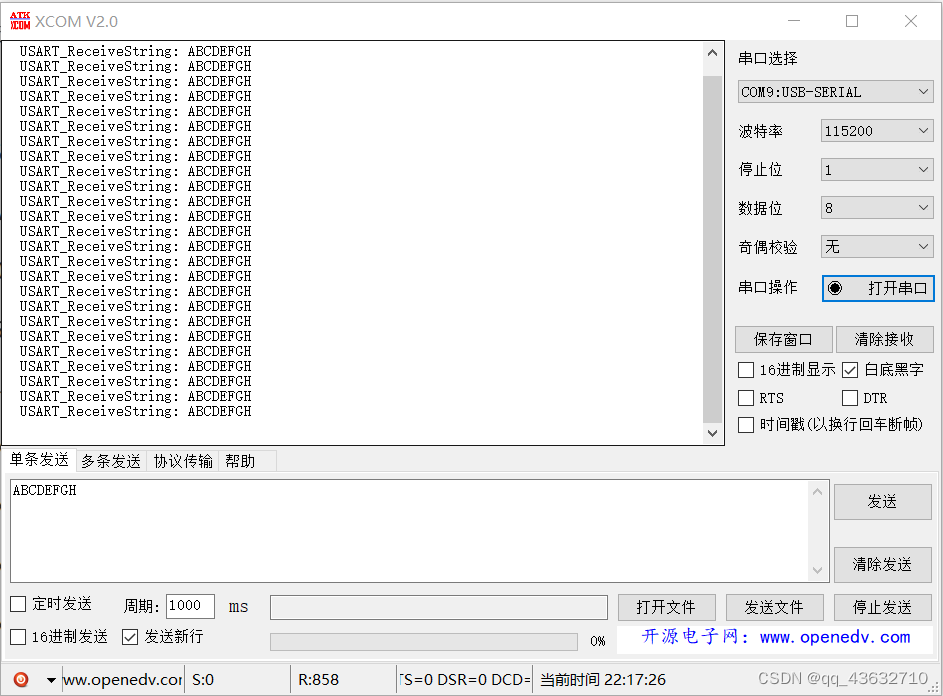
结果:**完整接收7个字符!**
# 原因分析:
应该是,printf()打印函数,他会占用一定时间,也许就导致串口中断接收过程中,造成了时延等问题,混乱了。
教训(第二次):**不要在中断函数里,用printf()来调试!**


 8130
8130


 被折叠的 条评论
为什么被折叠?
被折叠的 条评论
为什么被折叠?
 到【灌水乐园】发言


